A queue represents a Contact Center, inbox, queue or channel that your team staffs and serves.
By organising your calls, emails or messages into queues, you can accurately forecast the expected contact volume and required staffing for each queue. This allows you to optimize staffing levels and ensures your team is equipped to handle the expected workload.
Queues can be organized based on various criteria, including:
Channel: Group contacts by communication channel (e.g., phone, email, chat).
Team Structure: Categorize contacts based on your team's structure (e.g., sales, support, or language-specific teams).
Customer Segment: Segment contacts based on customer type or priority level.
Let’s dive into the details.
Who can use this
WFM Admins can create queues.
Dialpad WFM is available to all Dialpad users and as a standalone product.
Contact your Customer Success Manager to discuss adding Dialpad WFM to your plan.
Create a queue
Creating a queue is a simple process. First, you’ll need to map the correct contacts to the group, then define how the contacts are handled and your desired service targets.
If you’re not a Dialpad user, you’ll need to connect your CRM or customer service platform(s).
Dialpad users
To create a Dialpad Queue,
Create a new WFM queue
Navigate to Forecasts
Select Queues
Select New queue
.png)
Name your queue
It’s helpful to match the queue name to the relevant inbox, Contact Center, or channel in the relevant customer service platform.
Select the data source
Customer Service Integration: One of your integrated systems, e.g. Dialpad or Zendesk.
CSV: Import historical data via CSV - helpful if you use a system that’s currently unsupported by Dialpad WFM.
Using a CSV?
Read this article for a step-by-step guide for forecasting with CSVs
Dialpad users
If you have a Dialpad Contact Center, Dialpad WFM can create queues for each of your Voice Contact Centers. These queues will inherit the Contact Center name, filters, and business hours from Dialpad, and will automatically sync some properties and data. If a change is made to the parameter in Dialpad, this will automatically cascade into the WFM Queue properties, once the ‘resync from Dialpad' button is clicked.
This will affect:
name
business hours
timezone
service level
When creating a Queue, simply check the box beside the Contact Center(s) you want to create a queue for, then select Create queues.
If you want your queue to have unique parameters that don’t align to the Dialpad Contact Center, select Create custom.
Define queue
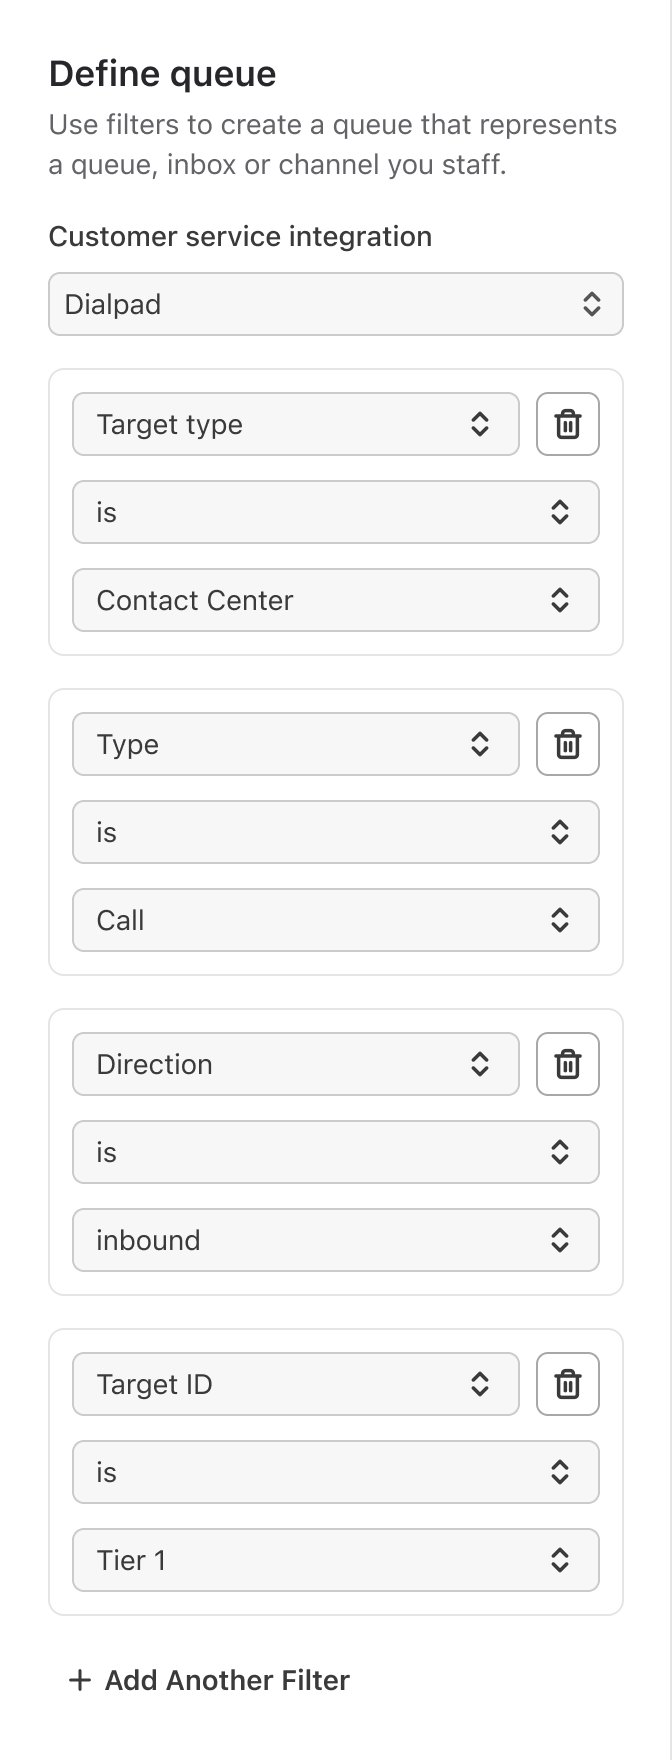
Next, you need to filter down the contacts that relate to this queue using conditions, e.g. “direction is inbound”, “team_id is Tier 1”.
If you do not include any filters this will target all contacts in your selected integration.
Select the customer service integration
Select + Add filter
In the box that appears, select the following:
The property you want to filter by — these are the metadata types attached to your contacts (e.g. tags, views or direction).
A condition (e.g. is, is any, contains).
The value(s) you want the contacts to match. The system will pull the list of available values direct from your data. If there are no existing values then you can enter a value as free text.
To create a queue for a Dialpad Contact Center or Department, use the following conditions:
Target type is Contact Center (or Department)
Type is Call
Direction is Inbound
Target ID is [select the relevant Contact Center or Department from the list]
Types of conditions
Dialpad WFM offers the following queue condition types:
Is - Includes all the contacts which have the value provided.
Is not - Includes all the contacts which do not have the value provided.
Is empty - Includes all the contacts who’s attribute is empty.
Is any - Includes all the contacts which have any of the values provided.
Is none - Includes all the contacts which do not have any of the values provided.
Contains any - Includes all the contacts which have any of the tags provided.
Does not contain any - Includes all the contacts which do not have any of the tags provided.
Contains all - Includes all the contacts which have all of the values provided.
Does not contain all - Includes all the contacts which don’t have all of the values provided.
We also offer additional conditions for specific CRMS:
Zendesk: Dialpad WFM supports Zendesk views, making it easier to replicate your set-up, without the needs for multiple filters.
Select 'view' from the property dropdown.
Salesforce: Dialpad WFM supports custom attributes.
Select 'custom attributes' from the property dropdown and enter the name of the attribute. Custom attributes are usually in the format 'custom_attribute__c'.
As you apply filters and conditions, the preview chart will display the number of contacts that match your criteria from the past 7 days.
You can cross reference this with the All Calls report in Dialpad Analytics to verify that the right contacts are included in the group.
Note
Values you create today won't be available until the following day, once the latest data is gathered from your customer service platform.
Coverage requirement
Now you need to provide additional additional inputs to turn the forecasted contact volume into a coverage requirement.
Enter the Average Conversation Time (ACT). Learn more about ACT.
This is the average time if takes an agent to handle and resolve the conversation, sometimes referred to as Average Handle Time (AHT). You can find your AHT in Dialpad by visiting Analytics, filtering to the relevant Contact Center and selecting Duration.
Once your schedule is live, and monitoring agent behaviour, Dialpad WFM will provide ACT data for each queue in Performance Reports.
Add concurrency (optional)
This represents how many contacts agents can work on at a time.
For most channels this will be 1, but for chat it may be higher.
Enter shrinkage
This should include external shrinkage (e.g. time off, sickness) and internal shrinkage (e.g. meetings, comfort breaks) and be represented as a %. Learn more about shrinkage.
Enter your target First Response Time (FRT), sometimes referred to as an SLA (Service Level Agreement).
This specifies the percentage of contacts you aim to respond to within a target first response time, such as 90% of calls answered in 60 seconds.
Enter the percentage and target time in seconds to ensure you have accurate staffing requirements based on your forecast.

Set business hours
By setting business hours for your queue, you can ensure that agents are only scheduled when you’re lines are open.
If a queue is linked to a Contact Center, then that Contact Center’s business hours will be synced into the queue automatically. Please note, the sync does not include Holiday hours.
The business hours for these queues have to be managed from Dialpad, and cannot be edited in Dialpad WFM. Business hours are synced every 12 hours. If you’ve just updated your hours and want to force a resync on demand, select Refresh.
To edit the business hours of a queue not linked to a Contact Center:
Define if this queue is open 24/7 or is only open during specific times. If your queue is open 24/7 then you can skip to the next section.
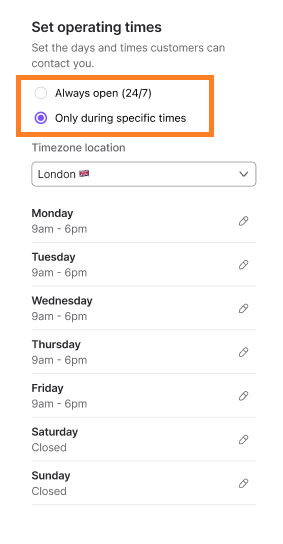
Select the timezone that operating hours are set it.
Select the pencil icon next to each day to edit your business hours
.png)
Toggle on/off to set a day as open or closed
Enter the desired hours
.png)
Select Copy time to all to apply the same operating hours to all days of the week.
Select + Add hours to create multiple windows in a day. This is helpful if your queue is closed for lunch.
Note
Contact volumes are always forecasted 24/7, but coverage requirements will only be provided within operating times in the schedule coverage bar.
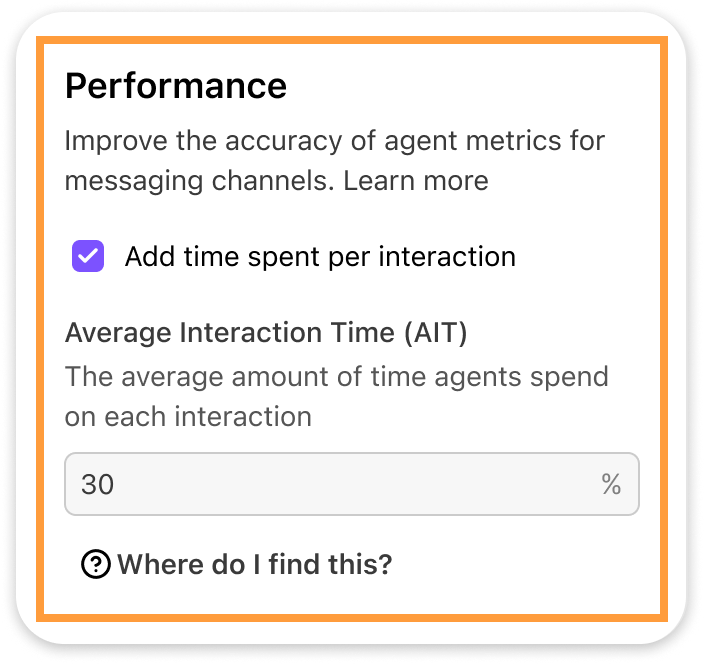
Performance (optional)
Finally, you can opt-in to provide additional data to improve the accuracy of agent metrics for messaging channels. This allows the system to more accurately measure the time agents spend on each interaction when measuring adherence. Learn more here.
To enable this, check the box labelled “Add time spent per interaction”
Enter the applicable Average Interaction Time (AIT)
Save queue
Once your queue is set-up, select Save.
The system will take a few minutes to process your new queue and generate the updated forecast. You can track the progress using the status indicator on the queue page. When your queue is ready, you’ll see a green checkmark in the Status column. 
Frequently asked questions
Can I set different working hours for specific days, like one schedule for the first Monday of the month and another for the third Monday?
No, working hours repeat weekly for each day. However, admins can make manual adjustments at any time for one-time changes.
Is there a limit to how many time windows I can set in a day or week?
Nope! You can add as many time windows as you need in a day however, they can’t overlap. For example, you can’t have one queue open from 9 AM - 11 AM and another open from 10 AM - 1 PM.
Are my business hours synced with my Dialpad account?
If a queue is linked to a Contact Center, then that Contact Center’s business hours will be synced into the queue automatically. Please note, the sync does not include Holiday hours.
The business hours for these queues have to be managed from Dialpad, and cannot be edited in Dialpad WFM. Business hours are synced every 12 hours. If you’ve just updated your hours and want to force a resync on demand, select Refresh.
Are holidays synced with queue’s business hours?
No, Contact Center holidays are not synced with Dialpad, and won’t be accounted for in the forecast.
What do I do if it says ‘queue volume is too low’?
In order to accurately forecast your contacts, the system needs enough data to analyze and understand your ticket trends. We recommended having at least 1 month's worth of historical data for the group's contacts and that you receive more than 3 contacts per hour on average to ensure accurate forecasting.
If you do have enough historical data and you know you receive more than 3 contacts per hour, then check your conditions to ensure you have filtered your contacts correctly.
If your contacts are new, or you don’t receive many contacts per hour, we recommend either merging with another group to increase volume or you can schedule activities without using a forecast.
What do I do if it says 'queue contains no contacts’?
If your queue doesn’t have any contacts, start by checking your conditions to ensure you have filtered your contacts correctly.
Use the preview chart to see how many contacts that match your conditions were received in the last 7 days.
If you continue to see this message, contact our Customer Care team for help.
Why hasn’t the forecast updated?
When you save a queue, Dialpad WFM analyzes your historical data to generate a forecast for the next 12 months. This process takes may take a few minutes, during which a loading spinner will appear.