Monitoring coverage helps you make the most of every agent hour – especially when staffing is tight and budgets are limited.
Coverage data can show you exactly where you're understaffed or overstaffed, removing blindspots and missed opportunities to improve both service levels and efficiency.
Let’s dive into the details.
Who can use this
Dialpad WFM is available to all Dialpad users.
Contact your Customer Success Manager to discuss adding Dialpad WFM to your plan.
How do I monitor coverage in WFM?
Schedule coverage helps you see if you have enough agents scheduled for the work you expect. In Dialpad WFM, the coverage bar appears in the Shift and Activity views so you can check coverage in the way that works best for you.
The coverage bars give you a simple, color-coded view of staffing across the day. This makes it easier to spot when you may have too few or too many agents scheduled to handle forecasted contact volume and meet your service goals.
Real-time actual volumes can also help you decide if your current coverage looks right. However, they do not change the required staffing shown in the coverage bar. The coverage bar updates when staffing changes, when the forecast is updated, or when fixed staffing rules are updated.
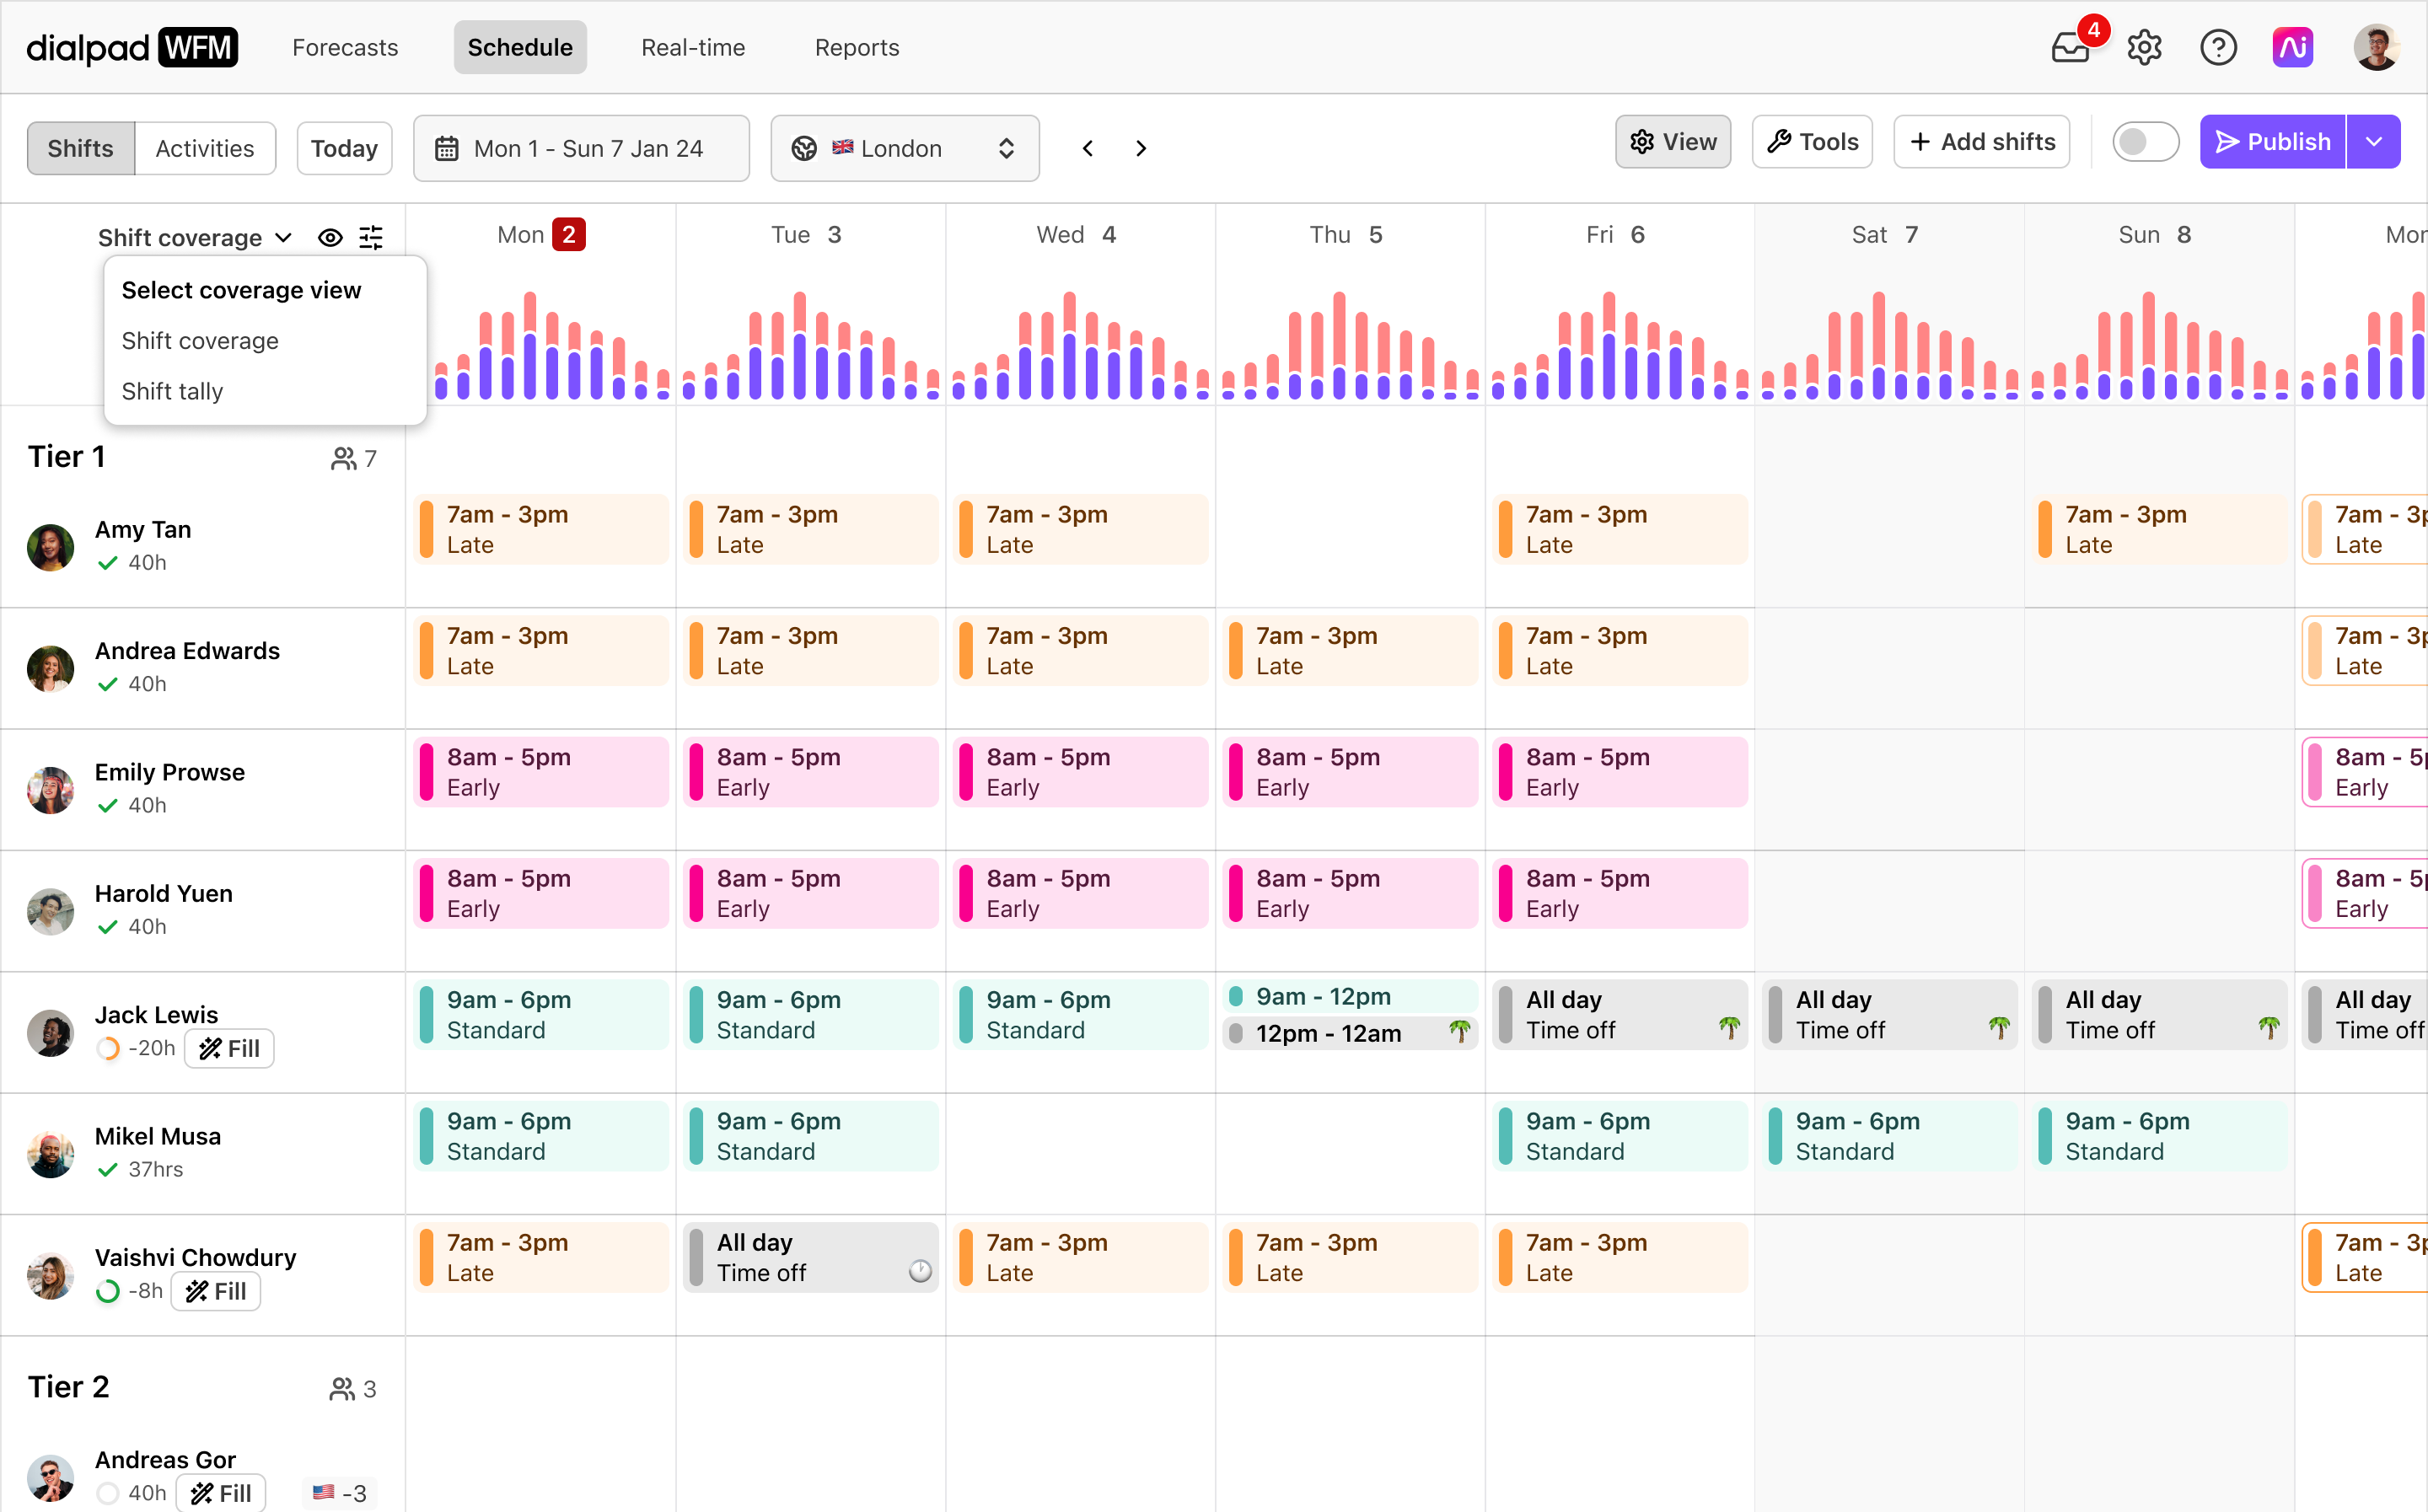
Monitor coverage in the Shift view
The coverage bar in the Shift view in the schedule allows you to compare scheduled headcount with the forecasted requirement, and the ability to understand how many agents are on each shift.
Show coverage
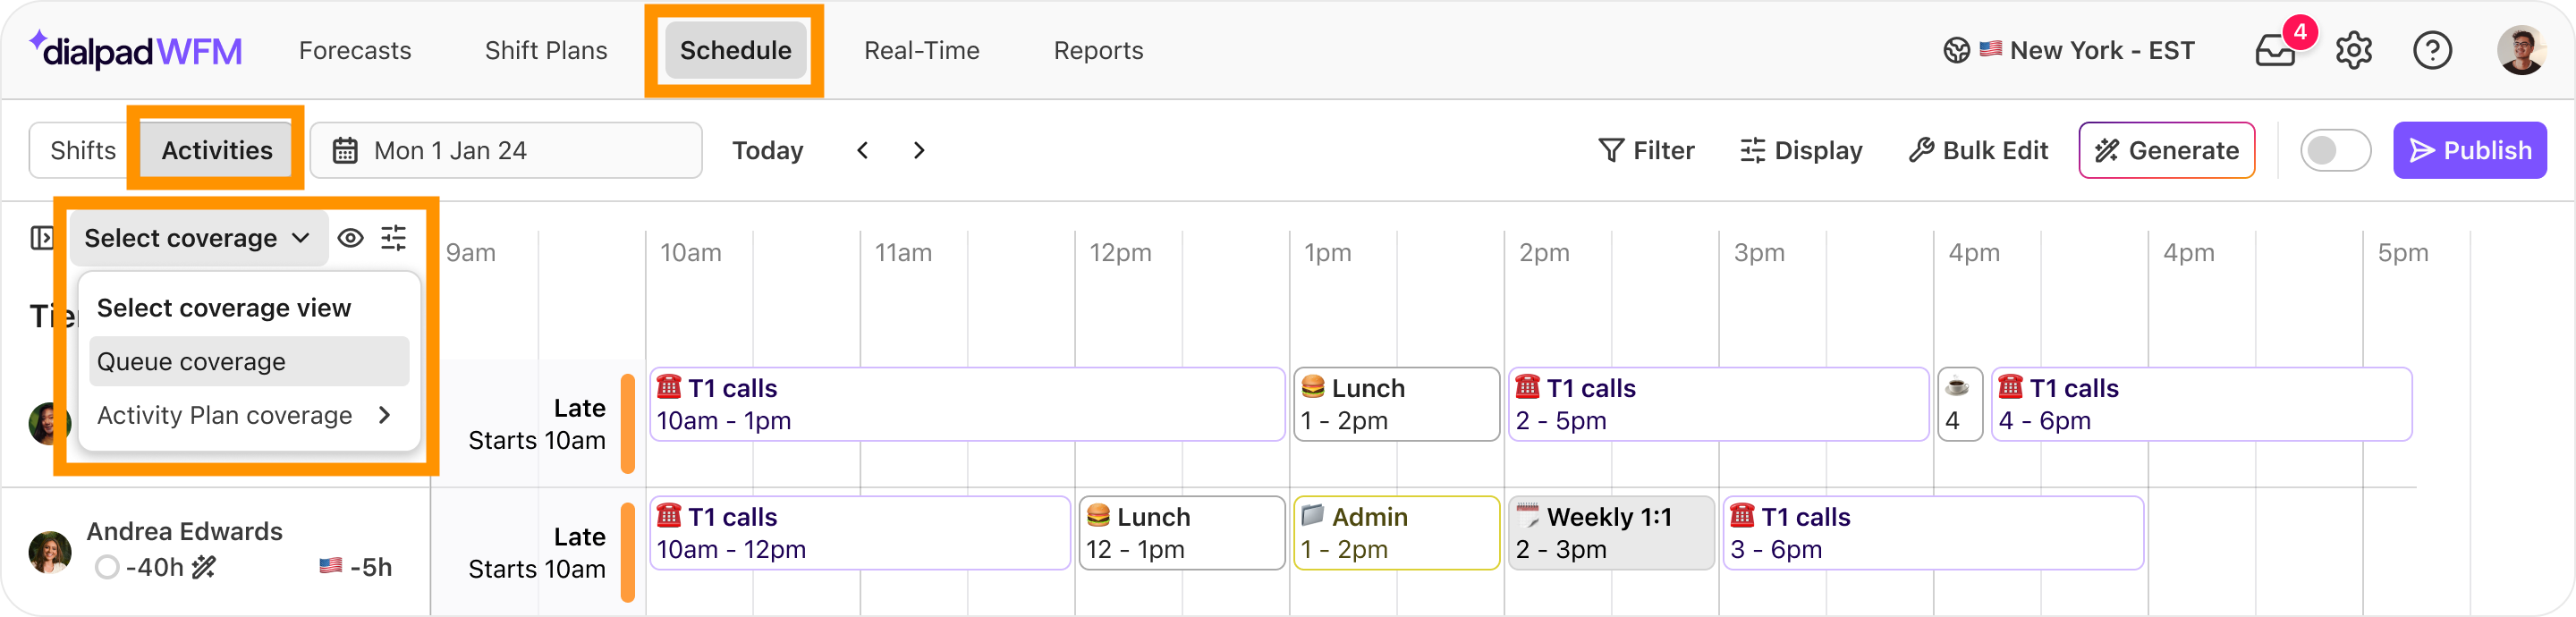
To show coverage in the Shift view of the schedule, select Select coverage
There are two coverage options in the Shift view of the schedule: Shift Coverage and Shift Tally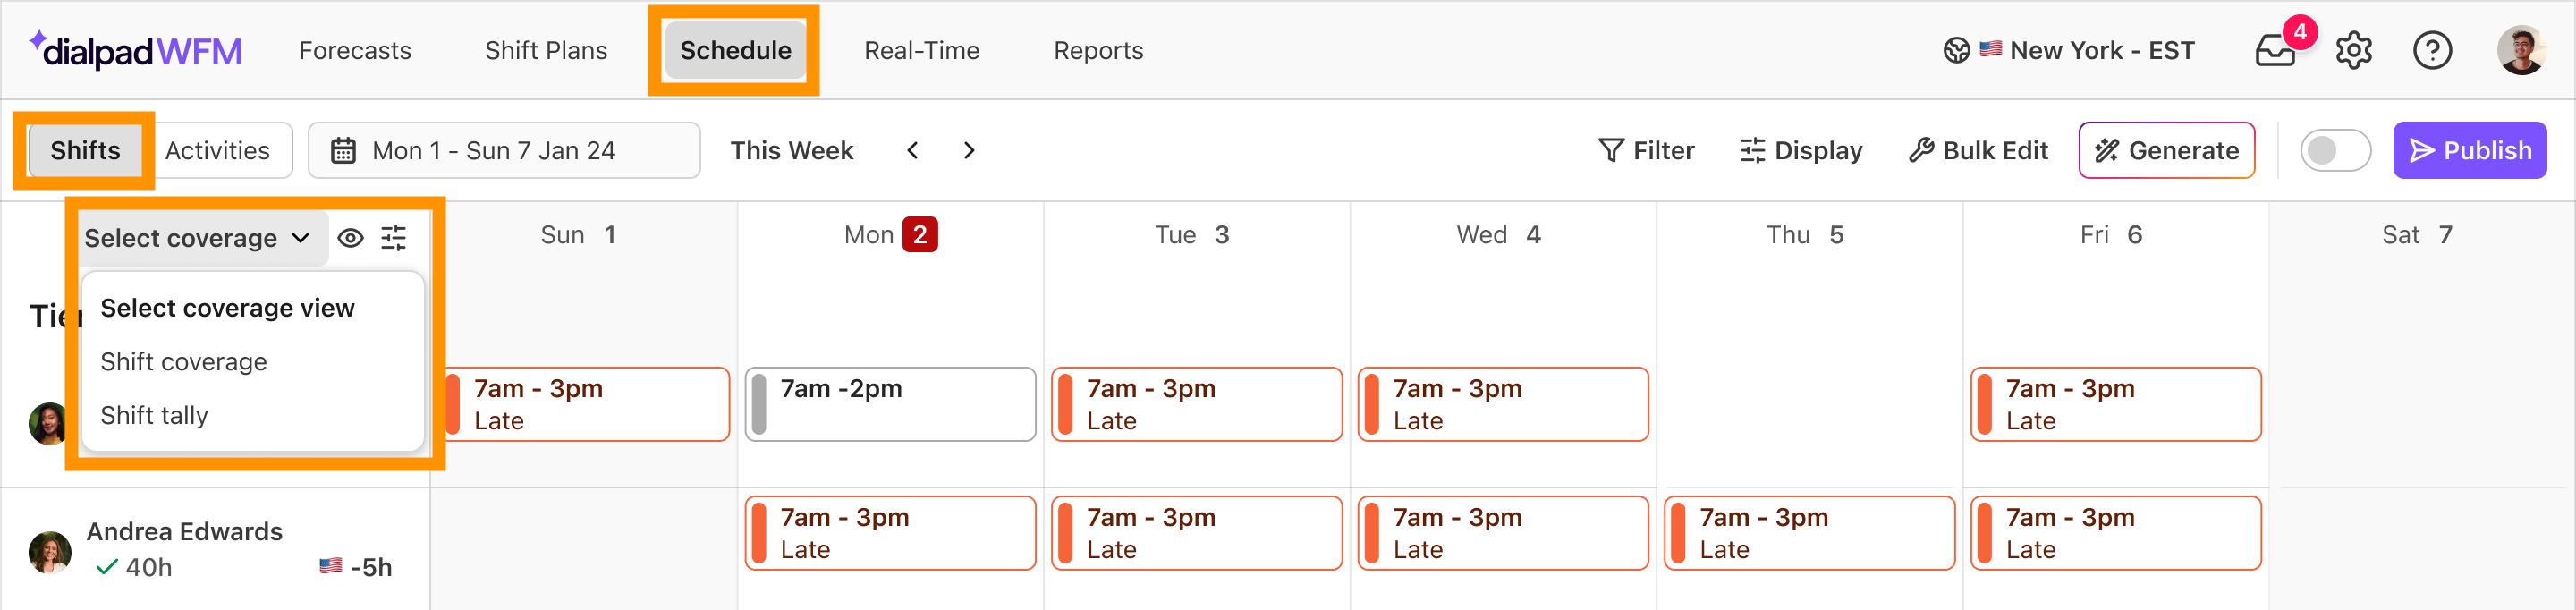
Shift Coverage
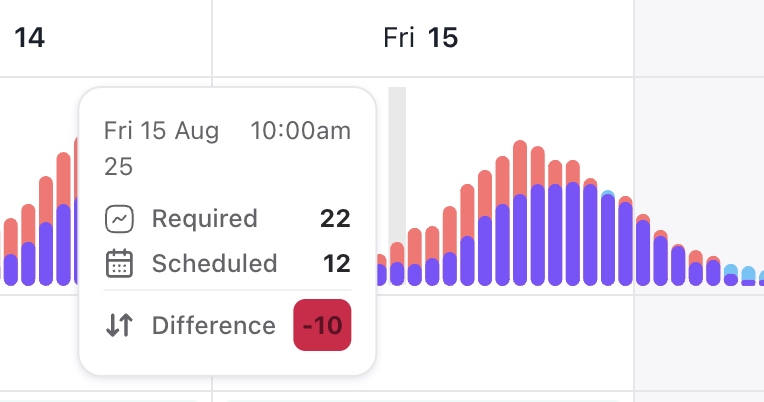
Displays a graph comparing scheduled staffing with the forecasted coverage requirement for each hour of every day.
Red bars indicate the required level of staffing
Purple bars indicate the actual level of staffing
Blue bars indicate periods of over-staffing
.png)
The scale of the chart will adapt to the entire viewed period, allowing you to identify your peak or quiet times in context over a 1 - 4 week period.
An agent needs to be staffed for at least 50% of the interval (30 minutes) to count as “1”.
Hover over a bar to view a breakdown for that hour.
View coverage for specific queues
By default, coverage will be compared to all queues in the account.
To view coverage for specific queues, select the coverage settings button
, then select the queues from the dropdown menu.
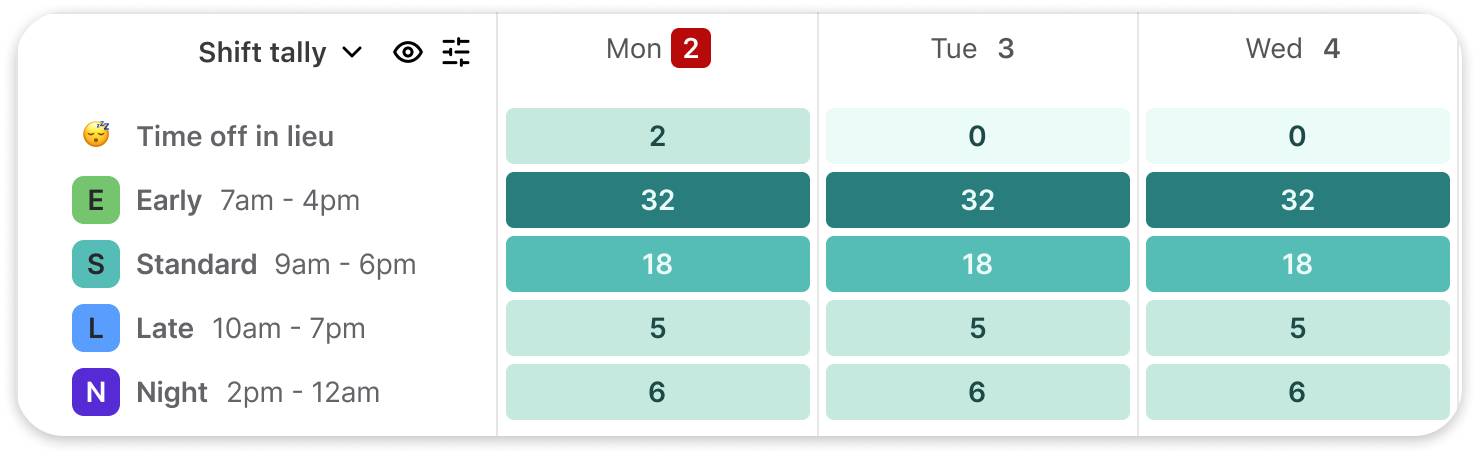
Shift Tally
Displays a count of how many agents are scheduled on each shift type, or have time off.
Each shift or time off type is listed alongside a tally of the number of agents scheduled on each type.
The color scale indicates which shift or time off type has the most number of agents scheduled. The darker the colour, the more staffing there is.
View a tally for specific shifts
By default, a tally will be displayed for all shift types in the account.
To view a tally for specific shifts, select the coverage settings button
How to switch between Shift Tally and Shift Coverage
Navigate to Schedule
Select Activities
Select the coverage label to open the menu
Select Shift coverage or shift tally
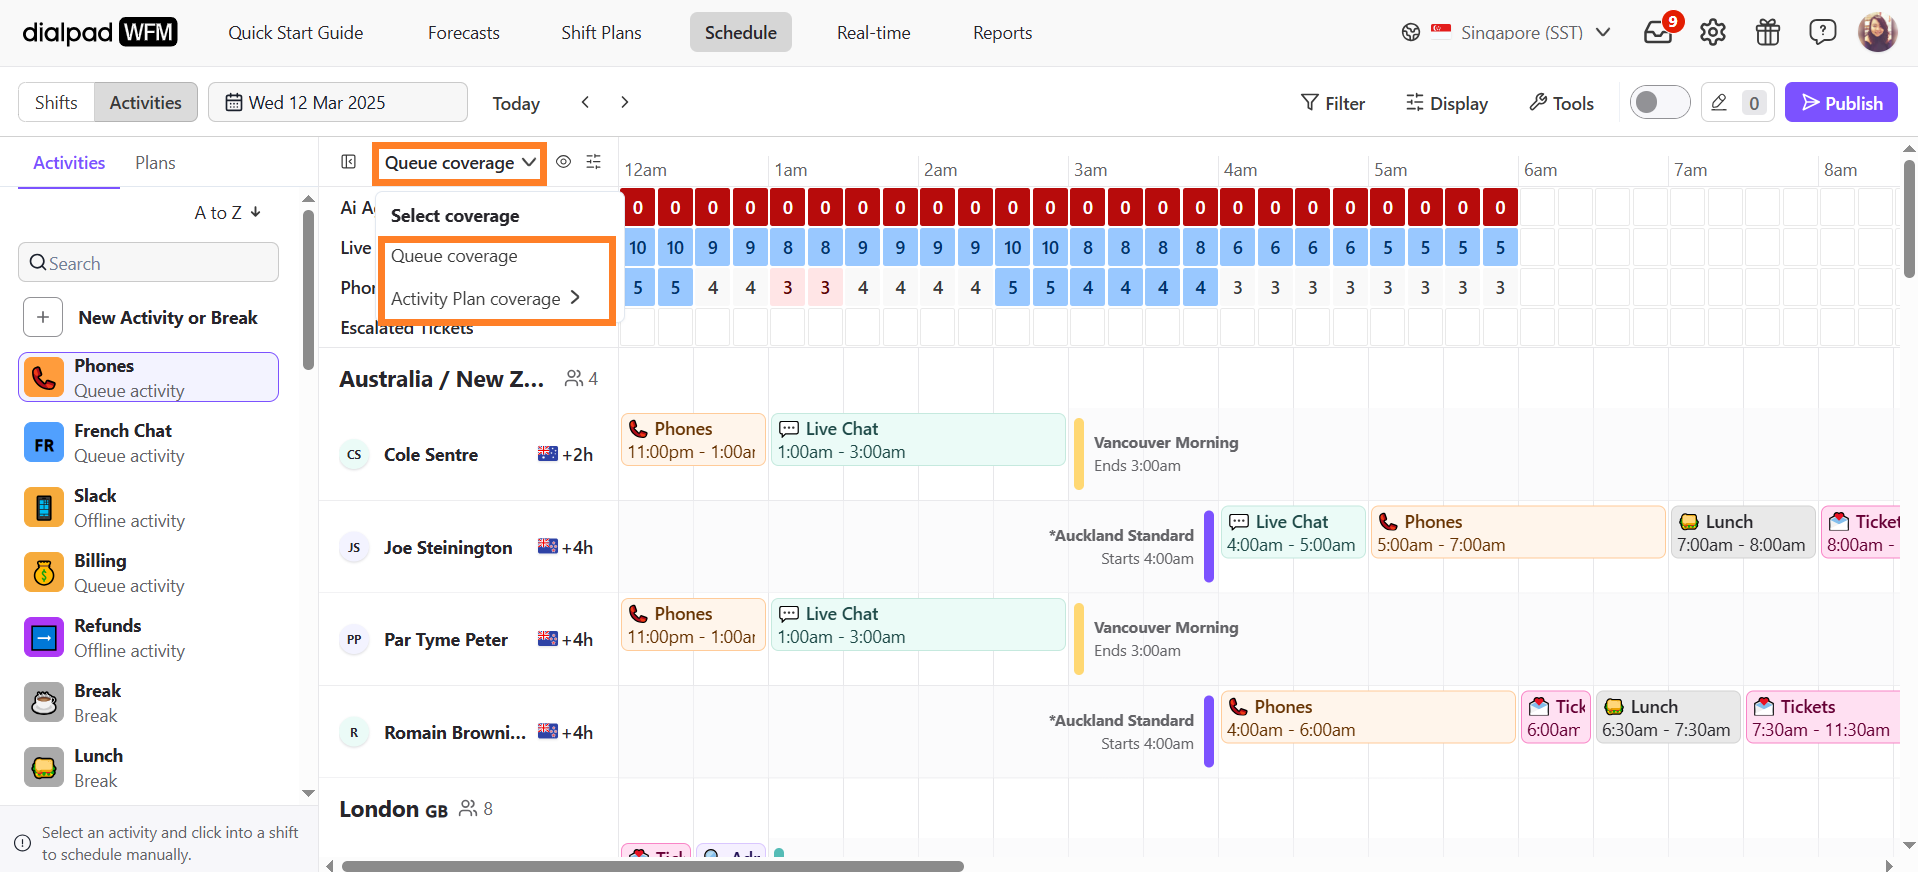
Monitor coverage in the Activity view
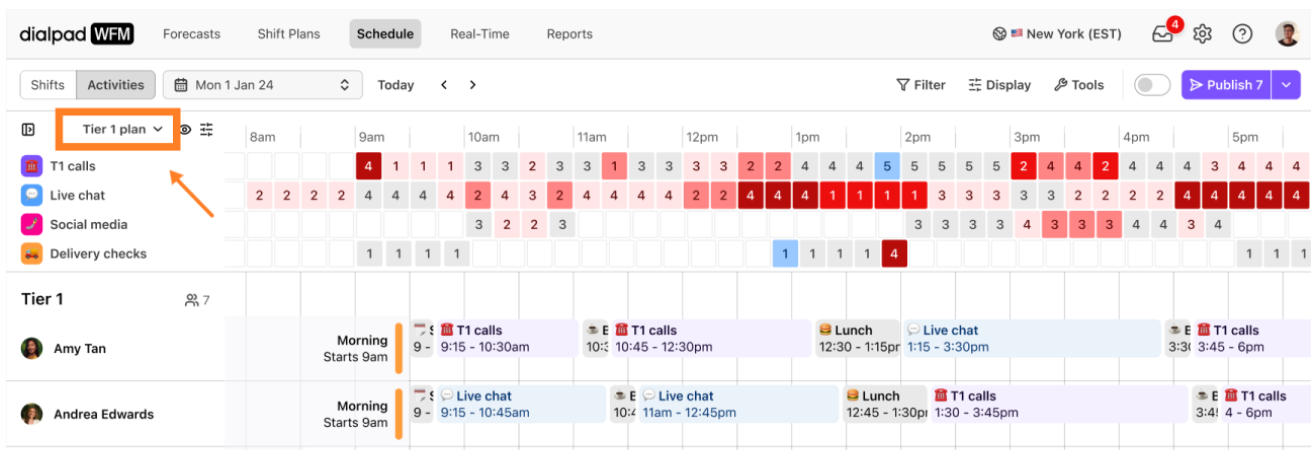
The coverage bar in the Activity view in the schedule allows you to view detailed staffing for each queue or activity, to identify gaps or opportunities to improve coverage.
Show coverage
To show coverage in the Activity view of the schedule, select Select coverage
There are two coverage options in the Activity view of the schedule: Queue Coverage and Activity Plan coverage
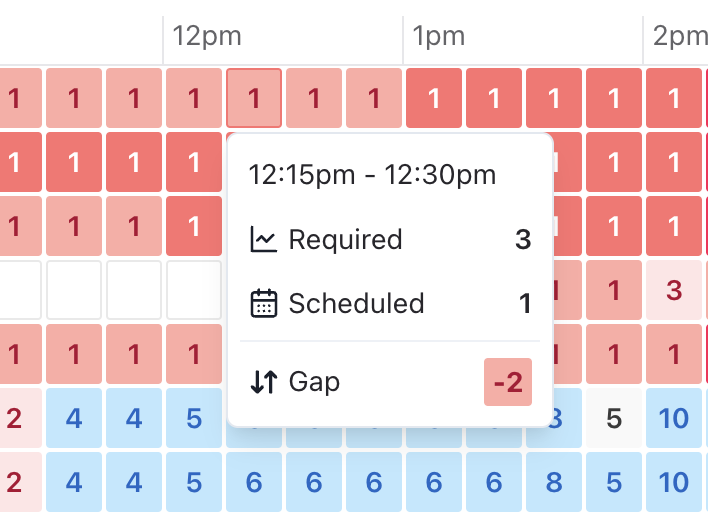
The Activity coverage bar displays detailed coverage information for every 15 minute interval of every day.
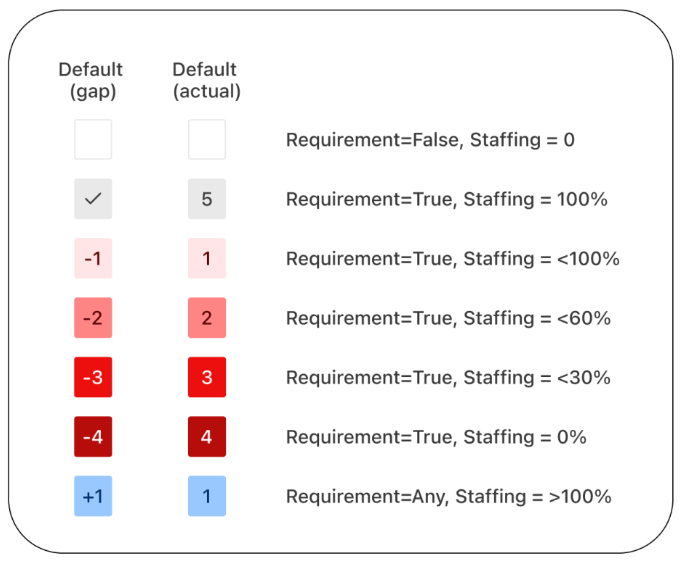
Intervals are color-coded to indicate how well staffed they are:
Gray cells indicate that the required level of staffing has been met
Red cells indicate a deficit between the scheduled and required staffing. The darker the shade, the larger the gap.
Blue cells indicate periods of over-staffing
An agent needs to be staffed for at least 50% of the interval (8 minutes) to count as “1”.
Hover over a cell to view a breakdown of staffing for that queue/activity for the selected 15 minute interval.
Queue overage
Compares the number of agents scheduled against the forecasted coverage requirement for each queue.
A blank cell means the time is outside the queue’s operating hours, so no staffing is needed for that interval.

Activity Plan coverage
Compares the number of agents scheduled against the ‘fixed staffing’ rule requirement for each activity in the selected Activity Plan.
A blank cell means the fixed staffing rule doesn’t apply to that time for the activity, so no staffing is needed for that interval.

You can tell which Activity Plan’s coverage you are viewing at any time by referring to the label.
How to read the coverage bar
The coverage bar uses shades of red to show staffing levels. The darker the red, the more understaffed that time interval is.
How to switch between Queue or Activity Plan Coverage
Navigate to Schedule
Select Activities
Select the coverage label to open the menu
Select Queue coverage or Activity Plan coverage
When selecting an Activity Plan, you’ll see a list of all Activity Plans applied to that day.
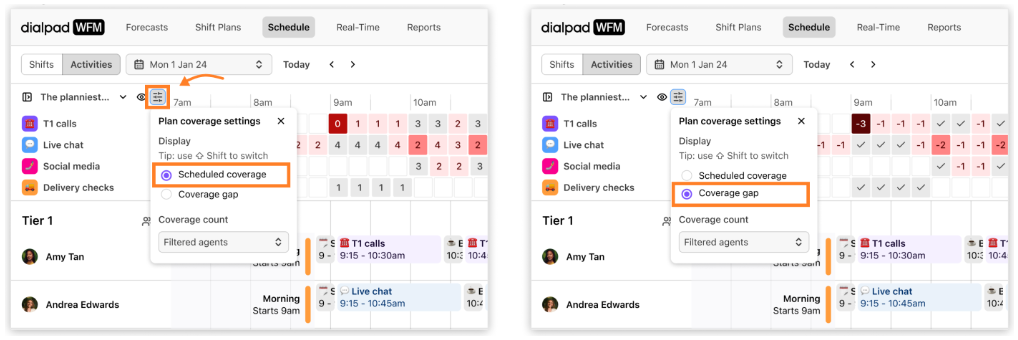
Choose how coverage is displayed
You can choose how the coverage bar is labelled to suit your needs:
Scheduled coverage (default): shows the number of agents scheduled, for example, 5.
Coverage gap: shows the difference between scheduled and required agents, for example, -3.
Press Shift (⇧) while in the activity schedule to jump between views anytime, or select the coverage settings button
Choose how coverage is counted
You have the option to choose how coverage is counted in the schedule, giving you more flexibility and visibility over data.
All agents: Count staffing for all agents in the account, even if they’re hidden by filters.
Filtered agents: Only count staffing for agents currently filtered in the schedule.
Agents in this plan: Only count staffing for agents included in the selected Activity Plan.
This option is only available for Activity Plan coverage.
The default option for all views is ‘filtered agents’. You can change this option at any time by clicking the settings button and opening the Coverage count menu.
Show or hide the coverage bar
You can show or hide the coverage bar at any time by selecting the eye button .png)
Frequently asked questions
I’ve selected an Activity Plan, but no rows are showing in the coverage bar
The Activity Plan coverage bar will only show rows the activities scheduled using a ‘Fixed Staffing’ rule. If your Activity Plan does not contain any of these rules, then there will be no coverage to show. We recommend using the queue coverage view instead.

I’ve selected an Activity Plan but it’s not showing when I go to other days
Activity Plan coverage will only show on days that the Activity Plan has been added to. If you navigate to another date where the selected Activity Plan has not been added, then the coverage bar will be hidden. We recommend switching to queue coverage or selecting a different Activity Plan.

Why can’t I select any Activity Plans to view?
Activity Plan coverage is only available if an Activity Plan has been added to that date. If the option is disabled (grayed out), then an Activity Plan has not been added.
Why do my queues look unstaffed?
To track staffing on queues, you need to link them to activities. For more information, head to this help article
To link an activity to a queue:
Navigate to Schedule
Select Activities
Open the toolbar and select the relevant activity
Enable the link to queue toggle
Select the queue you wish to link to the activity
.png)
Why is the coverage bar undercounting?
If the coverage bar appears to be undercounting, review the ‘Staffing count’ setting being used. The default option is ‘filtered agents’
All agents: Count staffing across all teams.
Filtered agents: Only count staffing for agents filtered in the schedule.
Agents in this plan: Only count staffing for agents included in selected Activity Plan.
This option is only available for Activity Plan coverage.
Are interval lengths changing anywhere else in the app?
Nope! Shift coverage and the Insights heatmap will stay hourly. Agents only count if they’re scheduled for over half the interval (8 minutes for 15 mins, 30 minutes for hourly).
How often does the coverage bar update?
The numerator (scheduled agents) updates every time staffing changes, e.g. you edit or add a new activity to an agent’s schedule.
In the queue coverage view, the denominator updates whenever the forecast is updated. This includes when a forecast adjustment is added.
In the Activity Plan coverage view, the denominator updates whenever the fixed staffing rules in your Activity Plan are updated.
Real-time actual volumes can help you assess whether your current coverage is appropriate, but they do not update the required staffing shown in the coverage bar.