Failover ensures callers can still reach your business in the rare case of a Dialpad outage. Depending on the line and your plan, calls can be routed to a non-Dialpad phone number or voicemail.
The Office Failover Settings experience helps admins find shared lines more easily and test failover with clearer safety controls.
Who can use this
Only admins with permission to manage office-level settings can view or edit the Office Failover Settings page.
Failover testing is available only to users on an Enterprise plan.
Let's go over the details.
How you set up failover depends on whether you are configuring it for shared lines or individual user lines.
Note
Available options also depend on your plan.
Admins can configure failover for these shared lines:
Main Line
Department
Contact Center
Office failover numbers
To manage failover for shared lines, go to your Dialpad Admin Settings and select Office > Failover Settings.

The Office Failover page displays supported shared lines in a searchable list. Admins can search by:
Entity name, such as: Support Mainline
Dialpad number
Where available, admins can also filter the list by line type. Each row shows the entity name, its Dialpad number, and a summary of the current failover destination.
Use the row actions to Configure, Test, or Remove a failover.
Note
The Office Failover update changes only the admin experience. It does not change the underlying failover routing model or the timing of when Dialpad activates failover.
Configure a failover number
To configure a failover number to an office for users on an Enterprise license, go to your Dialpad Admin Settings.
Select Office > Failover Settings
Choose the desired main line, department, or contact center and select Action > Configure

Choose one of the following:
Forward to a Number (enter a PSTN number)
Send to Voicemail
Enter the failover number or voicemail message

Select Save
Note
The Failover Number must be a non-Dialpad PSTN number. Dialpad numbers can’t be used.
Remove a failover configuration
Removing the configuration clears the explicit failover destination for that line.
To remove a failover configuration, go to your Dialpad Admin Settings.
Select Office > Failover Settings
Find the desired shared line
Select Action > Remove

Confirm that you want to remove the failover configuration
Test the failover number
To test that the failover number is configured, go to your Dialpad Admin Settings.
Select Office > Failover Settings
Locate the desired Department, Contact Center, or Main Line and select Action > Test
On the test verification page, select Start Test

Verify that calls are routed to your configured failover number

Tip
We recommend running tests outside of business hours to minimize disruption.
Stop a failover test
Once you’ve verified that the failover number is configured properly, be sure to end the test.
To end a failover test, go to your Dialpad Admin Settings.
Go to Office > Failover Settings
Locate the Department, Contact Center, or Main Line being tested (marked with a red X) and select Action > Test
On the test verification page, select Stop Test

Shared line failover numbers
Admins can configure failover for shared lines manually on each Contact Center or Department, using a PSTN number. Shared-line failover configuration remains available from the Contact Center or Department settings pages. These paths are separate from the Office Failover overview.
Note
Office Failover Settings apply to shared lines such as main lines, departments, and Contact Centers with DIDs. Individual user failover continues to use verified forwarding numbers and is managed separately.
To add a failover number for shared lines, go to your Dialpad Admin Settings.
Select the Contact Center or Department you want to configure
Go to Advanced Settings
Under Contact Center Failover Number or Department Failover Number, enter a non-Dialpad (PSTN) number
Select Validate

Note
The Failover Number must be a non-Dialpad PSTN number. Dialpad numbers can’t be used. Failover testing isn’t supported on Pro or Standard plans.
Removing a Failover Number
To remove a failover number for users on Pro and Standard licences, go to your Dialpad Admin Settings.
Select the Contact Center or Department you want to configure
Go to Advanced Settings
Under Contact Center Failover Number or Department Failover Number, select Remove Failover Number

Individual user lines
For individual users, Dialpad automatically uses the last verified forwarding number as the failover number. You can add up to five forwarding numbers, but only the most recently added one will be used in an outage.
Note
Individual user failover is managed from user-level settings, not from the Office Failover page.
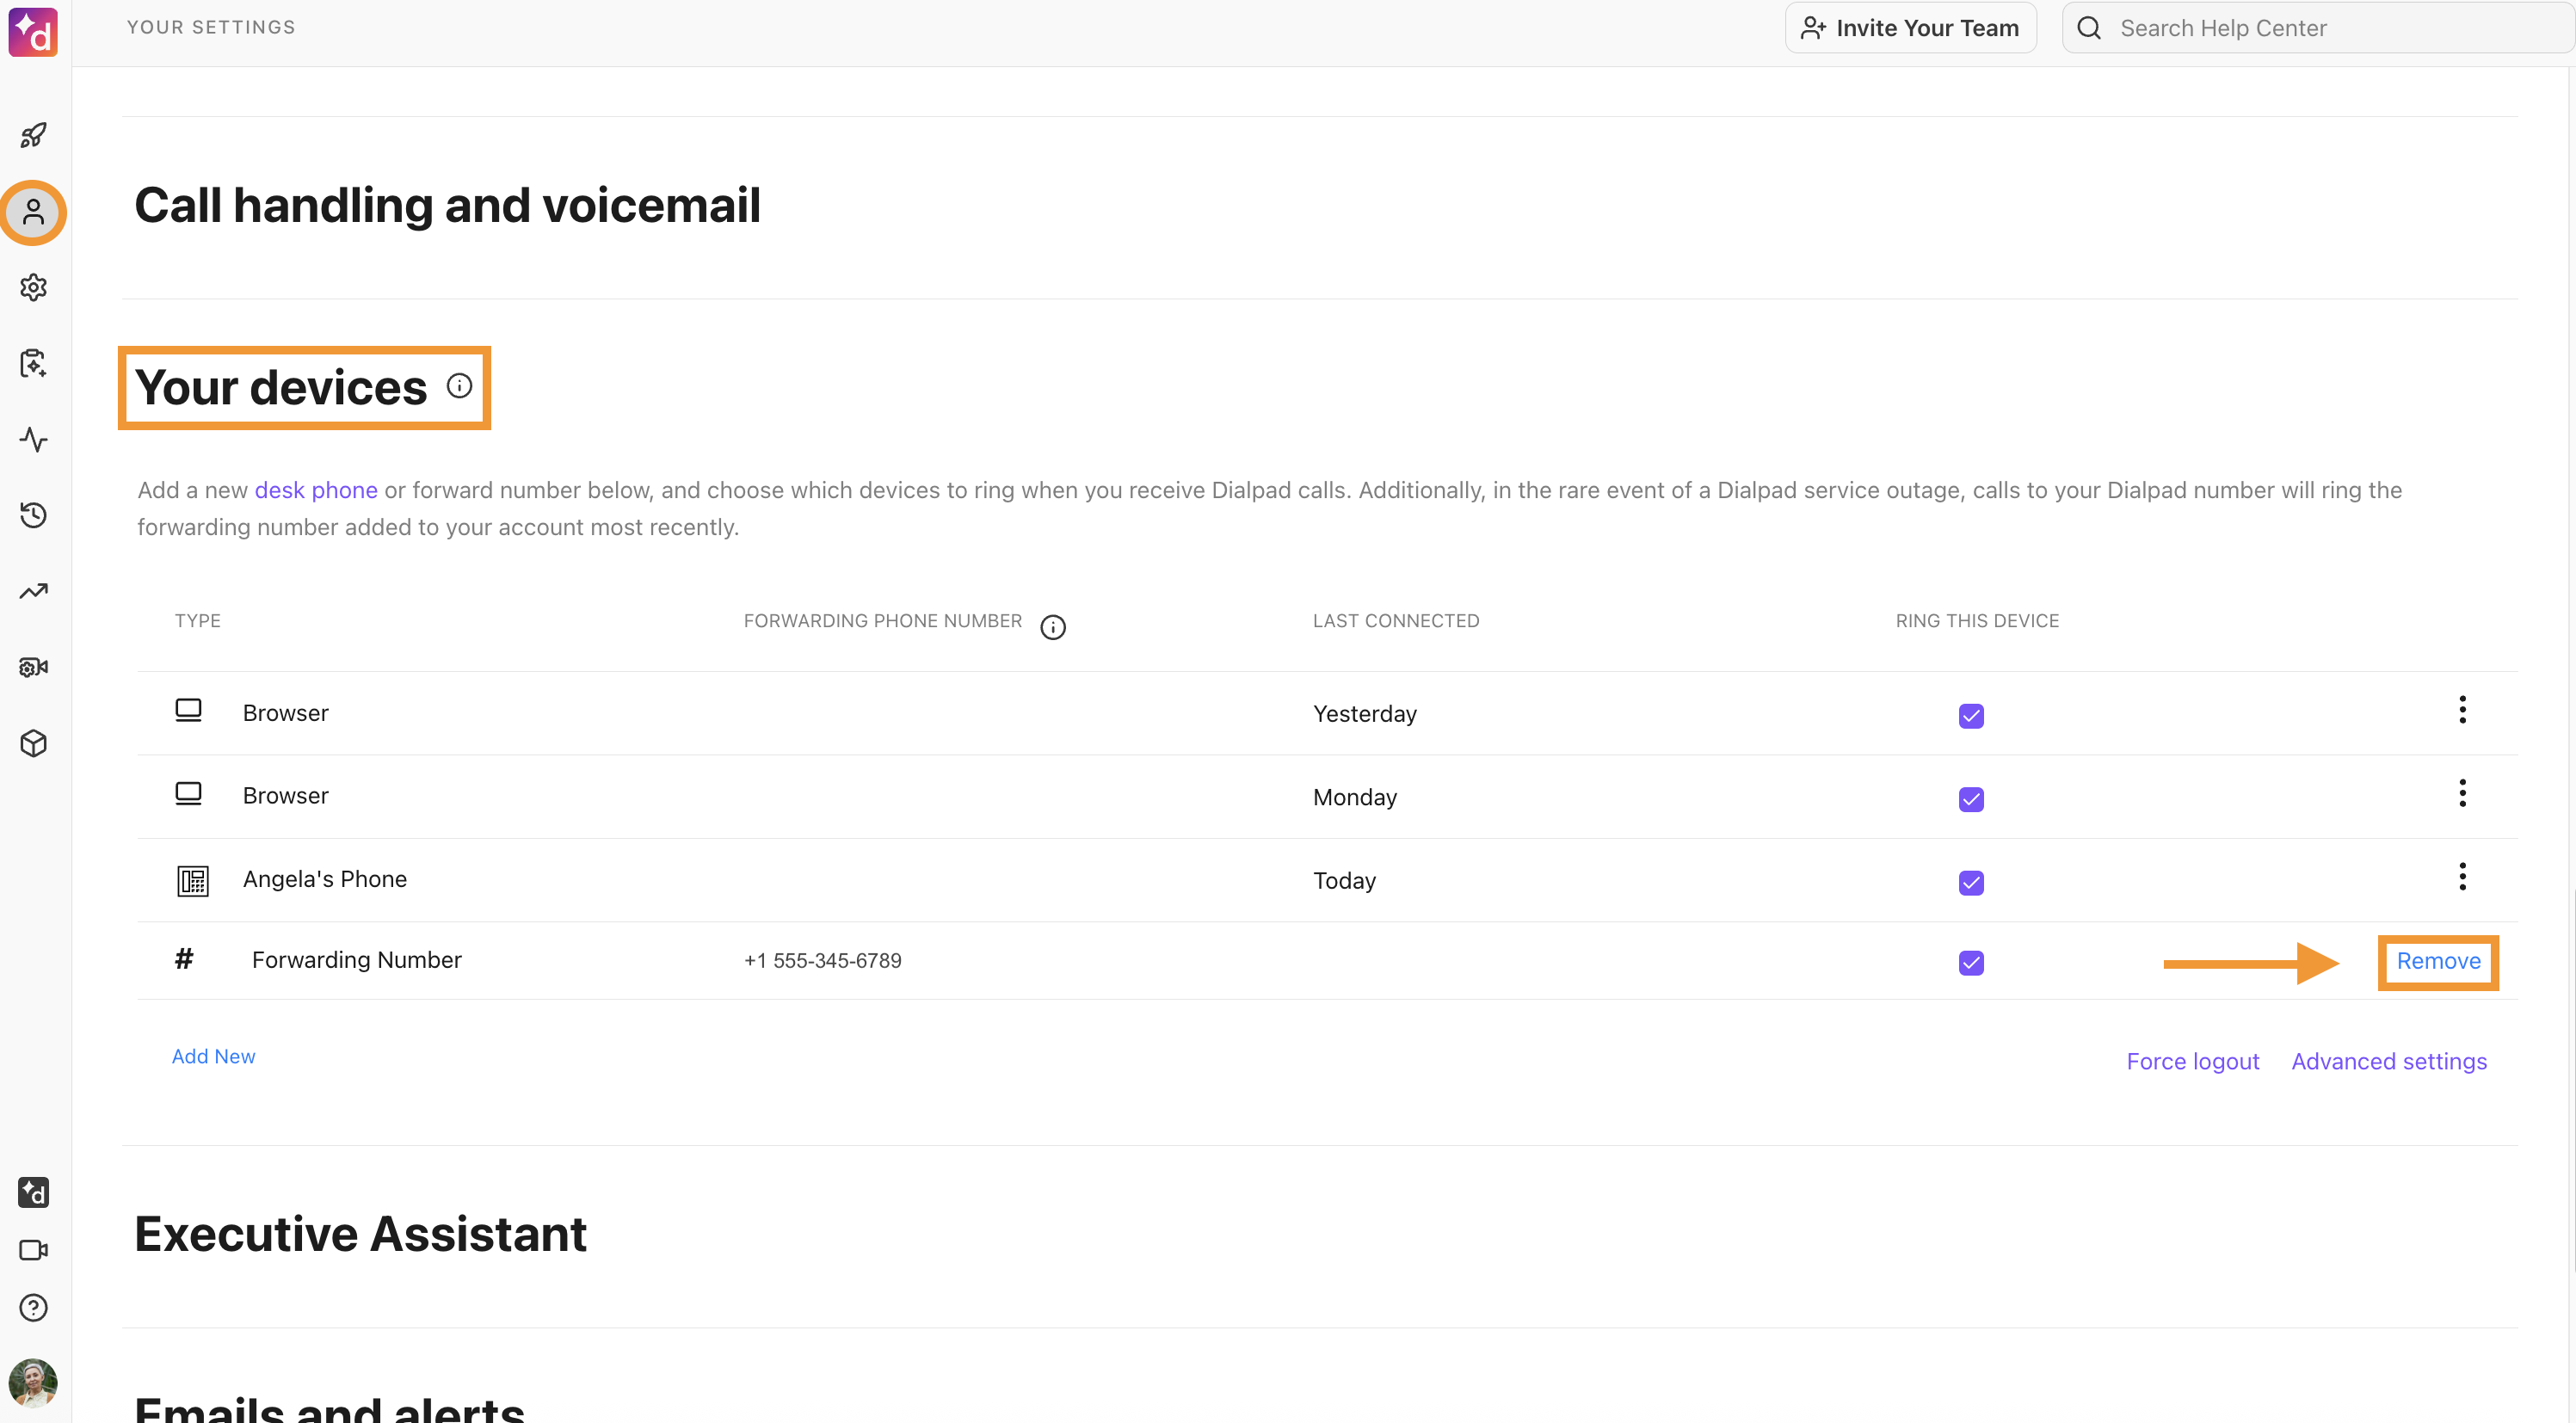
To add a forwarding number, go to Your Settings.
Go to Your Devices
Select Add New > Add a Forwarding Number
Enter the number and select Verify

Once verified, this number becomes your failover destination.
Note
When you enter your mobile number during the initial Dialpad app setup, it’s automatically saved as both your forwarding number and your default failover destination.
Removing a failover number
To remove a failover number for individual users, go to Your Settings.
Go to Your Devices
Locate the desired number and select Remove
Failover voicemail
All lines have an automatic failover voicemail. The default message is:
“No one is available to take your call. Please leave a message after the tone.”
Note
Pro & Standard + Individual users: Can’t edit the default voicemail failover message.
Enterprise customers: Can edit and customize the voicemail failover message.
If a failover number is set to a PSTN destination, that will take priority over voicemail.
Messages left during failover are stored in the voicemail box of the impacted line (e.g., Contact Center, Department, or individual user). They can be retrieved in the same way as any other voicemail:
From the Dialpad app (Voicemails tab)
From the email notification (if voicemail to email is enabled)
From the Dialpad Admin dashboard, for shared lines
Call queue failover
In the event of a severe outage, contact center agents and department/main line operators receive inbound calls to those shared lines in the Dialpad failover app. The failover app provides basic, limited functionality for inbound calls to Contact Centers, Departments, and mainlines. The failover app functionality includes:
Agents can set their availability to On Duty or Off Duty
Call routing is handled by the longest-idle call wait time
Use on the desktop and web apps
For minor availability issues, the standard failover process is followed. The table below highlights the failover methods for Dialpad based on the outage severity:
Affected Line | Minor Outage | Severe Outage |
|---|---|---|
Individual Line | Standard Failover | Standard Failover |
Contact Center/Office Main Line/Department Line | Standard Failover | Call Queue Failover |
When failover is enacted, a banner displays in the Dialpad app telling users that Dialpad is experiencing an outage. The failover app opens in a new window, while the main Dialpad app remains open in a degraded state.
Note
For some Contact Centers with Call Queue Failover enabled, the failover configuration dialog may not fully reflect the severe-outage behavior. The underlying routing remains correct.
When service is restored, the failover app notifies users. The Dialpad app is restored and calls are routed through the main Dialpad app again.
Note
For call queue failover to operate properly, you must allow these domains:
*.twilio.com
*.twil.io
Call queue fail over only works for inbound calls made to queues with a DID and assigned operators/agents.
Test call queue failover number
24 hours after a failover number has been set for a shared line, it can be tested.
Before testing, ensure the following domains are whitelisted in your firewall setup:
*.twilio.com
*.twil.io
To test a failover number for a shared line (Contact Center, Department or Mainline), go to the Dialpad Admin Settings.
Navigate to the shared line (Contact Center, Department or Mainline)
Select Advanced Settings
Navigate to Call Queue Failover Number
Select Test Call Queue Failover
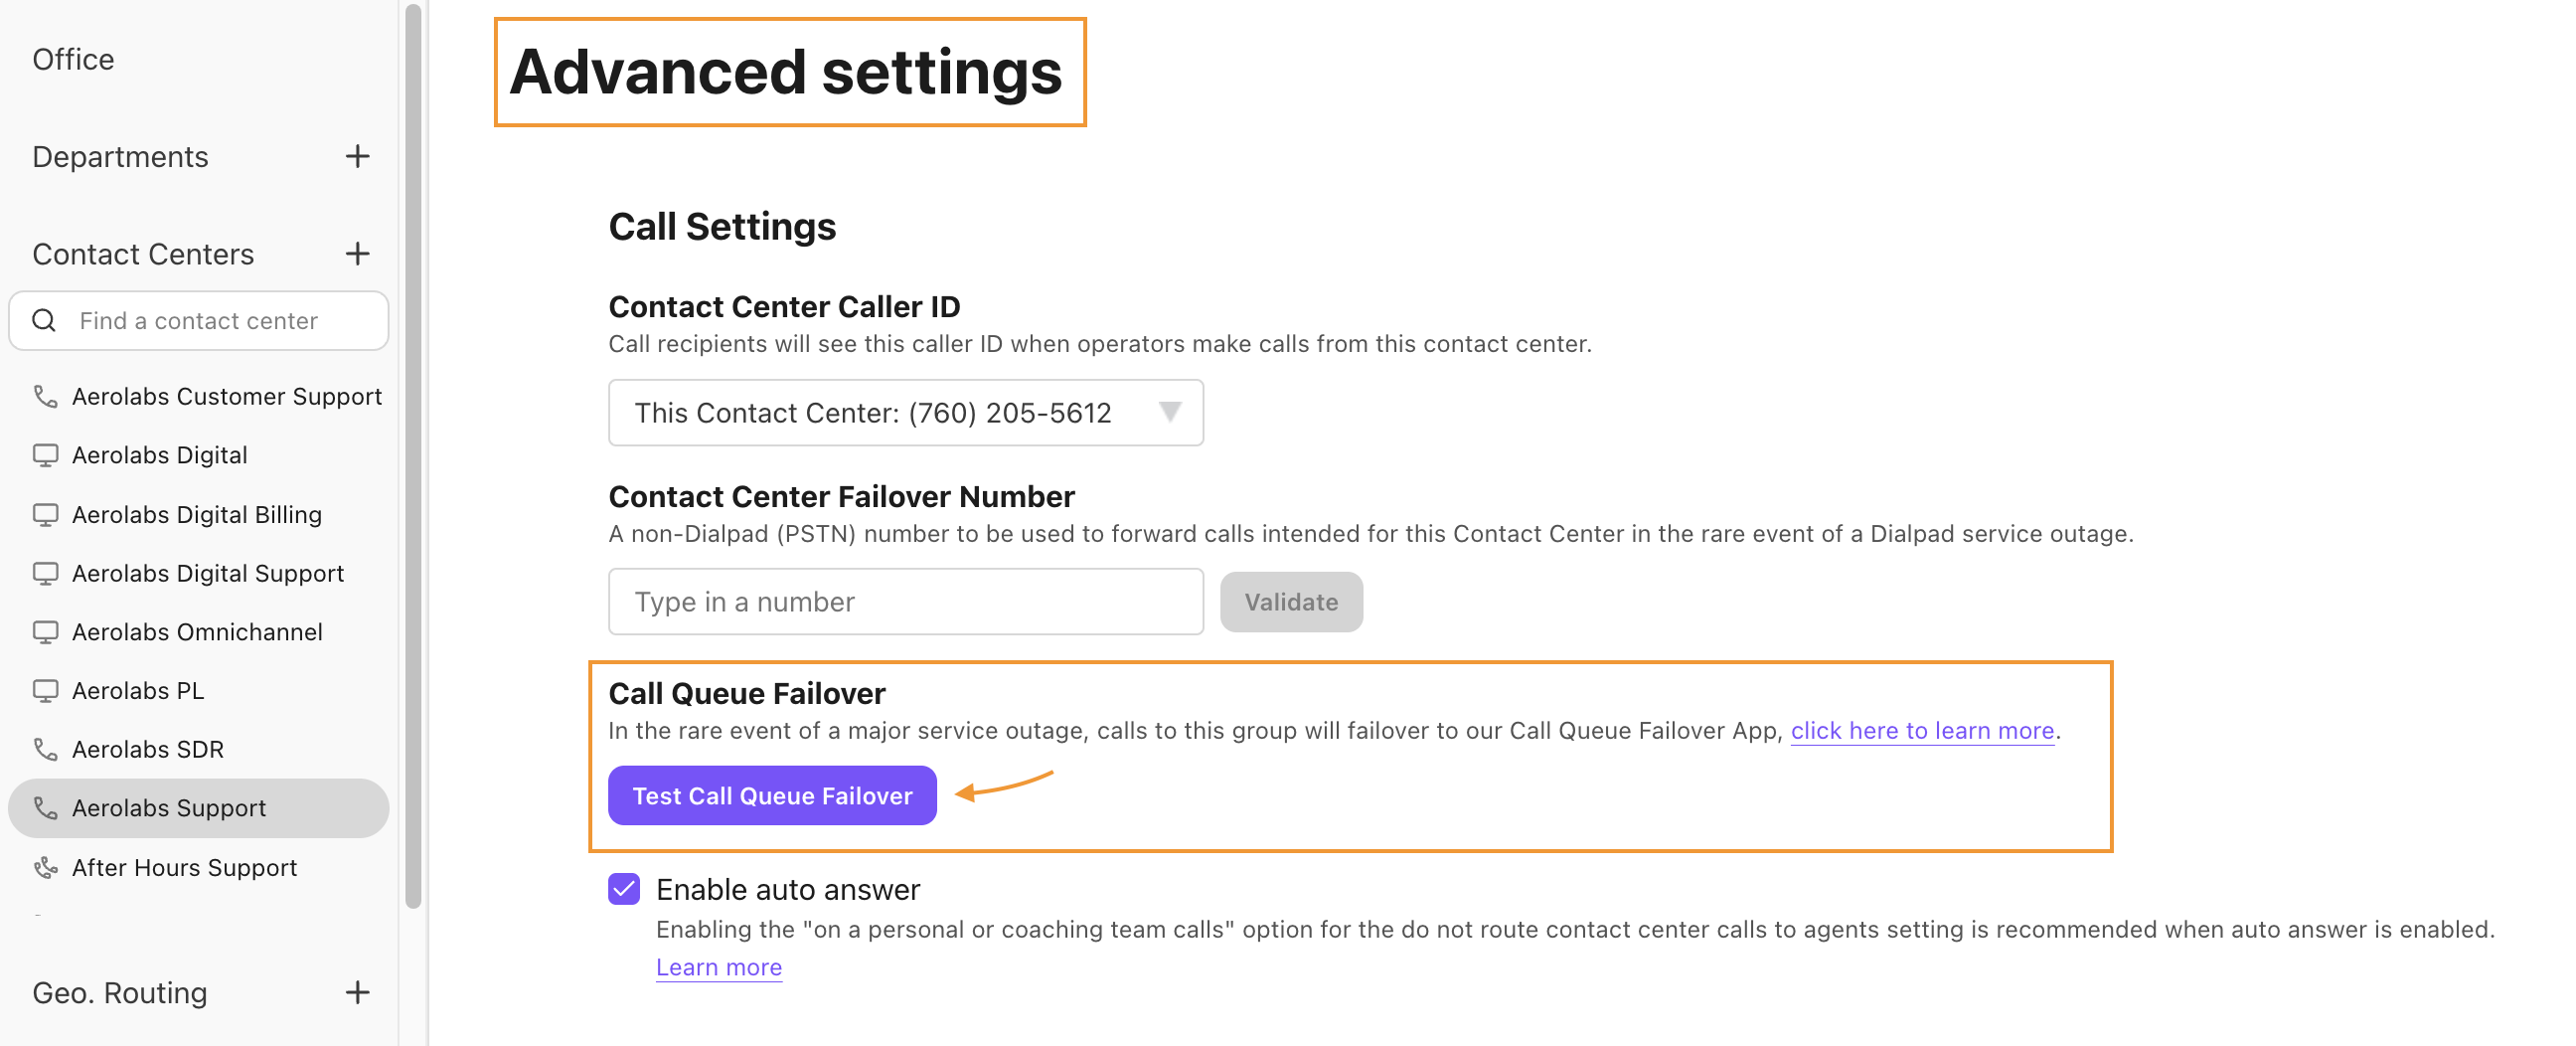
Select Start Test
If you need to stop the test while it is running, select Stop Test.