Use this self-start deployment guide as assistance through the deployment and migration process with Dialpad.
Our Professional Services Team offers a variety of packages to get you started, but we know some people prefer to do it on their own. For you independent folks, please use this Self-Start guide to assist you throughout the entire process. We'll identify the setup steps, what functions can be completed via the Dialpad web portal, and which require assistance from our Support Team.
Let's begin!
1 - Network testing
Dialpad will run over your existing wired and wireless network. So it is critical that your network is set up properly for voice quality and that ample bandwidth is available. As well, you should ensure that all ports necessary for Dialpad communication are open and that the proper quality of service (QoS) rules are in place.
Please read our Network Test Analysis Guide to ensure that your network is in ideal condition, and be sure to do a quick network test to ensure your deployment will be a breeze.
Using Chrome Web Browser, navigate to the Dialpad Network Assessment Test
You may have to load a plugin first.
Select the Click to start test button
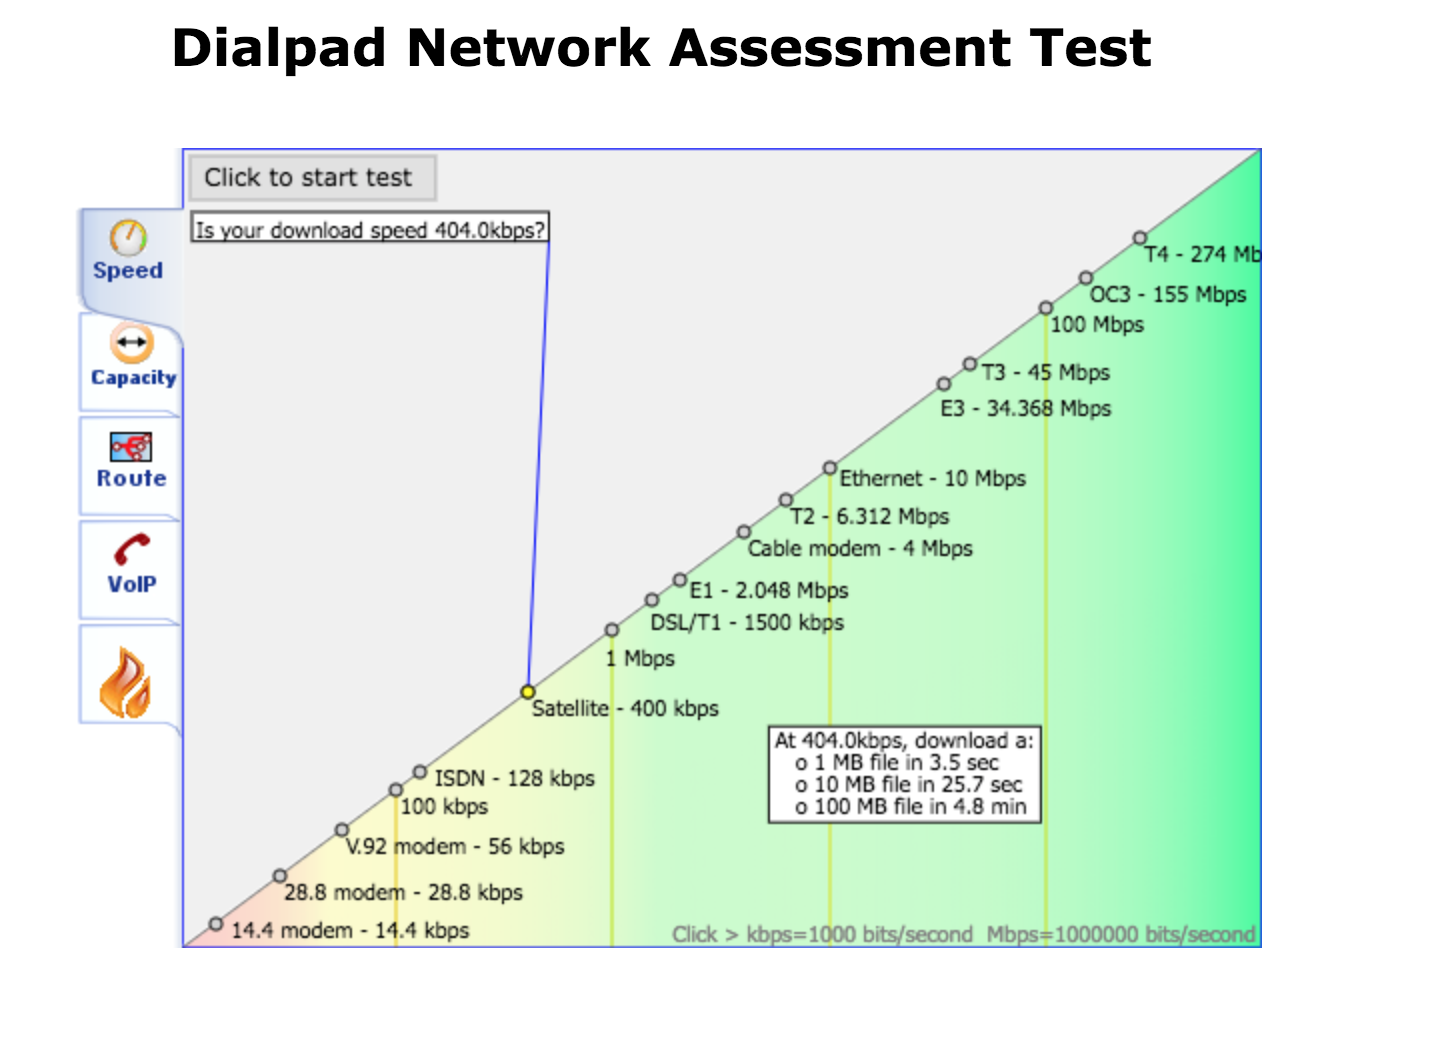
Enter your email address where prompted for a Company/User Name
While the test is running, watch your real-time results.
Testing is focused on:
Bandwidth
Network Capacity
Route Hops
Ports
Firewall rules / QoS
Once the test finishes, the summary will be displayed. Click through the various links to find more detailed results.
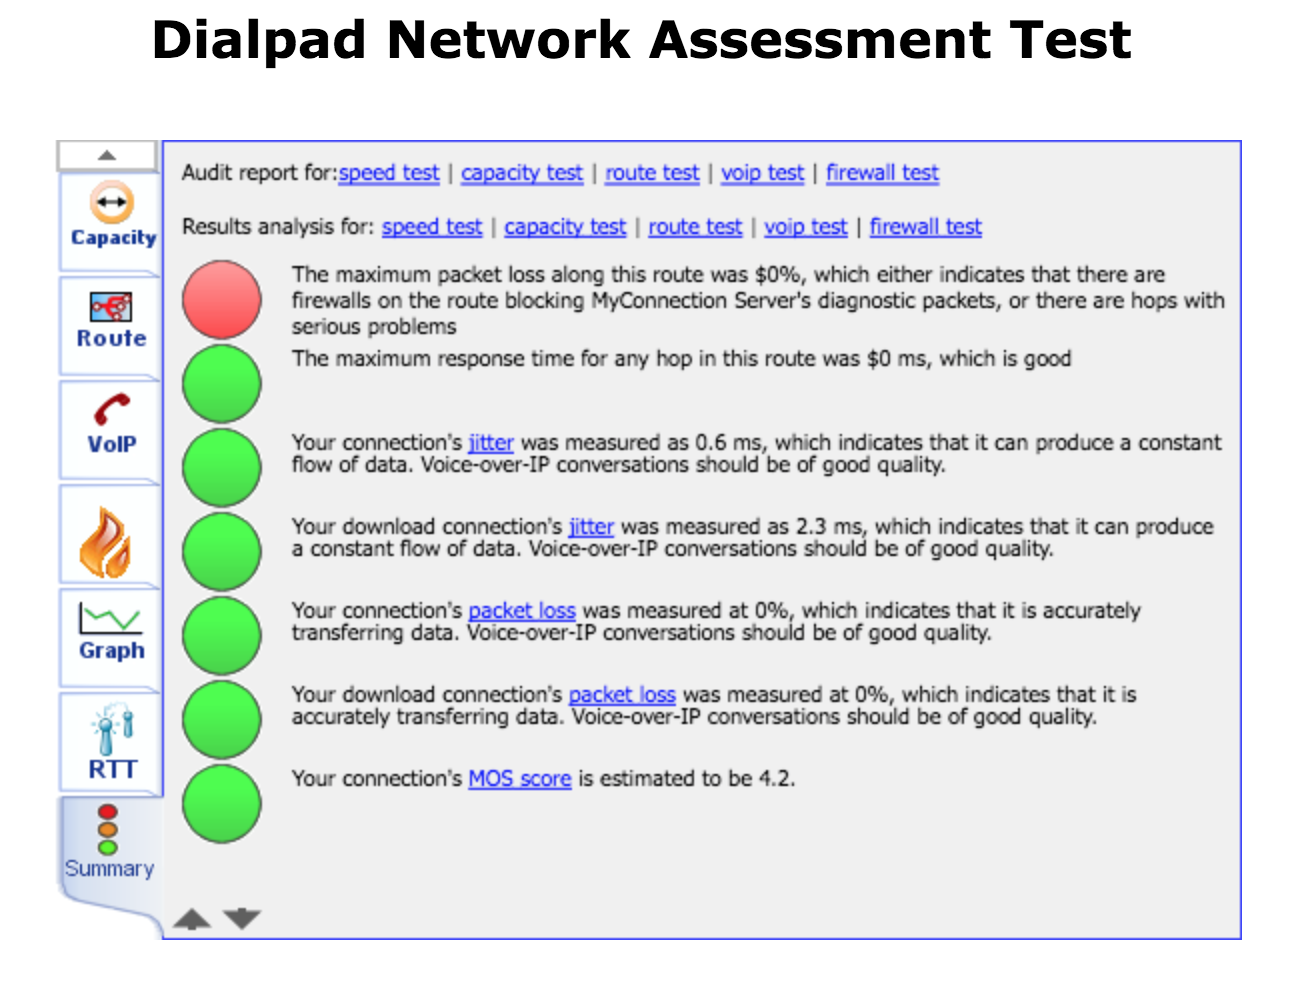
Mean Opinion Score (MOS) gives VoIP testing a numerical value as an indication of the perceived quality of received voice after being transmitted and compressed using codecs. This measurement is the result of underlying network attributes that act upon data flow and is useful in predicting call quality, and is a good VoIP test tool in determining issues that can affect your VoIP quality and your conversations.
VoIP calls are often in the 3.5 to 4.2 range. If the MOS score is below 4.0, reach out to the Support Team so that further testing can be done and recommendations can be made.
2 - Supported headsets
When it comes to Dialpad call & audio quality, your headset is a major factor, along with the speed and reliability of your network.
For more information on recommended headsets, please read this Help Center article.
Due to call control issues, please use UC (Unified Communications) and not MS/ML models.
Note
While you can utilize any other Bluetooth headset, it must pair with a USB dongle. If you are pairing directly to your computer's Bluetooth adaptor, you will more than likely incur audio issues and not be able to enjoy Dialpad to its fullest capability.
Furthermore, if you experience any call quality issues with your non-recommended headset, our Dialpad team will not be able to assist you.
Wired options
Plantronics, USB Blackwire Models, and Jabra wired USB models (either mono or dual-ear) should also work, but must be the UC model, and not the MS/ML version.
Other supported headset options
Models from other headset manufacturers, such as Logitech and Sennheiser, are usable as long as they do not have a custom driver and are USB.
3 - Supported desk phones
Dialpad supports a variety of SIP IP desk phones, which can be obtained from a third-party vendor or purchased directly from Dialpad. The main difference between devices purchased directly from Dialpad and those from a third party is that, when hardware comes from Dialpad, it is already pre-configured with our specific firmware and configuration and programmed to look to Dialpad for provisioning.
For a list of supported devices, check out this Help Center article.
*Dialpad service is also compatible with many other SIP-based IP Phones, Clients, and Adaptors, which may not be listed or provided by Dialpad. To ensure that the equipment will work with your Dialpad service, please reach out to Customer Care for more information.
3- Supported room phones
Dialpad supports room phones (conference phones) too, since we know that not every role relies on the use of smartphones, tablets, or laptops.
For a list of supported devices, check out this Help Center article.
4 - Ordering hardware
For customers located in the United States and Canada, you can easily order desk phones and other desk phone-related accessories right through your Dialpad web portal. This is a 100% automated process. For customers located outside of the United States and Canada, please contact your Dialpad Sales representative in order to purchase hardware.
What can be ordered from Dialpad?
Supported desk phones can be purchased directly from Dialpad.
From your Dialpad Admin Settings:
Navigate to Office
Select Desk Phones
Select Buy phones or learn more about compatible devices
Browse our phones and order your desired device
5 - Communication plan
Alert your users to the upcoming change, provide them with all necessary details, and have a streamlined go-live period.
Here are a few key times when communication should be sent out to your users:
In advance of the migration process beginning
To alert them when they will be having an account provisioned
Information regarding the upcoming training sessions being hosted
Official go-live
You can also send out specialized emails to the Department and Main Line Operators, or to Executive Assistants, as those users will most likely need additional training.
From what we’ve seen in successful deployments, it would also be good to host Dialpad information in your internal wiki, which can be used as a reference for users as they get on board. Content can be pulled from our Help Center, which will be covered in the Support section later on in this document.
For user onboarding, it is also ideal to identify some power users who will be heavy phone users, are tech-savvy, and can easily embrace Dialpad's platform.
6 - Create an additional Dialpad Office
An Office in Dialpad is simply a group of users within your Dialpad account. Commonly, there is an Office created for each physical site or location that you have in your organization.
When the organization's account is created, Dialpad will create the first Office, which will be associated with the country that you entered as part of your account setup process. It will be labeled as your Primary Office.
Before you begin deploying, it is recommended to create all the additional Offices that will be needed. It’s best to create them all up front, but they can be done at a time, as needed.
Depending on how your account billing is set up, you may or may not have the option to create the Offices yourself through the Dialpad web portal. If you don’t see the option to do so, all you need to do is reach out to our Customer Care Team with the name of the Office that needs to be created and the Office address; they will create it for you.
Create a new Office
Create a new office from your Dialpad Admin Portal.
Select My Company
Select Add new office
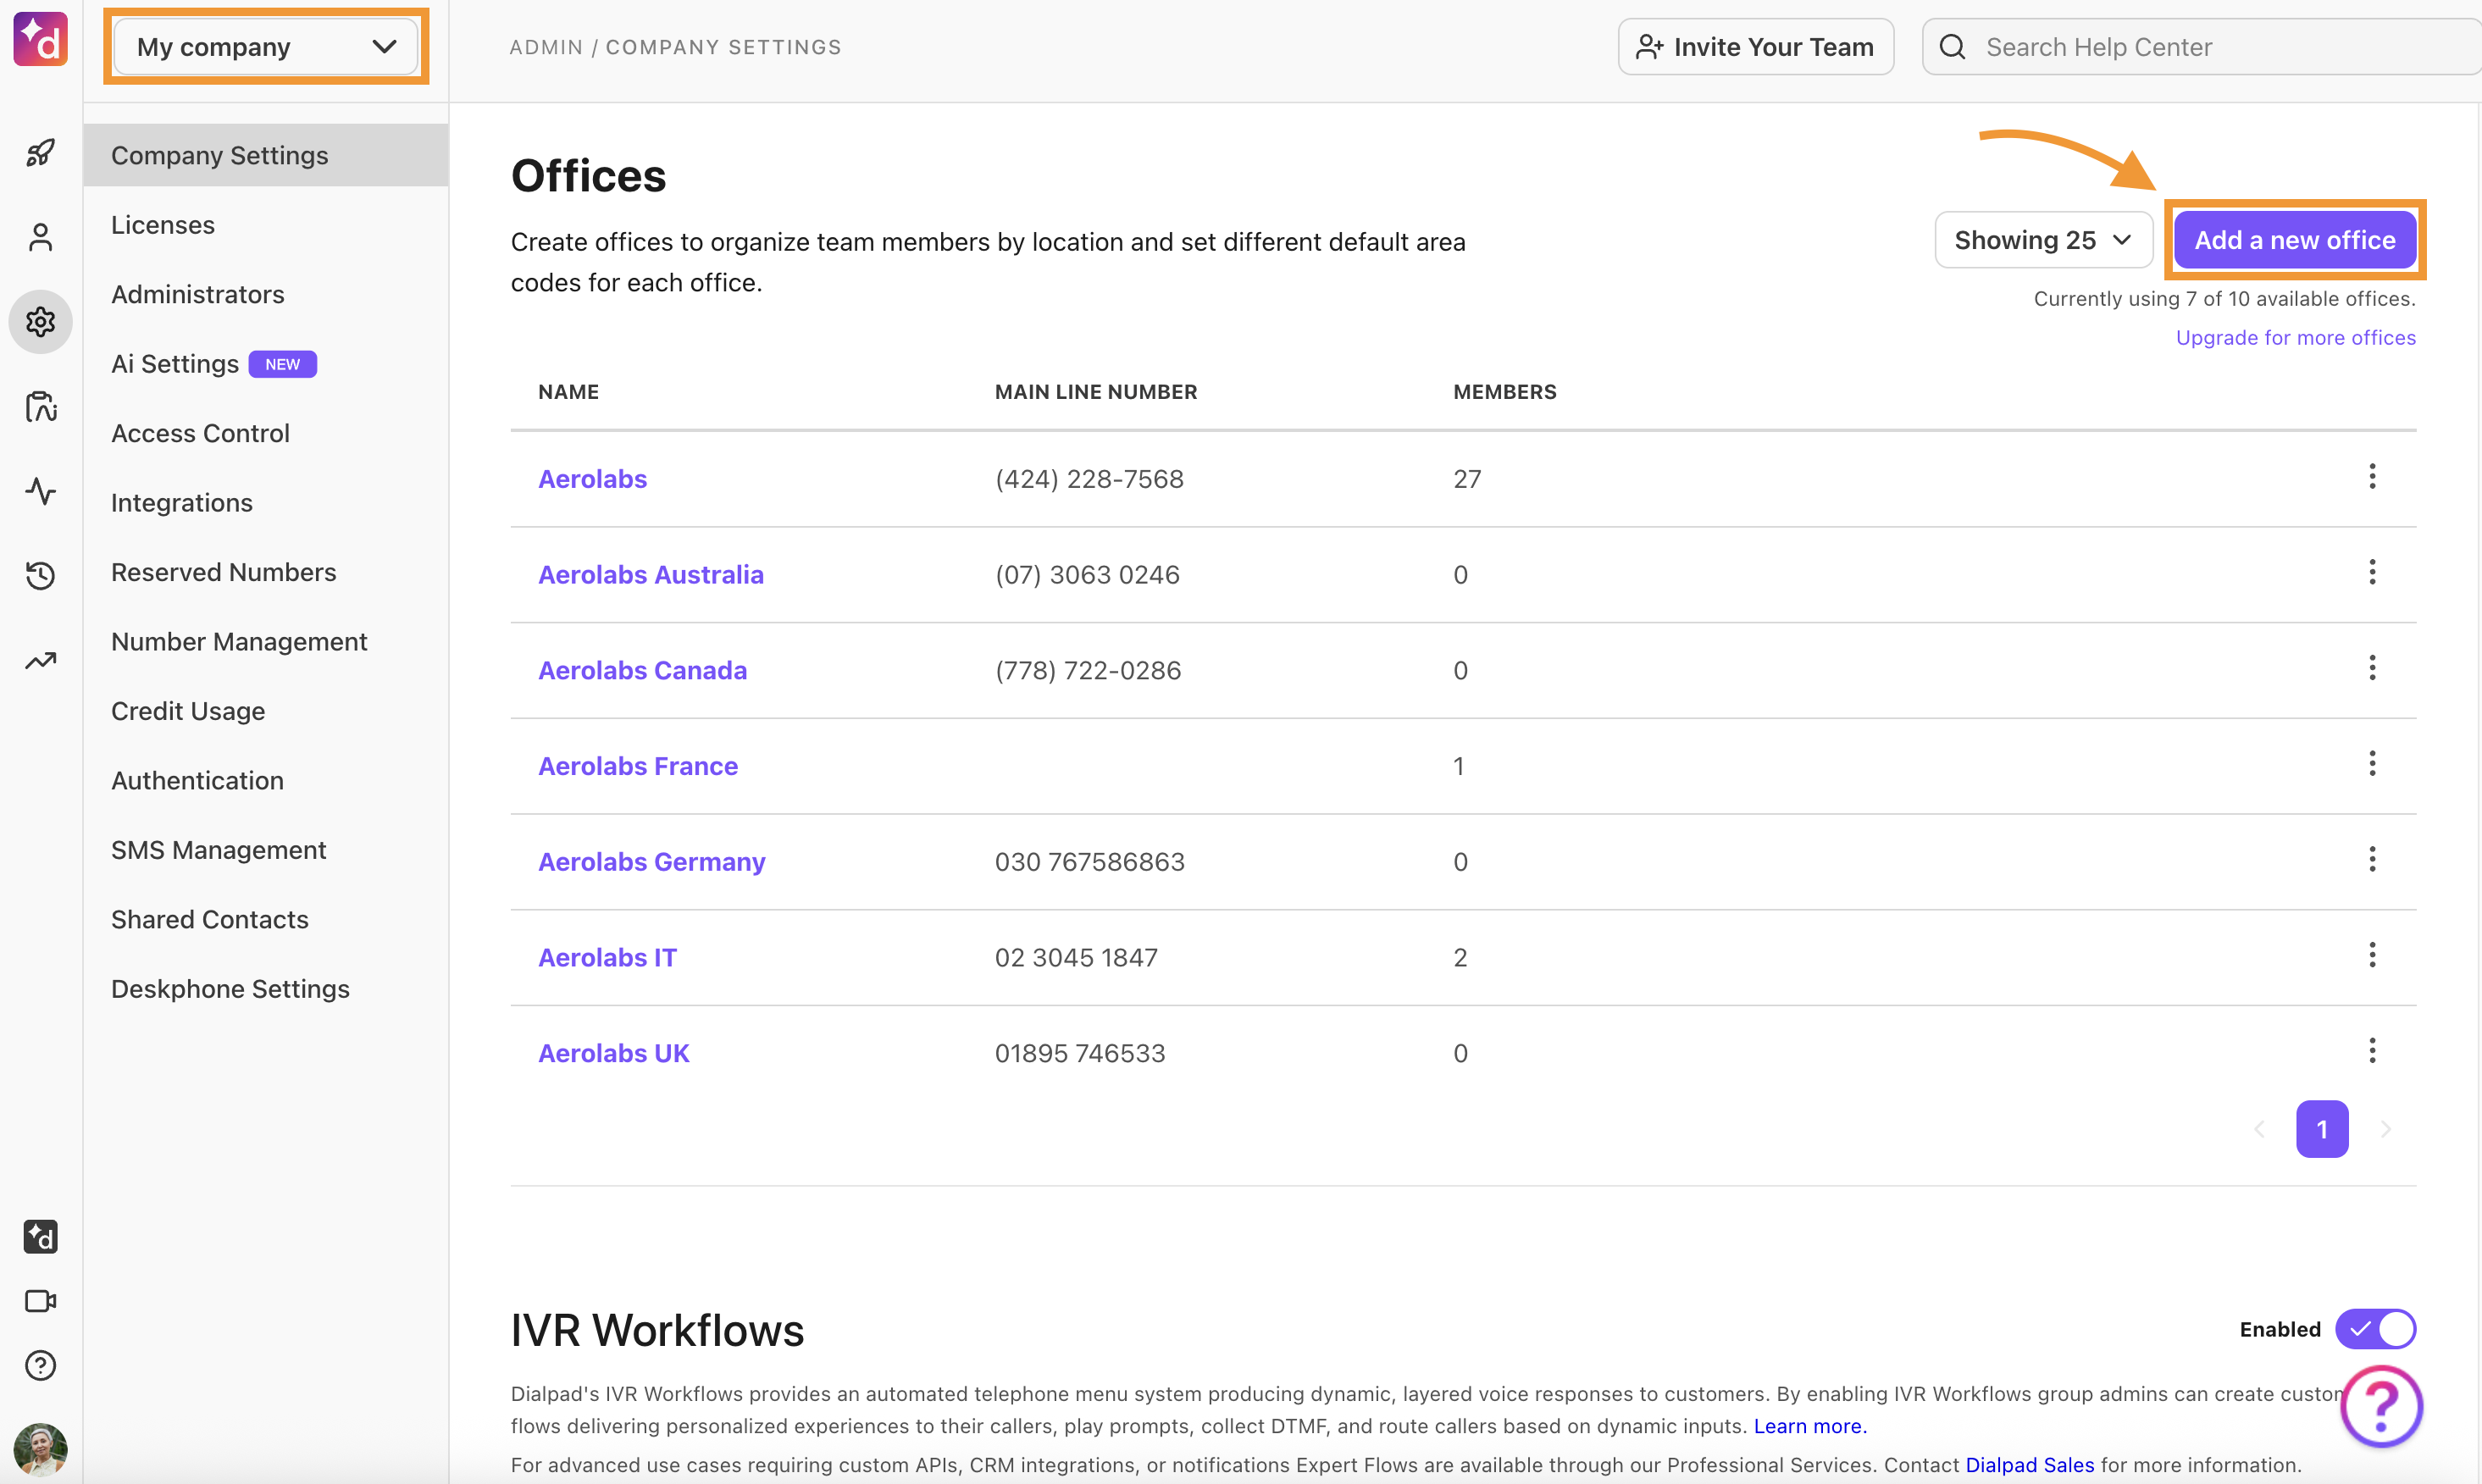
Select the country, choose the office name, and allocate the Office Admin
.png)
Select Continue
7 - Number porting
Number porting is the most critical part of the deployment process. It allows you to retain your current numbers that are in service with your current provider and get them migrated over to be used with Dialpad going forward.
While you are planning to deploy Dialpad within your organization, you should maintain a record of all details related to your current telecommunications accounts. Who is/are your service provider(s)? Account details and all numbers needed to be ported.
Expect the porting process to take 7-14 days (United States, Canada numbers only; international numbers take a little longer); however, this depends on the losing carrier and how responsive they are to complete the request
In the United States and Canada, you can easily port landline numbers, mobile numbers, Google Voice, etc.
Chat with our Support Team to check on international number porting and eligibility
Obtain necessary forms to submit the port request from our Sales Team or Customer Care Team
LOA Form: Country/carrier-specific authorizing the port request
Porting Spreadsheet: Record of all numbers being ported
Existing Provider Invoice (recommended, not required)
Visit this Help Center article on common questions related to porting.
Submit a Port request
Use the Dialpad Admin Portal to submit a port request for the local and mobile numbers in the United States and Canada.
Port requests for toll-free numbers and international numbers outside of the United States and Canada must be processed by our Customer Care Team. They'll verify porting eligibility and share forms to submit for the port request. Our Customer Care Team will answer questions and share updates along the way, too.
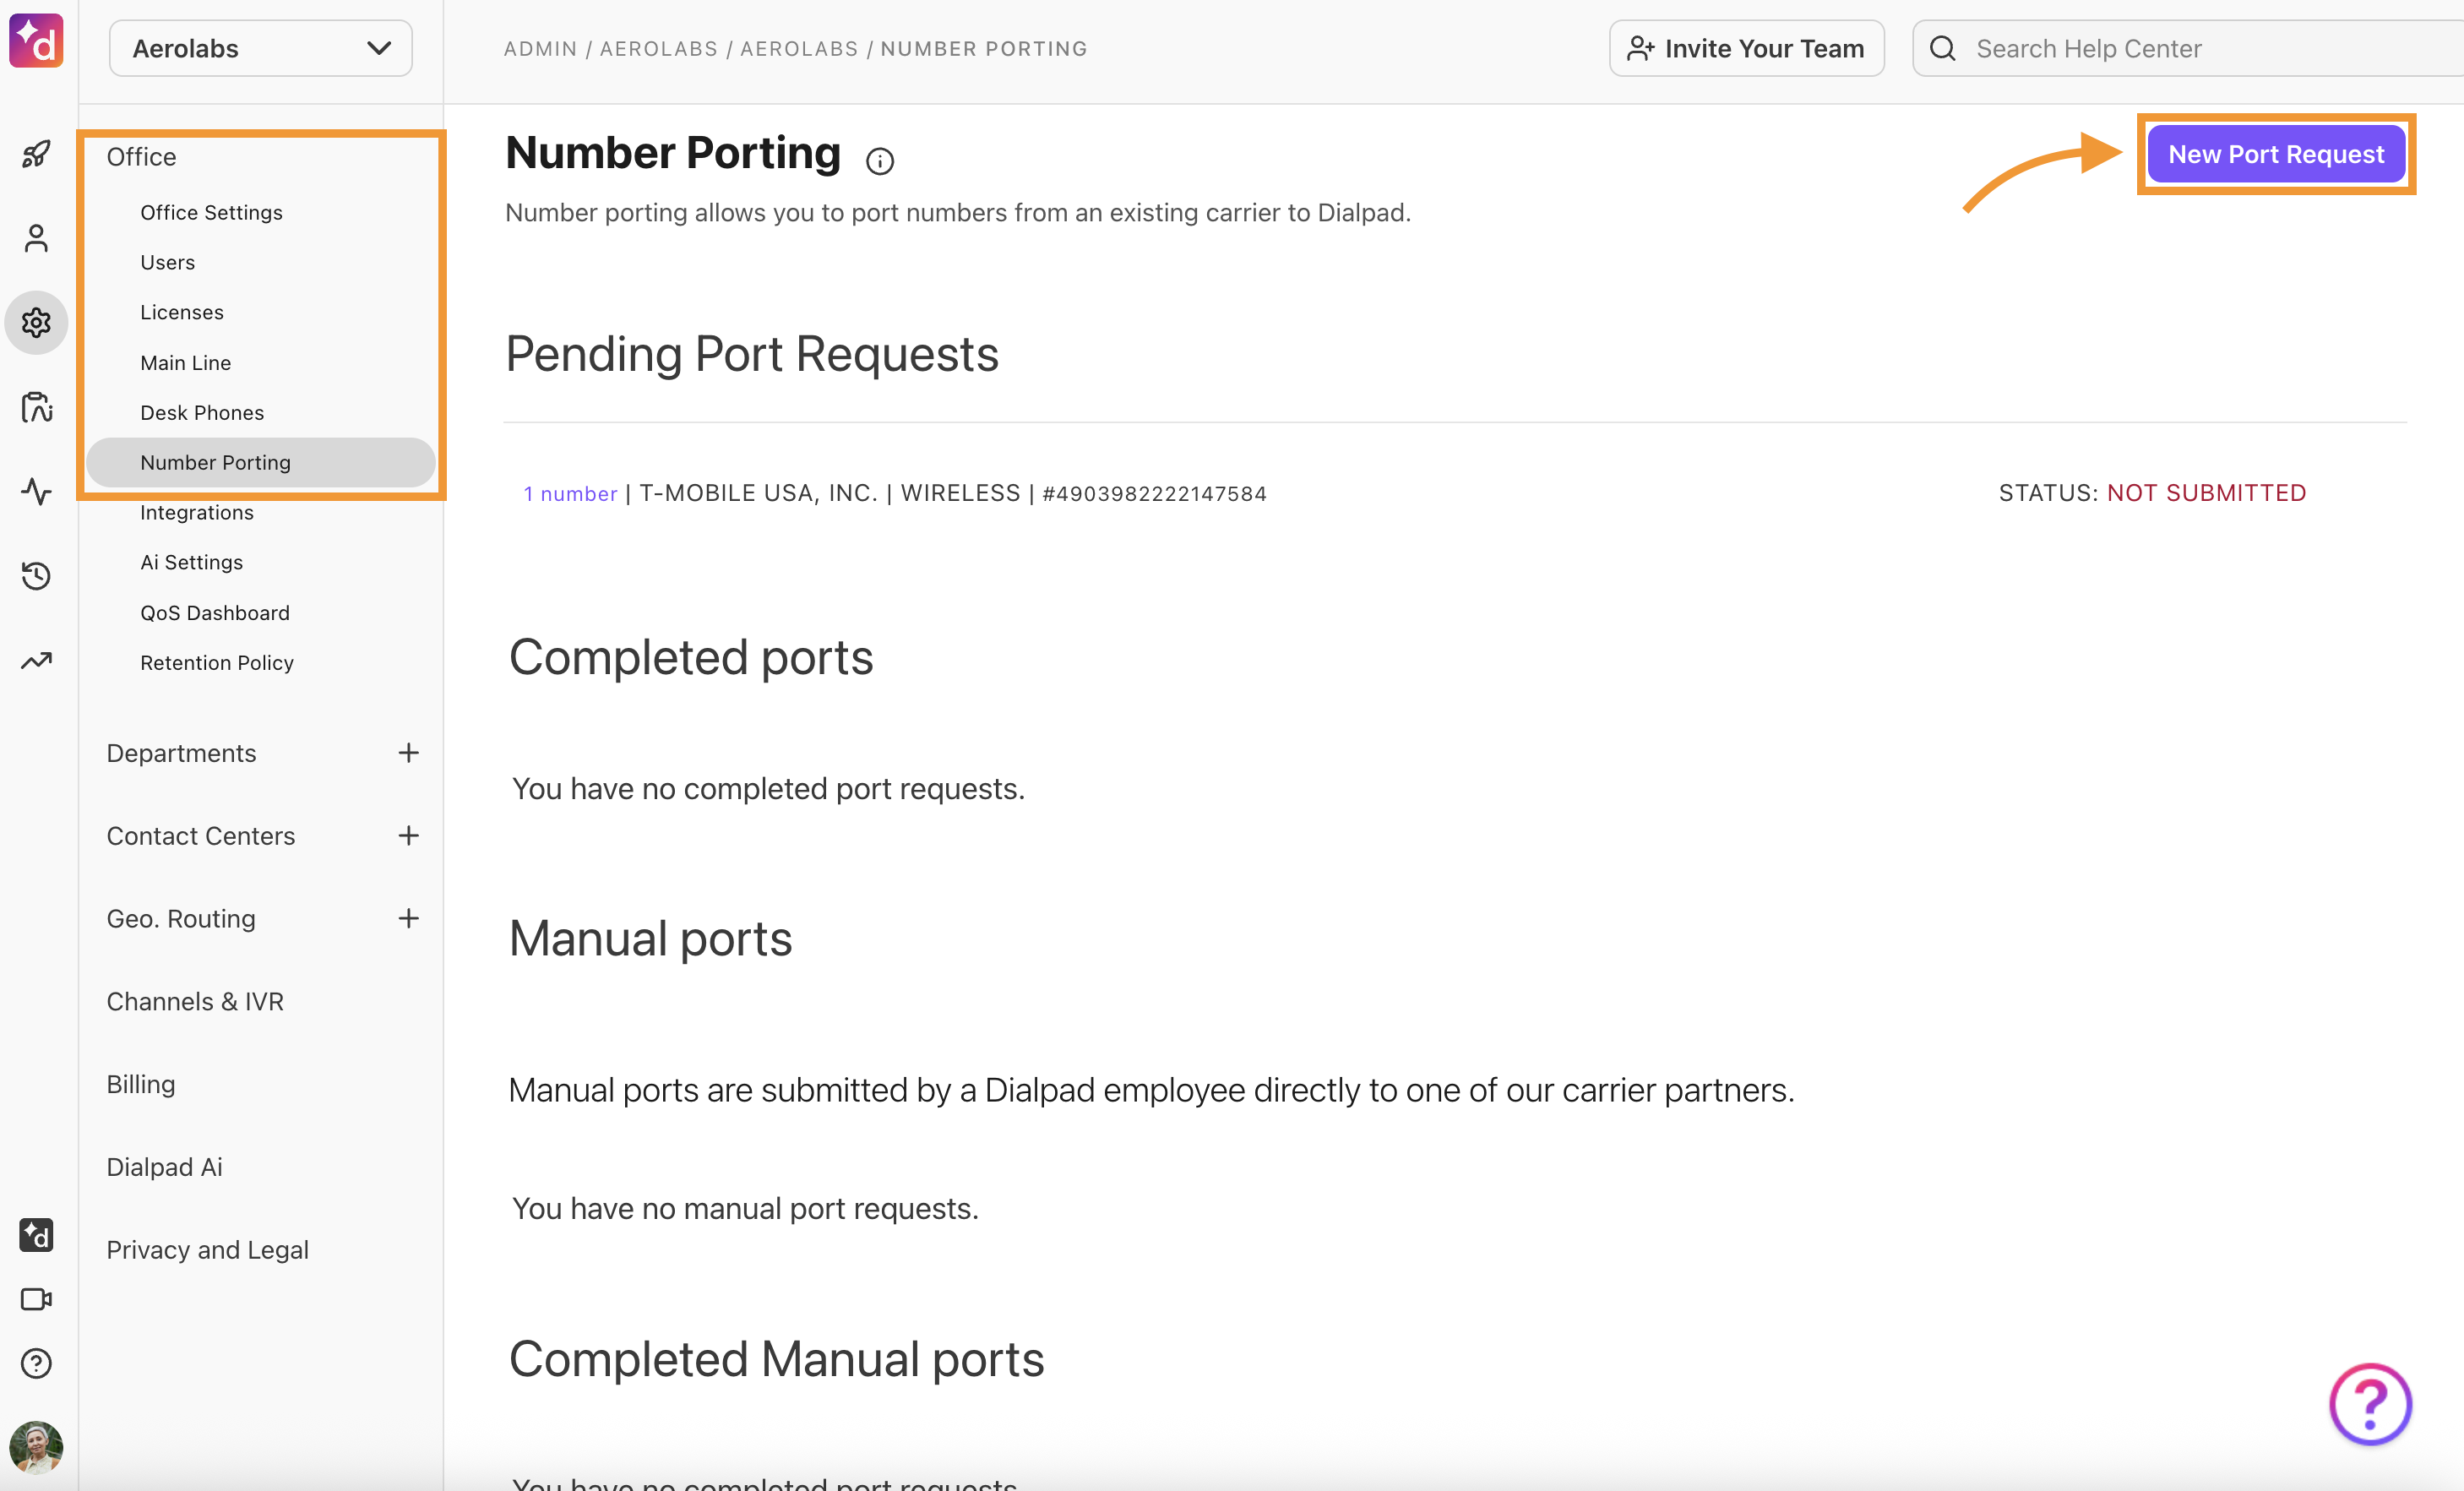
To submit a port request, go to the Dialpad Admin Portal.
Navigate to Office
Select Number Porting
Select New Port Request
Enter the numbers you'd like to port, then select Continue
Follow the instructions to specify where the number will port to in your organization
Make sure the user, room phone, Department, or Main Line is created first It will have a temporary number to start, and your number being ported in will replace that.
Since you need to authorize the port request with the existing service provider, enter account information in the displayed form. Then choose the preferred date and time for the port request to be completed.
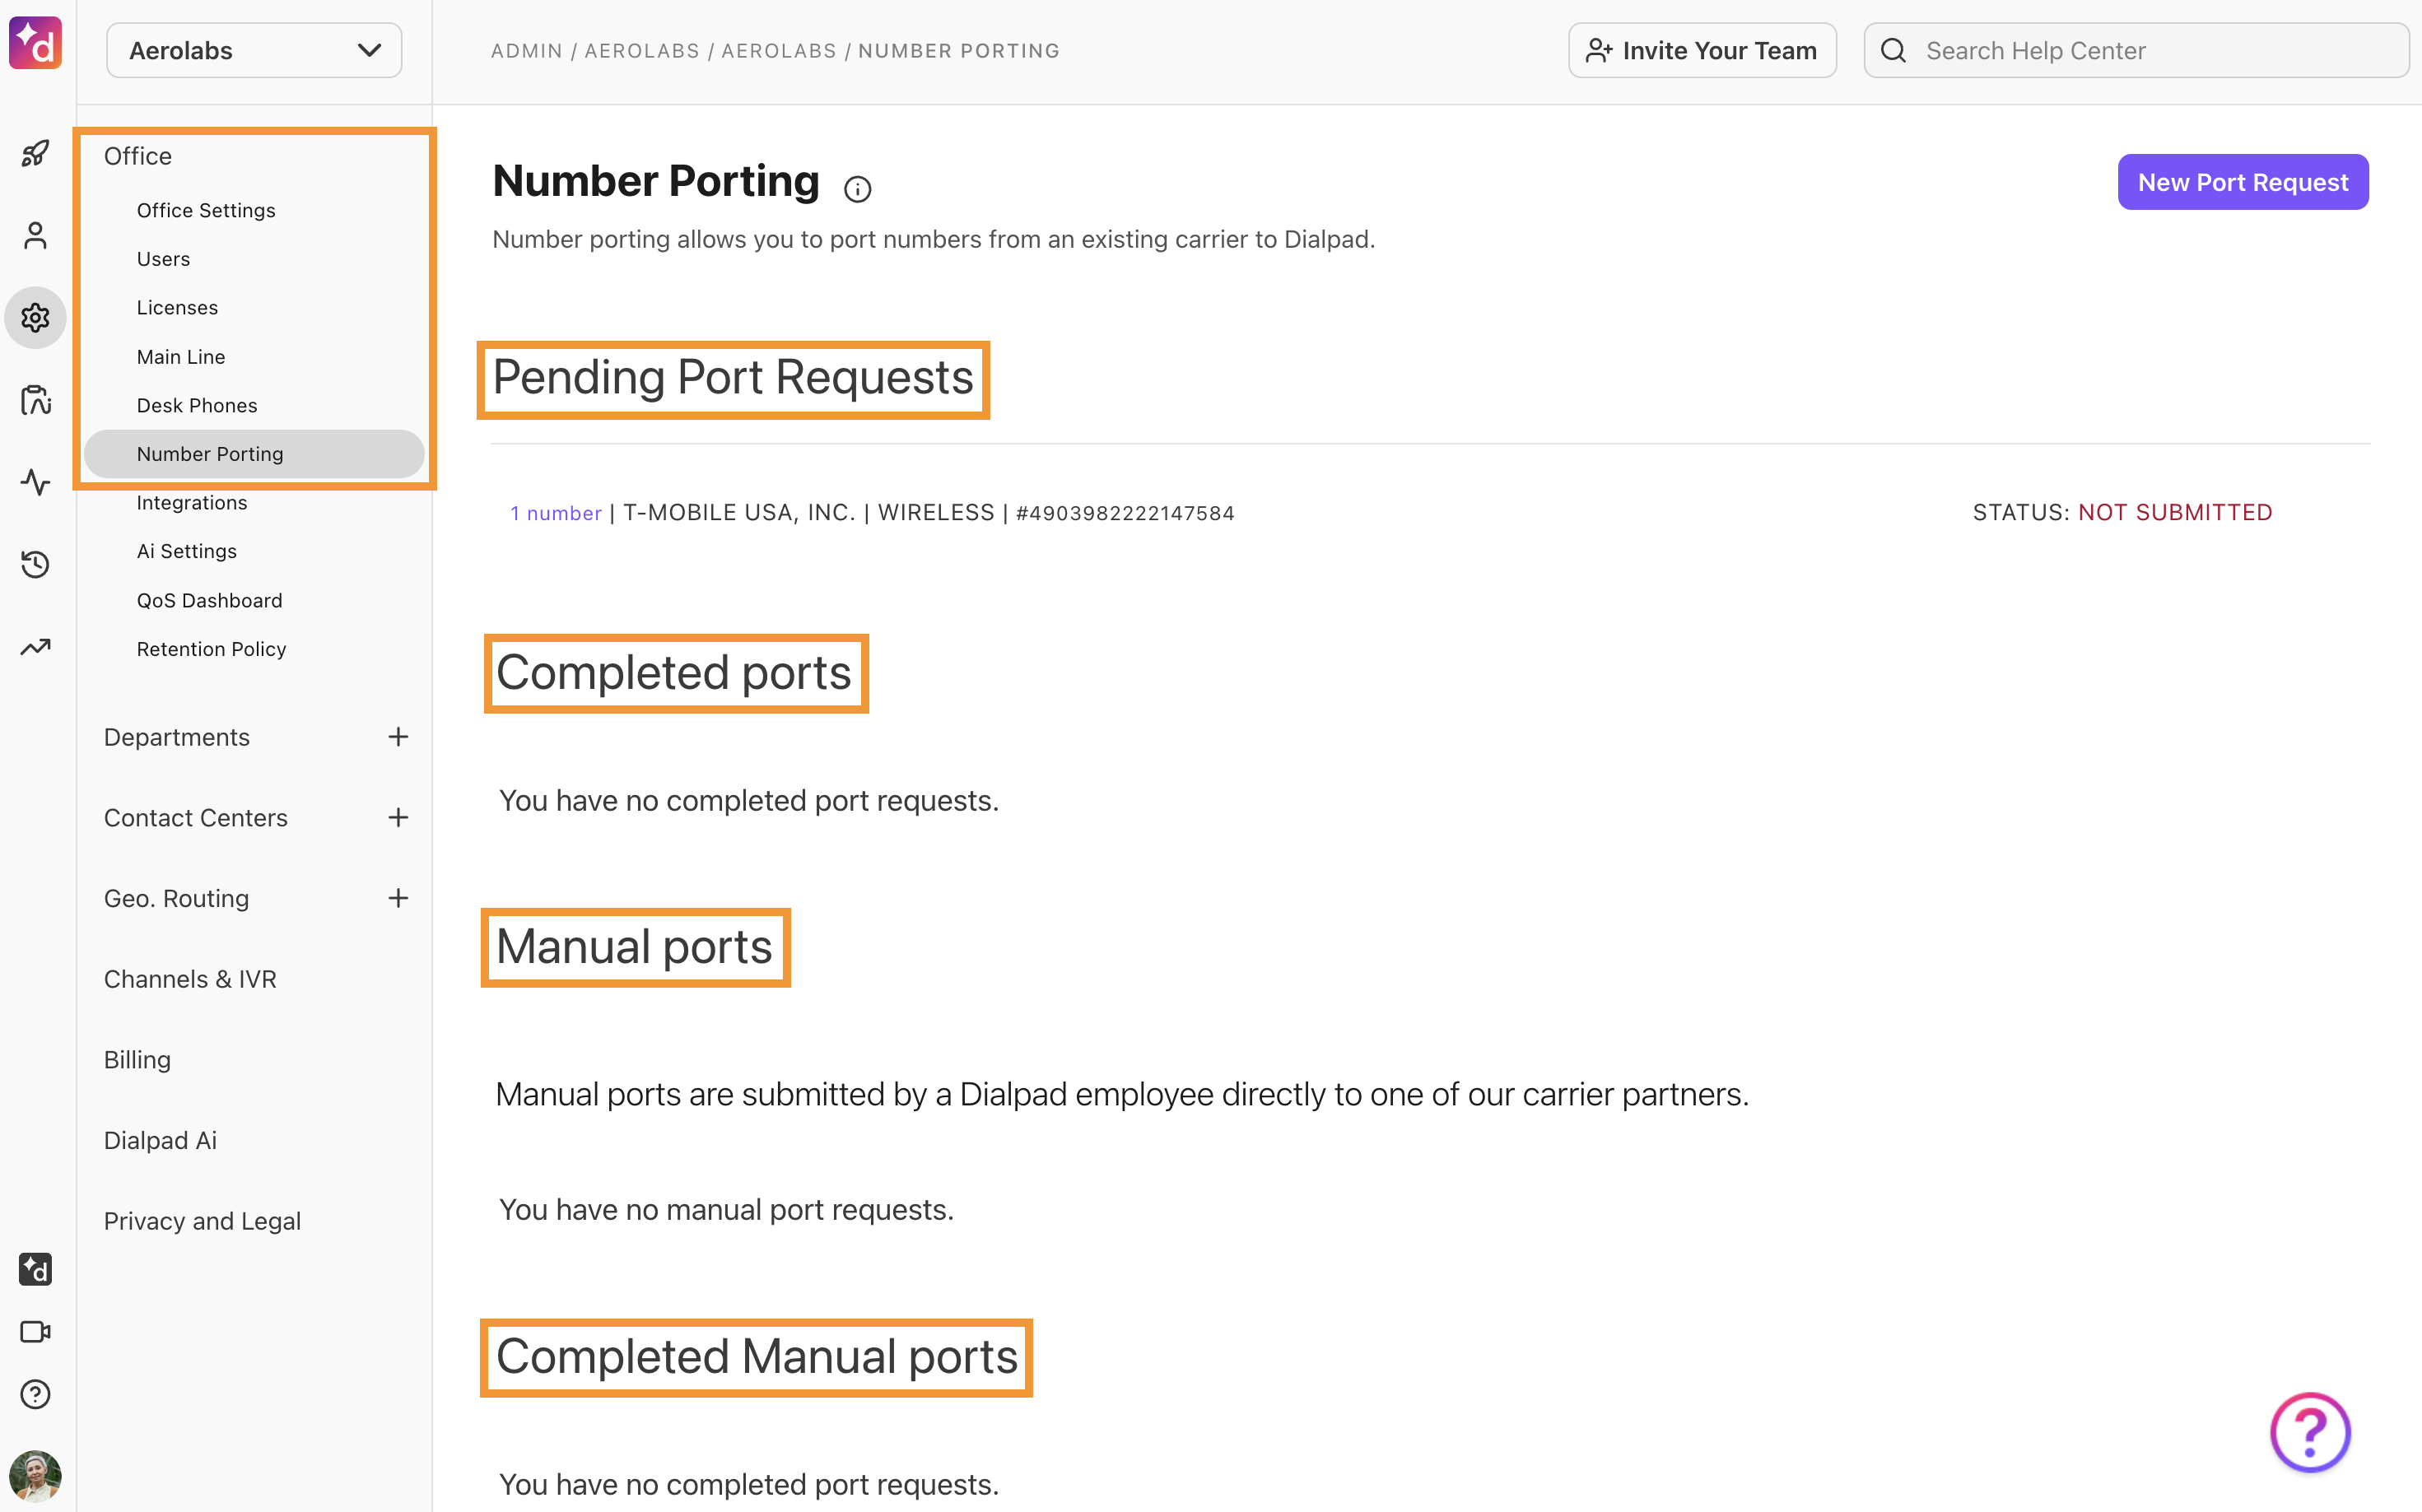
From the Number Porting page, you'll see all pending, rejected, and completed port requests.
8 - Ordering new numbers
Another important part of the deployment process is to make sure that all necessary DIDs are on hand and ready for us. This is important when new numbers are going to be assigned rather than ported.
Dialpad does keep an inventory of numbers ready for use by our customers, but if there are specific area codes or regions you’d like to have a set quantity of numbers in, or you find that we don’t have numbers available for the particular country where you will be deploying, our Support Team can easily arrange for new numbers to be ordered. It could take as little as 24 hours or more than a week to complete, depending on the country and particular carrier in that region.
In order for us to submit a request and obtain new numbers, all that is needed is:
United States, Canada
Specific area code or city
# of numbers needed
International
Service address where numbers can be registered to
City or region in-country
# of numbers needed
Note
Please keep in mind that there is a small monthly fee per number to hold them in your reserve pool when they are not associated with a user/room phone or department line.
9 - Deployment steps (task list)
Deployment can be broken up into phases or performed across your entire organization at once. The option you choose would depend on how many users, locations, and countries you have. Another important factor is whether you will be provisioning physical desk phones, as those do take some time.
No matter how you are deploying Dialpad to your organization, the steps in a standard task list remain the same:
Run Network Testing
Order Hardware & DIDs
Provision User Accounts
Provision User Desk Phones & Room Phones
Configure Main Line Routing
Set Up Departments, Contact Centers (if necessary)
Submit Port Request
Adjust Office Settings
Enable International Dialing & Add Call Credits (if necessary)
Configure Integrations (if necessary)
Set Up PSTN Failover
Conduct User Training
Port Completion & Go Live
Keep in mind that through the entire deployment process, you should be focused on change management, user communication, and user adoption.
Run network testing
Refer to section 1 - Network Testing in this Help Center article for details on how to run and analyze the network test. It is recommended that you run the test from both a wired and a Wi-Fi connection at each location where Dialpad will be deployed.
Ordering hardware & numbers
Refer to section 3 - Supported Desk Phones in this Help Center article for details on official desk phone models supported. Desk phones can be purchased from Dialpad or a third-party seller. You may also leverage hardware that is already in place if it meets the recommended specifications.
Provision user accounts
As a Dialpad Admin, you can control the provisioning and de-provisioning of user accounts from the Dialpad web portal.
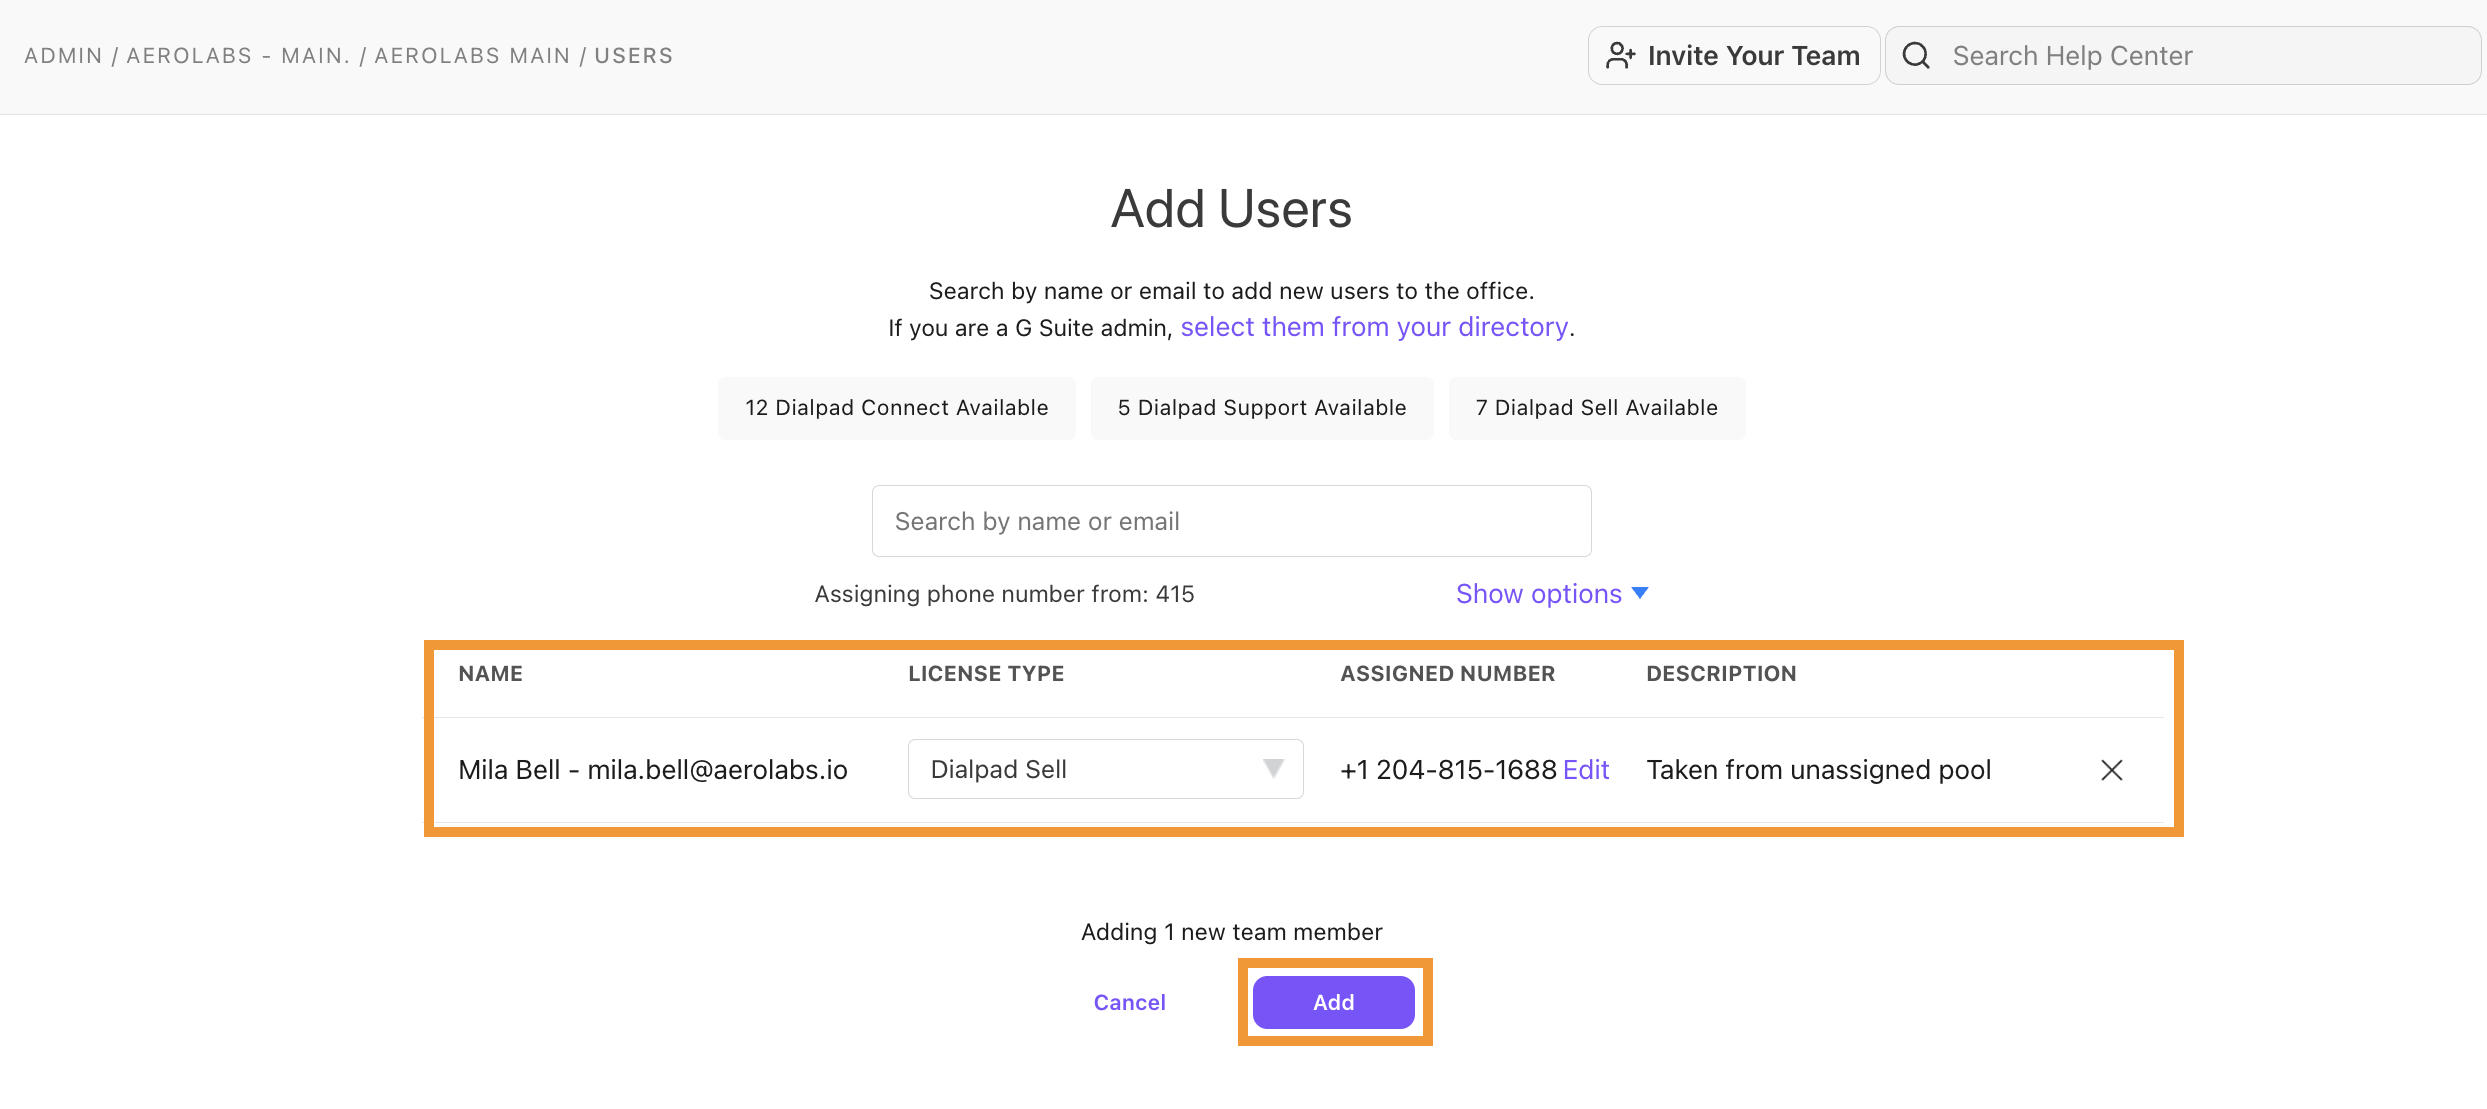
From your Dialpad Admin Portal:
Navigate to Office
Select Users
Select Add Users
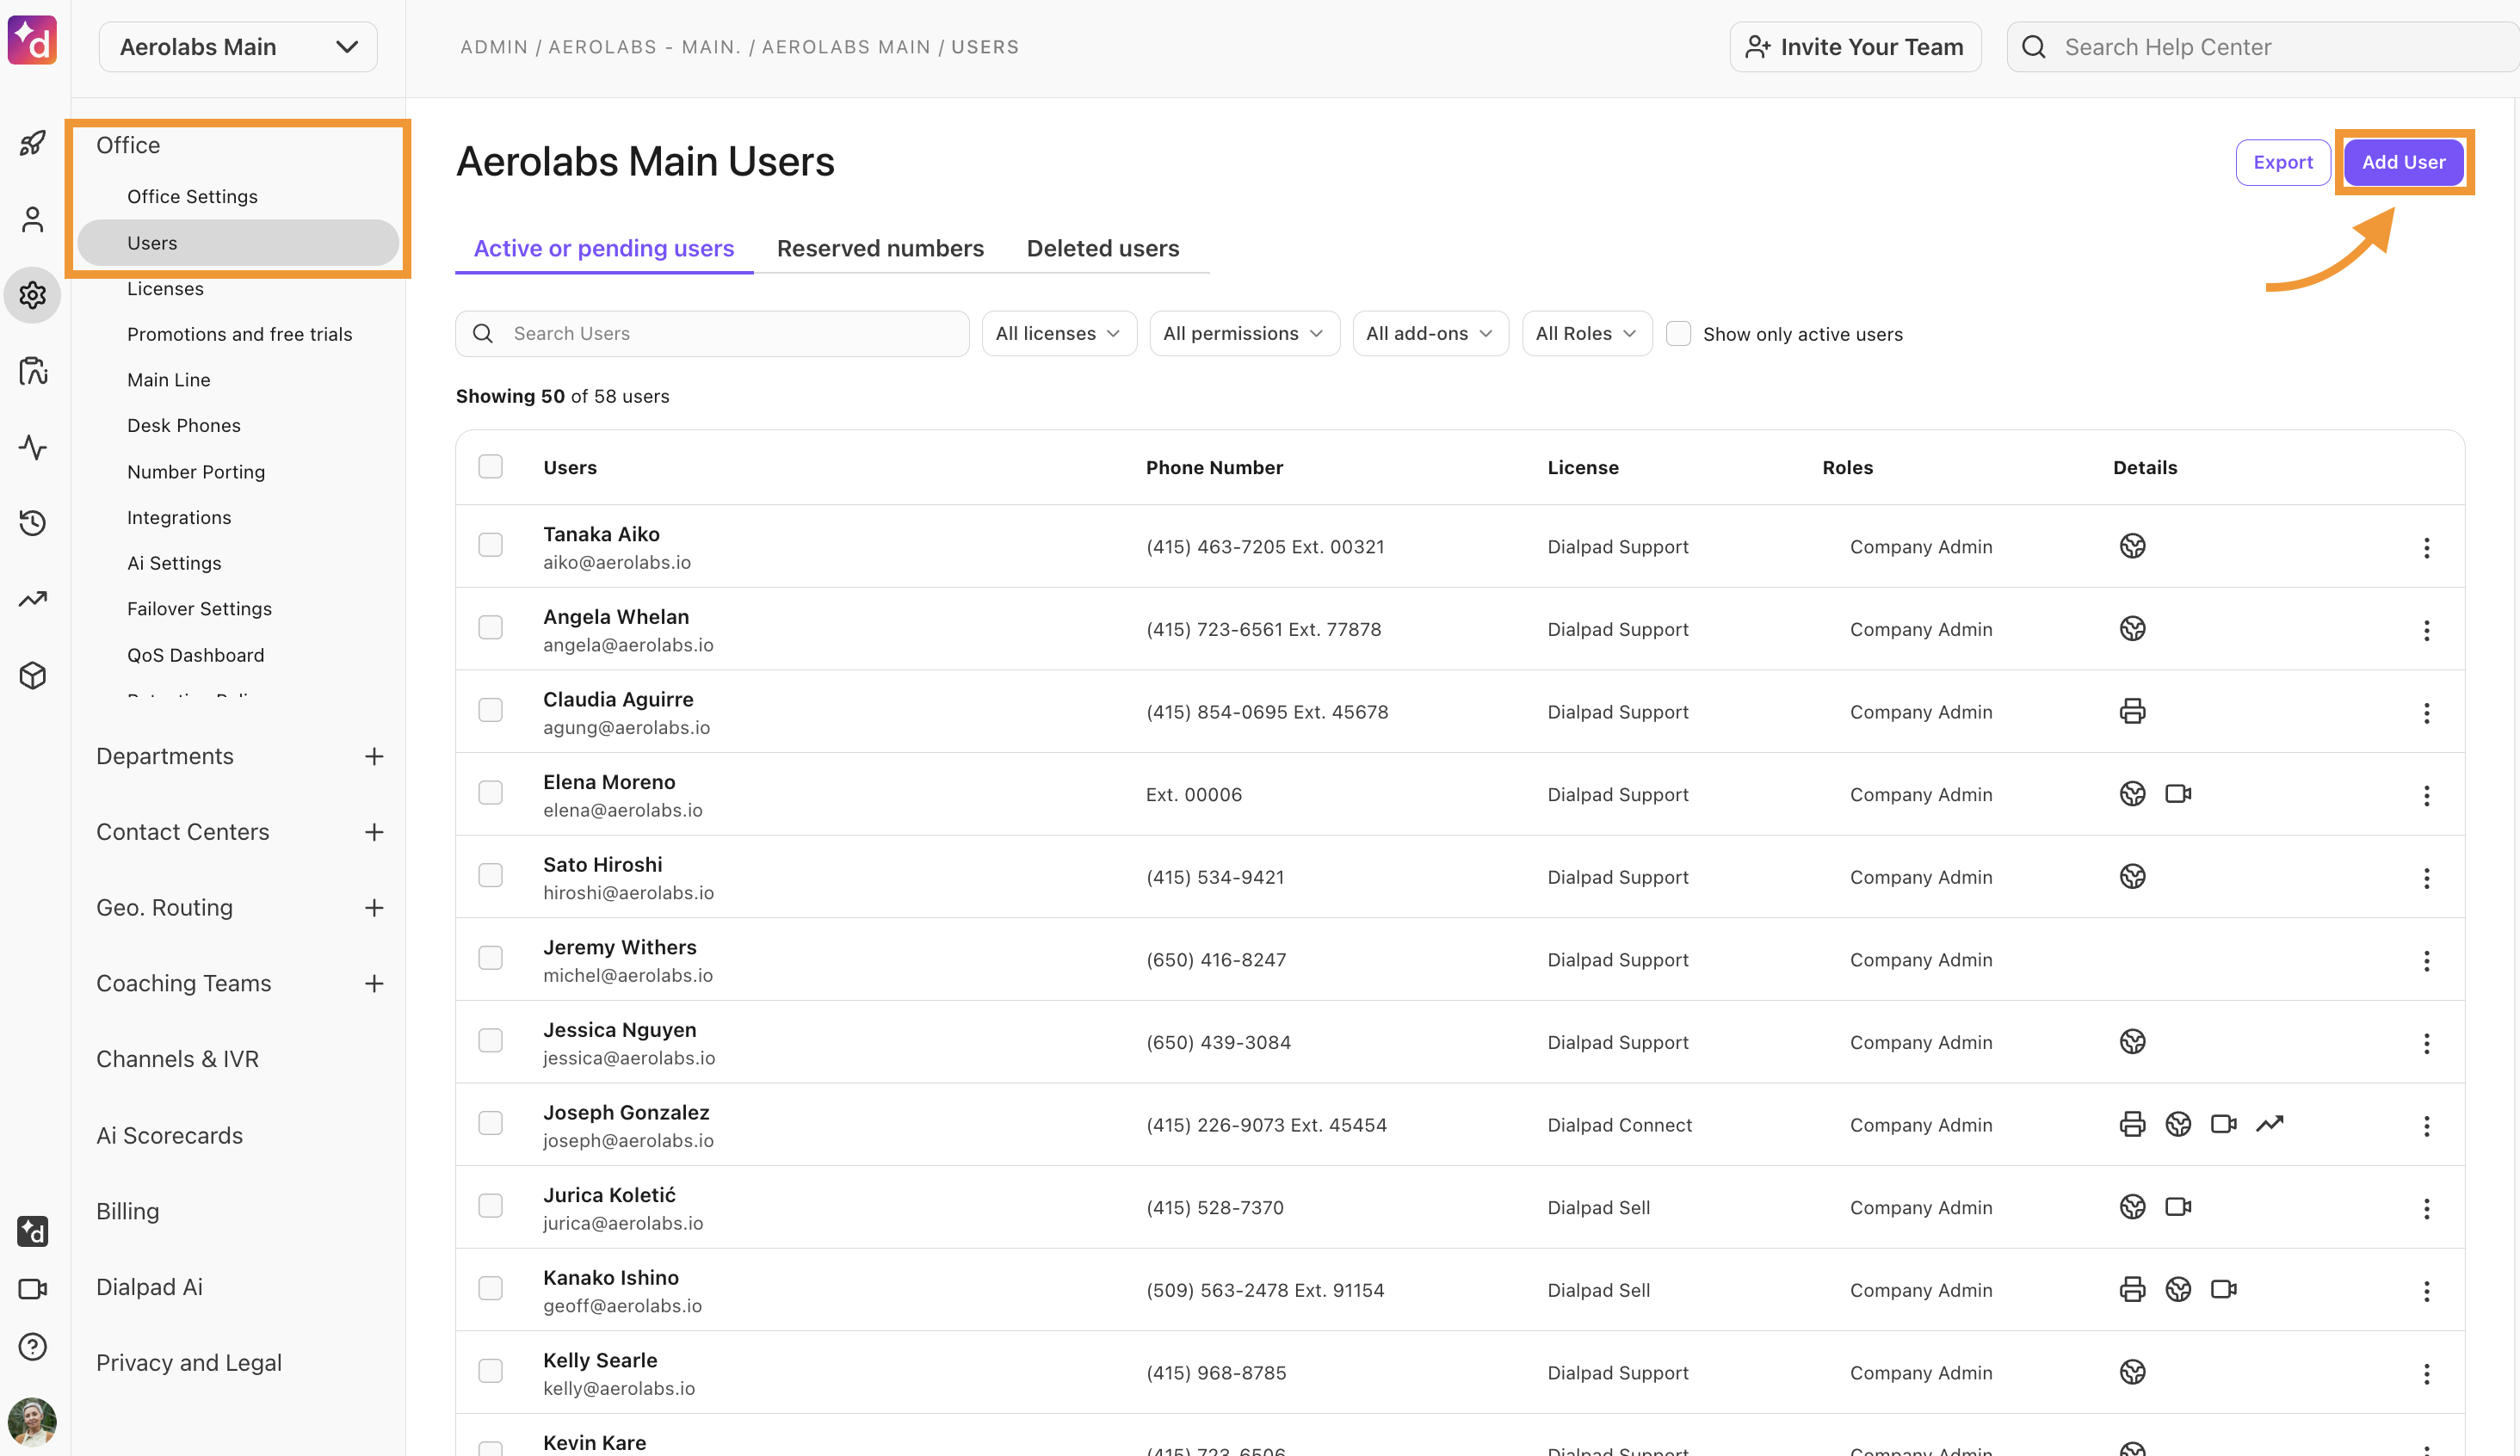
Enter the user's name or phone number in the search bar
Select the license type and number
Select Add
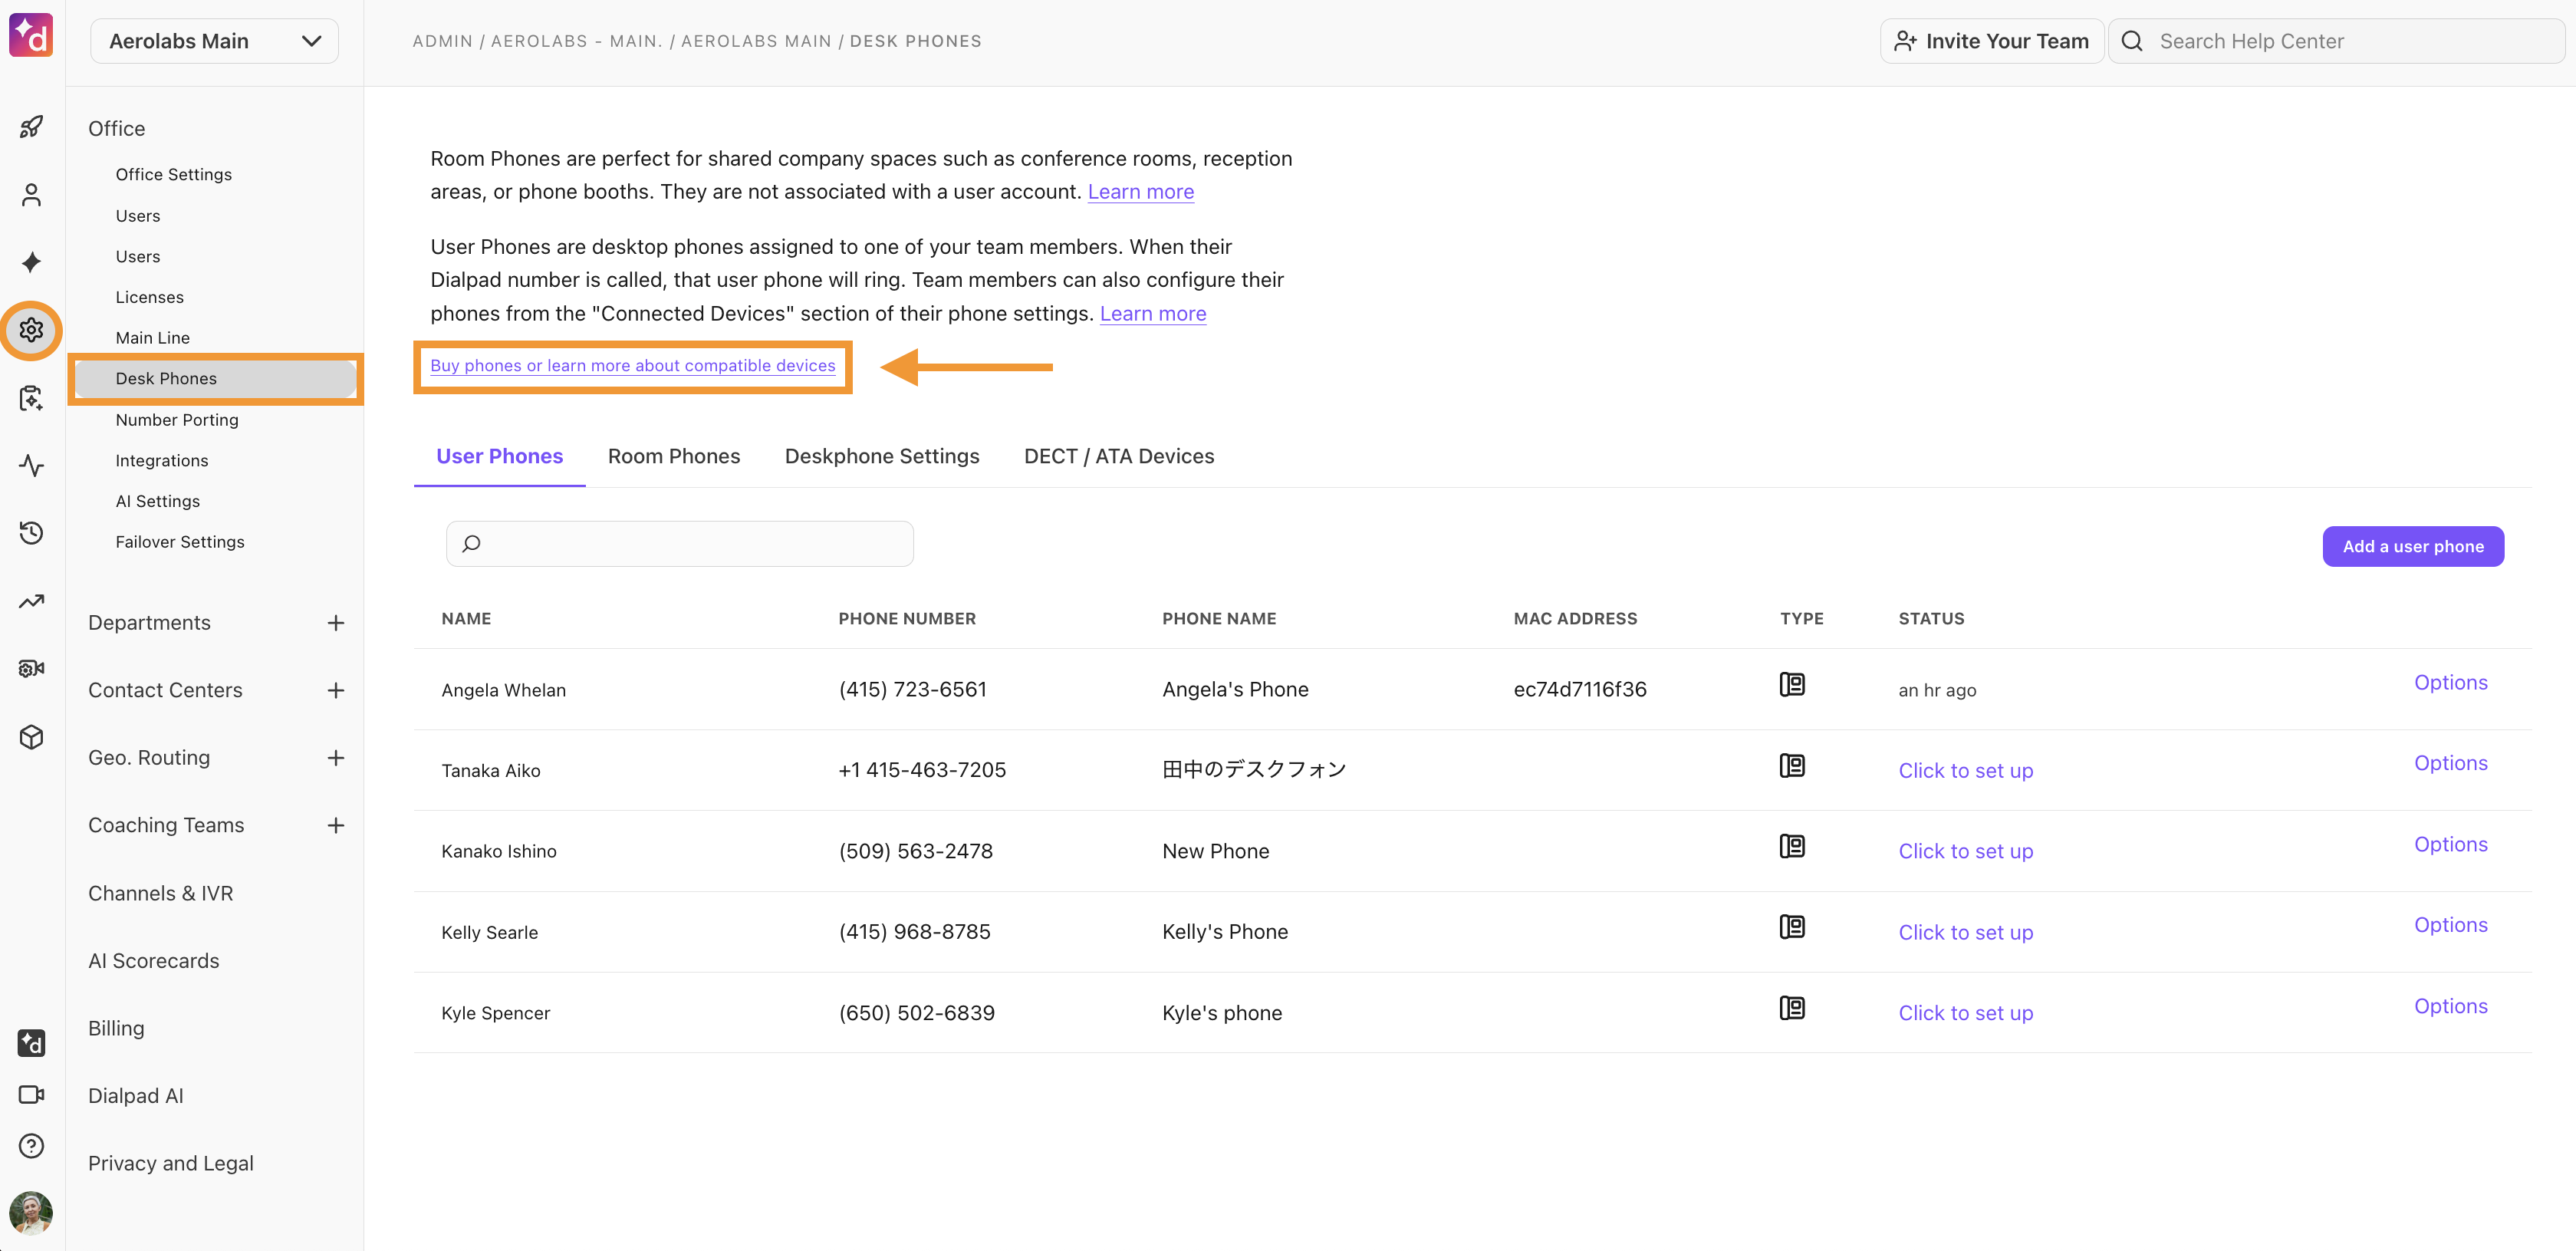
Provision user desk phones & room phones
Where the user desk or room phone comes from will define the process to provision. Yet they're all easily provisioned right from the Dialpad web portal. It’s always important when you provision a new user desk or room phone that you are creating it within the appropriate Office.
To add a desk phone, head to your Dialpad Admin Settings.
Navigate to Office
Select Desk Phones (or Room Phones)
Select Add a user phone (or Add a room phone)
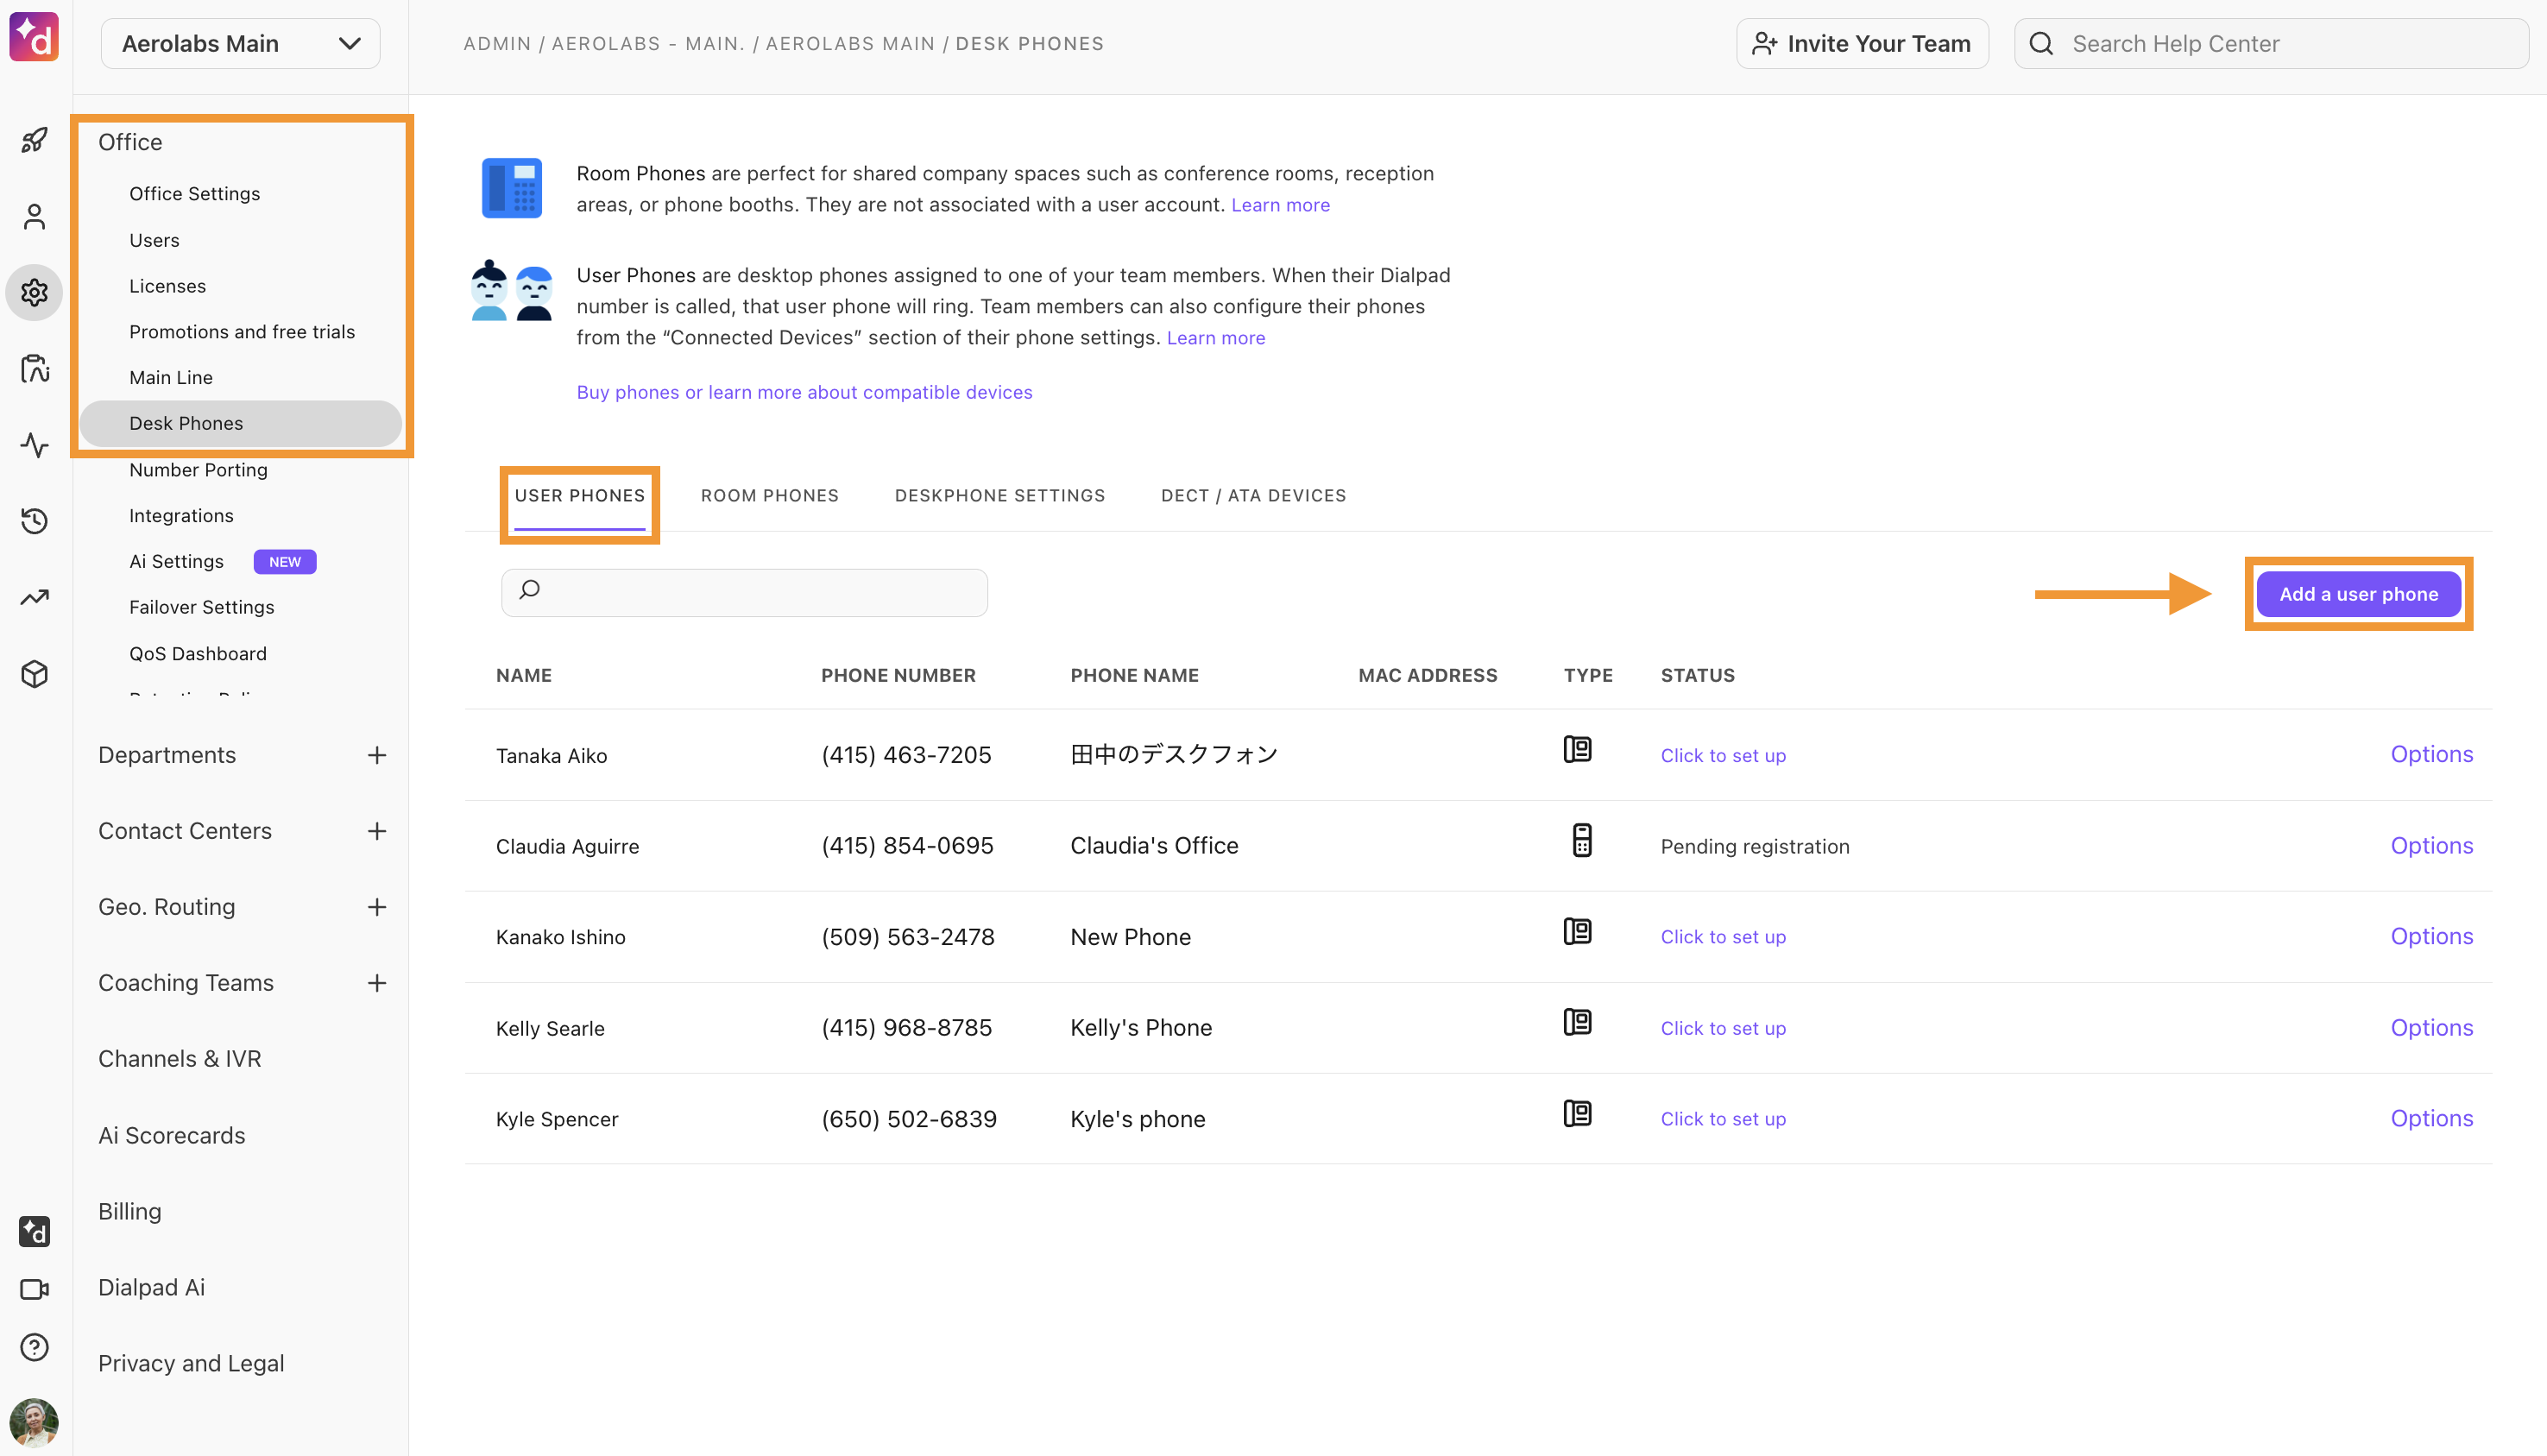
Follow the prompts based on your phone type
Visit this Help Center article that discusses provisioning Obihai or Polycom VVX devices. Some key areas to focus on and pay close attention to:
Make sure you choose the correct option, from Dialpad or from a third-party party
For Polycom VVX devices, you should always factory reset the phone prior to attempting to provision it on Dialpad; also, make sure that the firmware version is running 5.6.1.x or higher
If you have a third-party SIP device to configure, you should always check with our Support Team to see if it is first able to be registered to Dialpad through open SIP protocols. They can also provide documentation regarding what will be required to get it set up properly.
Configure Main Line
Each Office will have its own Main Line. It is most commonly used as your front desk or public-facing number.
To configure your Main Line, head to your Dialpad Admin Portal.
Navigate to Office
Select Main Line
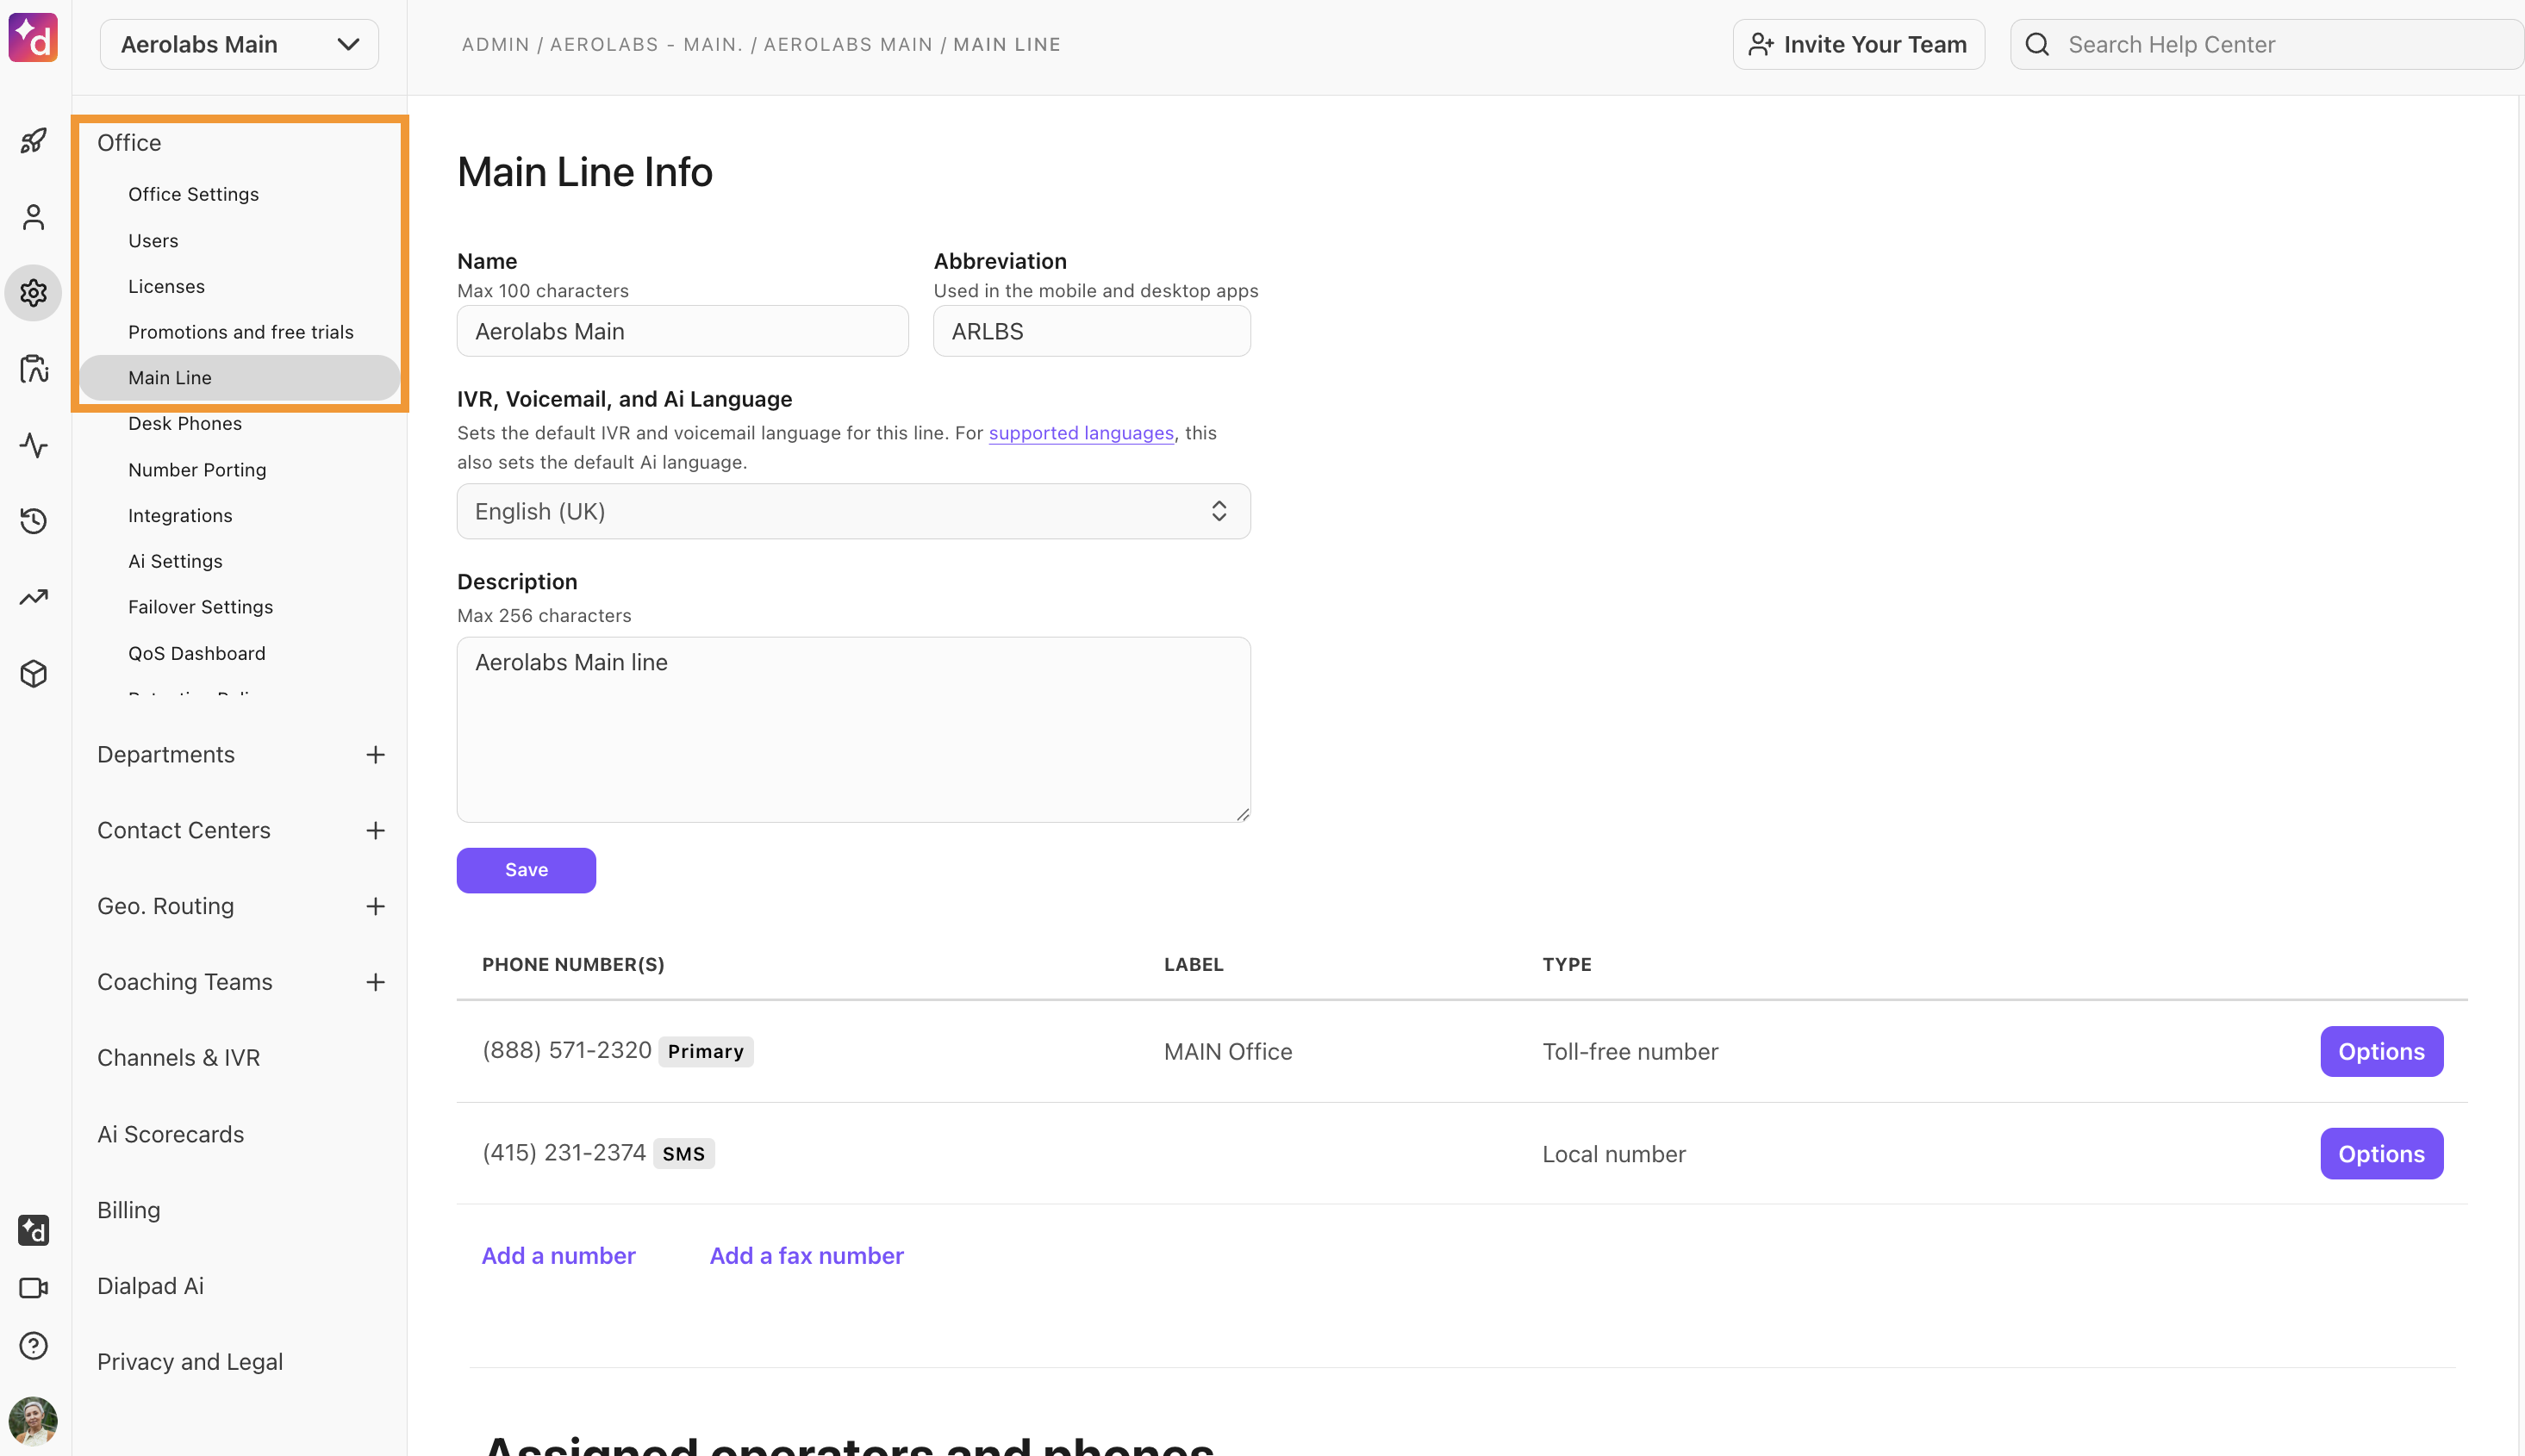
Here, you can customize the following sections:
Assigned Operators & Phones | Users and phones set to receive calls to the Main Line; operators also receive notifications and voicemails. |
Business Hours & Call Routing | Not only does this handle when calls come into the Main Line, it determines how they're handled and routed once received. |
Hold Music | Play a preset or custom sound while a caller is on hold with the Main Line. |
Dialpad Ai, which helps you get the most out of your conversations, can automatically start on the Main Line, and show real-time transcripts during calls that come into the Main Line. | |
Integrations | Connect the Main Line to Salesforce, ServiceNow, Slack, Zoom, Zapier, Front, Zendesk, and HubSpot; some integrations are enabled and/or locked at the Office level, however. |
Advanced Settings | Main Lines can automatically record calls, notify Operators of incoming call notifications when they are on a call already while no others are available, and send email notifications for voicemails and faxes. |
Visit this Help Center article to learn more about setting up your Main Line.
Set up Departments & Contact Centers
When it comes to setting up Departments and Contact Centers, the configuration options are nearly the same.
The limit for Departments that can be set up depends on your Dialpad license and plan; if you see a prompt where you are unable to create any additional Departments, please reach out to our Sales Team.
Contact Centers do require additional user licenses that are Contact Center-specific.
Visit these Help Center articles to learn more about creating a Department or Contact Center.
Submit port request
Refer to section 7 - Number Porting in this Help Center article for details on port requests. Local numbers in the United States and Canada can have port requests submitted through the Dialpad web portal, but international numbers must be handled by our Support Team.
Adjust Office Settings
To adjust your office settings, head to your Dialpad Admin Portal.
Navigate to Office
Select Office Settings
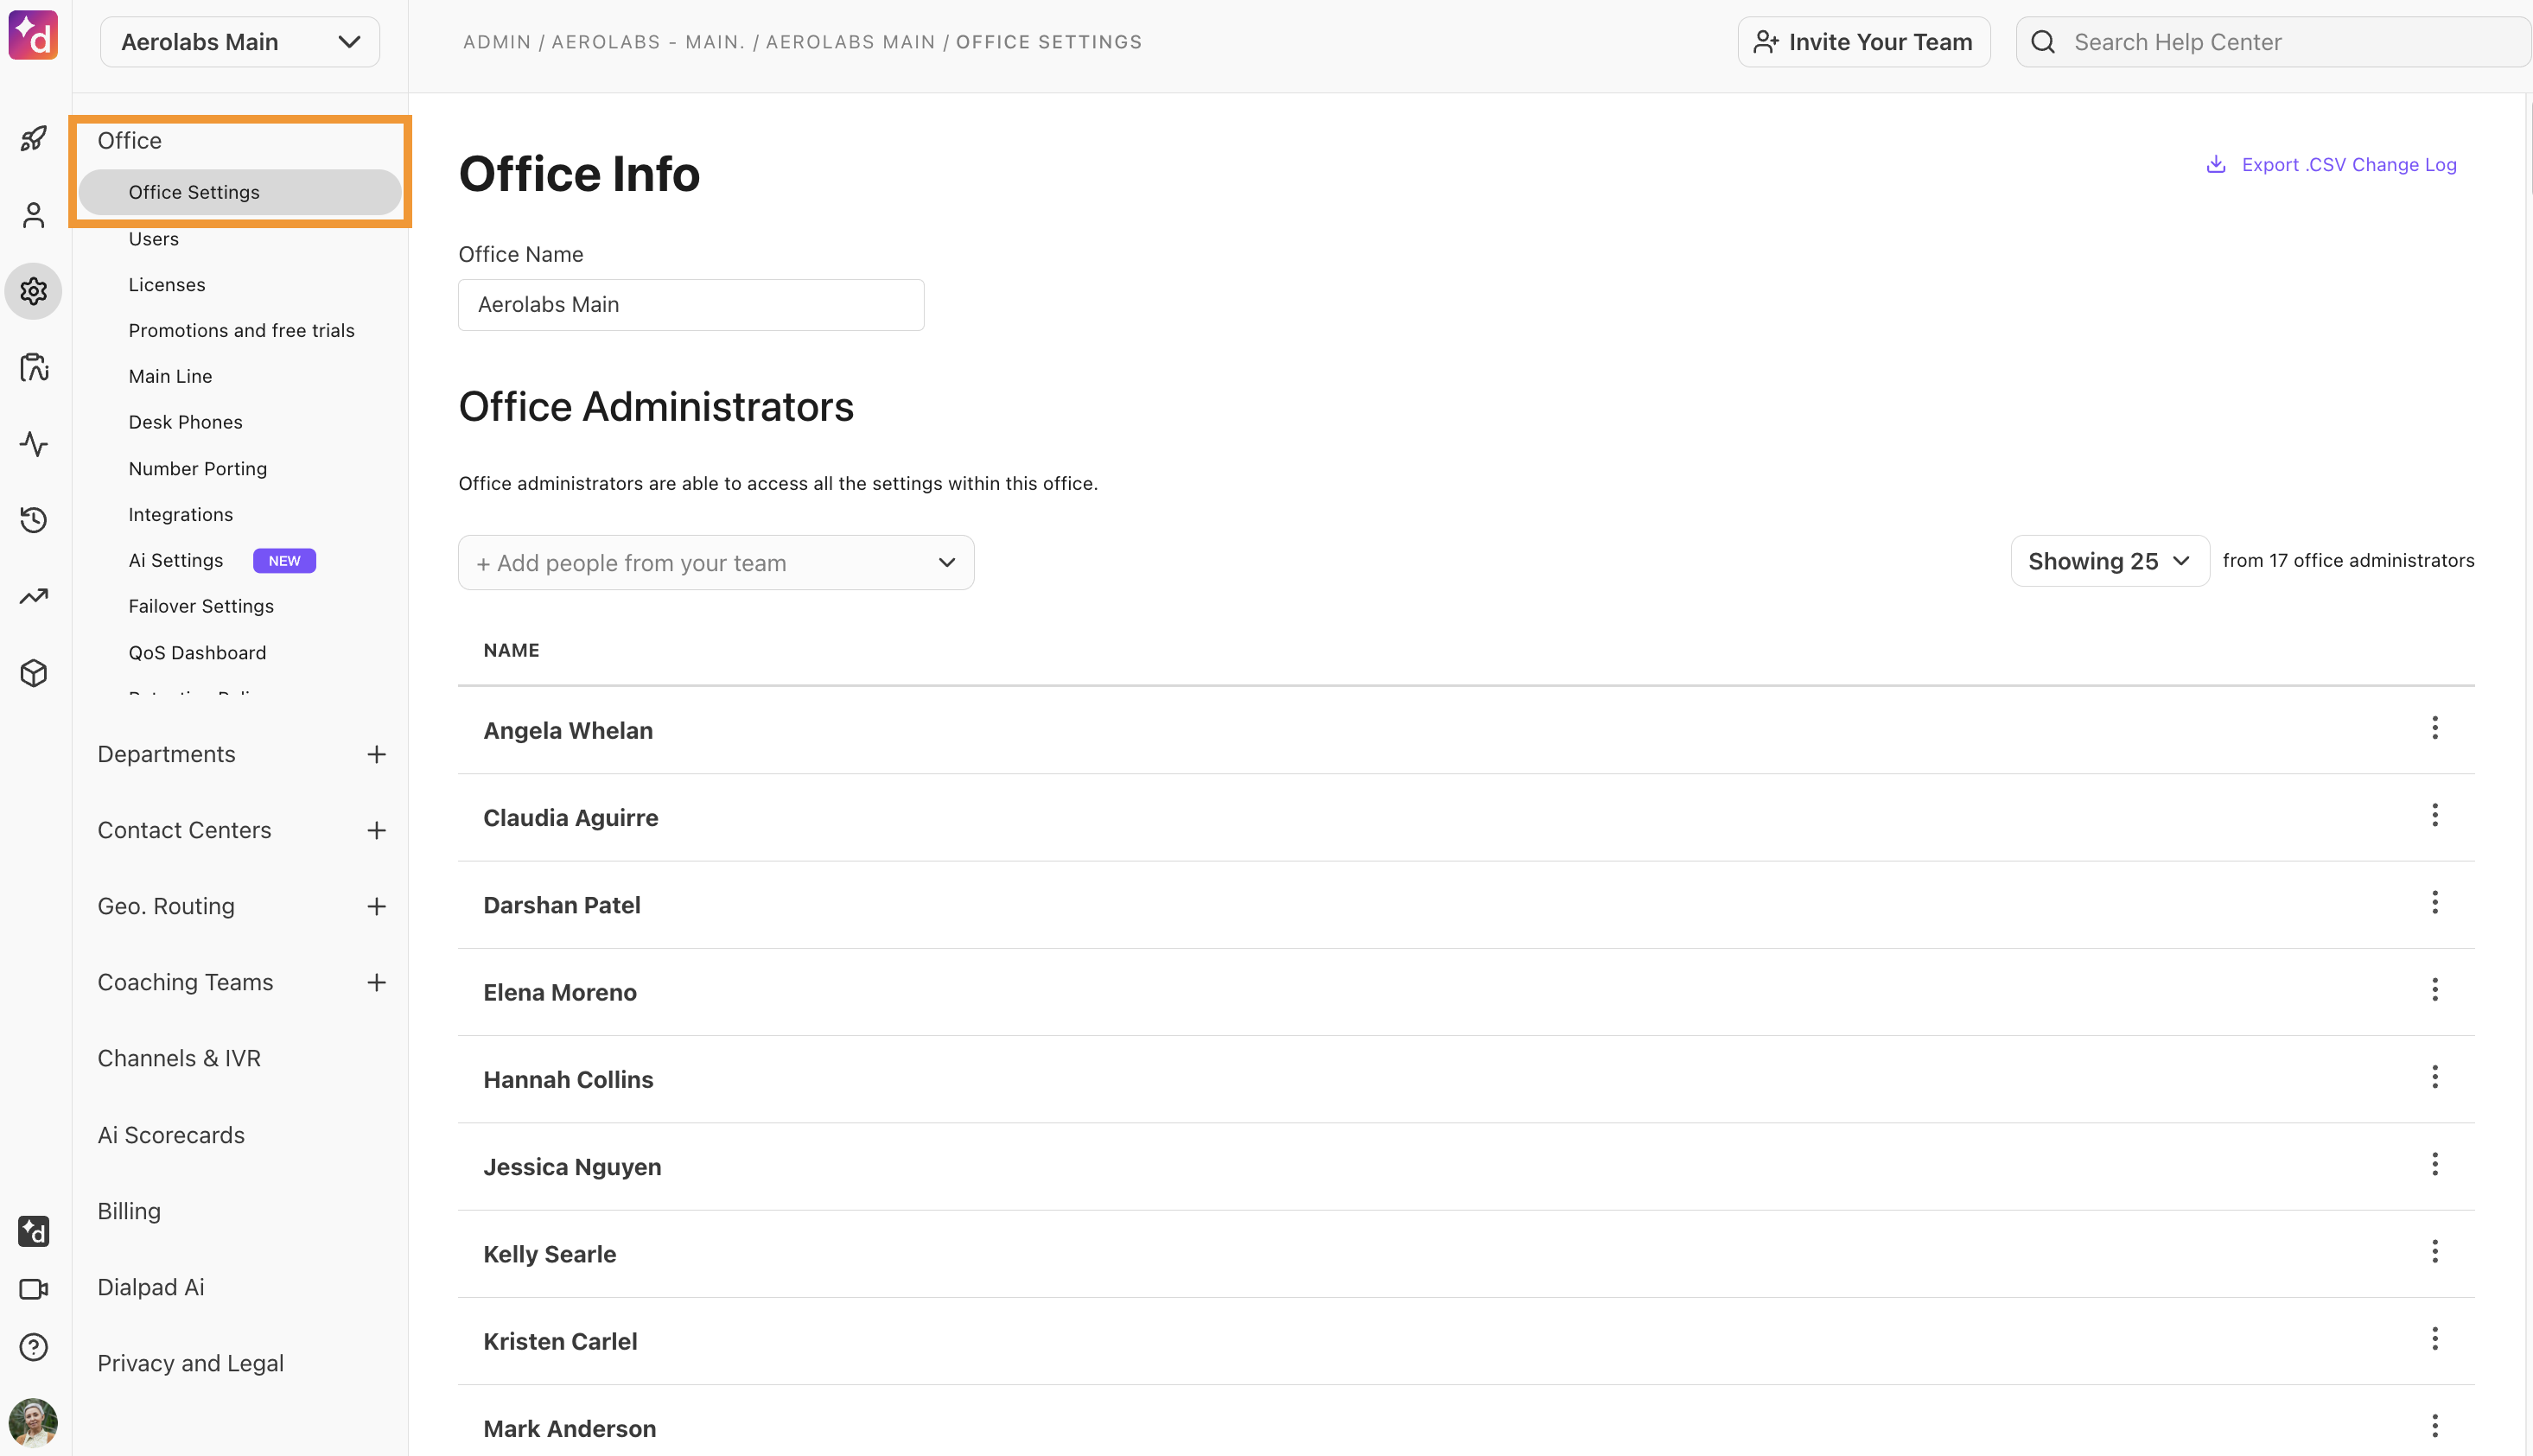
Here, you can manage the following:
Office Info | Office name. |
Office Administrators | People who are able to access all the settings within this Office. |
Office-Wide Settings | Settings applied to every person in this Office.
|
Office Holidays | Manage holidays for the entire Office. |
Executive Assistant | When enabled, any incoming calls to the designated executive will also ring the assistant. |
Failovers | In the rare event of a Dialpad service outage, calls to Departments and Contact Centers in this Office will be forwarded to the numbers added. |
Registered Location for Emergency Calls | Default address for all team members created under this Office. |
Call Disposition Lists | Ask Agents to select a call disposition and log notes at the end of every call. |
Contact Center Off Duty Statuses | Allow Agents to choose from a list of Off Duty statuses. |
Contact Center Surveys | Get customer satisfaction (CSAT) insights by surveying your customers after their calls end. |
Local Presence | Automatically select a number with a matching or neighboring area code to call from, based on the area code you are calling. |
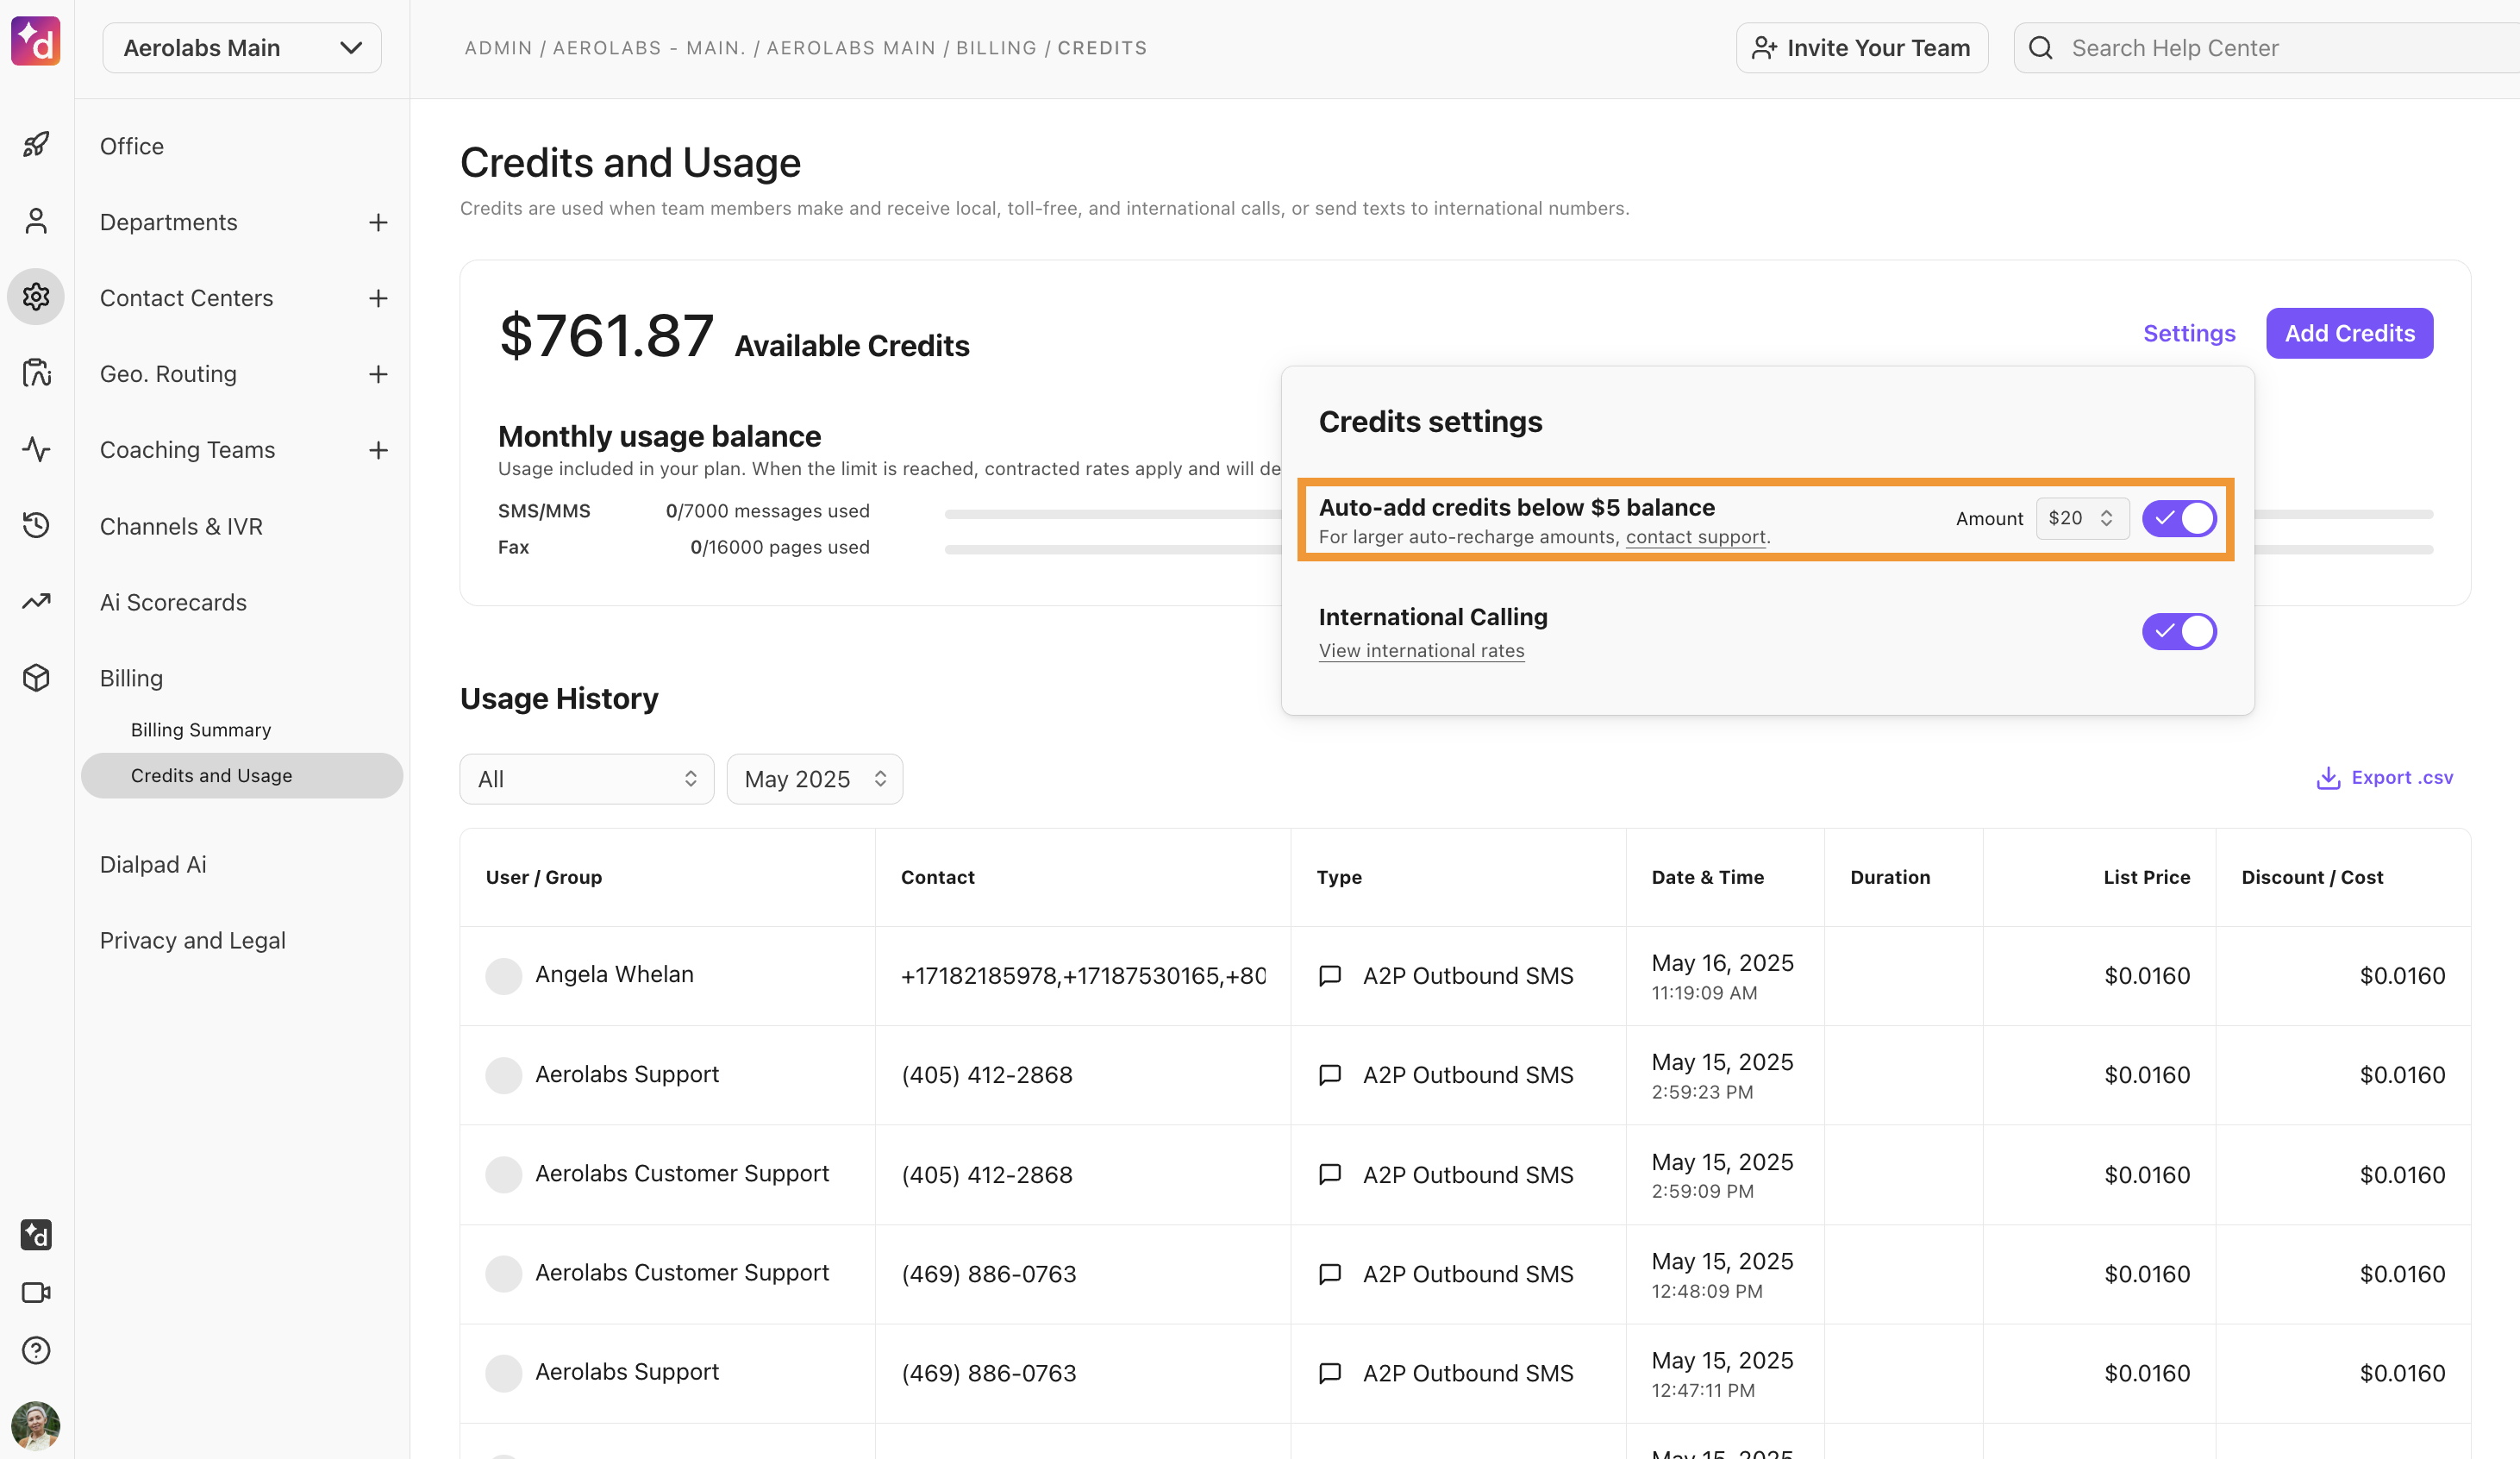
Enable international dialing & add credits
Enjoy free domestic dialing within your local country, to the United States and Canada, and to any other Dialpad-issued number.
International dialing, meanwhile, is subject to additional charges.
To enable international calling, head to your Dialpad Admin Portal.
Select Billing
Select Credits and Usage
Navigate to International Calling
Slide the toggle on
If you don't see the option to enable international service, please reach out to our Support Team and they will enable the functionality for your Office.

To add credits, select Add Credits.
By default, all users and room phones within that Office will see international dialing enabled. You can then manually enable or disable the capability on an as-needed basis:
For users, navigate to Admin Settings > Office > Users > Options > Privileges > Enable/Disable International Service
For room phones, navigate to Admin Settings > Office > Desk Phones > Room Phones > Options > Enable/Disable International Dialing
Visit this Help Center article to learn more about international dialing, and be sure to check out our list of frequently asked questions on the topic.
Set up PSTN failover options
By adding a failover number, callers can still access your business' lines or team members in the rare case of a Dialpad outage.
You can add a failover number for all Main Lines, Departments, and Contact Centers through Advanced Settings, and for an Office through Office Settings.
Visit this Help Center article to learn more about adding a failover number.
Conduct user training
Ensuring that your users are fully trained on Dialpad will lead to a smooth and seamless rollout. Different users might need different types of training, though:
Between user guides, recordings, and live training, it would be up to your organization to decide what type of approach works best
There could be also different pieces of training delivered to different types of users
Please use the Help Center to explore topics in-depth.
Port completion & go live
Once port requests are confirmed as complete, feel free to go live. But, prior to that date, you should:
Ensure that all users, room phones, and Departments are set up
Communicate to your team the go-live and any particular instructions you’d like them to have
Test your call routing
Put recorded voicemails and greeting in place
If you selected the remove temporary number feature, you would not need to manually remove any old temporary DIDs that were in place. You may instead just remove the excess DIDs.
You should also do some post-go-live testing, especially for your Main Lines and critical Departments to ensure that there are no issues.
10 - Dialpad Support SOP
When it comes to post-go-live support, the first place you should look to is our Help Center. It is intended for both Admins and end-users.
Submitting a Ticket with Support
From the Help Center, you can click on the Contact Us button in the top-right corner and use the displayed webform to submit a ticket, or you can find what live channels are available to you based on your organization's Dialpad license and plan.
Providing the right information to the Support team
In order to assist effectively and ensure that your issue is resolved as quickly as possible, it is best that you include all necessary information in your first message.
For any call-related issue, try to provide:
First name, last name, and phone number belonging to the user who experienced the issue
Scenario-related details: Caller's number, inbound or outbound, and date/time of the call occurred; it will allow our Telephony Team examples to investigate as long as it the call occurred within the last 48 hours
For any, product-related issue, try to provide:
Summary of the issue
Affected user's environment
Application Log
Right-click anywhere in the Dialpad app and select Send Logs. Include the date/time when you did so in the support ticket, letting our Support Representative locate it immediately.
In both cases, as much detail as possible is useful to us.