Call recordings are valuable for training agents and maintaining compliance in contact centers of any size. They capture call audio and can include screen recordings, offering insights into agents' workflows.
Call recording settings can be customized to ensure you’re in compliance with local regulations.
Who can use this
Contact Center recording is available to users on a Dialpad Support plan.
Contact Center Admins and Supervisors can access call recordings from the Call History.
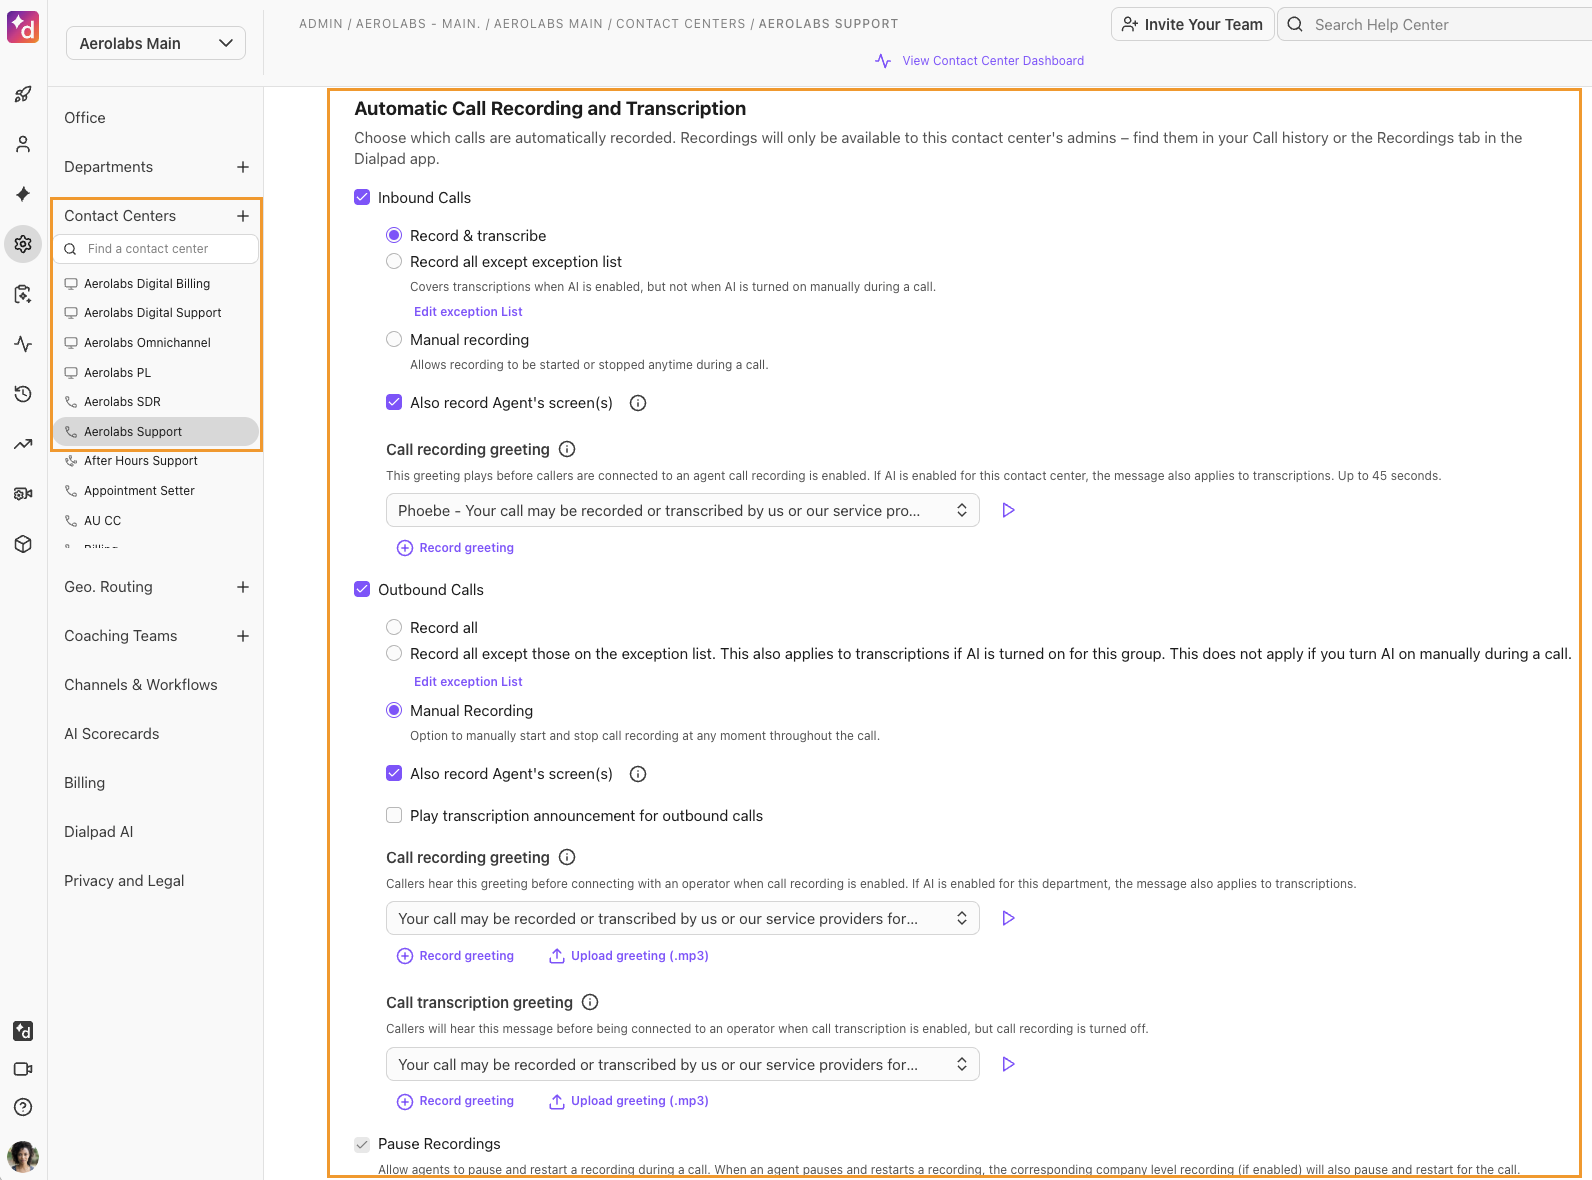
Automatic recording & transcription
Contact Center Admins can enable automatic recording and transcription for their Contact Centers.
To enable these features, go to your Dialpad Admin Settings.
Select Contact Centers and select the desired Contact Center
Go to Advanced Settings > Automatic Call Recording and Transcription
Select Inbound Calls and/or Outbound Calls
Select Record all
Select Record all except those on the exception list
Tip
If you'd like to allow agents to stop and restart call recordings during a call, select Pause Recordings. Company-level recordings will also stop and restart for the call when the agent does this.
Once call recording is turned on, you need to determine what call recording data you’d like to all your agents to access. Choose to give your agents access to their own call data, all contact center data, or none at all.
Head to your Contact Center’s Advanced Settings to set agent permissions.
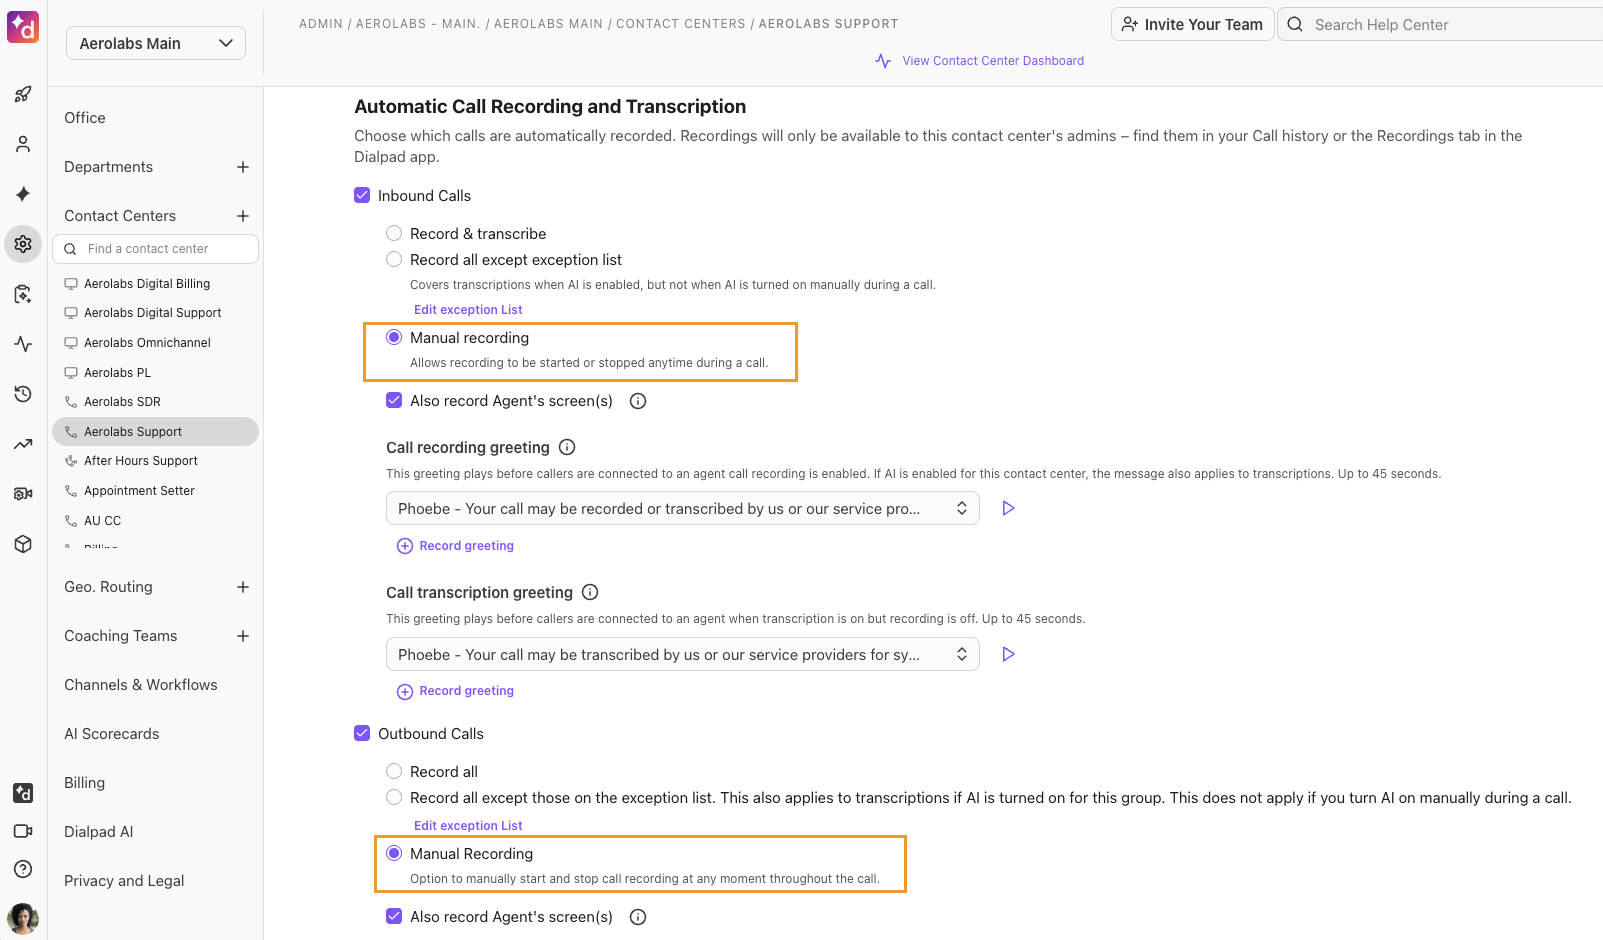
Manual recording
Choose manual recording to allow agents to start or stop recording at any point during the call.
To enable manual recording, go to your Dialpad Admin Settings.
Select Contact Centers and select the desired Contact Center
Go to Advanced Settings > Automatic Call Recording and Transcription
Select Inbound Calls and/or Outbound Calls
Select Manual Recording
Notes
Manual recording won’t work for numbers on the exceptions list.
Agent screen recording begins and ends with manual recording.
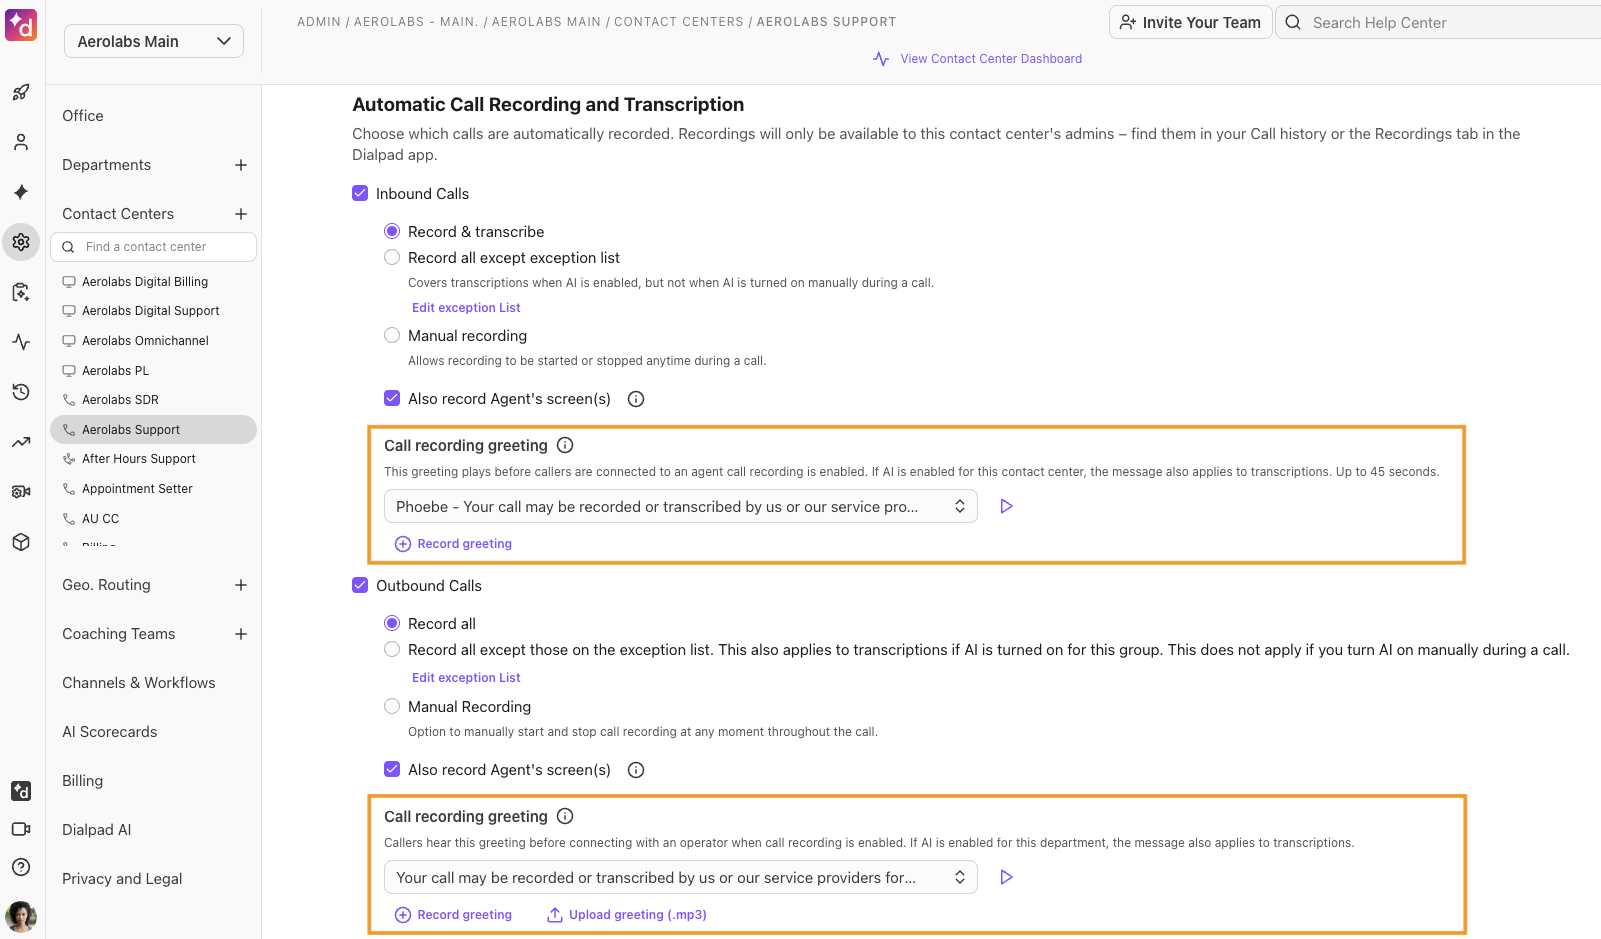
Call recording greeting
Use a call recording greeting to inform callers that the call may or will be recorded.
To create or edit a Contact Center Call recording greeting, go to your Dialpad Admin Settings.
Select Contact Centers and select the desired Contact Center
Go to Advanced Settings > Automatic Call Recording and Transcription > Call Recording Greeting
Select one of Dialpad's default greetings, or upload your own custom greeting using our TTS tool
Note
Different greetings can be used for inbound and outbound calls.
If you’re uploading your own call recording greeting, it must state the following:
Call recording/transcription is in use: Clearly tells the caller that their call may be recorded or transcribed.
A third party is involved: Makes it clear that a 3rd party may perform the recording or transcription (e.g., a partner or service provider).
Expand the box below to see examples of acceptable and unacceptable call recording greetings.
Examples
An exact script match is not required; let’s look at some examples of what types of greetings will be accepted.
✅ Acceptable greetings
“This call may be recorded or transcribed by us and our service providers for quality assurance.”
“Thank you for calling AeroLabs. Your call is recorded and transcribed by our partners to ensure a quality experience.”
“Welcome to AeroLabs. Calls are recorded by our service providers to…”
❌ Unacceptable greetings
“This call may be recorded for quality purposes.”
“We might record this call for training purposes.”
(Reason: No mention of transcription or service providers.)
For more information, read this Help Center article.
Call recording legalities
U.S. recording laws can be complex, since there are regulations at both the federal and state levels. Two key principles govern the recording of phone conversations, applying to both personal and business calls.
One-party consent | An individual can record conversations they are a part of without the other person’s consent. Currently, 38 states and DC currently require one-party consent. |
Two-party consent | All parties must be informed that the call is being recorded, and the party recording the conversation must obtain prior consent from the other party. Currently, 11 states require two-party consent. |
Note
If a state has no law in place regarding call recording consent, it is considered to have a one-party consent requirement under federal law.
Using the phrase (or a variation of), “This call may be monitored or recorded for quality and training purposes,” lets your customer know that the call will be recorded, and if they proceed, they’re consenting to be recorded.
Ensure compliance with the laws of different states by setting up exceptions for any locations that require them.
You can also choose to record only the agent’s side of the conversation, which can still help with quality control and dispute resolution.
Depending on the purpose of your Contact Center's calls, there are other regulatory requirements you may need to be aware of.
PCI compliance | Payment card industry compliance is established by credit card providers and governs what can and cannot be discussed or recorded. PCI’s data security standards (DSS) include: “12 key requirements, 78 base requirements, and 400 test procedures to ensure that organizations are PCI-compliant.” |
PHI compliance | If your organization is in any way connected to healthcare, then this is something you need to consider. PHI (protected health information) is governed by the Health Insurance Portability and Accountability Act of 1996 (HIPAA). If you do deal with clients’ health information or work in healthcare, it’s worth considering using a platform that’s compliant with HIPAA requirements. |
Exception list
Use an Exception List to ensure that calls are recorded except for certain countries and area codes. Numbers noted in your Exception List apply to both inbound and outbound calls, as well as Dialpad Ai transcriptions if you have Auto Start Dialpad Ai turned on for the contact center.
To create or edit your Exception List, go to your Dialpad Admin Settings.
Select Contact Centers and select the desired Contact Center
Go to Advanced Settings > Automatic Call Recording and Transcription section
Select Record all except those on the exception list
Select Edit exception list
.png)
In the Exception List panel, enter a comma-separated list, in E.164 international format
For example: +1415, +1212, +44 (for San Francisco, New York and the UK)
Select Save Changes
You can also choose to avoid recording the entirety of calls that match the Exception List, or to only record the agent side of these calls.
Tip
Be sure to reference our list of all-party consent state area codes and add those to your Exception List if you plan to place calls to these regions.