Conversation History provides insights into every minute of your calls and digital interactions.
From the conversation history menus, you can:
View records of all Dialpad calls and digital interactions.
Filter for specific offices or users, as well as dates and times.
View conversations per channel type.
Review call details such as date/time, direction, and the initial point of entry and access call recordings and voicemails (personal calls only).
Access interaction transcripts.
Track a user's experience through an IVR menu.
Track AI Playbooks and Custom Moments usage.
… and more!
Who can use this
Conversation History is available to all Dialpad Connect, Dialpad Sell, and Dialpad Support users. If you'd like to schedule your call recording report, you'll need to be on a Pro or Enterprise plan.
Conversation History permissions
What you'll find in Conversation History depends on your Dialpad permissions.
Company Admins can see all conversations within their company.
They can also access AI Summaries and automatic recordings from shared lines (Departments, Contact Centers, and Coaching Teams).
Office Admins can see all conversations within their Main Line, Departments, Contact Centers, and Coaching Teams.
They can also access AI Summaries and automatic recordings from shared lines.
Department and Contact Center Admins can see all conversations within their Departments and Contact Centers.
They can also access AI Summaries and automatic recordings from these shared lines.
Coaching Team coaches can see all conversations for their trainees, as well as their AI Summaries and automatic recordings.
Users can see all their own calls and access personal call recordings — they can also access AI call summaries for these calls.
Note
Office Admins cannot access call recordings, or AI Summaries, for calls on personal lines, or for calls that were manually recorded by the user.
Types of Conversation History
Dialpad makes it easy to track your interactions with detailed Conversation History for different types of communication:
Voice Conversation History: A detailed log of all voice calls conducted through the Dialpad app.
Digital Session History: A comprehensive record of digital interactions within the Dialpad app, including:
IVR Workflows: Interactions with automated menu systems.
Digital Engagements: Chat, SMS, or other text-based communications.
Note
You'll only see digital and workflow details if your company uses IVR Workflows or has a Digital Contact Center.
Access Conversation History
To access your Conversation History, head to your Dialpad Admin Portal and select Conversation History.
Here, you’ll see a list of your Contact Center’s interactions across all channels.
.png)
Select any interaction to access the details, call/interaction summary, or select the arrow beside the interaction to expand it and see each part of the conversation.
Tip
When looking at a conversation, you can hide or view internal messages. To see internal messages, select Show internal messages.
.png)
AI insights
Conversation History also provides an overview of AI insights, such as the conversation's transcript and grade (as long as Dialpad AI was turned on for the call). To access the call or interaction's AI Summary, select the AI icon beside the interaction..png)
Set default Conversation History view
Save time by setting a default view for your Conversation History page. Next time you visit, your preferred view will load automatically, so you won’t need to reapply filters.
The following options can be set as your default view:
Conversation history
My conversations
My coaching teams
My searches
To set a default view, select the pin icon..png)
After setting the default view, the pin icon will change to yellow. .png)
If you don’t set a default view, Dialpad automatically displays all conversations for the entire Office.
Customize Conversation History columns
Customize the Conversation History table to display only the columns and information that you need.
To customize your Conversation History columns:
Select Edit
Select the eye icon to view or hide a column
The User and Contact Center column cannot be hidden.
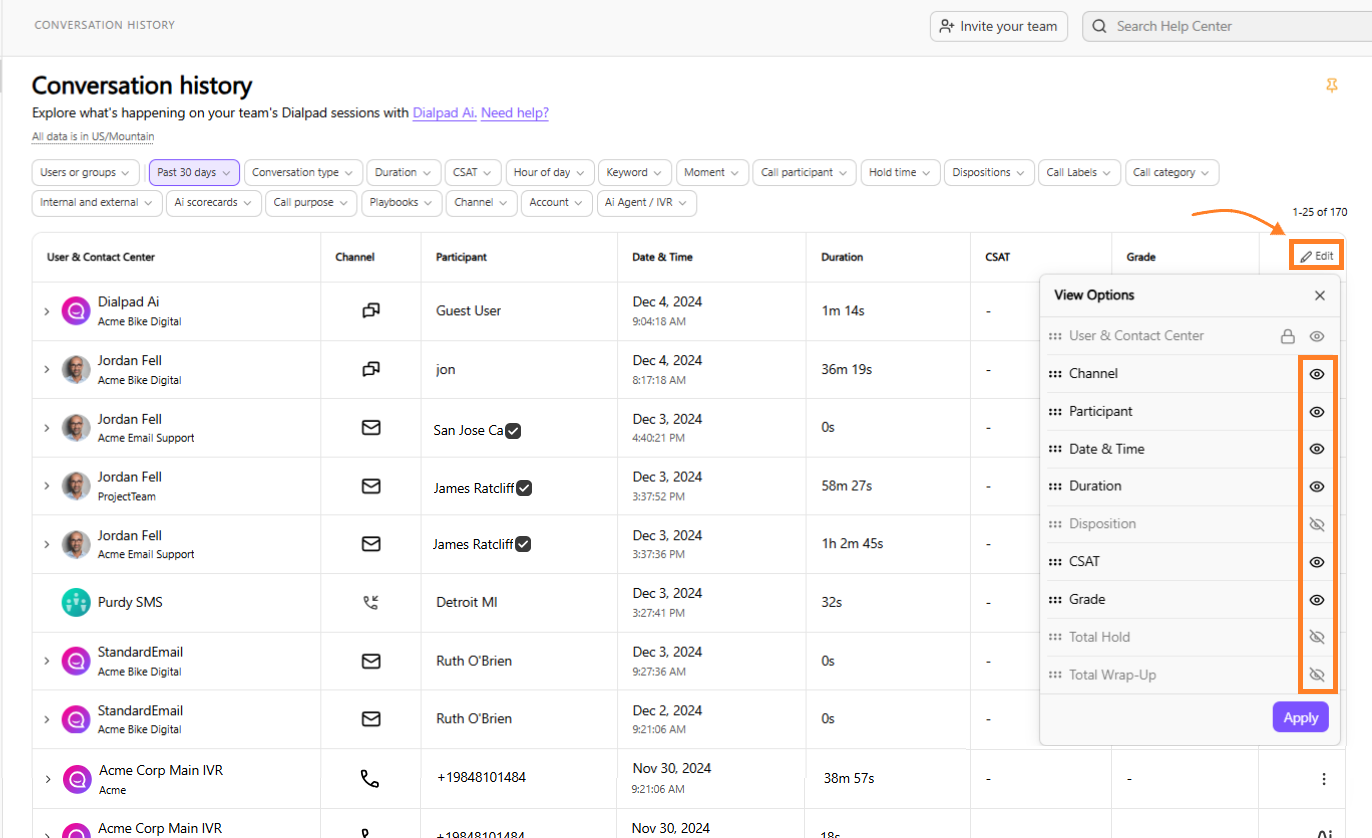
Select Apply
Reading call logs
In the Conversation History, call logs display key details such as the call status, start date and time, duration, disposition (for Contact Centers), and options to access controls like the call recording or call review.

Hover over a user or target to view additional details, such as their name, phone number, and target type.
Call logs include these columns:
User and Contact Center | The name of the user and the contact center that received the call. |
Channel | The type of call. |
Participant | The name or number of the caller. |
Date & Time | The date and time the call started. |
Duration | The duration of the entire call. |
Duration Connected | The duration of the call where the agent/operator and caller were connected. |
CSAT | The CSAT score of the call. |
Grade | The grade of the call, evaluated by AI or manually by a supervisor. |
Call Summary and Options | The call summary (sparkle icon) allows you to view details of the call, like excerpts and transcripts. The call log options (icon with 3 dots) allow you to view additional call log options, like the call journey or provide a grade (if you’re a supervisor or admin). If a recording of the call is available, a Play icon appears, allowing you to listen to the call. |
There are additional columns available to display for call logs, including:

Disposition | The topic of the call. |
Total Hold | The total amount of time a call was on hold. |
Total Wrap-Up | The total amount of time the agent/operator spent in wrap-up. |
Agent Talk Time | The amount of time the agent/operator was talking during the call. |
Agent Listen Time | The amount of time the agent wasn’t talking during the call. |
Silent Time | The amount of time where there was no talking between the agent/operator and the caller and the call wasn’t on hold. |
Conversation ID | The unique identification number for the call. |
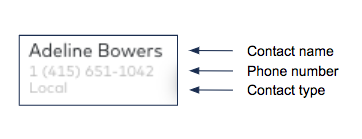
What is a contact?
Contacts are phone numbers outside of Dialpad who called (or were called) by a user or target within your Dialpad company.
The contact type indicates whether the contact source came from a third-party service (e.g., Google, Microsoft) or your local address book (e.g., from your mobile phone).
Conversation History filters
Use multi-target filters to dig deeper into your Conversation History, letting you sort and refine data by multiple criteria, such as interaction type (calls or chats), date range, specific users, departments, and more — all in one view..png)
Dialpad offers a wide variety of filters to let you customize which interactions you want to see.
Let’s go over each one.
Offices | Groups filter
The Offices | Groups filter displays interactions from specific offices or groups.
Office calls: Shows calls from a specific office.
Group calls (Department, Main Line, or Contact Center): Shows all calls made by agents on behalf of those groups.
Does not include personal calls from those agents/operators.
Coaching team calls: Shows all individual calls made by the team members, excluding contact center calls.
Notes
Only Departments and Contact Centers can be filtered simultaneously.
The restrictions are as follows:
Multiple Departments, Contact Centers, or Mainline
Multiple Coaching teams
Multiple users (+/-group)
Single Office or Company
For example, you cannot filter for a Department and a Coaching Team at the same time.
Once you’ve filtered by Office and/or groups, you can use the Members Filter to filter by specific users.
To filter by office or group:
Select the Office | Groups filter
Search for the office(s) and group line(s)
To add another office or group, select check the boxes beside their name
Select Apply

Members filter
The members filter lets you filter interactions by specific users.
Note
By default, the members filter displays all members. You must select an Office or Group before you are able to select individual users.
To filter by members:
Select the Offices | Groups filter and select the office and/or group
Select the Members filter
Uncheck All Members, then check the boxes beside the agents you want to view
Select Apply
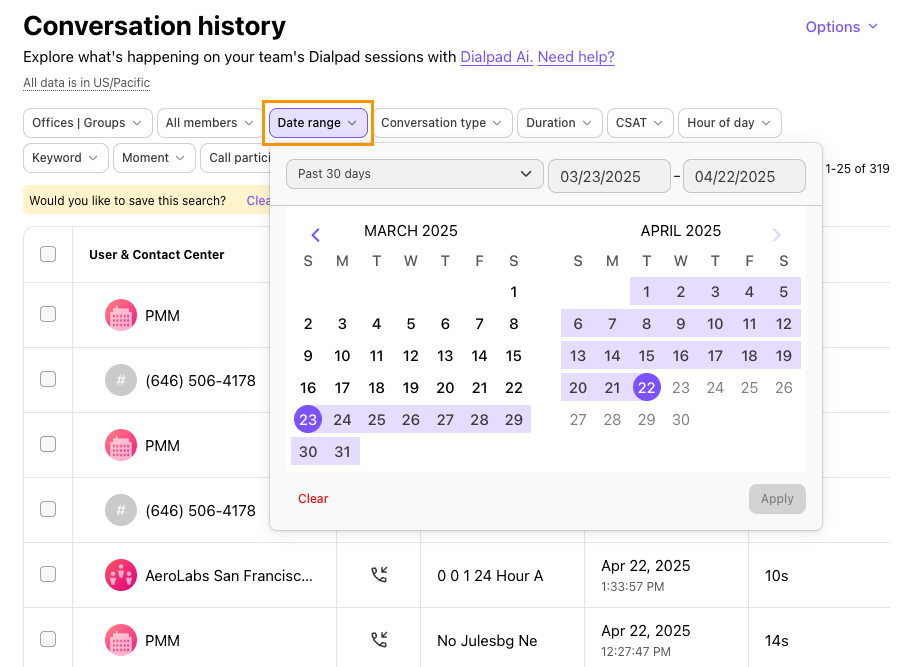
Date range filter
The date range filter lets you filter your Conversation History data by a specific time period.
Notes
By default, Conversation History shows conversations from the past 30 days.
Dialpad Connect users on a Standard Plan can only filter calls from the past three months.
To filter by a date range:
Select Date Range
Select a date range
Select from pre-set date ranges using the drop down
Select a custom date range
Select Apply
Expertise filter
The expertise filter helps you see how agents handle different requests, including time in each call status, break patterns, and productivity stats.
Note
The Expertise Filter appears only when a Digital Contact Center is selected. If no skills or expertise are set up, the filter will not display any options..
To filter by expertise:
Select an office(s) and group line(s)
Select the Expertise filter
Check the box(es) beside the expertise(s) or type in the agent’s name in the search bar
Select Apply
.png)
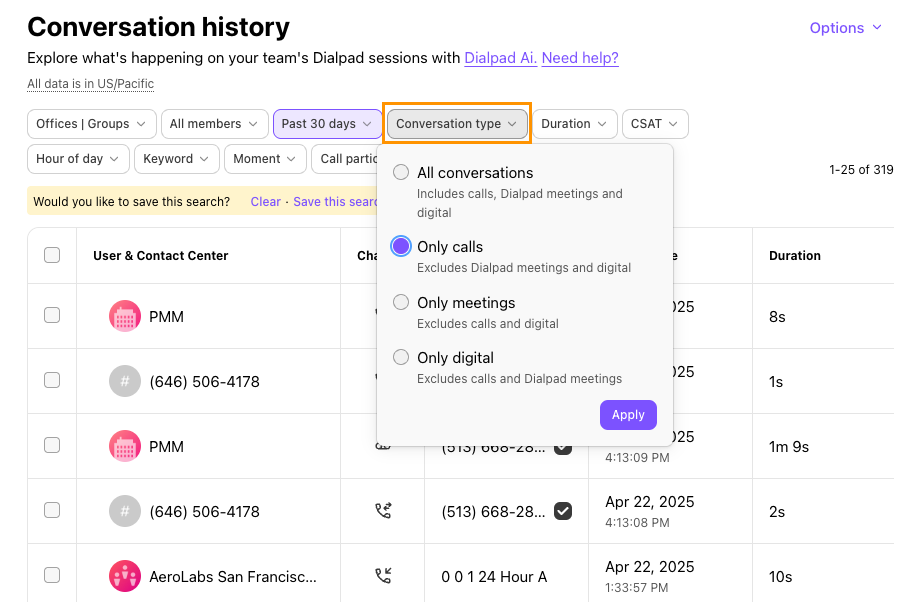
Conversation type filter
The conversation type filter lets you filter interactions by their conversation type.
You can choose to see:
All conversations | Displays all conversation type and set as the default option. |
Only calls | Displays only calls. |
Only meetings | Displays only Dialpad Meeting interactions. |
Only digital | Displays only Digital interactions, and IVR workflows. |
To filter by conversation type:
Select Conversation type
Choose the type of conversation you want to see
Select Apply
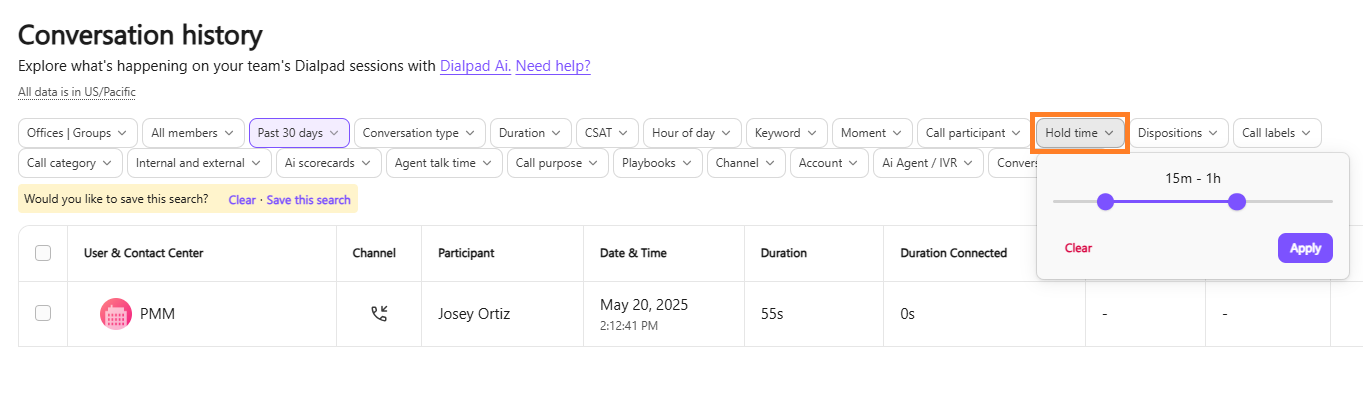
Hold time
The hold time filter helps you find calls based on time spent in the hold queue.
To filter hold time:
Select Hold time
Adjust the slider to the desired hold time
Select Apply
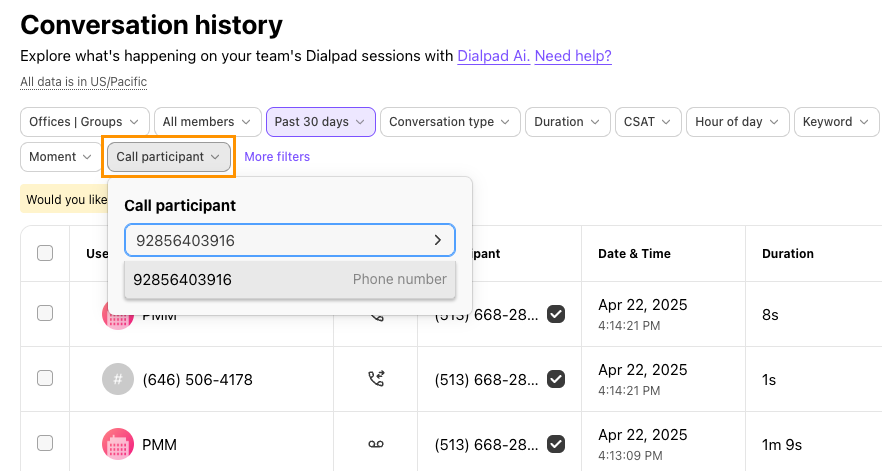
Call participant filter
The call participant filter lets admins filter by call participant(s) to quickly find data for specific users.
Notes
This filter only applies to calls, and not to Dialpad Meetings.
If a participant is a Dialpad contact, searching by their email or name will show voice and digital sessions.
If no contact name is associated, searching by their email or number will show only their digital sessions.
To filter by call participant:
Select Call particpant
Enter the name, email address, or phone number of the agent or caller
Select Apply
Keyword filter
The keyword lets you filter calls by specific keywords to easily understand the tone of the call.
Notes
Dialpad AI must be enabled to generate results with any call content filter.
If you search for multiple keywords, it will only return calls with all the keywords.
This filter isn’t available if you’ve already applied other filters.
To filter by keyword:
Select Keyword
Enter up to five keywords (separated by commas)
Choose who mentioned the keyword (agent, customer, or both)
Select Apply
.png)
Moment filter
The Moment filter lets you filter by Custom Moments to easily understand the tone of the call and what was discussed.
Notes
Dialpad AI must be enabled to generate results with any call content filter.
This filter isn’t available if you’ve already applied other filters.
If you search for multiple moments, it will only return calls in which all moments were triggered on the same call.
To filter by Custom Moment(s):
Select Moment
Choose the Custom Moment, or enter a Custom Moment’s name in the search bar
Select who mentioned the Custom Moment
Select Apply
.png)
Duration filter
The duration filter displays interactions of a specific length, this is particularly helpful if you want to find long or short calls.
To filter interactions by their duration:
Select Duration
Slide the toggle to the desired call duration
Select Apply
.png)
CSAT
The CSAT filter displays conversations with customer feedback and AI-predicted calls.
To filter CSAT:
Select CSAT
Adjust the slider to select the desired rating
Check the box(es) beside Customer ratings and AI predictions
Select Apply
.png)
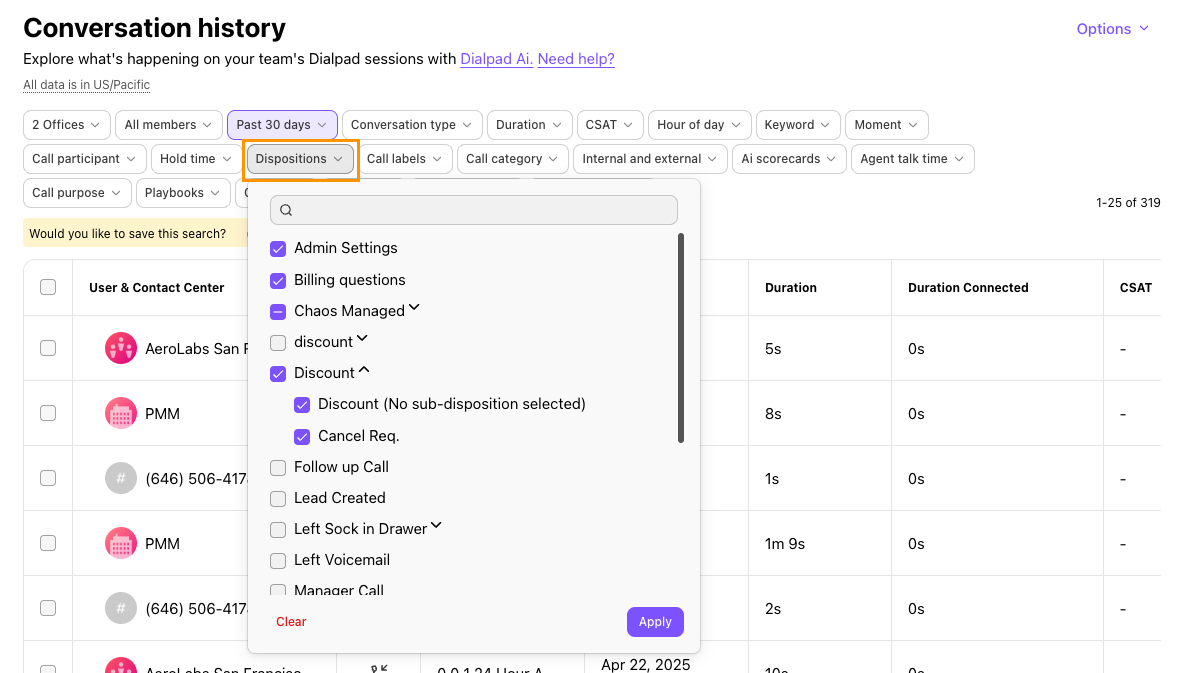
Dispositions filter
The dispositions filter lets you quickly find that agents closed with a specific call disposition.
To filter by disposition:
Select Dispositions
Check the box(es) beside the disposition(s) and sub-disposition(s), or enter their names in the search bar
Select Apply
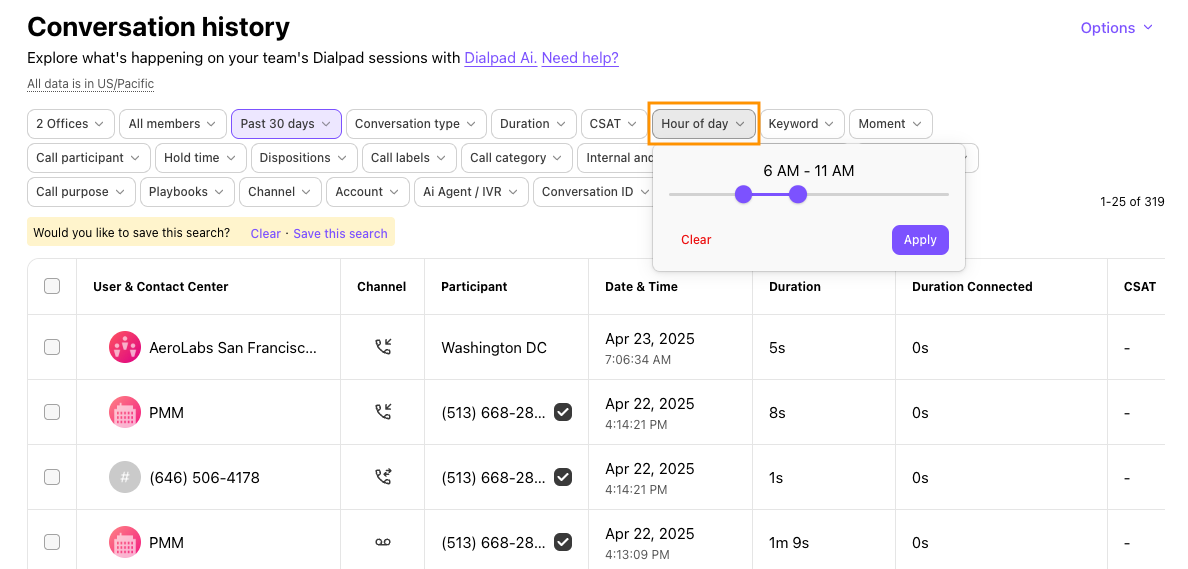
Hour of day filter
The hour of day filter lets you find interactions that occurred between specific hours. This is particularly helpful if you want to identify interactions during peak hours.
Note
The time is based on the timezone of the current office, not the user.
To filter by hour of day:
Select Hour of day
Adjust the slider to include the desired hours
Select Apply
Internal and external filter
The internal and external filter lets you easily find interactions between team members (internal) and calls with customers (external).
Note
Deleted calls are not included in the internal or external filter.
To filter by internal/external user:
Select Internal and External
Select your preference
Internal displays calls between your team.
External displays calls that included customers.
All calls and Dialpad Meetings displays all calls and meetings, including self calls.
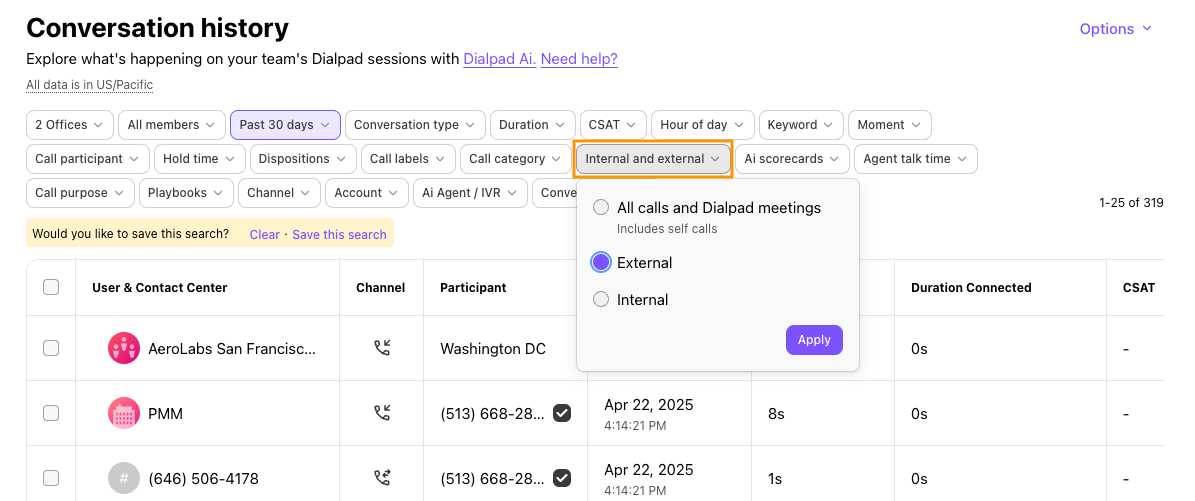
Select Apply
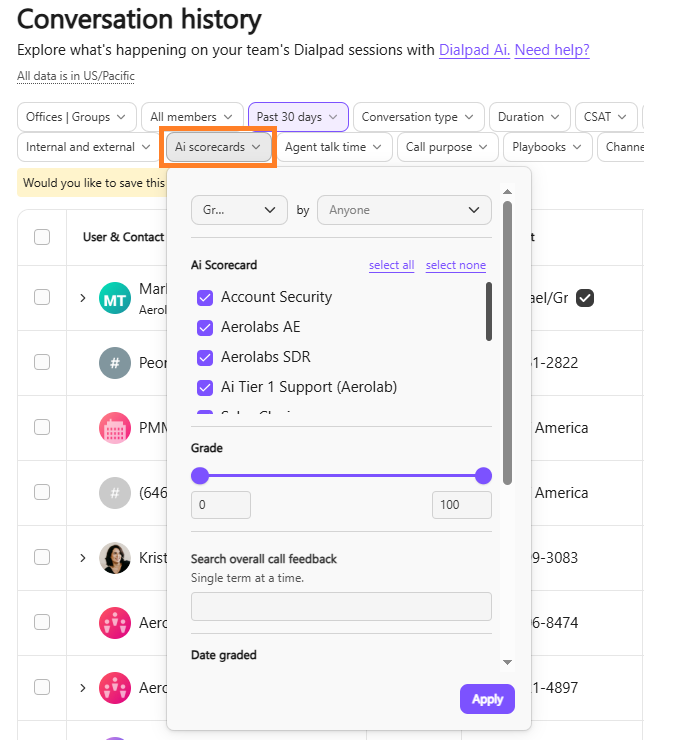
AI Scorecard
The AI scorecard filter lets you find graded interactions based on Contact Centers or agents.
To filter AI Scorecards:
Select AI Scorecard
Choose your desired criteria
Graded/Not Graded by specific grader
Grade Score
Search Overall Call Feedback
Date Graded
Select Apply
Call category filter
The call category filter lets you easily separate inbound, outbound, and handled calls, along with their call status types.
Calls are broken down into the following sub-categories:
Inbound | Outbound | Status |
|---|---|---|
|
|
|
|
|
|
|
|
|
|
|
|
|
| |
|
| |
|
| |
|
| |
|
| |
|
|
To filter by call category:
Select Call category
Choose the direction(s) and which sub-categories you want to include
.png)
Select Apply
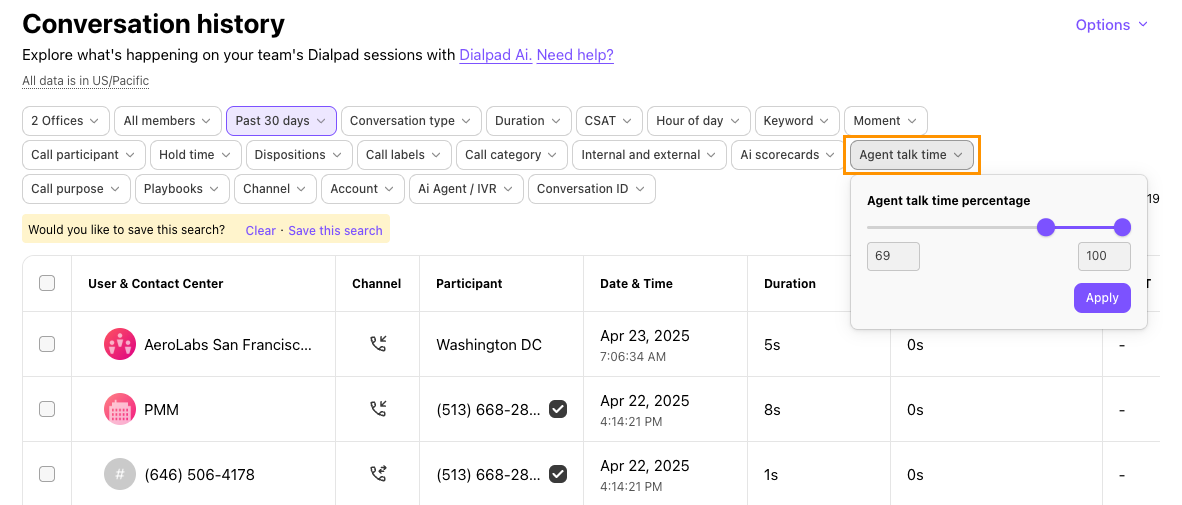
Talk time filter
The Talk Time Filter helps you quickly find calls based on the percentage of time the agent spoke during the conversation.
To filter by talk time:
Select Talk Time
Move the sliders to set the talk time percentage range
Select Apply
Once filtered, you’ll see 4 new columns.
Column Name | Description |
|---|---|
Duration Connected | The time it took for the call to reach an agent. |
Silent Time | The duration when neither the agent nor the caller spoke. |
Agent Listen Time | The time the agent spent listening without speaking. |
Agent Talk Time | The time the agent spent speaking. |
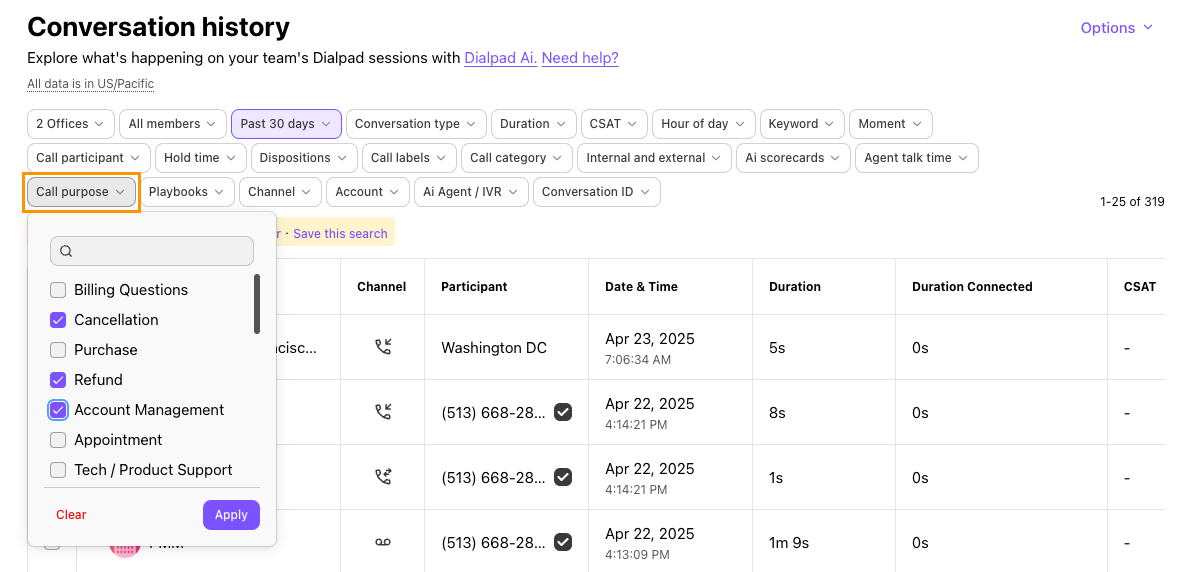
Call purpose filter
The call purpose filter lets you easily find calls based on their Call Purpose Category.
Note
If the call date is before August 2023, you will not see the Call Purpose filter. However, you can still filter by Call Purpose by using the Moments filter.
If you don’t have access to the call summary but you do have analytics access, you can also filter by Call Purpose; but you won’t be able to access the call itself.
To filter by call purpose:
Select Call purpose
Select the desired Call purpose category
Select Apply
Playbooks filter
The playbook filter lets you see which agents are using what AI Playbook.
Notes
The AI Playbook filter is only available for calls after Oct 31, 2023.
You'll need Dialpad AI enabled to generate results.
This filter isn’t available if you’ve already applied other filters.
To filter by playbook(s):
Select Playbooks
Select desired playbook(s), or type them in the search bar
Select Apply
.png)
Channel filter
The channel filter lets you see interactions that took place on specific digital channel(s).
To filter by channels:
Select Channel
Select the desired channel(s)
Select Apply
.png)
Account filter
Use the account filter to find interaction based on the account where the interacion occured.
To filter by account:
Select Account
Select the desired account(s)
Select Apply
.png)
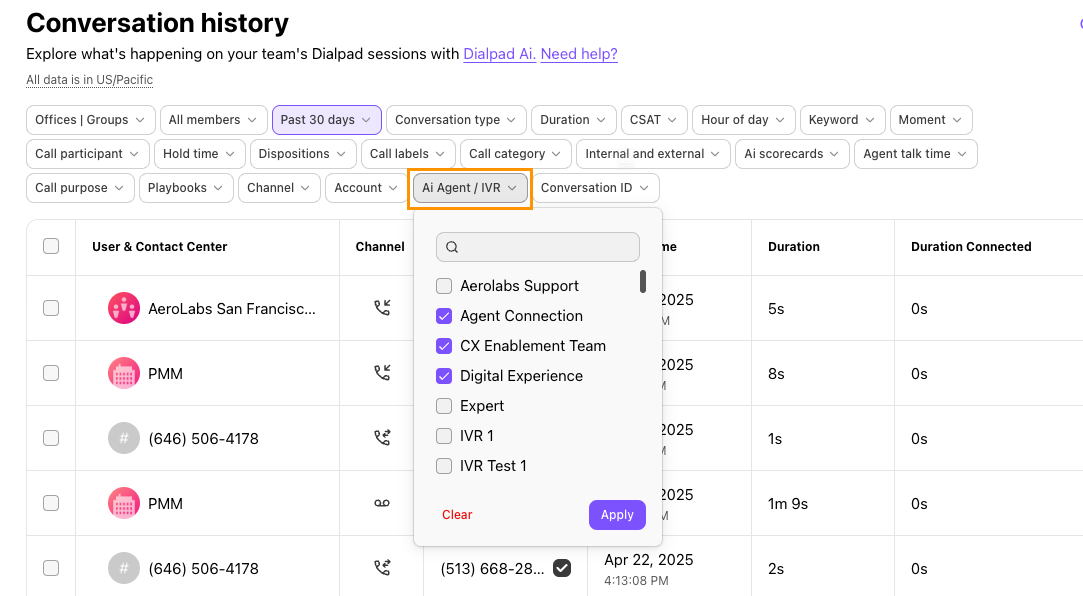
AI Agent / IVR filter
Use the AI Agent / IVR filter to view conversations handled by your AI Agent or IVR workflows.
To filter by AI Agent or IVR:
Select AI Agent / IVR
Select desired AI Agent(s) or IVR workflow(s)
Select Apply
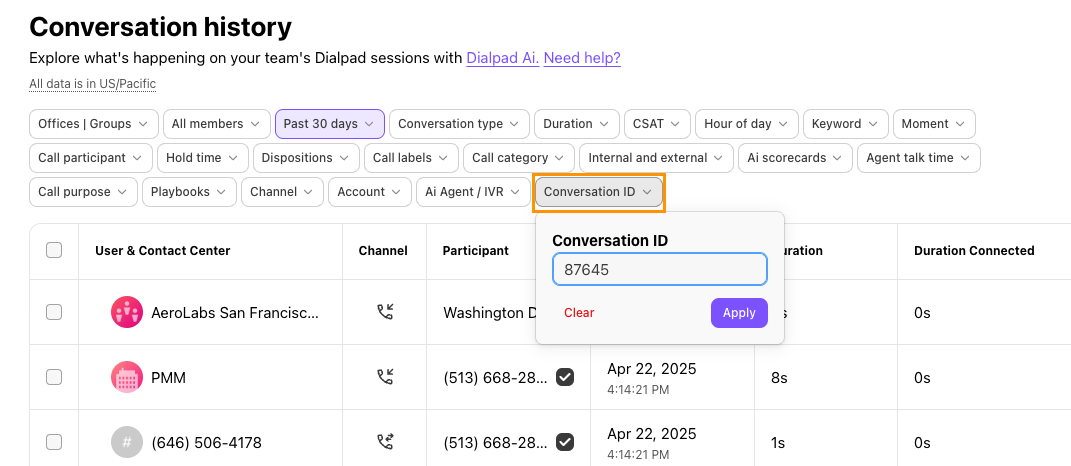
Conversation ID filter
The Conversation ID Filter helps you quickly find interactions based on the interaction’s unique conversation ID.
To find the Conversation ID, go to the the interaction in the Conversation History.
To filter by conversation ID:
Select Conversation ID
Enter the conversation’s unique ID
You must enter at least three numbers.
Select Apply
Saved search filters
Save filters to easily return to specific data sets that you frequently use.
To save a search:
Navigate to Conversation History
Select your desired filters
Select Save this Search
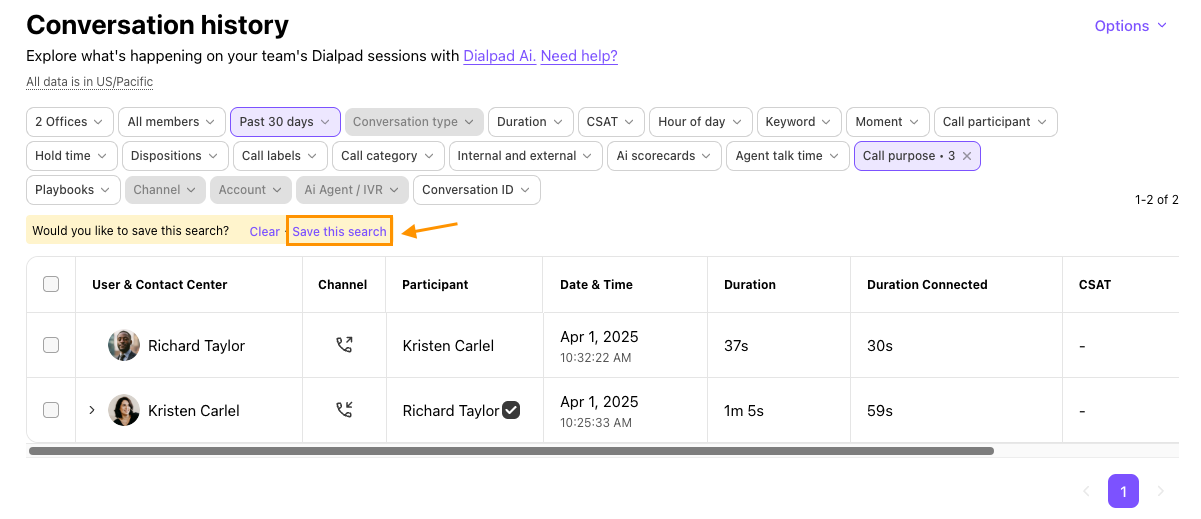
Name the search
Enter a description
Select Save Search
Note
Saved searches are stored in the My Searches section on the Conversation History page.
Saved searches can also be deleted. To delete a saved search:
Select the search from My Searches
Select the Trash icon
.png)
Saved search also offers edit and reset options if you decide to make any changes.
Note
Saved searches in Conversation History do not carry over to the analytics menu.
Search templates
Saved searches are also available in templates, which can be used as-is or customized to quickly create a new saved search.
To use a search template:
Navigate to My Searches
Select the Plus icon
.png)
Select the Office(s)
Select the template type
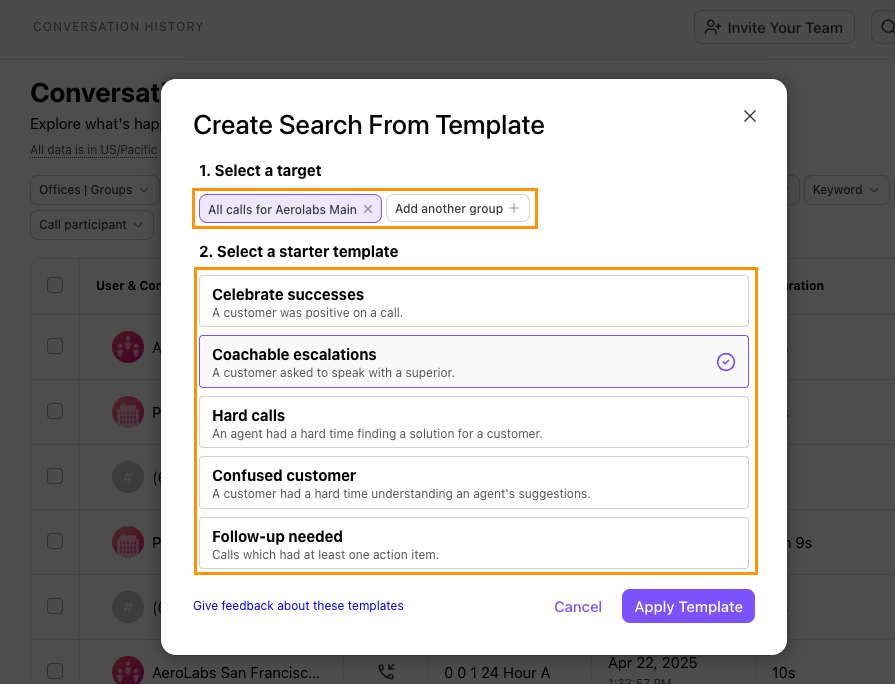
Select Apply Template
Select Save this search
Frequently asked questions
Can I search for more than one user or group at the same time?
Yes, you can search for a user within a group. For example, if you're filtering for your Finance Department group, you can also filter specifically for agent Jon Doe within that group.
Can I view IVR workflows in a call?
Yes! Check out this Help Center article to see what callers selected when navigating your IVR workflow.
How far back does Conversation History data go?
Call records of your company’s history are accessible for at least one year.
Can I export Conversation History data?
Not from the Conversation History page, but you can switch to the analytics menu that includes charting data and then export your call logs to obtain call history.
You might need to contact Customer Care to have this functionality added to your account.
Can I delete calls from the Conversation History?
No, but you can delete calls from the app. Go to Inbox, then navigate to the Calls tab and select Option (that's the 3 vertical dots on the far right) then Delete Call.
Once a call is deleted in the app, it'll take 24 hours for the deletion to disappear in your Conversation History.
How can I find conversations beyond the initial ~500 displayed?
If the conversations you're looking for aren't within the initial ~500 displayed, you can easily find them by refining your filters. Try adjusting for a smaller date range, specifying a target selection (e.g., a specific contact or department), or narrowing down by call categories.