Dialpad’s Workflows are powerful automation systems designed to model complex customer journeys. They offer the flexibility to create sophisticated routing paths and unique behaviors that best suit your business logic for both voice and digital experiences.
Workflows don’t require any coding knowledge, and you can create these dynamic experiences quickly.
Let’s dive into the details!
Who can use this
Workflows are available to Dialpad users on all plans and licenses.
You must be a Company or Office Admin to manage and configure Workflows.
Self-enablement is available for all companies.
Benefits of workflows
Workflows let you customize the customer experience by:
Collecting crucial user information (booking numbers, account numbers, etc).
Accessing CRM or other systems through APIs.
Identifying the caller.
Creating unique routing and behavior according to the individual customer’s needs.
This enables more efficient use of agents and, in some cases, even allows the customer to resolve their questions through self-service.
Workflows do not replace the need for a live agent, but they improve customer satisfaction while freeing up agents to handle complex inbound calls. Not only that, they offer a self-service option accessible outside business hours.
Workflow steps
Dialpad's bespoke workflow steps enable you to guide customers through personalized voice or digital interactions, ensuring the experience aligns with your brand. Add as many workflow steps as you need, and edit them at any time.
There are 3 types of workflows that you can build:
Voice | Workflows that only service phone calls. |
Digital | Workflows that only service digital conversations through WebChat, SMS, and Email channels. |
Shared | Workflows that apply common logic to both voice and digital conversations. |
Workflow steps are organized into 3 categories:
Note
This table includes all options that are available across Voice, Digital, and Shared Workflows. Not all options listed below may be displayed depending on the selected workflow type.
Prompt | Prompt steps provide users with greetings, options, or information to guide them through the workflow. The steps included in Prompt are:
|
Logic | Logic steps make decisions in the workflow based on user input or data. The steps included in Logic are:
|
Terminal | Terminal steps mark the end of the workflow journey—like hang-up, voicemail, or agent transfer. The steps included in Terminal are:
|
More information
Learn more about each voice workflow step in this Help Center article.
Learn more about each digital workflow step in this Help Center article.
Learn more about each shared workflow step in this Help Center article.
For details on system variables, see this Help Center article.
Enable Workflows
First things first, Workflows must first be enabled at the Company level.
Note
Self-enablement is available for all companies.
To enable workflows, go to your Dialpad Admin Portal.
Select My Company > Company Settings
Navigate to Workflows
Slide the toggle to Enabled

Once enabled, you can create a Standard Workflow.
Note
Enabling this setting grants you access to voice workflows. If you have a Digital Engagement license, you’ll also get access to digital workflows as well.
Create a Workflow
To create a workflow, go to your Dialpad Admin Settings.
Select Workflows
Select Create Workflow
Select the workflow type
Voice
Digital
Shared
Name your workflow
(Optional) Select the Company-wide access option to allow the workflow to be available at a company level
Note
Editing remains limited to the office where the workflow is created.
Select Add
Select the + icon
Choose if you'd like to create a workflow from scratch or use a template
Select the desired actions and routing rules
Select Publish > Publish (or Save, if you want to save a draft)
Tip
Click and hold your mouse to move (drag) the workflow diagram across your screen (you can also zoom in and out using the preview on the bottom right).
Edit a Workflow
To edit a workflow, go to your Dialpad Admin Settings
Select Channels & Workflows > Workflows
Under the Workflows tab, choose the workflow you want to edit and select More > Edit.
Alternatively, you can select the workflow name directly.
Make the desired changes
Select Save to save your changes
Select Publish
Review any changes made to your workflow. If there are errors detected, such as information missing inside a step, a warning message will be displayed
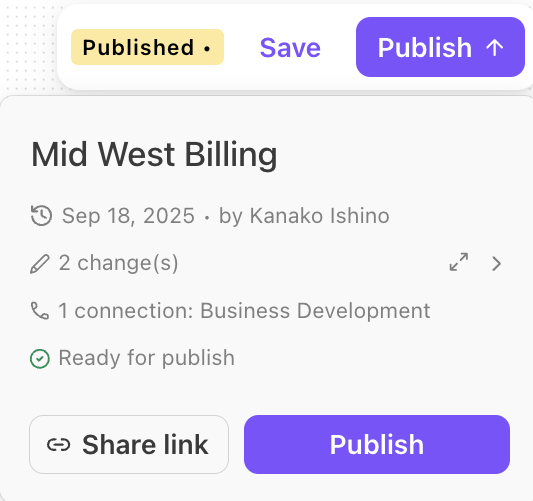
Select Publish to push your edits live to connected numbers
Save vs publish
Save lets you work on a workflow and save the changes without activating them. This is especially useful if you would like a colleague to review the updated flow.
Publish pushes the changes live to all connected numbers.
Note
When you edit a workflow step, you're modifying the settings within that same step type.
If you need to change the step type entirely, you can either:
Delete the existing step and add a new one, or
Disconnect the current step and insert a new step in between.
Copy a Workflow
Copy Workflows to easily make changes without impacting live calls. This is perfect for maintaining version control and ensuring smooth updates for your workflow Developers.
Note
To ensure a single workflow accessible across the company, it must be made available company-wide. Editing remains restricted to the office where the workflow was created. See Create a workflow for more details.
To copy a workflow, go to your Dialpad Admin Settings.
Select Channels & Workflows > Workflows
Under the Workflows tab, choose the workflow you want to copy and select More > Copy
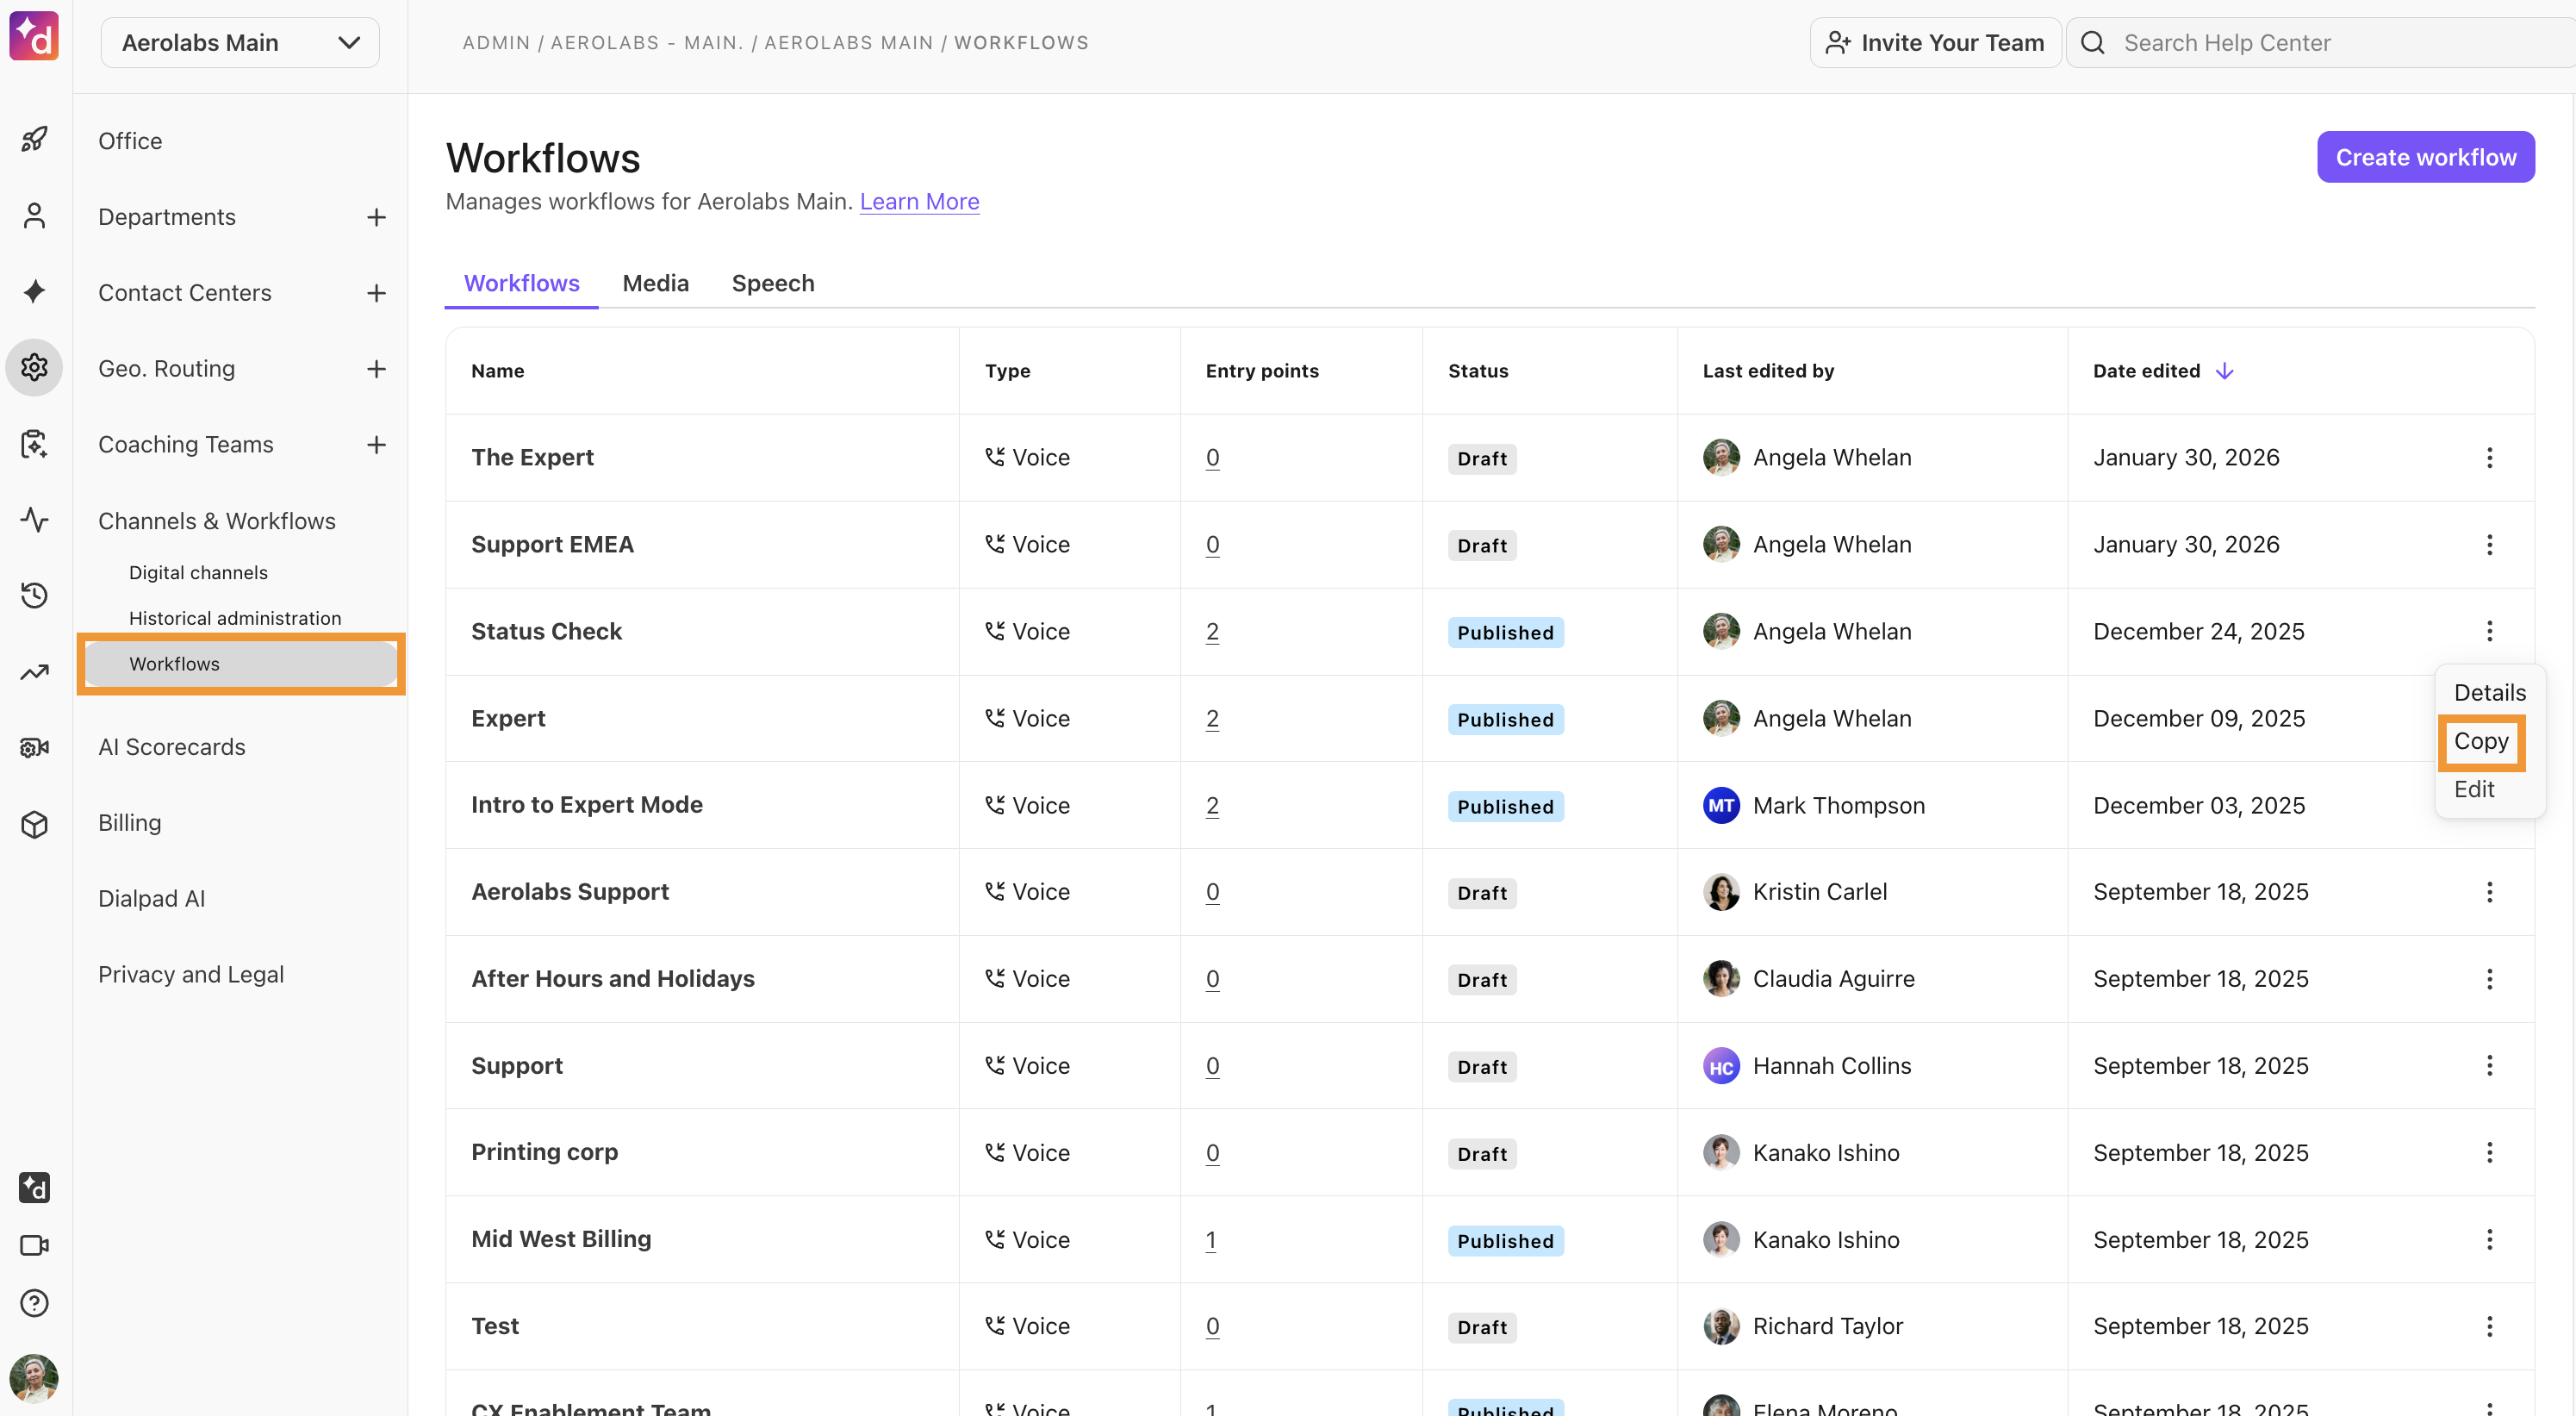
Name the new (copied) workflow
Select which Office(s) you want to use the copied workflow, then select Apply
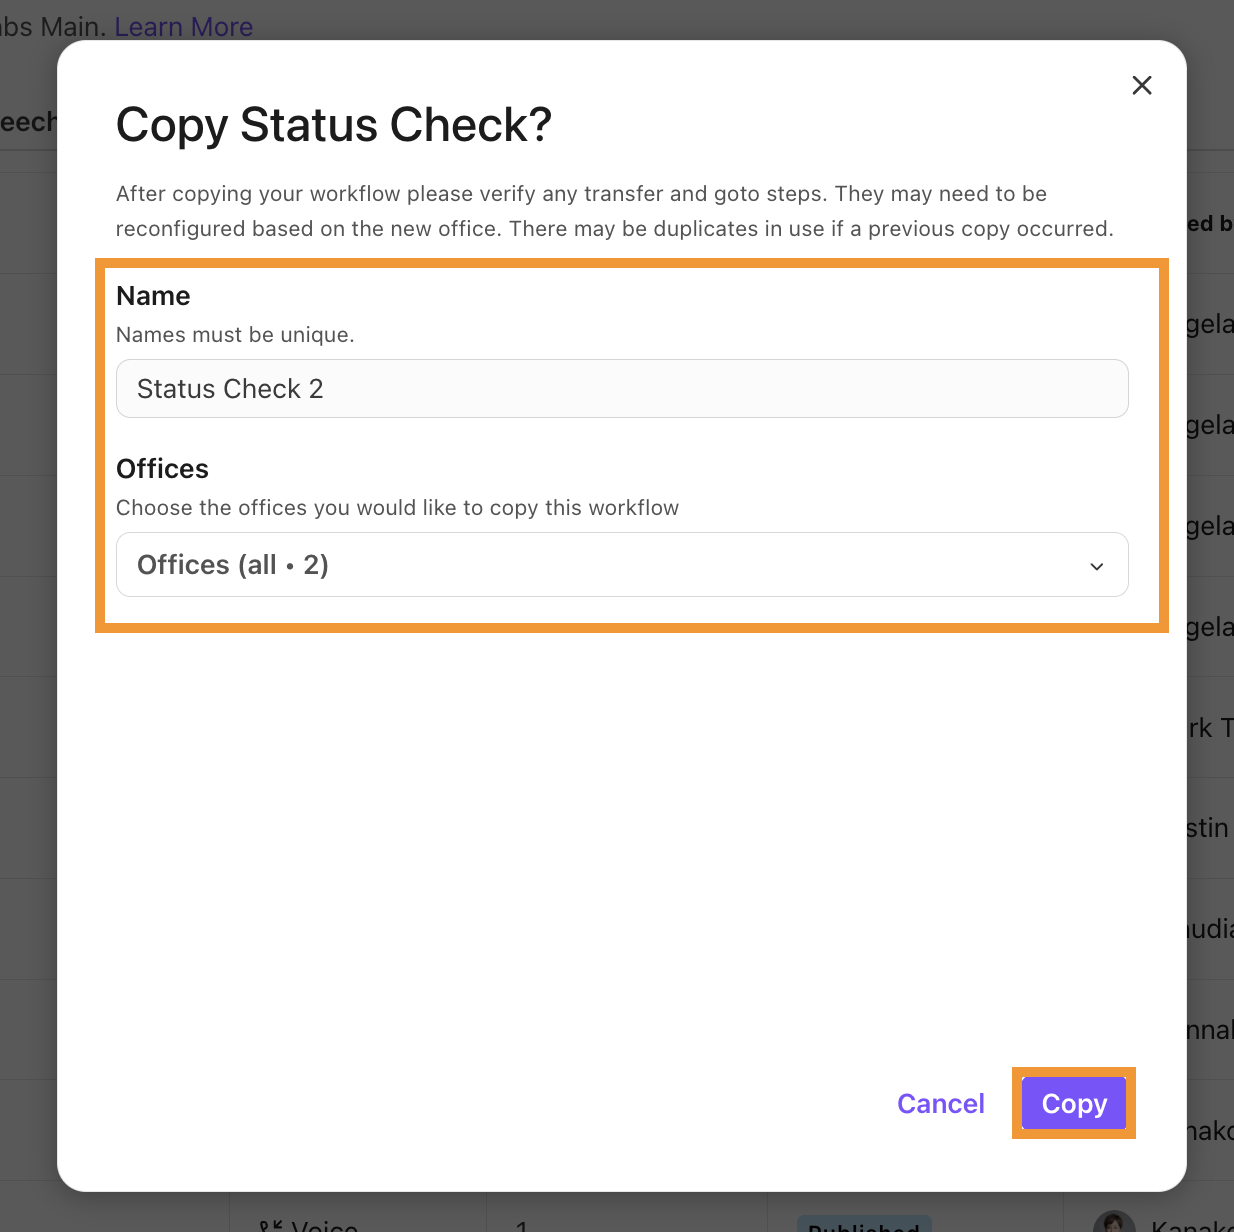
Select Copy
Note
Up to 10 offices can be included in each workflow copy request.
Disconnect a workflow step
Need to add or change a step on your workflow? No problem! You can insert new steps effortlessly by disconnecting, reconnecting or deleting a workflow step.
To disconnect a workflow step, go to your Dialpad Admin Settings.
Select Channels & Workflows > Workflows
Under the Workflows tab, choose the workflow you want to edit and select More > Edit
.png)
Navigate to the step you want to disconnect
Select Options > Disconnect
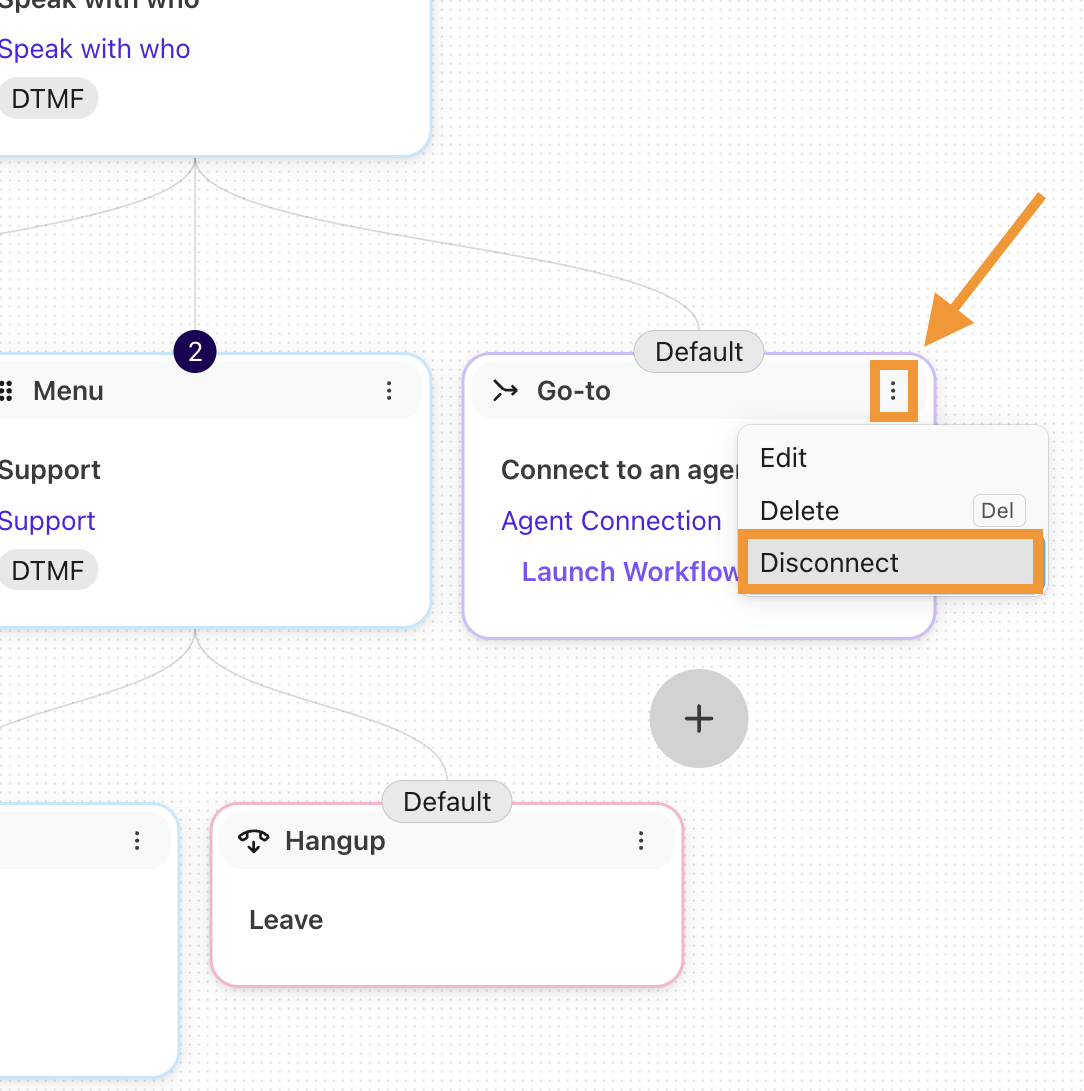
Once you remove a step, you can change and update both the workflow steps and the disconnected step at the same time.
To reconnect a step, select the step and drag it to the connector.
Delete a Workflow
To delete a workflow, go to your Dialpad Admin Settings.
First, you’ll need to remove any connected numbers from the Workflow.
Select the desired Office, Department, or Contact Center that is currently assigned to the Workflow you need to delete
Select Business Hours and Call Routing
Navigate to Call Routing
Select Edit Call Routing
Choose Open Hours Routing or Closed Hours Routing
Change the routing option to something other than workflows.
Next, return to Channels & Workflows > Workflows in your Dialpad Admin Settings.
Under the Workflows tab, choose the workflow you want to delete and select More > Delete
Confirm the deletion
Note
Workflows that have entry points cannot be deleted.
Warning
Deleting a workflow cannot be undone.
Voice Workflows
Voice workflows allow you to create workflow logic specifically tailored to voice calls to your Mainline, Department, Office, or Contact Center.
Assign a workflow
Once an workflow has been published, you need to assign it to an Office, Department, or Contact Center.
To assign an workflow, go to your Dialpad Admin Settings.
Select the desired Office, Department, or Contact Center
Select Business Hours and Call Routing
Navigate to Call Routing
Select Edit Call Routing
Choose Open Hours Routing or Closed Hours Routing
Select No operator
Select To a workflow(voice)
Select the desired workflow
Once an is assigned, you'll see the number of Entry Points appear beside each workflow.
Fallback options
In the rare event that a step in your workflow becomes unresponsive, use a fallback action to route callers to an alternate line.
To set a fallback action, go to your Dialpad Admin Settings.
Select the desired Contact Center, Department, or Office
Select Advanced Settings
Navigate to Workflows(voice) Fallback Action
Note
You'll only see the fallback action option for Contact Centers, Departments, and Offices that already have a workflow configured.
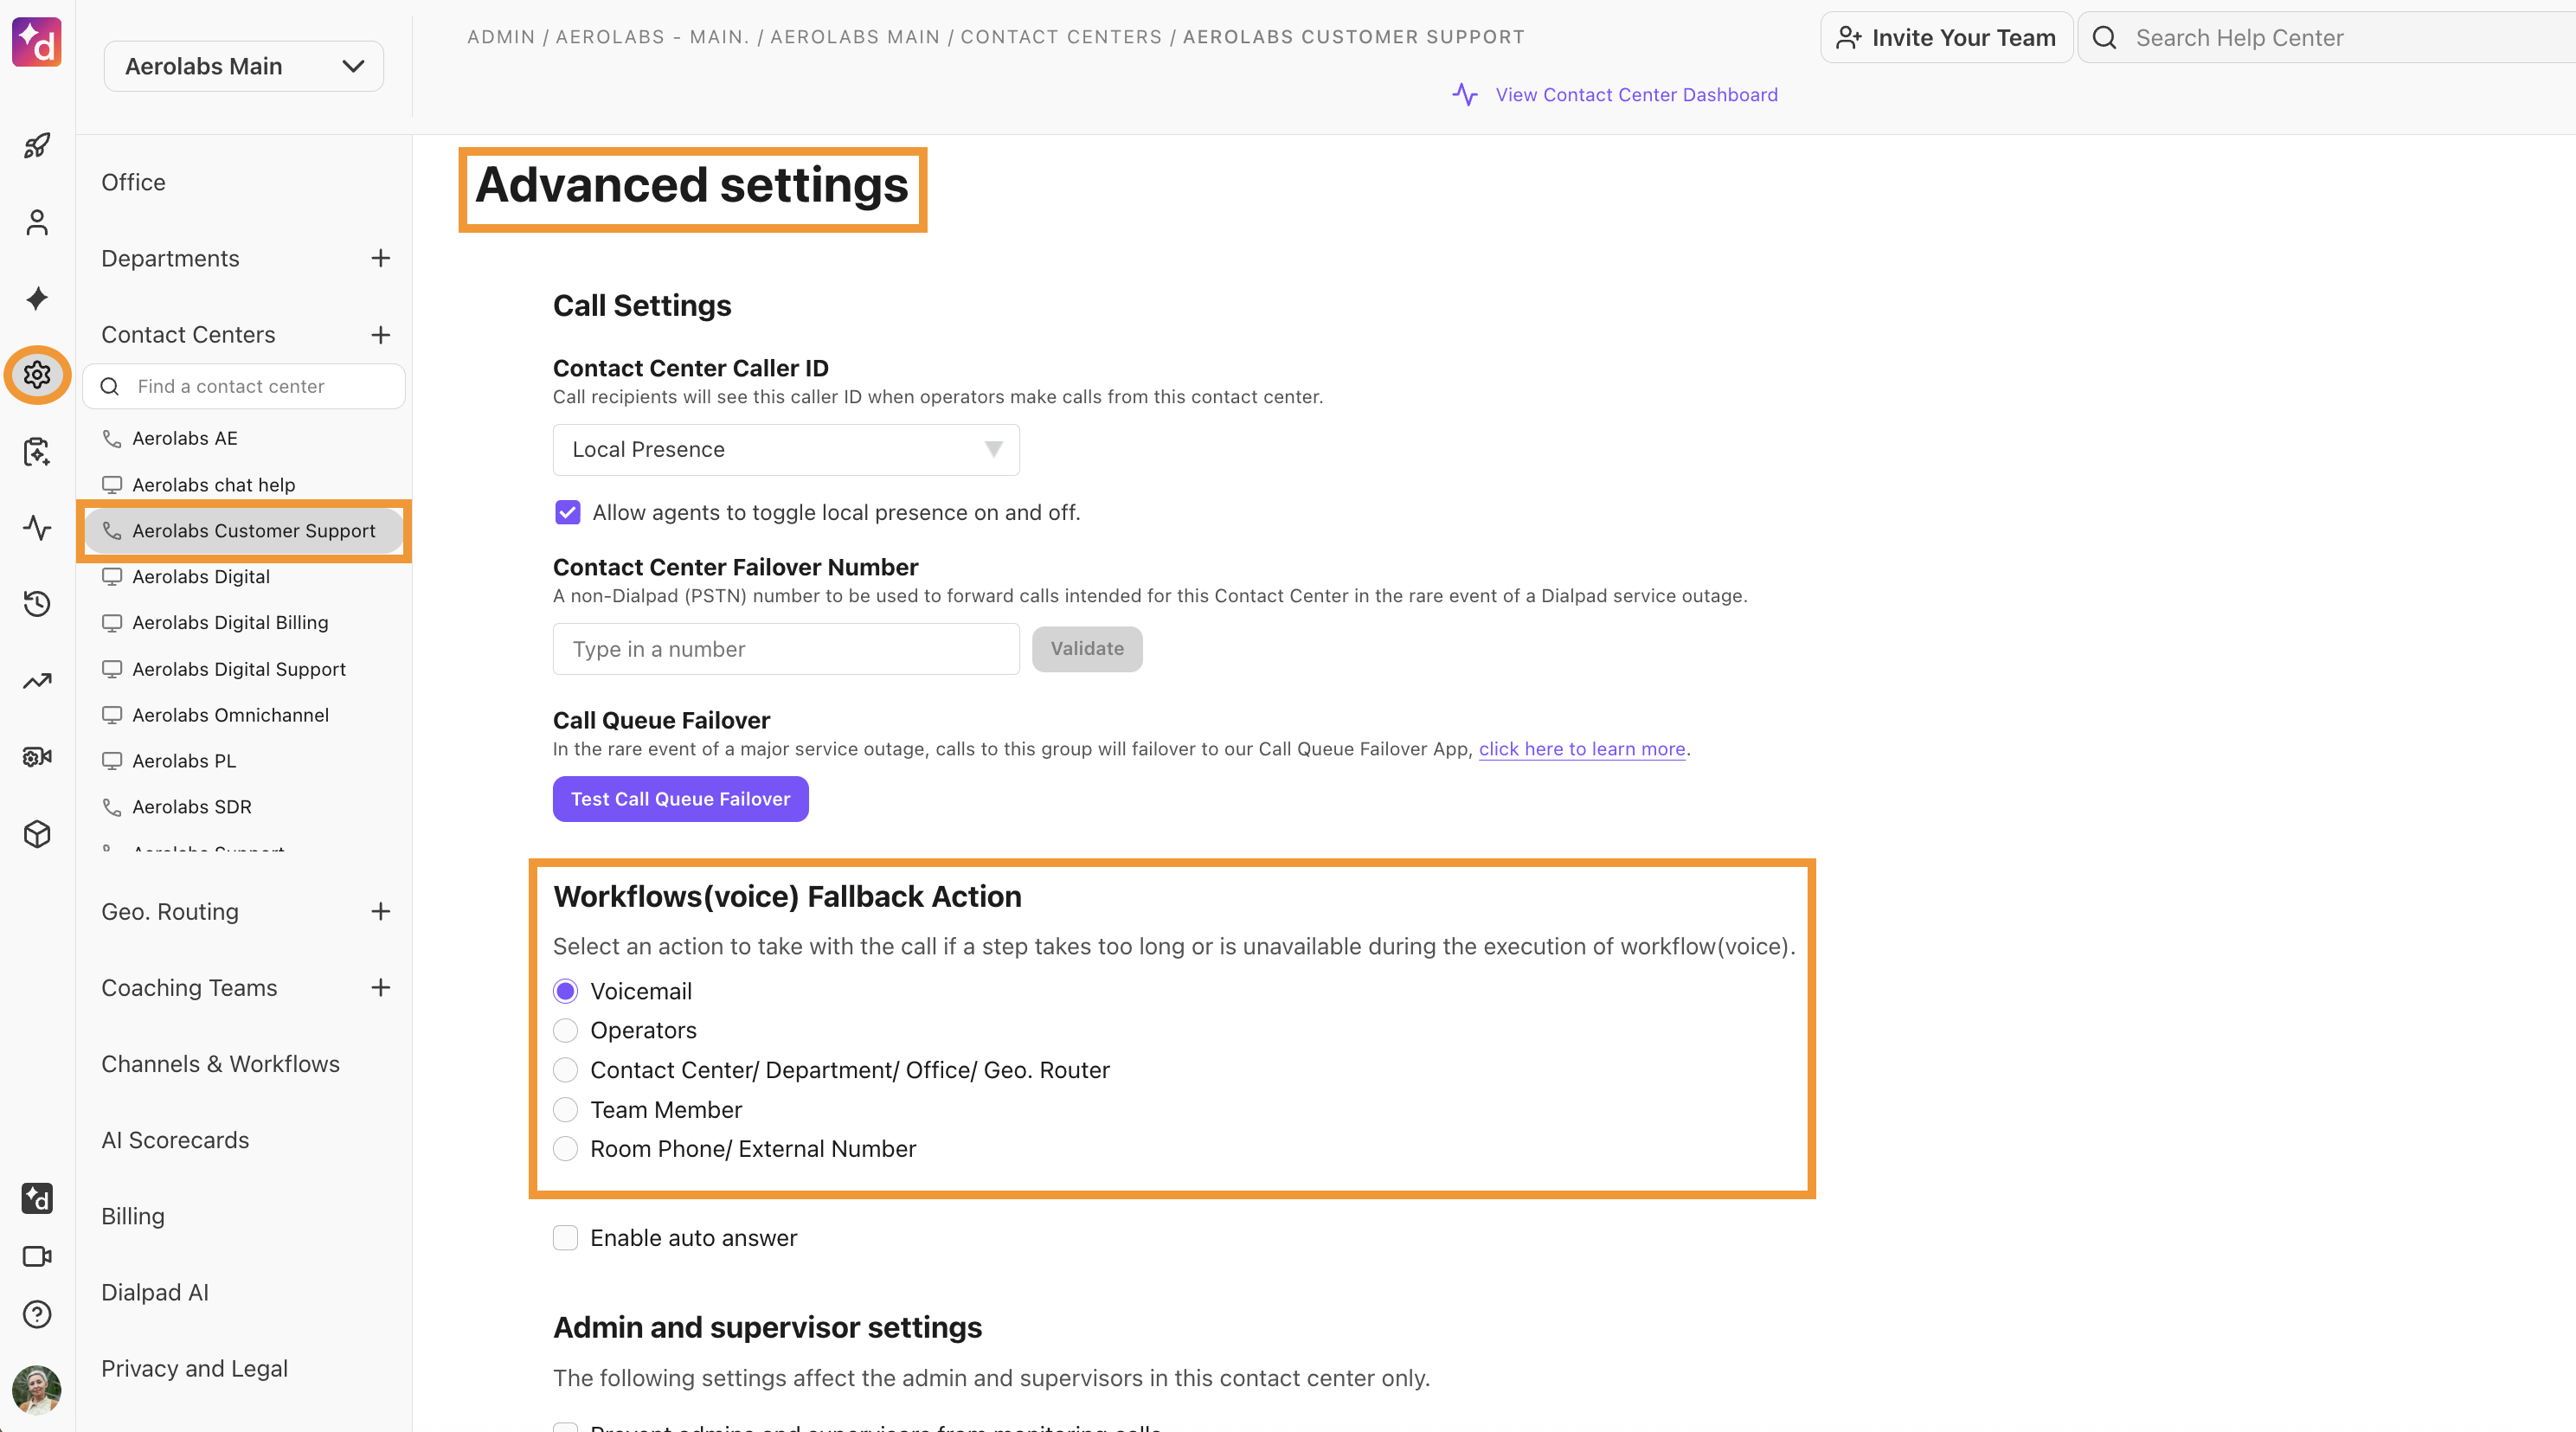
Choose the desired fallback option
Voicemail
Sends the caller to the Contact Center's voicemail.
Operators
Sends the caller to operators.
Contact Center / Department / Offices
Sends the caller to a specific Contact Center, Office, or Department.
Team members
Sends the caller to a specific team member.
Room Phone / External Number
Sends the caller to a specific room phone or number.
Note
Operator Fallback only works if all operators are off-duty; it will not activate if the hold queue is full or if an operator misses a call.
Find interactions with Workflows
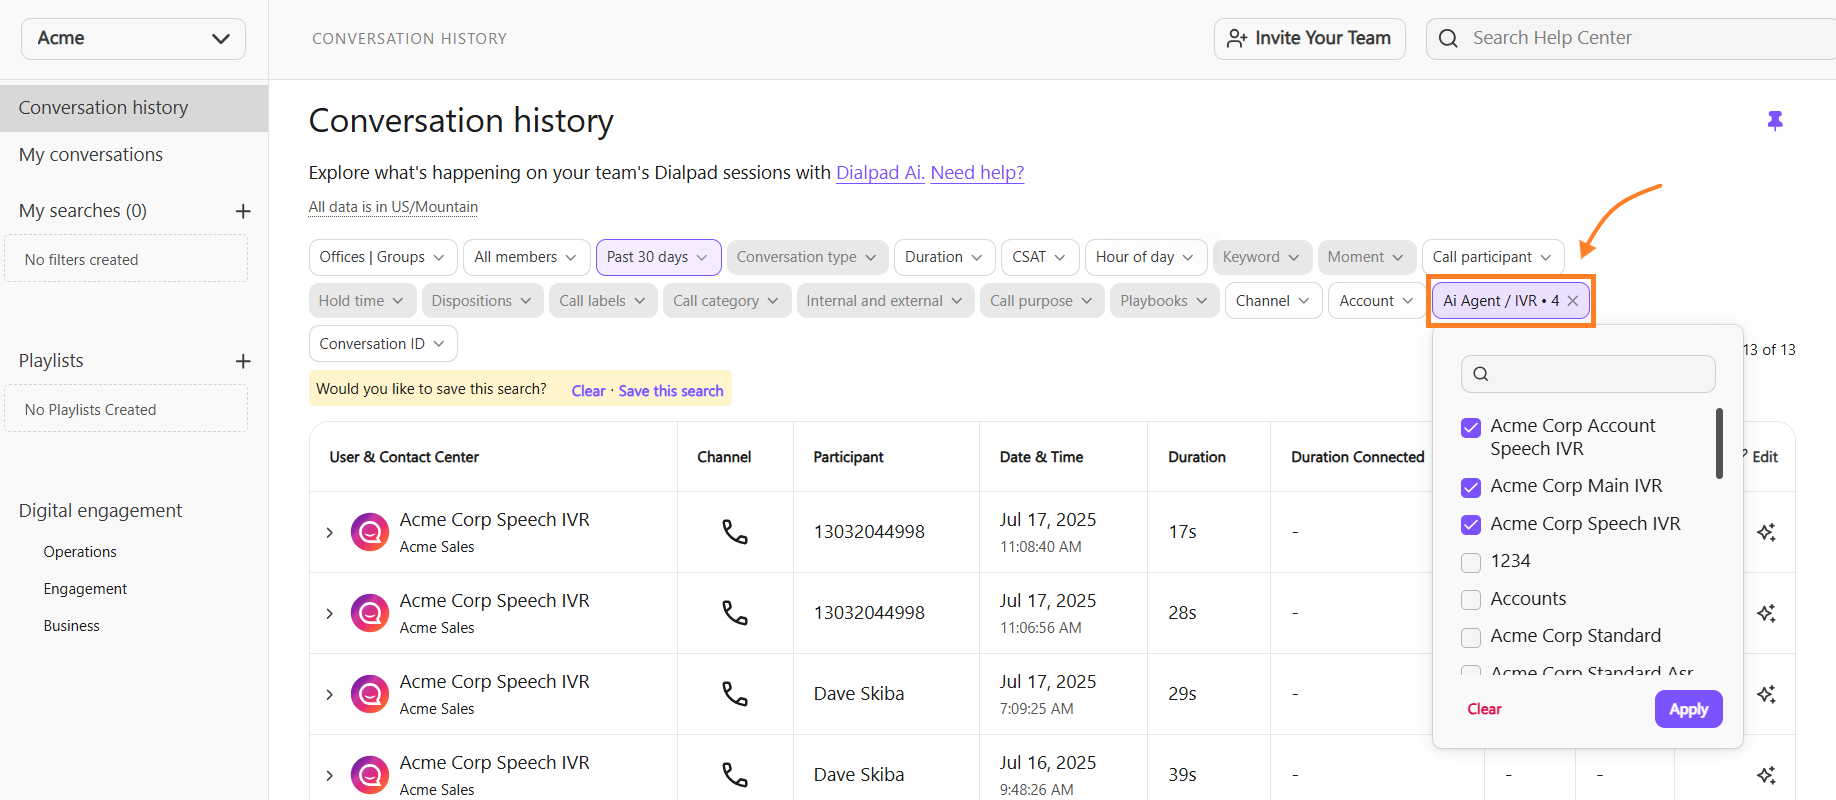
Use Dialpad's Session History to easily find calls and interactions where users were guided through your Workflows.
From the Conversation History section of your Dialpad Admin Portal:
Select Conversation type > AI agent / IVR
Select the desired workflow, then select Apply
View Workflows in a call
Want to see the exact steps your callers selected as they navigated through your voice workflow?
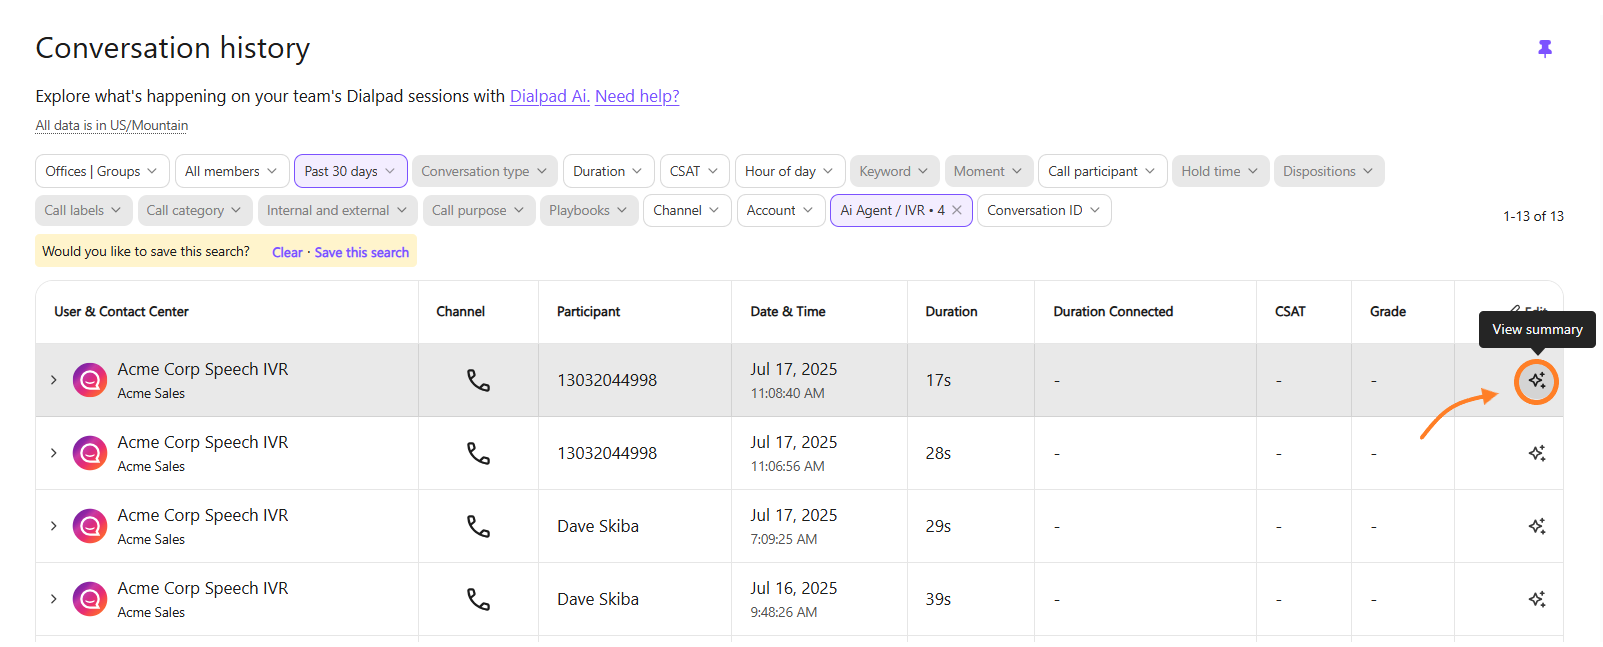
Once you've found the interaction from the Conversation history:
Select View summary
Select Show internal messages
.png)
That's it! Here, you'll see each workflow step, the media that played and the customer's selection.
Digital Workflows
Dialpad Digital Workflows let you design automated, self-service experiences for text-based customer interactions.
Use Digital Workflows to guide customers through Web Chat, SMS, and Email conversations with channel-aware logic, messaging, and routing.
Requirements
Before you create a Digital Workflow, make sure your company has:
a Digital Engagement license
Digital Channels configured in Dialpad Admin if you plan to attach the workflow to a channel event
Benefits of Digital Workflows
Digital Workflows let you customize the customer experience by:
sending automated replies in text-based channels
collecting customer information before routing to an agent
using workflow logic to personalize the conversation
connecting to external systems through APIs
configuring digital automation across Web Chat, SMS, and Email channels
Digital Workflows are best when you need a workflow built specifically for digital interactions.
Use a Digital Workflow in Digital Channels
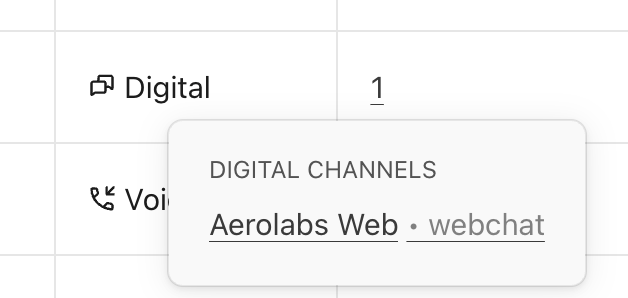
Once a Digital Workflow is published, you can attach it to supported channel events from the Advanced tab in Digital Channels.
To attach a Digital Workflow to a channel, go to your Dialpad Admin Settings.
Select Channels & Workflows > Digital Channels
Open the channel you want to update
Select the Advanced tab
Choose the event you want to configure
Select the published Digital Workflow
Save your changes
Published Digital Workflows are available for selection across the company from the Advanced tab, even if they were created in a different office.
When a workflow is attached to a channel through the Advanced tab, the Workflows list view will show that the workflow has a connection.
Best practices for digital workflows
A few things to keep in mind when using digital worklfows:
Use Digital Workflows for channel-specific messaging and automation.
Use Shared Workflows when the same logic should be reused across both voice and digital channels.
Add a description before publishing so other admins can find the right workflow quickly.
Check channel compatibility before reusing the same workflow across Web Chat, SMS, and Email.
Avoid using transfer nodes in the Advanced tab for Digital Channels unless you are configuring the Out of business hours event.
End simple digital flows cleanly. A terminal node is not always required.
Shared Workflows
Shared Workflows enable teams to build common logic once and apply it seamlessly across both voice and digital channels, eliminating the need to recreate the same workflow in multiple places.
They’re ideal for centralizing reusable processes such as CRM data dips, customer authentication, and routing logic, ensuring consistency and reducing maintenance overhead.
Shared Workflows are especially useful for:
business hours checks
CRM or external data lookups
customer authentication
routing rules
other reusable workflow logic
Shared Workflows vs. Digital Workflows vs. Voice Workflows
Use a Shared Workflow when you want to reuse the same logic across voice and digital channels.
Use a Digital Workflow when you need a workflow built specifically for text-based channels such as Web Chat, SMS, or Email.
Digital Workflows are the better choice for channel-specific messaging experiences, such as sending messages directly in a digital conversation.
Voice workflows work best for voice-specific contact centers, such as when you use TTS (text-to-speech) or have callers choose a support team they want to speak to when a digital channel may not be suitable to use.
Use Shared Workflows in Digital Channels
Once a Shared Workflow is published, you can attach it to supported Digital Channel events.
To use a Shared Workflow in a Digital Channel, go to your Dialpad Admin Settings.
Open the channel you want to update
Select the Advanced tab
Choose the event you want to configure
Select the published Shared Workflow
Select Save changes
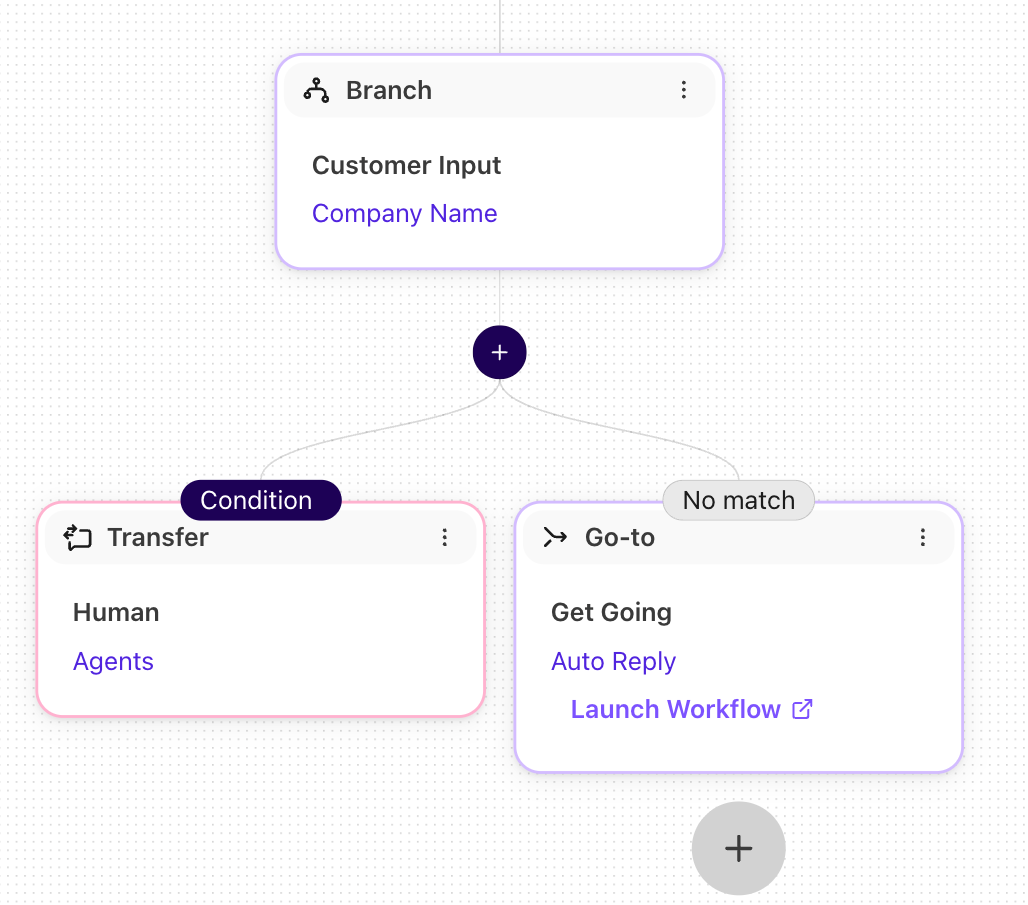
To link a workflow to a shared workflow, go to your Dialpad Admin Settings.
Open the workflow you want to update
Select Options > Edit on a Go-To step
Select Workflow and choose the shared workflow you want to link
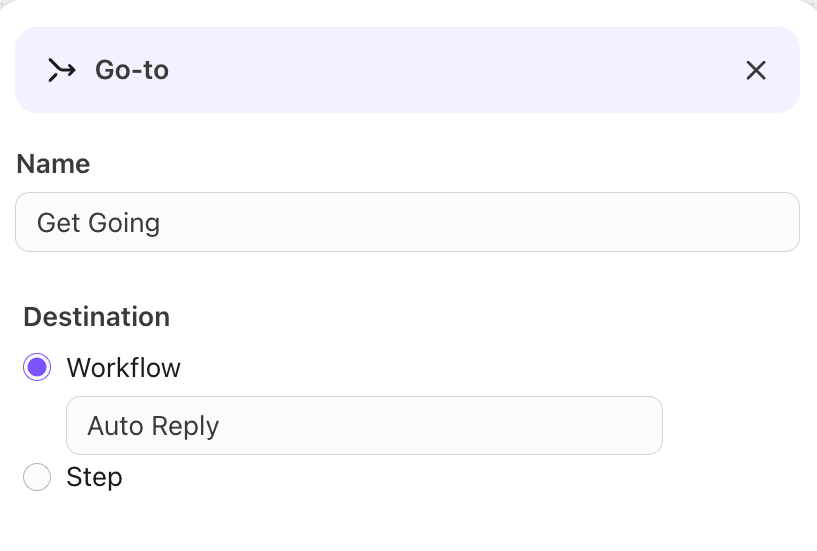
Select Add
Select Publish to update and publish the workflow
The shared workflow is now linked with the existing workflow.
Published Shared Workflows are available from the Advanced tab across the company, even if the workflow was originally created in a different office.
Frequently asked questions
When should I use a Shared Workflow instead of a Digital Workflow?
Use a Shared Workflow for reusable logic that should work across both voice and digital channels.
Use a Digital Workflow for text-based digital experiences, especially when you need channel-specific messaging behavior.
Why is my Shared Workflow not showing in a Digital Channel?
Only published workflows are available from the Advanced tab.
If the workflow is still saved as a draft, publish it first.
Want to learn more?
Check out Dialpad University's free courses covering our products and services, as well as insightful tips and best practices.