Workflows are a great tool for properly routing calls and interactions for your company. While useful and valuable, they can also be tricky to navigate and structure. Here are some best practices for working with workflows.
Who can use this?
All Dialpad plans include standard workflows.
Expert Workflows require configuration assistance from Dialpad's Professional Services team.
Let’s dive in!
Recommended external assets
When designing and building a workflow, we recommend creating an external diagram.
Tip
Some suggested programs are: Lucidchart, Visio, Diagram.io or similar.
Creating an external diagram can:
Create visibility with stakeholders who don’t have access or training on workflows
Allow for faster development and quicker onboarding of new developers
When adding improvements or changes, make sure to update these documents to ensure your data is accurate.
Note
Variables, prompts, and workflows should also be documented in a separate document. This allows for faster changes and better visibility.
Go-to steps in workflows
When using Dialpad workflows, you can use the Go-to workflow step (also called a node) to link multiple workflows. This allows you to break up logic and information into smaller, easier-to-consume chunks. These Go-to workflows are usually referred to as “sub-workflows.”
For more information about Go-to workflows, read this Help Center article.
Copy workflows
Copy existing workflows when you create a new one for another office to maximize efficiency and minimize errors. This allows you to keep the desired workflow for another office without creating one from scratch.
For information on copying a workflow, read this Help Center article.
Note
When copying a workflow, the names used in the workflow must be unique to each office to which it’s applied.
Recommended version control process (complex workflows)
Version Control is important for controlling, organizing, and tracking different versions of content or processes. This is crucial for workflow systems to ensure that updates and changes are made without affecting active calls.
When managing different versions of complex workflows, we recommend following these steps:
From your Admin Settings, select Channels & Workflows > Workflows
Under the Workflows tab, select Options > Copy
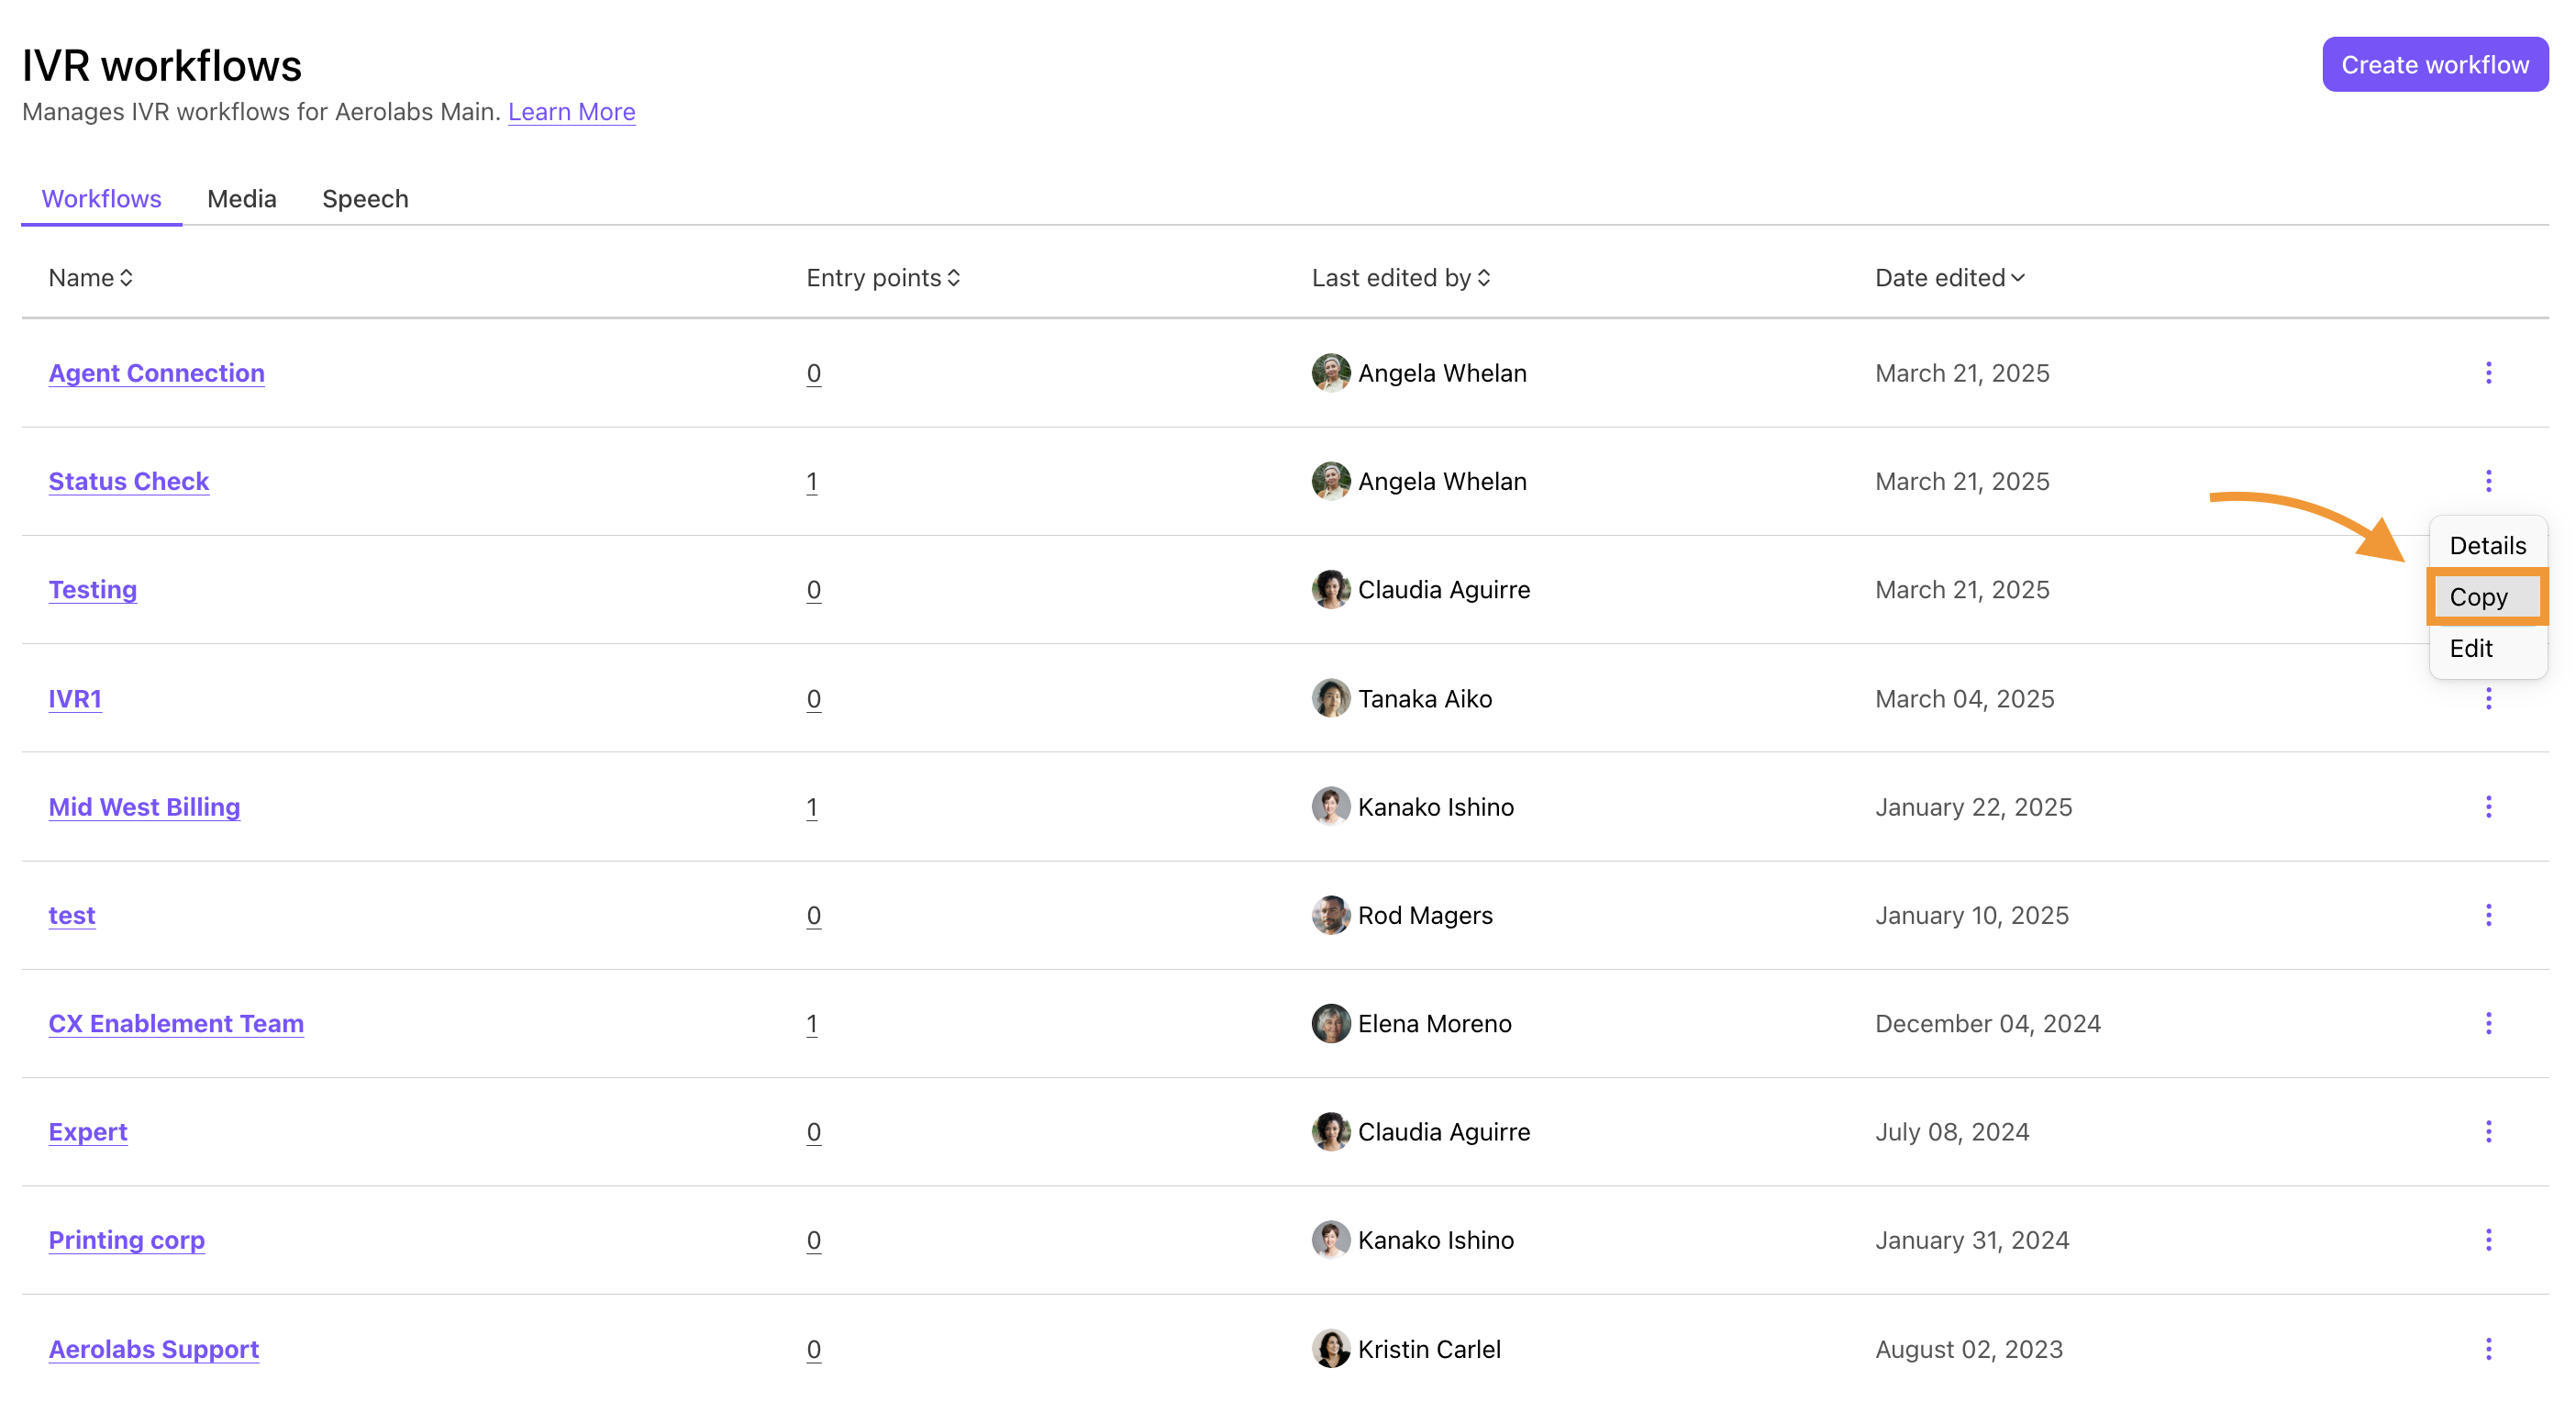
Tip
Use this naming convention: Production Main Workflow to QA Main Workflow [Date of Copy] [Initials of Developer].
Rename the workflow and select an Office

For the sub-workflows that need to be changed, go to the desired workflows in the list of workflows and select Options > Copy
Note
Use the same naming convention mentioned in Step 1. QA Main Sub Workflow [Date of Copy][Initials of Developer]
Update any Go-to nodes that link to another workflow, if needed
Note
If a Go-to node links to another workflow, the sub-workflow must be updated as well if it is part of the required changes.
Make the desired updates to the QA sub-workflows and select Save
In the QA workflow, update the Go-to nodes to link the newly published QA sub-workflows and select Publish workflow > Publish
Assign the new QA workflow to the test department phone number
For details on assigning a workflow, read this Help Center article.
Tip
It is recommended to seek approval or have any updates reviewed before pushing the QA workflow into production.
For the QA workflows and the QA sub-workflows used for the QA process, select Options > Copy
Rename the workflow and select an Office
Tip
For workflows going from QA to production, use this naming convention: Prod Main Workflow [Date of QA Go Live].
Select Save for the new sub-workflows
Update the Go-to nodes in the new production workflow to link with the newly published sub-workflows, with the date included
Select Publish workflow > Publish
Update the production workflow for Call Routing in the desired Office, Department, or Contact Center
For details on assigning a workflow, read this Help Center article.Note
This can be done during business hours without disrupting normal operations.
Leveraging workflows to automate recording and transcript consent
Where permitted, you can use the customer.session.voice.recordingoff variable to disable recording and transcription functionality. This allows the user to choose whether their interaction is recorded and transcribed.
This variable can be used in an Assign step within a workflow. To add this variable to a workflow, go to your Dialpad Admin Settings.
Select Channels & Workflows > Workflows
Select the desired workflow or create a new one
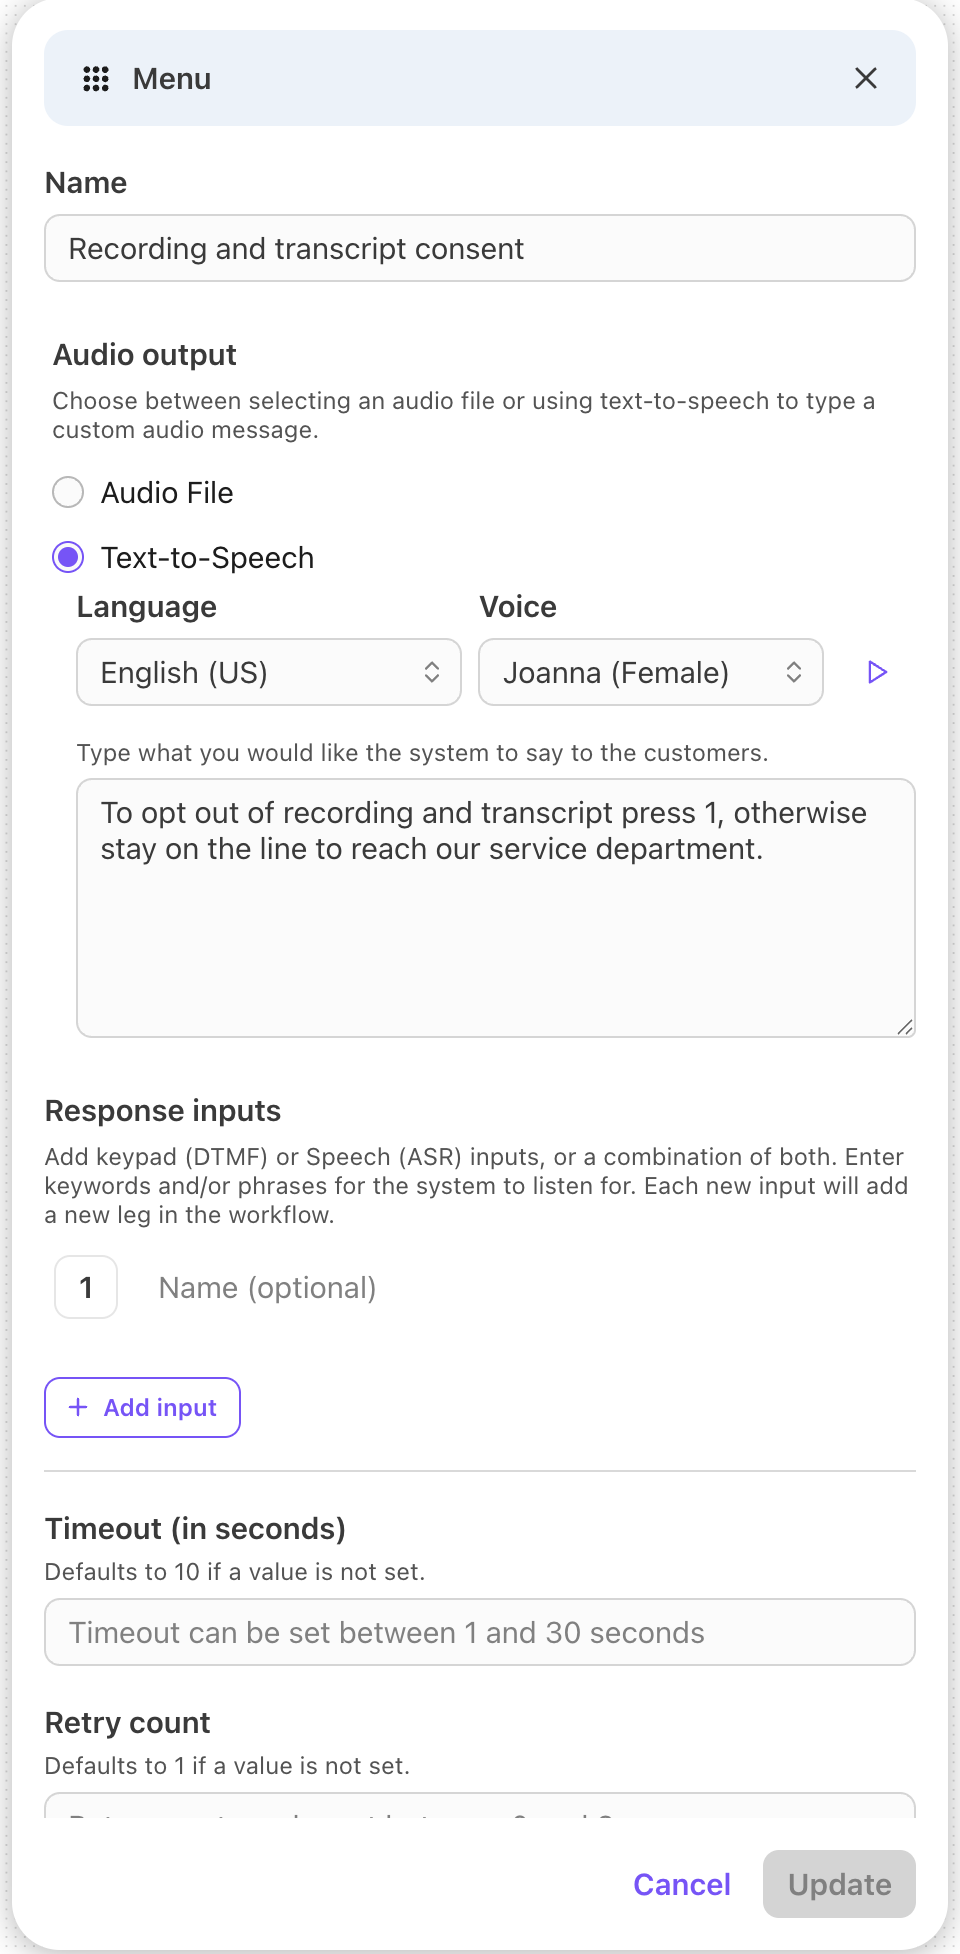
In the menu step, add or update the audio file or text-to-speech content to reflect the options the user has when they reach out using this workflow
Tip
Wording for this step could look similar to this example: “To opt out of recording and transcribing your interaction, press 1, otherwise, please wait to be connected to our support department.”
Add an Assign step, including:
Name
Variable name: customer.session.voice.recordingoff
Variable expression: true
Note
For this variable, only the true value is allowed. Any other variable expression is not permitted.
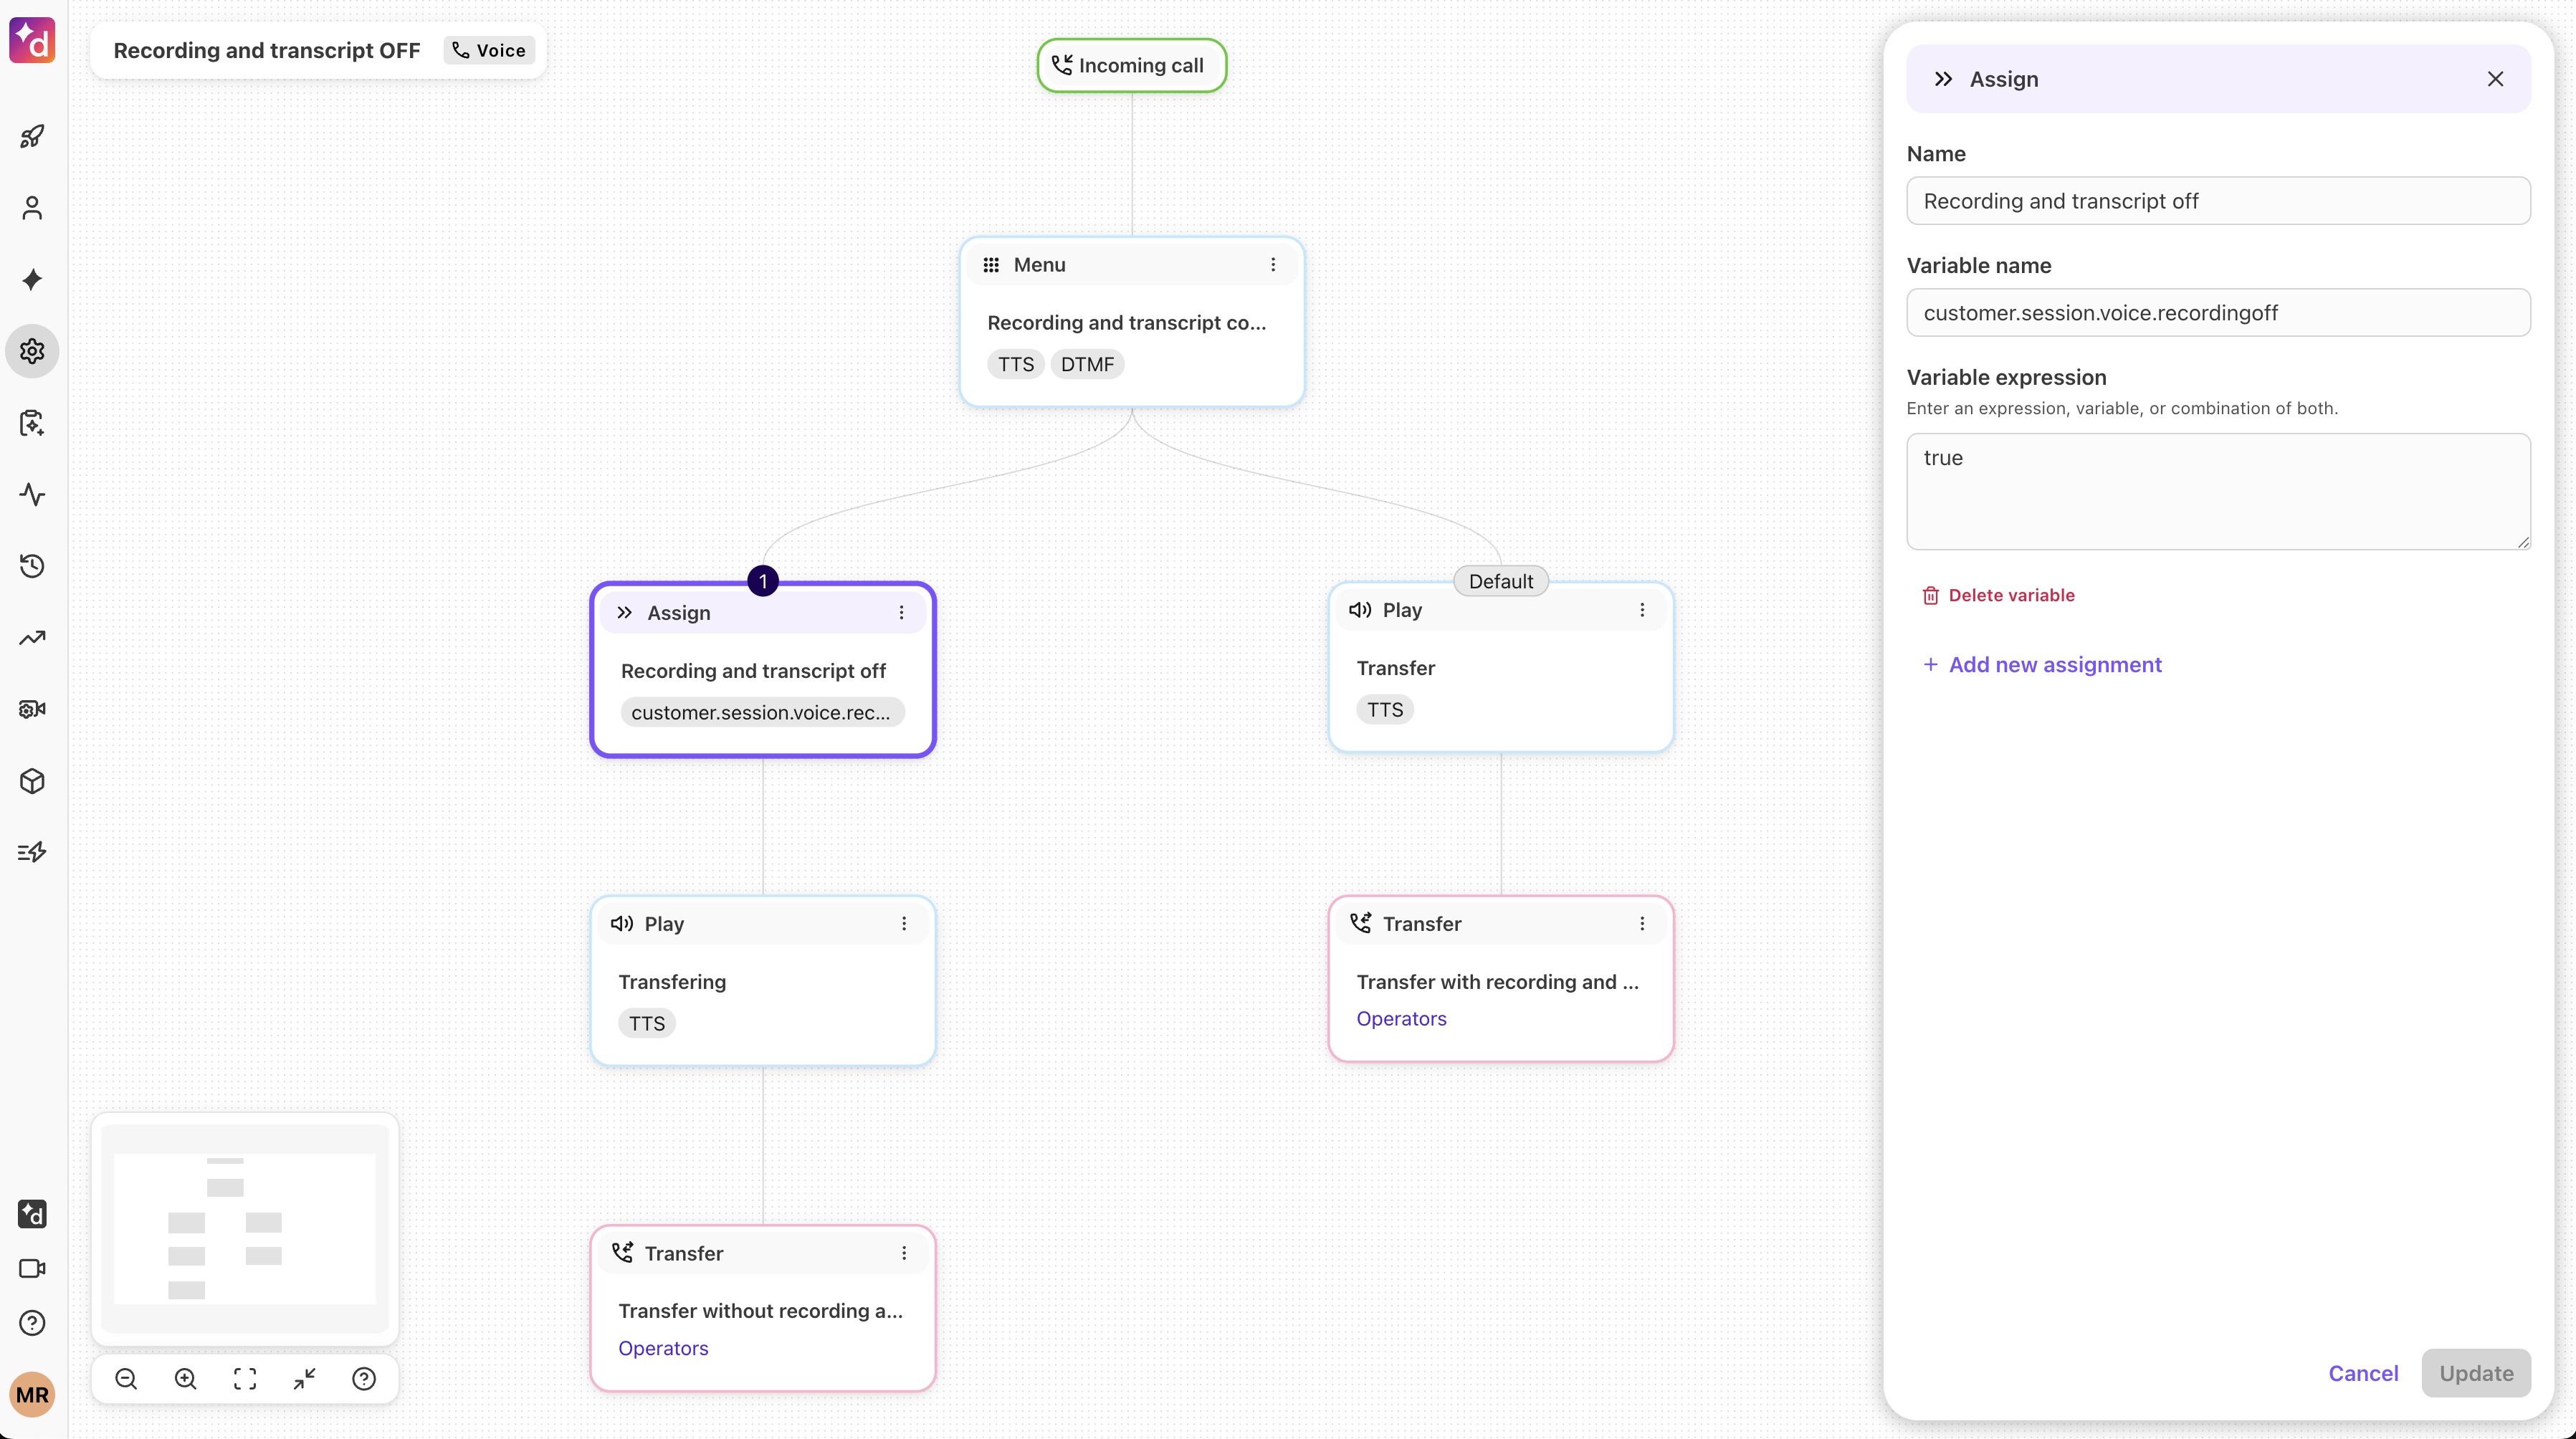
Select Update
Configure the rest of your workflow to route the call accordingly.
External APIs in Workflows
Dialpad’s Workflows offer a powerful way to guide your customers to the right place the moment they call. These intelligent systems go beyond basic phone menus by understanding exactly what a caller needs and adapting the experience in real-time. You can easily set up automated steps that let callers solve simple problems on their own, without ever waiting on hold for an agent.
By routing calls efficiently, you respect your customers' time and keep your team focused on the conversations that matter most. Adopting these workflows ensures that every call receives a professional and polished response, which builds trust in your brand. While extremely helpful, they can be complex and a little intimidating to work with.
Here are some use cases for when and how you can use external APIs in your contact center workflows.
Note
The examples shown below are all done within the Expert Workflow builder.
Data dip and transfer to a contact center
You can create a Data Dip API that retrieves a Dialpad Contact Center ID based on a given inbound phone number.
Using a data dip automatically routes callers to the correct department based on their history, enabling them to skip frustrating menus and unnecessary button presses. This ensures high-priority or existing customers are instantly connected to the right team, reducing wait times and unnecessary transfers.
To set up an expert workflow to use Data Dip, go to your Dialpad Admin Settings.
Select Channels & Workflows > Workflows
Select the workflow and select Launch Expert in the Expert node in the workflow
Add a Send Message node to log the “inbound phone number” (also called the ANI or Caller Number) using the customer.businessid.phone variable
Note
Send messages can be viewed in Digital Engagement under the Supervisor Tab.
Once the inbound number has been logged, add a Send a Message node to park the call
In the External API node, retrieve data from an API with a phone number
Note
It’s recommended to assign a variable in case the URL encoding doesn’t work as expected.
Add a Wait for Message node
Add a Send Message node to log the API results
Add a Branch node for an API response; one for a successful response and one for an unsuccessful response
Add some Assign Variable nodes for the ‘transfer URL’ to log the URL
Note
Add one variable for ‘Set URL’ (successful response) and one variable for ‘Set Default URL’ (unsuccessful response).
Add a Send a Message node with a Call Resume widget
Add a Wait for Message node
Add a Send a Message node with a Call Transfer widget
Select Publish expert
Select Publish workflow
The call will now be transferred to the appropriate contact center based on the inbound phone number.
Operator Transfer Workaround
When transferring to agents/operators for a given contact center/department, if no one is available, it will route to the workflow twice. To resolve this issue, you can create a workaround using the Custom Context API.
Using a Custom Context API enables your workflow to access external customer details, such as account status or recent orders, providing personalized self-service options that resolve issues even when no agents are available. This significantly improves the customer experience by preventing dead ends and ensuring your team has the necessary context to follow up efficiently later.
To create an expert workflow that performs an operator transfer without looping back to the workflow, go to your Dialpad Admin Settings.
At the beginning of the workflow, add an Expert step and name it ‘CheckLoop’
Add an External API node for Get Custom Context
Add a Branch node to check for the ‘customer.session.voice.calluuid’
Note
Add this API query within the Branch node.
If a call UUID is found, the call is a fallback call
Note
Set variable nodes accordingly to handle the call gracefully.
If the call UUID is not found, create a context with the ‘calluuid’
Select Publish expert
Select Publish workflow
API Troubleshooting
APIs can always be tricky to work with. If you’re experiencing issues with your APIs in workflows, consider some of these solutions.
Unable to reach an API
If you are unable to reach an external API, consider these options:
Double-check that the API is open to the environment.
Pull in another team member to run the Postman request to verify.
Schedule a working session with the API vendor to troubleshoot.
Create a standalone Workflow that contains only the External API call.
Moving an API to a workflow
If you are having trouble once you move the API to the workflow, consider these options:
Use a request bin or endpoint: A request bin is a separate URL where you can send your API request to log the request from Dialpad to a third-party API.
Sometimes, API requests may change from within a workflow. When in doubt, change the URL to a “request bin,” which will log the request for you to view and double-check that the results are the same.
Use TTS nodes at will when setting up a workflow script to read back API response variables and troubleshoot your JSON Path.
Every variable should be tested before going live.
Ask for detailed logs from Dialpad’s Support Team if you still can’t view/see the error you’re encountering.
API Timeouts
The maximum timeout for receiving a response from their API is 30 seconds at the platform level. Be sure to use timeouts to manage them correctly.