Expert Workflows let you create advanced call routing systems for your business. Completely customizable, Expert Workflows go beyond basic menus and greetings and ensure the caller experience is based on their needs, and your procedures.
Let’s dive into the details.
Who can use this
All Dialpad plans include standard workflows.
Expert Workflows require configuration assistance from Dialpad's Professional Services team.
Note
The External API step is available in the standard workflow builder. While you can still use External API steps in the Expert workflow builder, it is recommended to use the standard workflow builder using the standard External API step.
What can Expert Workflows do?
With almost endless configuration options, Expert Workflows let you personalize your workflow by:
Collecting caller data: Uses voice prompts to gather information from callers and store it for further use in the call flow.
Making personalized decisions: Routes callers to the most appropriate agent (or Department) based on their responses or stored data.
Accessing external data: Connects to other systems to retrieve caller information which then personalizes the experience.
Sending notifications: Keeps callers informed by sending SMS or email updates throughout the call flow.
Perform tasks: Completes specific tasks such as creating a service ticket or accessing and modifying customer order information.
Note
While this guide provides a basic overview, creating complex Expert Workflows requires some technical knowledge. If you're new to this, it's recommended to reach out to Dialpad's Professional Services team for assistance in building your custom workflow solution.
Access Expert Workflows
Once Professional Services has enabled Expert Workflows, you'll see an Expert step in your workflow builder.
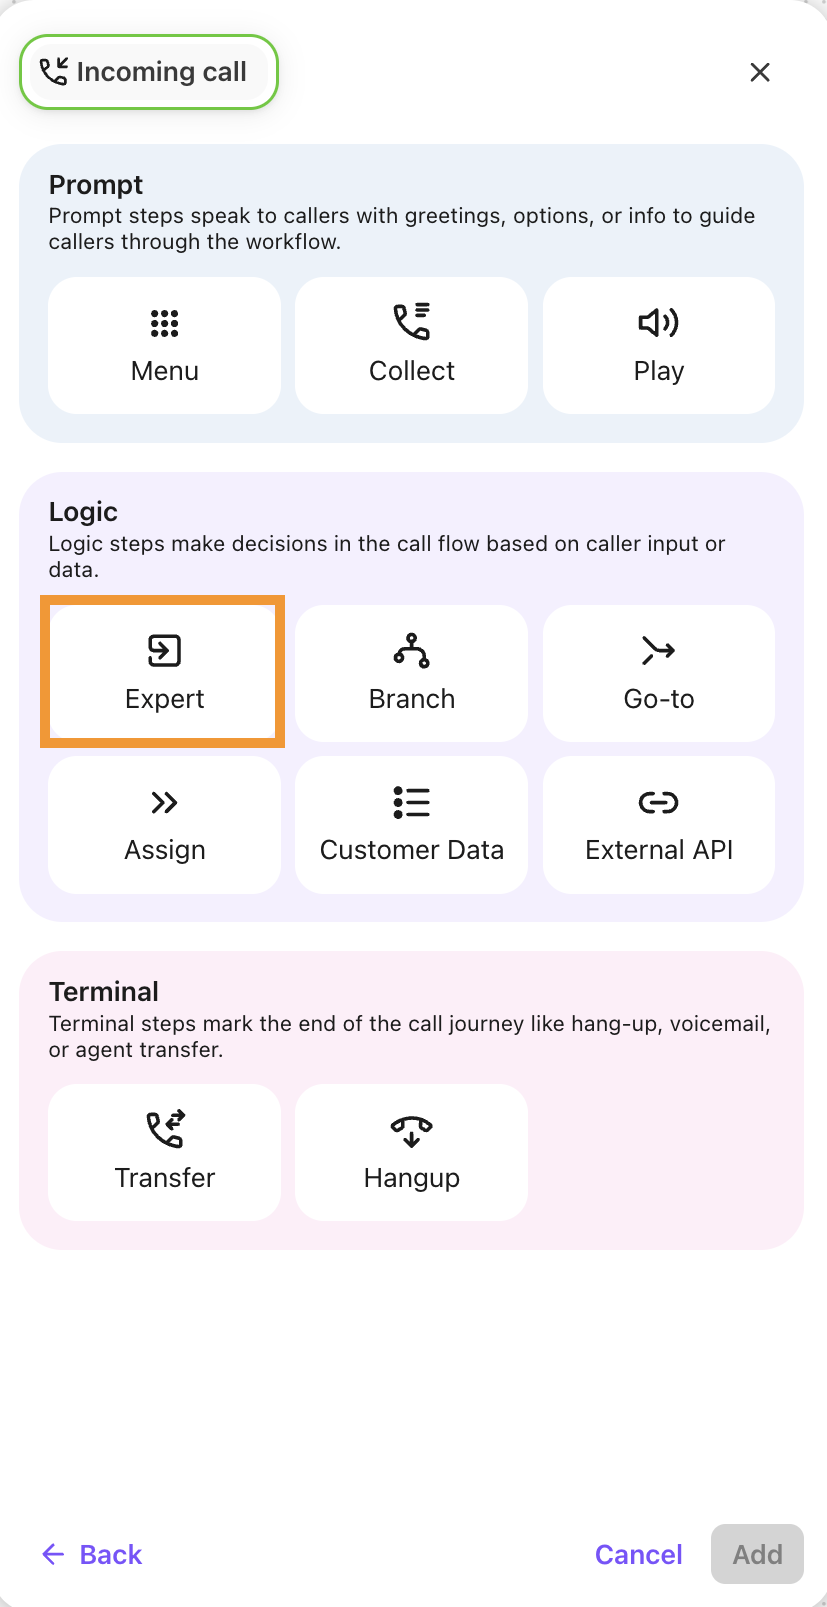
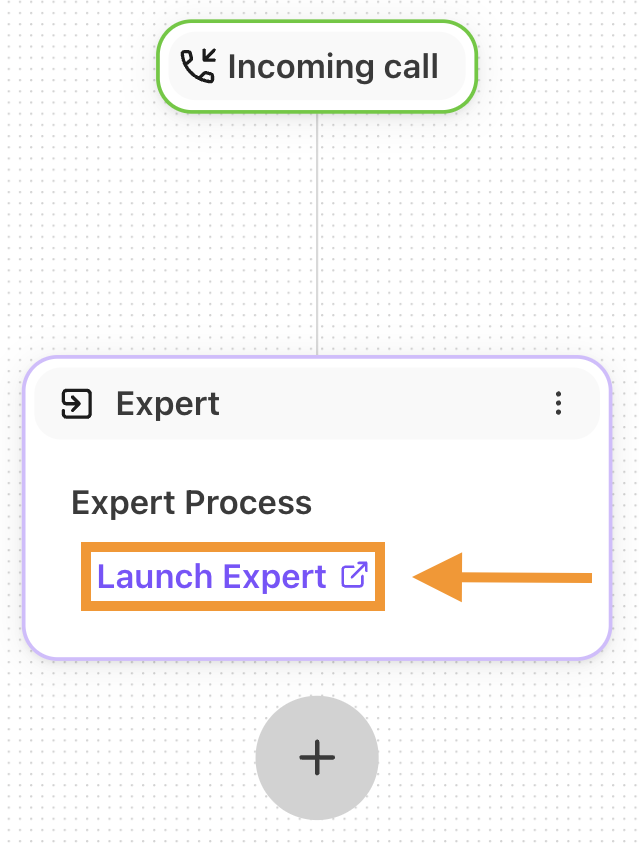
Once you’ve created and named your Expert Step, select Launch Expert to open the Expert Workflow builder.
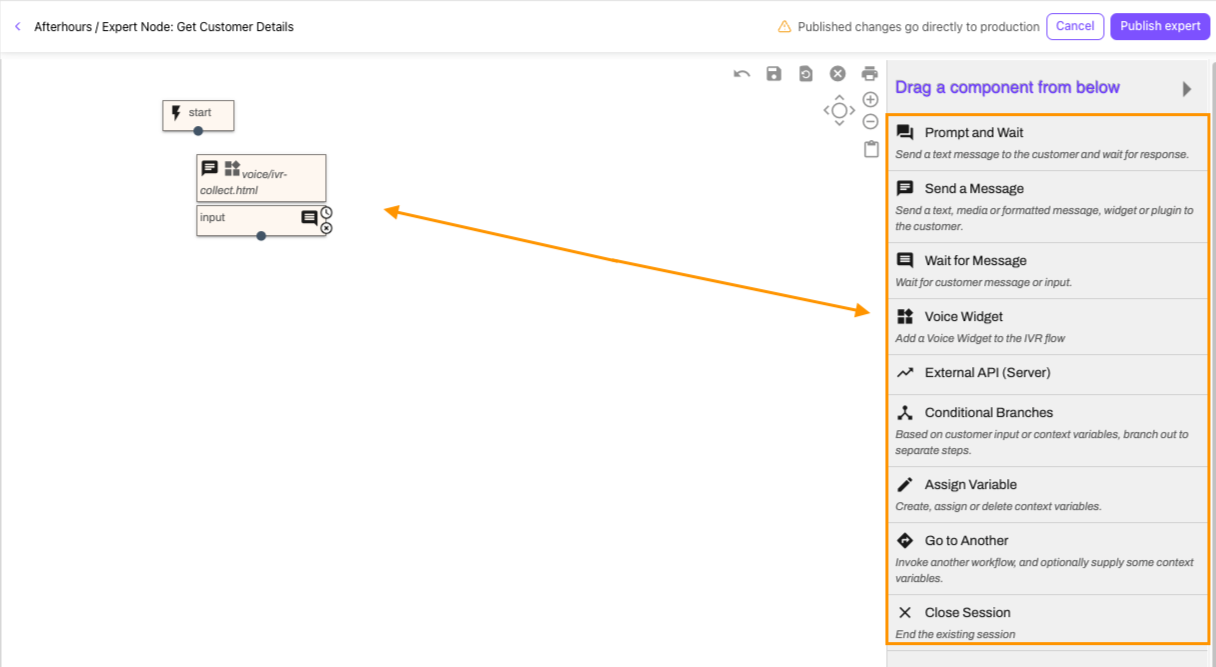
The Expert Workflow builder provides a drag-and-drop interface where you can connect different elements (nodes) to create a flowchart for your routing.
To add a node:
Select a component from the node menu
Drag and drop it into position on the canvas
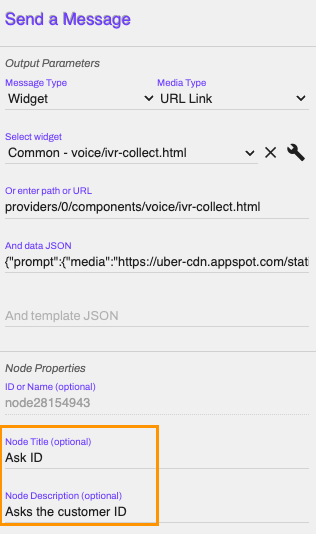
Select the node to add widgets and routing details
Name the node and add a description (optional)
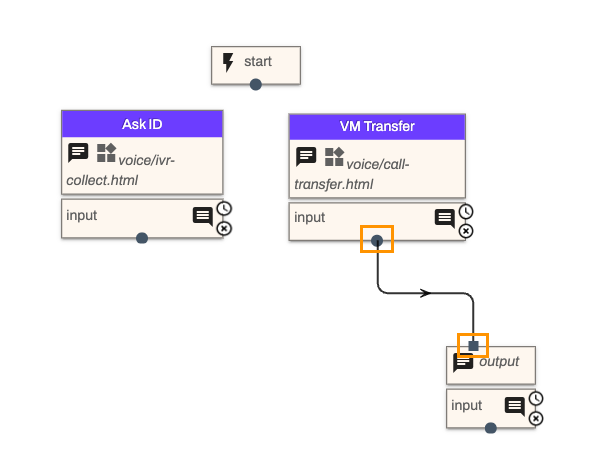
Connect nodes using the circle and square connectors on the top and bottom of each node
Select and drag from a circle (output) to a square (input) to connect.
Select the square (input) and drag to open canvas space to disconnect.
Change a connection by selecting it and dragging one end of the connection to another node.
Select Publish to save your workflow
Workflow builder features
The Expert Workflow builder has several built-in features to help you create complex workflows. Let’s look at what you can do.
Local change toolbar
The local change controls help builders manage workflow development. These features apply to your current editing session only.
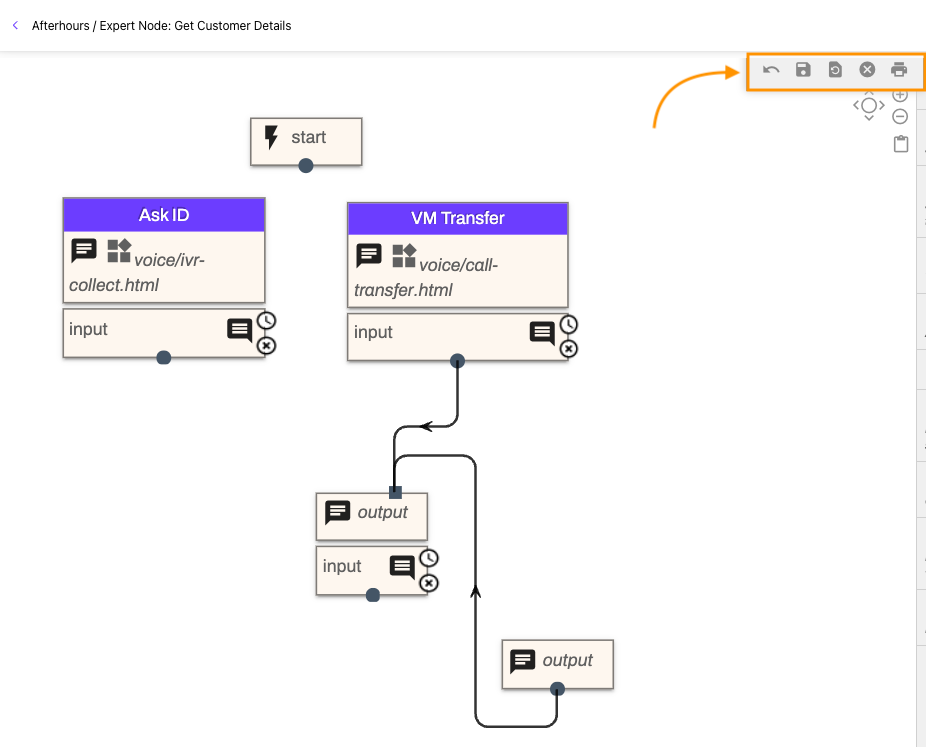
Here, you can:
Undo and redo changes you've made.
Save a local checkpoint of your workflow at any point.
Restore your workflow to the last saved local checkpoint, in case you make a mistake.
Clear any saved local checkpoints if you no longer need them.
Print your workflow to an image file for documentation purposes.
Important
Saving changes immediately affects your live workflow, so be sure you've reviewed everything before saving.
Navigation controls
The navigation controls at the top of your workflow canvas let you zoom in and out, and move around the workflow canvas for better viewing.
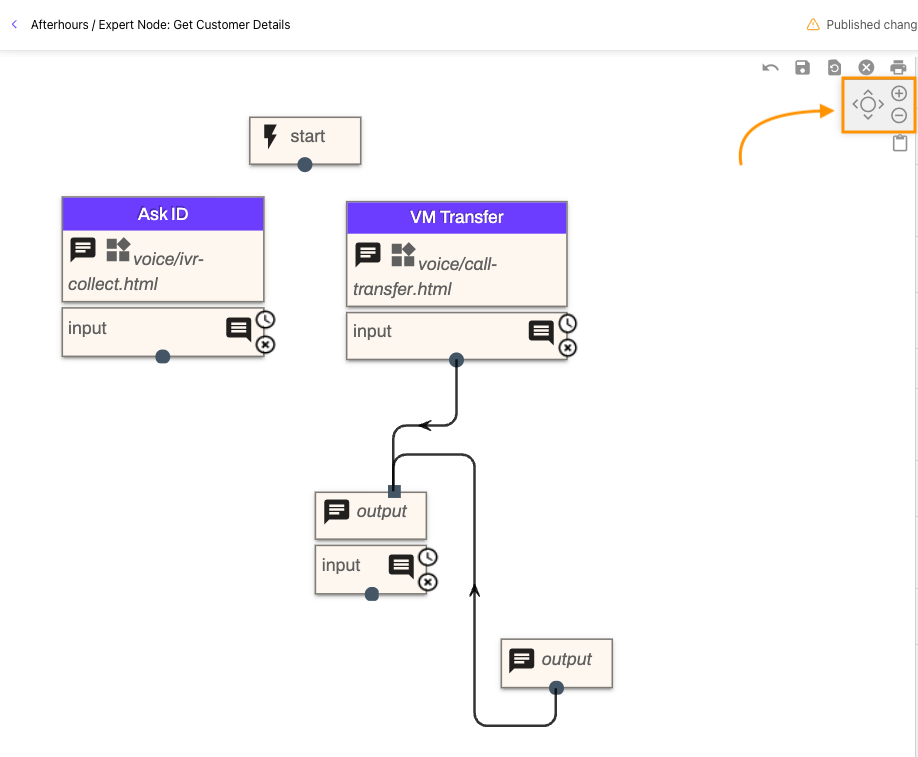
You can also long-hold the mouse to drag the canvas within the display.
Quick paste
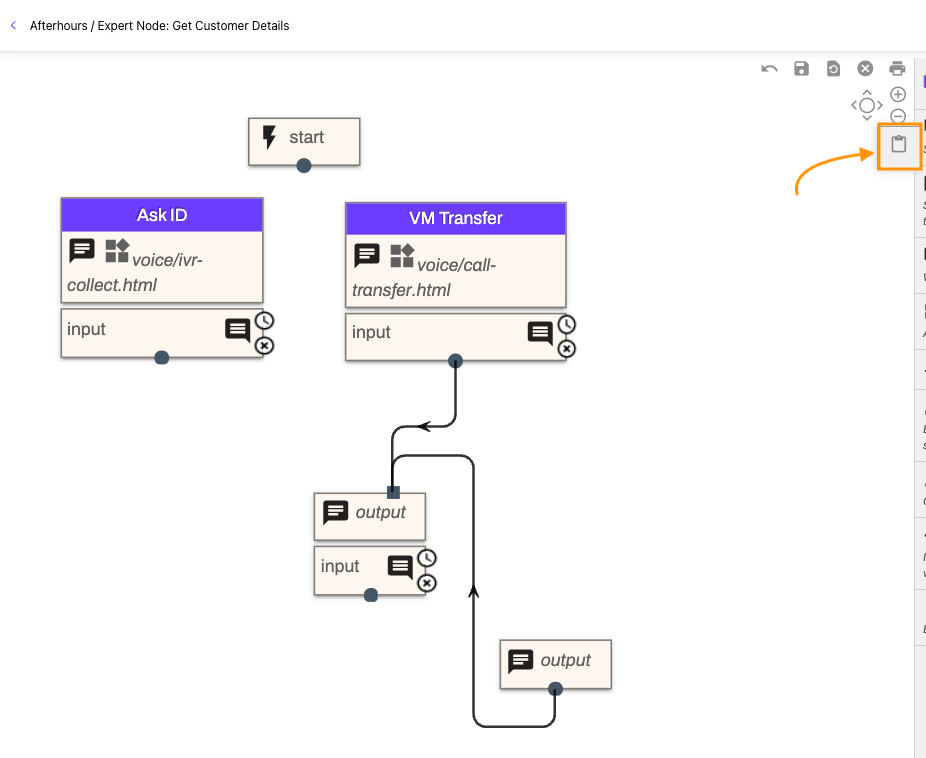
The quick paste button lets you paste your last copy or cut, making it fast and easy to duplicate elements within your workflow.
Custom Customer Context
With Dialpad’s Custom Customer Context, agents and supervisors have crucial client data at their fingertips, right from the beginning. Client details will appear as the call rings and are accessible throughout the call. This ensures customers avoid repeating information and allows agents to handle their specific needs better, resulting in improved overall customer satisfaction and more efficient interactions.
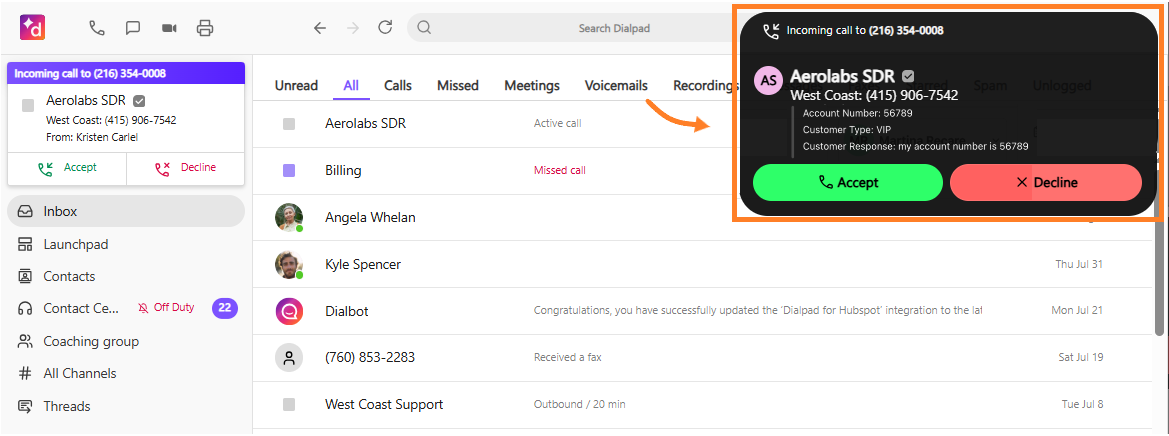
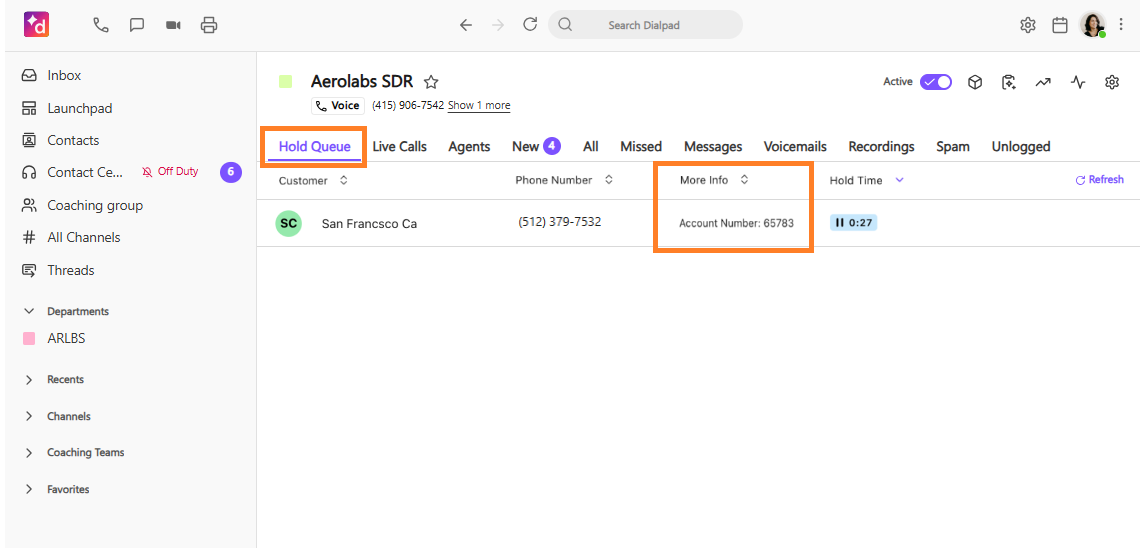
Digital Contact Center Supervisors can also keep tabs on priority customers by easily referencing customized customer context (think More info) from the live Supervisor Hold Queue tab.
Let’s dive into the details.
Configuration
Dialpad’s Professional Services Team will work with you to create a bespoke Custom Customer Context. We’ll discuss your exact business needs and desired data points to ensure the right information is displayed to your team. Creation and configuration is a 5-staged process.
Data Collection

Custom Customer Context is customizable for your team and because each team is unique, this means that there are multiple ways to collect client data.
No matter the data source, each data item needs to be stored within a DX Context variable.
This allows us to reference that data item in future stages of the pipeline above.
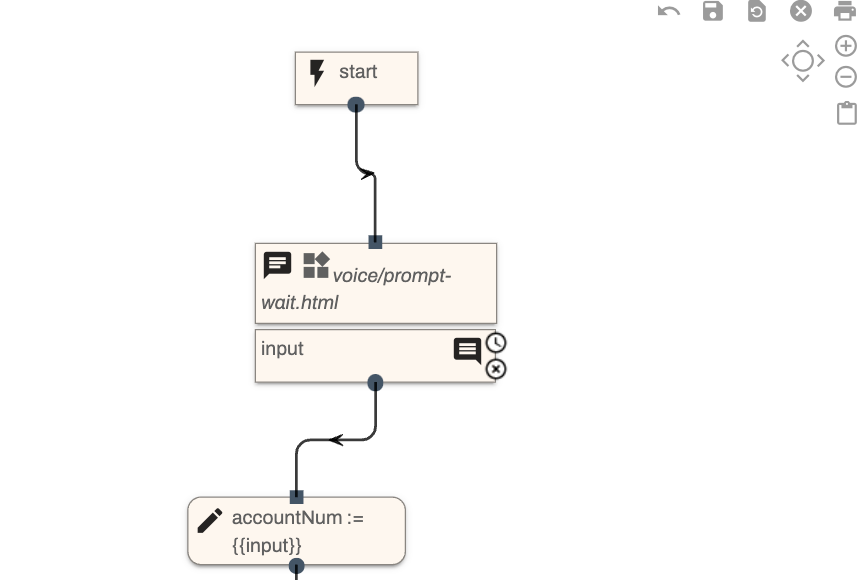
In the example below, we’re collecting the user’s account number, using the ‘Prompt and Wait’ node that prompts the user to enter their 5-digit account number. The result will be stored within a context variable which we’ll call “accountNum”.
Context Object formation
Once the context data has been collected and saved within the context variables, a Context Object is created to display the data within Dialpad.
This Context Object is an aggregate of all of the context variables created in the previous stage, organized in a specific array JSON structure.
Each context item object must be noted using the following structure and parameters.
name: The name key references the visible key name of the context item.
Each context item will have a different key name.
value: The value is the value of that context item.
In most cases, this value will reference an existing context variable containing information collected in previous steps.
displayOrder: The displayOrder integer property tells us the order to display this particular item.
If we have > 2 or more context items, specifying the displayOrder tells us which ones should be displayed before the others.
{
"name" : "Call Type"
"value" : "{{value}}"
"displayOrder" : 2
}
For example, in the below structure, we’re specifying that we want “Call Type” to be displayed first (displayOrder = 1), and following that we want to display “Account Info” (displayOrder = 2)
[
{
"name": "Call Type"
"value": "{{callType}}"
"displayOrder": 1
},
{
"name": "Account Info"
"value": "{{accountInfo}}"
"displayOrder": 2
},
]
In our example, we have only one context item, "accountNum".
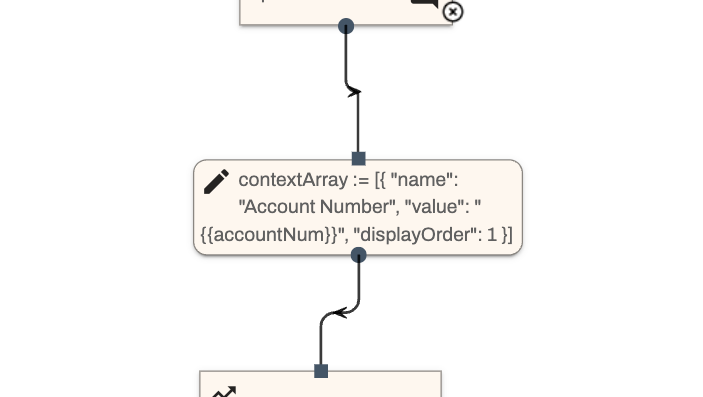
We can create Context Array as follows:
[
{
"name": "Account Number"
"value": "{{accountNum}}"
"displayOrder": 1
},
]
The {{ }} mustache notation allows us to reference pre-existing context variables created elsewhere. In this case, we’re setting the “value” key to equal the accountNum variable we defined above.
Finally, we’ll create the context array by setting it as a new context variable (as below).
Saving the Context data
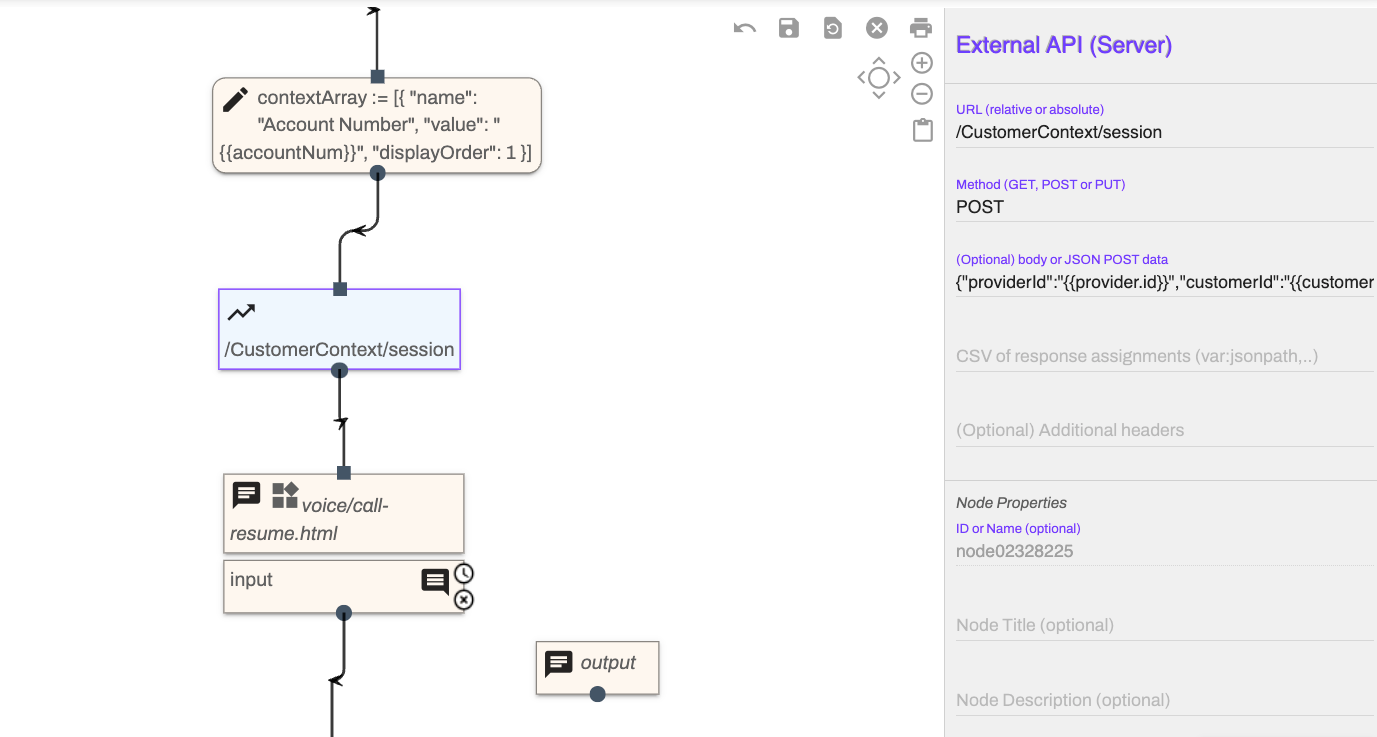
Next, the Context Object is passed within the body of a specific API call node - this node will call the `/CustomerContext/session` DX API in order to save the context data to the DX database. This step ensures that the data can still be accessed once when the call ends.
For this, we’ll need to use the “External API” node, setting the URL value to be /CustomerContext/session , and the JSON body to be the following:
{
"providerId": "{{provider.id}}"
"customerId": "{{customer.id}}"
"type": "{{customer.session.id}}"
"context": "{{contextArray|type=json}}"
}
Workflow Transfer
If built-in functionality of non-expert transfers can be used, publish your completed Expert workflow and navigate back to your Workflow.
After your Expert Workflow has set the context, every transfer node should include the Enable Call Context checkbox.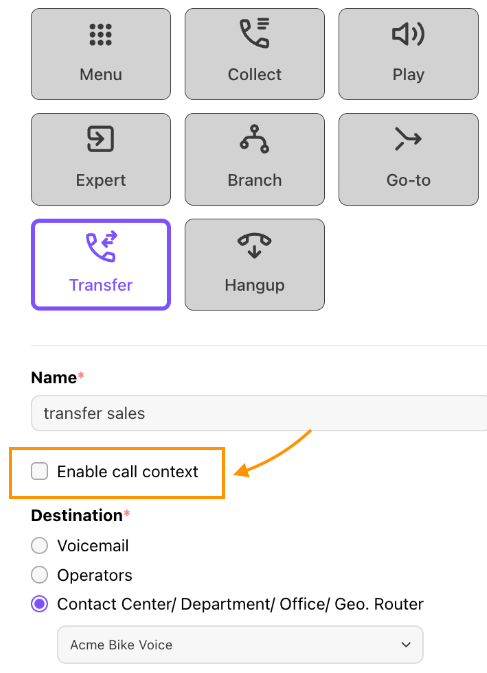
Transfers within Expert Mode
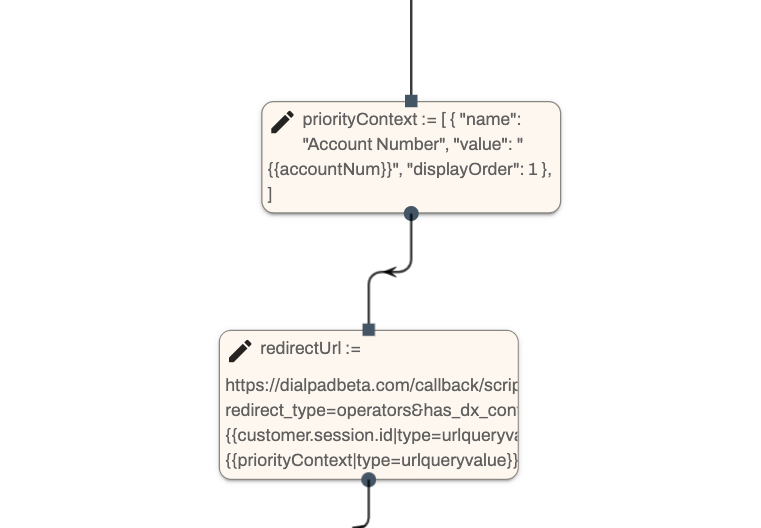
Transfers within Expert Mode are done using the Priority Context object and Redirect URLs.
Creating the Priority Context object
Using the original Context Object, we create a subset of the object and extract the top 3 items. We’ll use those 3 items to create a new array that we’ll call the Priority Context object.
This object specifies which 3 items we want to display in the Incoming Call notification view. Later, we’ll use this object in a redirect URL that allows us quick and easy access to the information.
Since we only have one context item in our example, we’ll add only that one item to the Priority context object. If we have 5 or more context items in total, then the Priority object would be composed of only the top 3 highest priority items.
Here’s what the priority object would look like:
[
{
"name": "Account Number"
"value": "{{accountNum}}"
"displayOrder": 1
},]
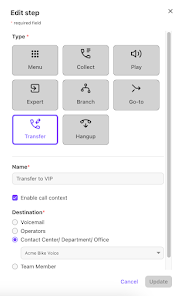
Finally, we redirect the call to Dialpad servers. This is done through either a Transfer node or a Digital Node. The Digital route node handles this step automatically, with no extra configuration required. If using a Transfer step, Customer Context is added by checking the Enable call context box (when Expert Workflows are enabled).
Redirecting to Dialpad
In the redirect URL, we will append two new query parameters: has_dx_context, which is set to ‘true’, and session_id, which maps to the current DX session ID. In addition, we’ll append a new priority_context param that references the priority context object.
All query parameters are required in order to tell the Dialpad servers that there is indeed context data that is tied to the current call.
Here’s what a typical redirect URL looks like:
https://dialpad.com/callback/scripted_ivr_option?redirect_type=operators&has_dx_context=1&session_id={{customer.session.id|type=urlqueryvalue}}&priority_context={{priorityContext|type=urlqueryvalue}}
We have two new query params, has_dx_context equals “1” and session_id equals the current session, referenced through the existing customer variable (as you can see above, we also make sure to serialize it as a query param). Both values are static regardless of the context data, so this URL will never change based on any dynamic data.
We also serialize the priorityContext object as a urlqueryvalue to ensure it’s sent to the DP in the correct format.
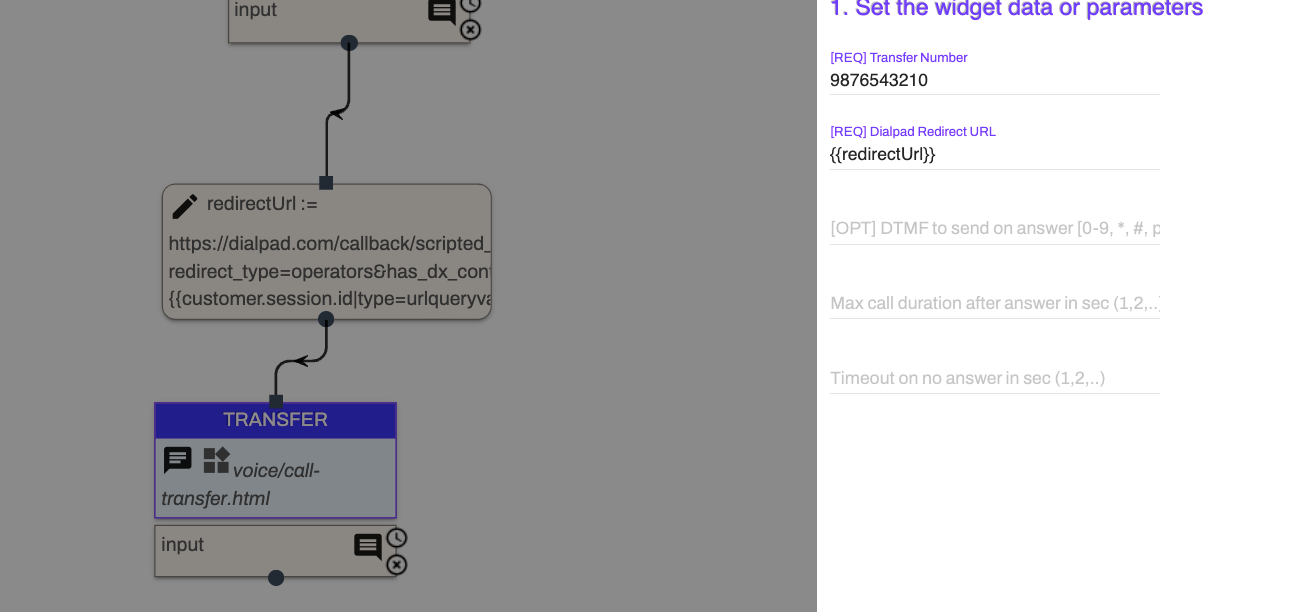
Here, the transfer node references the redirect URL within its “Dialpad Redirect URL” input:
Agent view
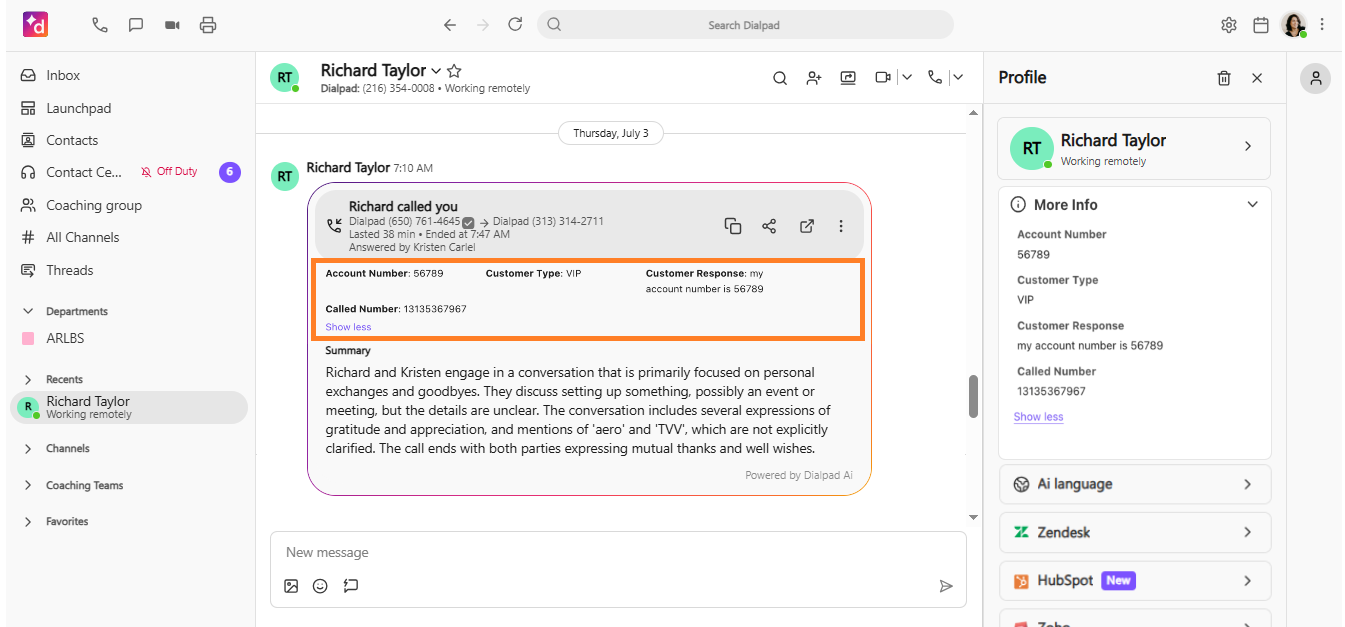
Contact Center agents can view the caller’s custom context details in 4 locations.
Within the incoming call notification
.png)
In the right-hand sidebar
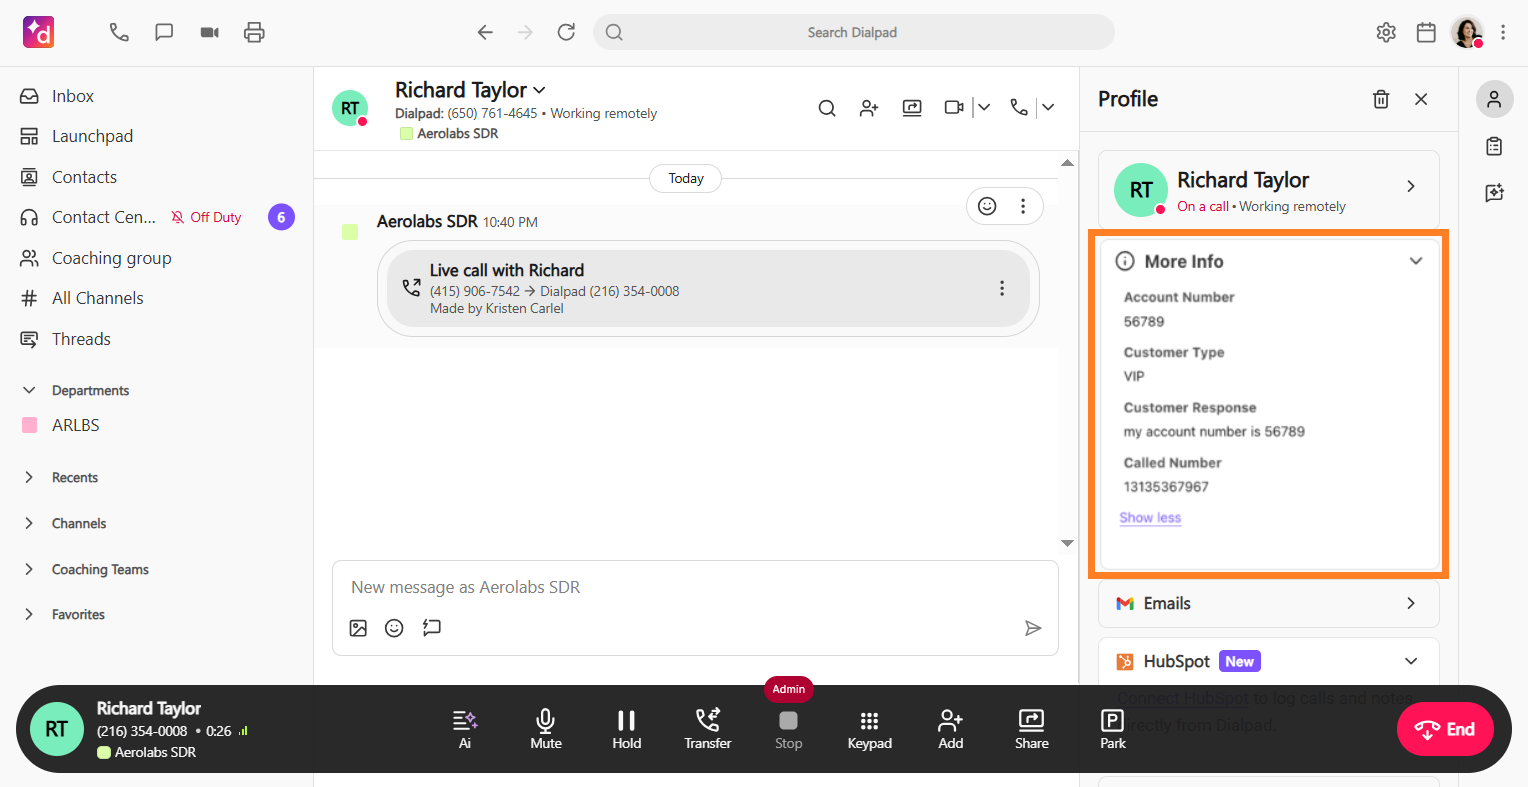
From the post-call and/or chat summary
Supervisor View
Supervisors can easily monitor top-priority customers by keeping tabs on the More info column in the Supervisor Hold Queue tab
Expert Workflow Nodes
Dialpad provides 9 different types of Expert Workflow nodes, each with a customizable name and description.
Let’s look at each node type.
Prompt and Wait
The Prompt and Wait node combines "Send Message" and "Wait for Message" to play a message and gather caller input.
Send Message
The Send a Message node plays pre-recorded messages (using a widget), information bubbles, or progress messages. Let's look at how each one works.
Widget: The Widget node provides call control elements such as playing prompts, transferring or hanging up.
Information Bubble: Information bubbles act as a debugging milestone for voice calls. Messages marked as Information Bubble will not be played back to callers, but appear in the logs for backend analysis.
Information Bubble should not normally be used with Prompt and Wait as it would cause the workflow to stop for input.
Progress: Progress messages are not audible to callers, they create a report tag for custom reporting modules. When custom reporting is enabled, Progress messages can be formatted into specific strings for build data reporting but should not be used with Prompt and Wait nodes.
Progress messages should be used with Send Message nodes only.
In the reporting string Workflow-^Name of Workflow>::Step-^<Step Name or desc> “-^” and “::” are defined delimiters in the reporting message.
When a Progress message is selected for reporting, select the data type as Task.
Wait for Message
The Wait for Message node pauses the workflow until the caller provides input.
Remember
Don’t forget to set timeouts to avoid indefinite pauses.
When designing an workflow, you do not need to use Send Message and Wait for Message as separate voice controls.
Voice Widget
The Voice Widget node lets designers send and use voice controls on the call. Choose from the 11 available widgets:
Voice Call-Park: Holds the call while longer operations are running.
Voice Call-Record: Records the call.
Voice Call-Resume: Resume the call after it was parked.
Voice Call-Terminate: Ends the call.
Voice Call-Transfer: Transfers the call to another destination like Department, person, or external number.
Voice Call-IVR-Collect: Gathers input from the caller.
Voice Call-IVR-Menu: Collects a menu choice from the caller.
Voice Media-Wait: Plays media and waits until finished.
Voice Play-Media: Plays a media file.
Voice Play-Prompt: Play a text-to-speech prompt.
Voice Prompt-Wait: Plays a text-to-speech prompt and waits for input.
Note
Some widgets require adding a "Wait for Message" node afterward for input.
This node does not explicitly include an input node—if your voice controls require an input node (required for all controls except call-park), you’ll need to add a Wait for Message or Prompt and Wait step after this node.
Go-to Another
The Go-to Another node directs callers to a different Iworkflow within your system. If the target workflow does not terminate the call, your workflow proceeds to the node below when the target workflow finishes. When creating a Go-to Another node, you’ll need to add the target workflow details.
To generate the expert URL name for a target workflow, you’ll need:
Workflow Name (without spaces).
Example: Acme Sales
Workflow ID (the letters and numbers after “workflow_” of your target workflow url).
Example: https://dialpad.com/workflows/workflow_IVR555555-4444444444
Then, compose your go-to target URL as follows:
WORKFLOW/<WORKFLOW ID>/<WORKFLOW Name without spaces>
Based on the example above, our target workflow URL will be:
WORKFLOW/WORKFLOW555555-4444444444/AcmeSales
Place this value into the Target Workflow Name.
Assign
The Assign node creates or updates variables to store information during the call, allowing for personalization.
If the variable does not exist, the variable will be created and assigned the given value.
New variables must be alphanumeric characters with no spaces or _ characters.
If the variable already exists the current value will be overwritten. See this Help Center article for details on system variables.
Notes
This node does not explicitly include an input node—if your voice controls require an input node (required for all controls except call-park), you’ll need to add a Wait for Message or Prompt and Wait step after this node.
Conditional Branch
The Conditional Branch node routes callers based on specific criteria (caller input, variables, expressions). This keeps wait times low, helps you prioritize VIPs, and ensures your team receives the information they need.
Dialpad offers 3 different types of conditional branching.
Customer Input: Based on the last variable input by the caller.
Context Variable: Based on any variables created or assigned in the call flow.
i.e . System-generated variables such as ‘customer.businessid.phone’
Expression: Based on combination checks of regular expressions.
Once the conditional element is configured, you can create multiple workflow branches that will route to a unique step for that variable.
External API (Server)
Note
External APIs can be added as a step in the standard workflow builder. For details, check out this Help Center article.
The External API node makes dynamic calls to external servers to retrieve or update information. Requires a JSON-based REST API.
Once an API call is made, this node also allows you to parse JSON responses and store specific attributes in the workflow.
API calls should finish in 2-3 seconds. If the APIs take longer on voice calls, use call-park before the API call and call-resume after the API call. This will prevent the call from being disconnected or routed to your configured fallback path (such as voicemail) in case of timeout.
Dialpad only supports GET, POST, and PUT REST API methods.
Notes
If you’d like to restrict API access, you can do this via an authorization header or public gateway IPs.
The API endpoint should be accessible over the internet, as the request will come from the Dialpad cloud. If you want to restrict API access, you can either use the appropriate authorization header or ask for our public gateway IPs to restrict traffic on their firewall.
If an API is secured using SSL, it must be standard SSL signed. We do not support custom-signed authority for HTTP.
Variables and Attributes in the response parsing are case-sensitive.
For API-initiated campaigns, outbound calls must have an assigned DID for a power dialer in order for the call transfer to occur without issue.
Close Session
The Close Session node ends the call interaction.
Expert External APIs in Workflows
Dialpad Expert Mode has an External API node. This node allows the IVR to fetch data from a separate platform (such as a CRM) via REST APIs. Here are some guidelines to help you successfully deploy more complex IVRs.
Reference and Test API request locally
Ensure the API is accessible via the public internet. Use tools like Postman or the command line via curl requests to mimic how the external API component performs.
Once the API is tested from your local machine, you should know:
The request URL.
The request method (GET, POST, or PUT).
The request body (if required by the API).
The request headers (usually required by the API).
Note
Headers are structured as JSON objects.
The response body possibilities.
Tip
Save these responses locally with a preferred JSON text editor, such as Sublime Text or Notepad++.
Set up the Workflow Outline
To set up the workflow, go to your Dialpad Admin Settings.
Select Channels & Workflows > Workflows
Select Create workflow and create a name for the workflow.
Tip
Try to create a unique name for the workflow so other team members will know what it does by the name alone.
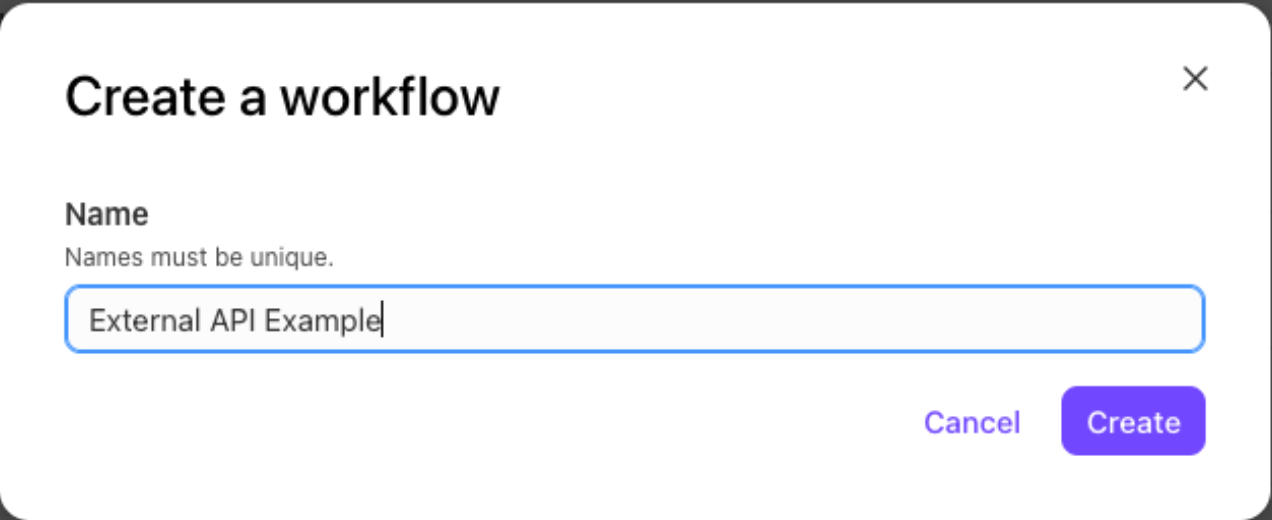
Select + to add a step
In the Add step window, select Expert
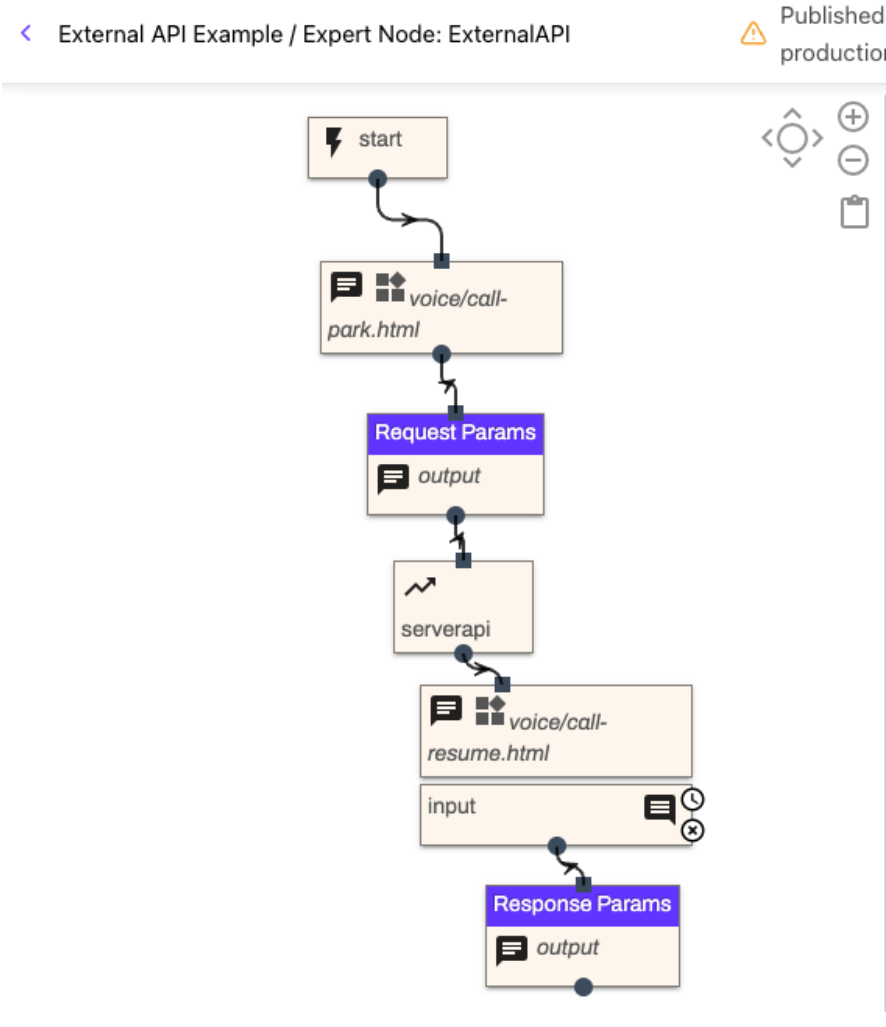
Add the following expert step components in order and connect them:
Call Park - This is available in the Voice Widget component. Selecting the widget drop-down for voice/call-park
Send Message - This is for logging your request parameters
External API (Server) - This is for the API request
Call Resume - This should use the Prompt and Wait component, selecting the voice/call-resume widget
Send Message - This is for logging response parameters
Select Publish Expert, then select Publish Workflow. The expert flow should resemble the one below.
Important reminders when using Expert nodes
Every expert node MUST end with a send message node.
If there is no match in the expert branch node, it must be mapped to a node.
Post JSON Body values must be wrapped in quotes in order to be saved or updated.
Create Test Contact Center or Department
To test the workflow:
Assign the workflow to a Department or Contact Center with an active phone number
Note
If a test routing group isn’t available, set up a new one. Add a phone number and change the Call Routing configuration to point to the new workflow.
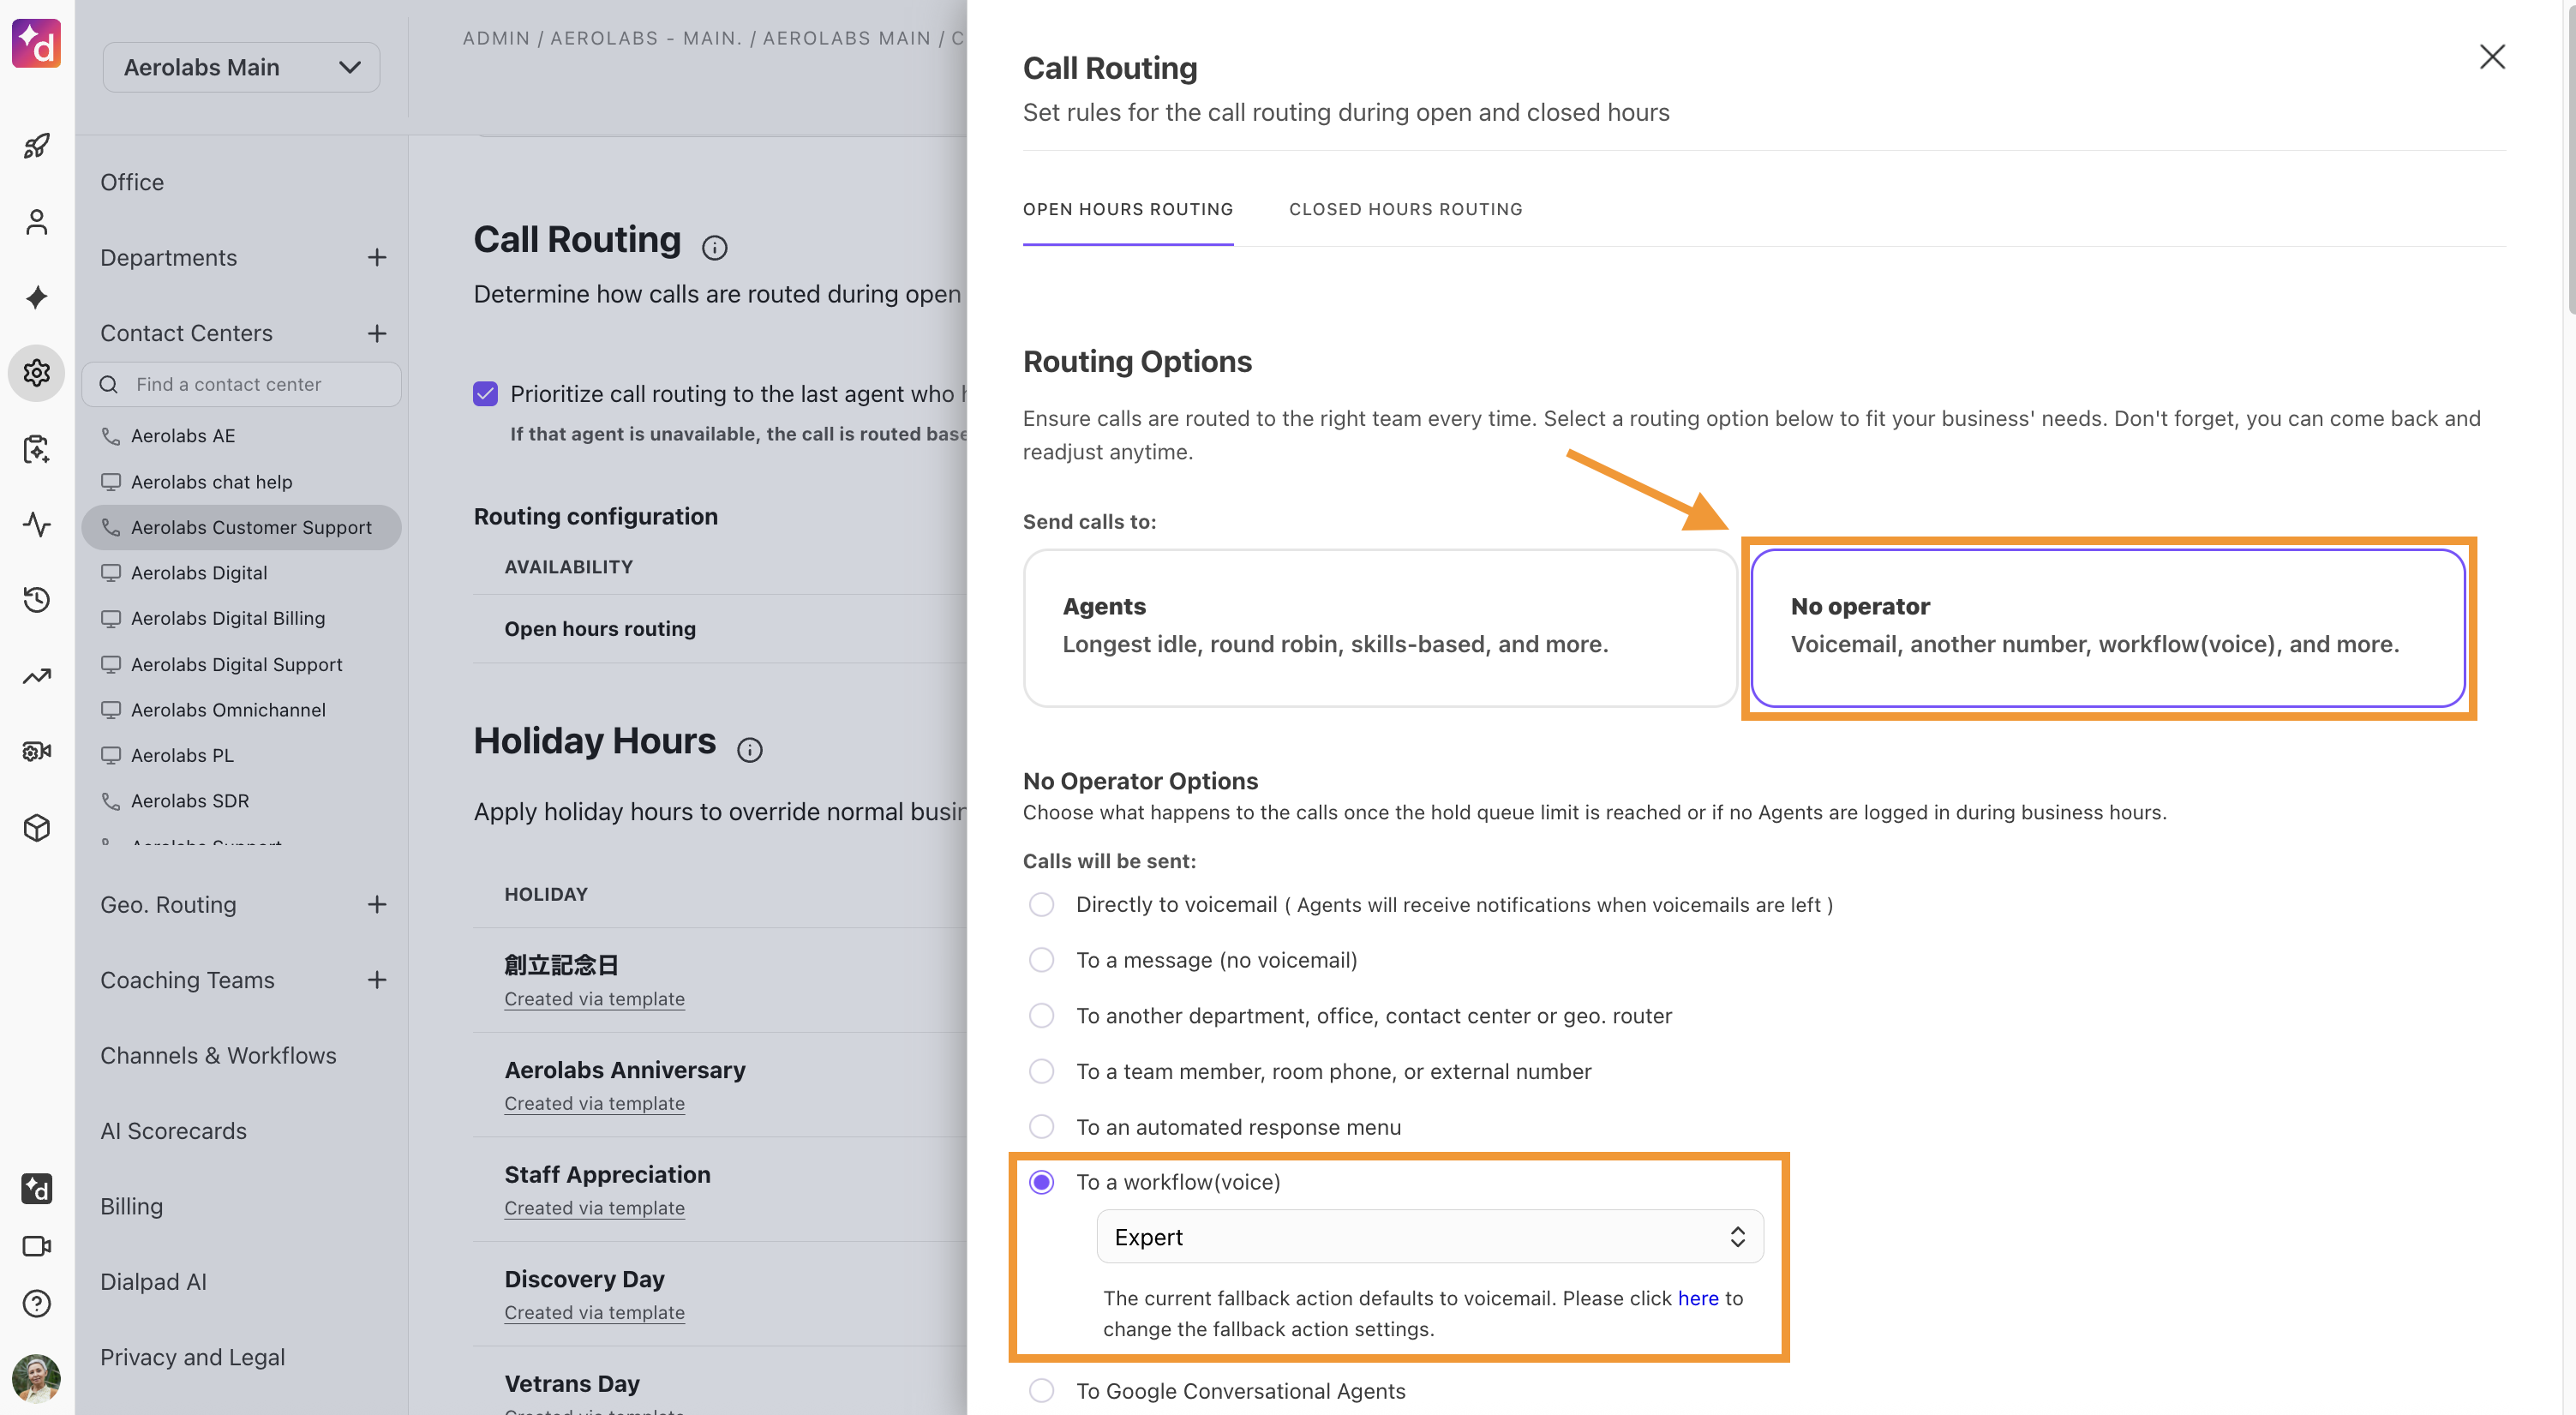
After assigning the workflow, make an initial call to ensure the new routing group successfully reaches the new workflow.
You will be able to review logs for the workflow in the Conversation History.
Add in API Details to Workflow
After setting up the basic API skeleton, add in the details of the API request.
URL | Copy the URL and paste it into the text field. If desired, use variables within the URL (wrap them in double curly braces); however, make sure that the beginning of the URL (https://) remains in the URL. |
Method | The method used in the request. Valid options are only GET, POST, and PUT |
Additional Headers | For the header field, create a valid JSON object with the Header Name as the key.
|
Editing the CSV JSONPath field
The External API node uses JSONPath to extract data from the API response and assign values in the response to workflow Variables. The format is [IVR variable name]:[JSON Path]. If there is more than one, they must be comma-separated.
To develop this expression Variable:JSONPath comma-separated list, use an external tool like jsonpath.com to find every value needed to be extracted from the API response.
Example JSON response
{
                    "firstName": "John",
                    "lastName": "doe",
                    "age": 26,
                    "address": {
                    "streetAddress": "naist street",
                    "city": "Nara",
                    "postalCode": "630-0192"
                    },
                    "phoneNumbers": [
                    {
                    "type": "iPhone",
                    "number": "0123-4567-8888"
                    },
                    {
                    "type": "home",
                    "number": "0123-4567-8910"
                    }
                    ]
                    }
To edit the JSONPath:
Note
Post JSON Body values must be wrapped in quotes in order to be saved or updated. For more details, see Variables below.
Copy the body of the API response into a JSONPath tester and find the JSON Path for each variable needing to be pulled out
Choose a variable name. The variable name goes first, then a colon, and then the JSONPath expression. See the example below:
JSONPath expression
first:firstName, (= "John")
                            last:lastName, (="doe")
                            streetAddress:address.streetAddress
                            city:address.city
                            phoneNo1:phoneNumbers[0].number
                            phoneType1:phoneNumbers[0].type
                            phoneNo2:phoneNumbers[1].number
                            phoneType2:phoneNumbers[1].typefirst:firstName, (= "John")
After removing the new lines, the CSV JSONPath text field in the External API node look like the example below:
CSV JSONPath for External API node
first:firstName,last:lastName,streetAddress:address.streetAddress,city:address.city,phoneNo1:phoneNumbers[0].number,phoneType1:phoneNumbers[0].type ,phoneNo2:phoneNumbers[1].number,phoneType2:phoneNumbers[1].typeAfter adding this into the text field, select Save and publish the IVR workflow
Variables
These are some variables you can use for JSON APIs.
Variable encoding
Variables can be url encoded or transposed to JSON using the following formatting on the variable:
JSON: {{exampleVariableName|type=json}}
URL Encoded: {{exampleURLString|type=urlqueryvalue}}
Number in JSON Body value: "{{num|type=jsonnumber}}"
Boolean in JSON Body value: "bool":"{{bool|type=jsonboolean}}"
Add in Logging
Once this work is complete, you need to add logging. The two send message nodes before and after the API request are used for recording some of this data to the Conversation History for troubleshooting.
If any variables are used in the API request, include those in the first request, but also include the response.
There are two built-in variables: response.status and response.code. These must be logged in the response message. Additionally, log all of the variables created with the CSV JSONPath.
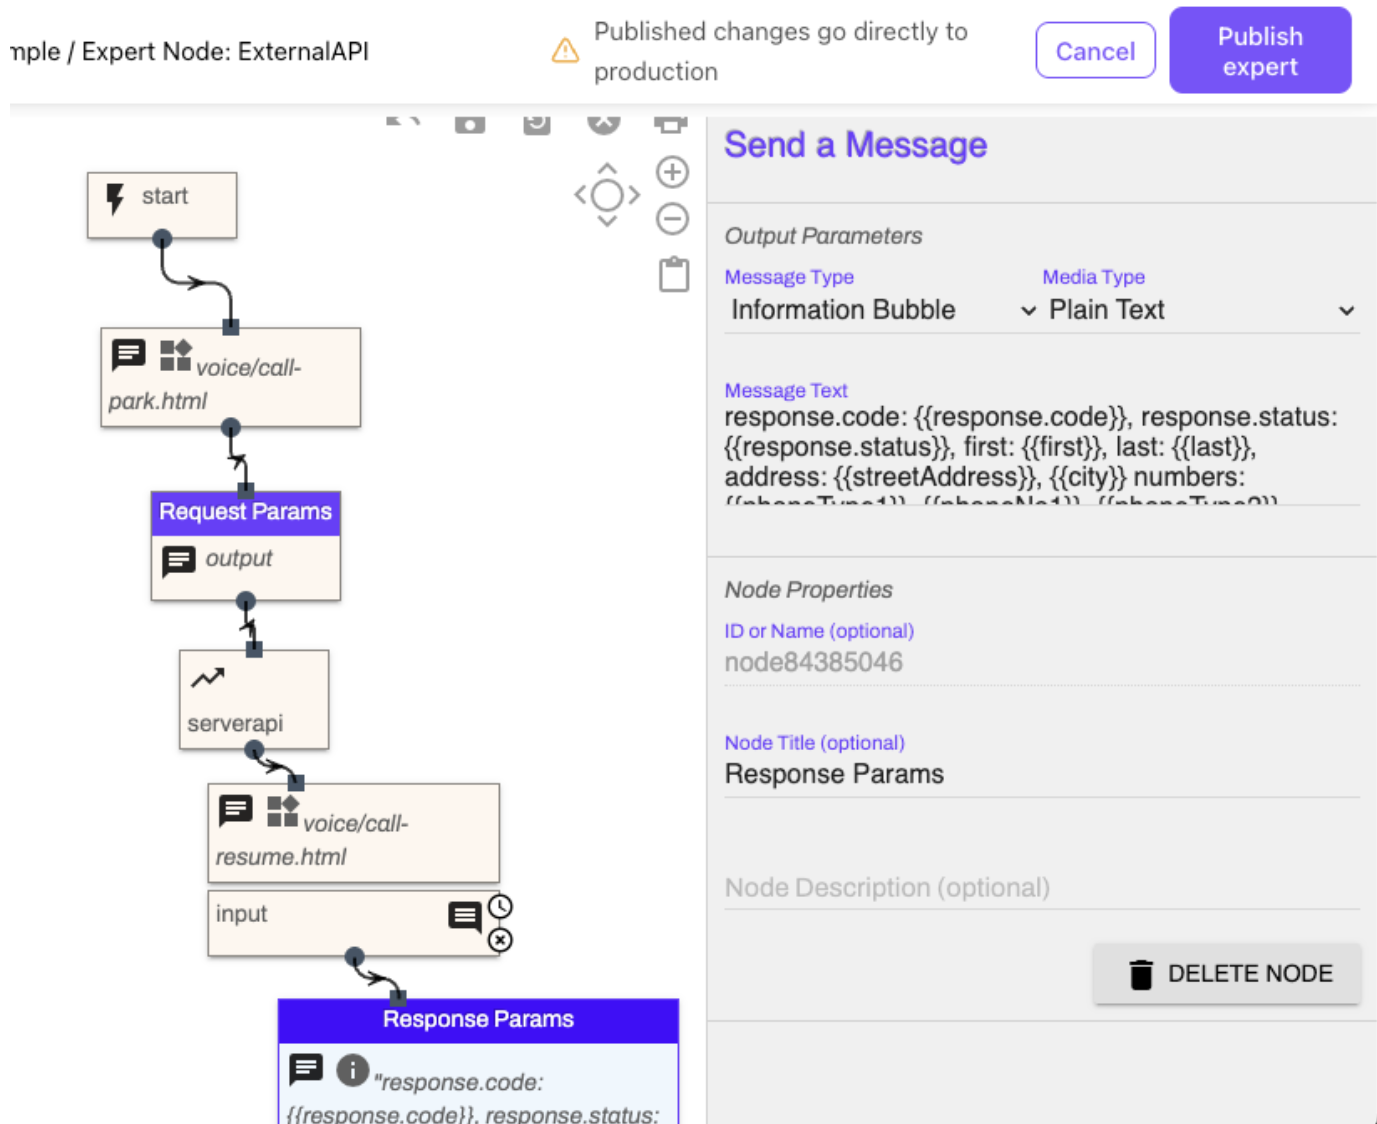
Now, you can start testing!
Testing and Add-ons
Perform an initial test call and find the call within the Conversation History. The output of the IVR shows the response values from the IVR within the logs.
To view the response values from the IVR, go to your Conversation History.
Filter on the Only Digital Conversation Type
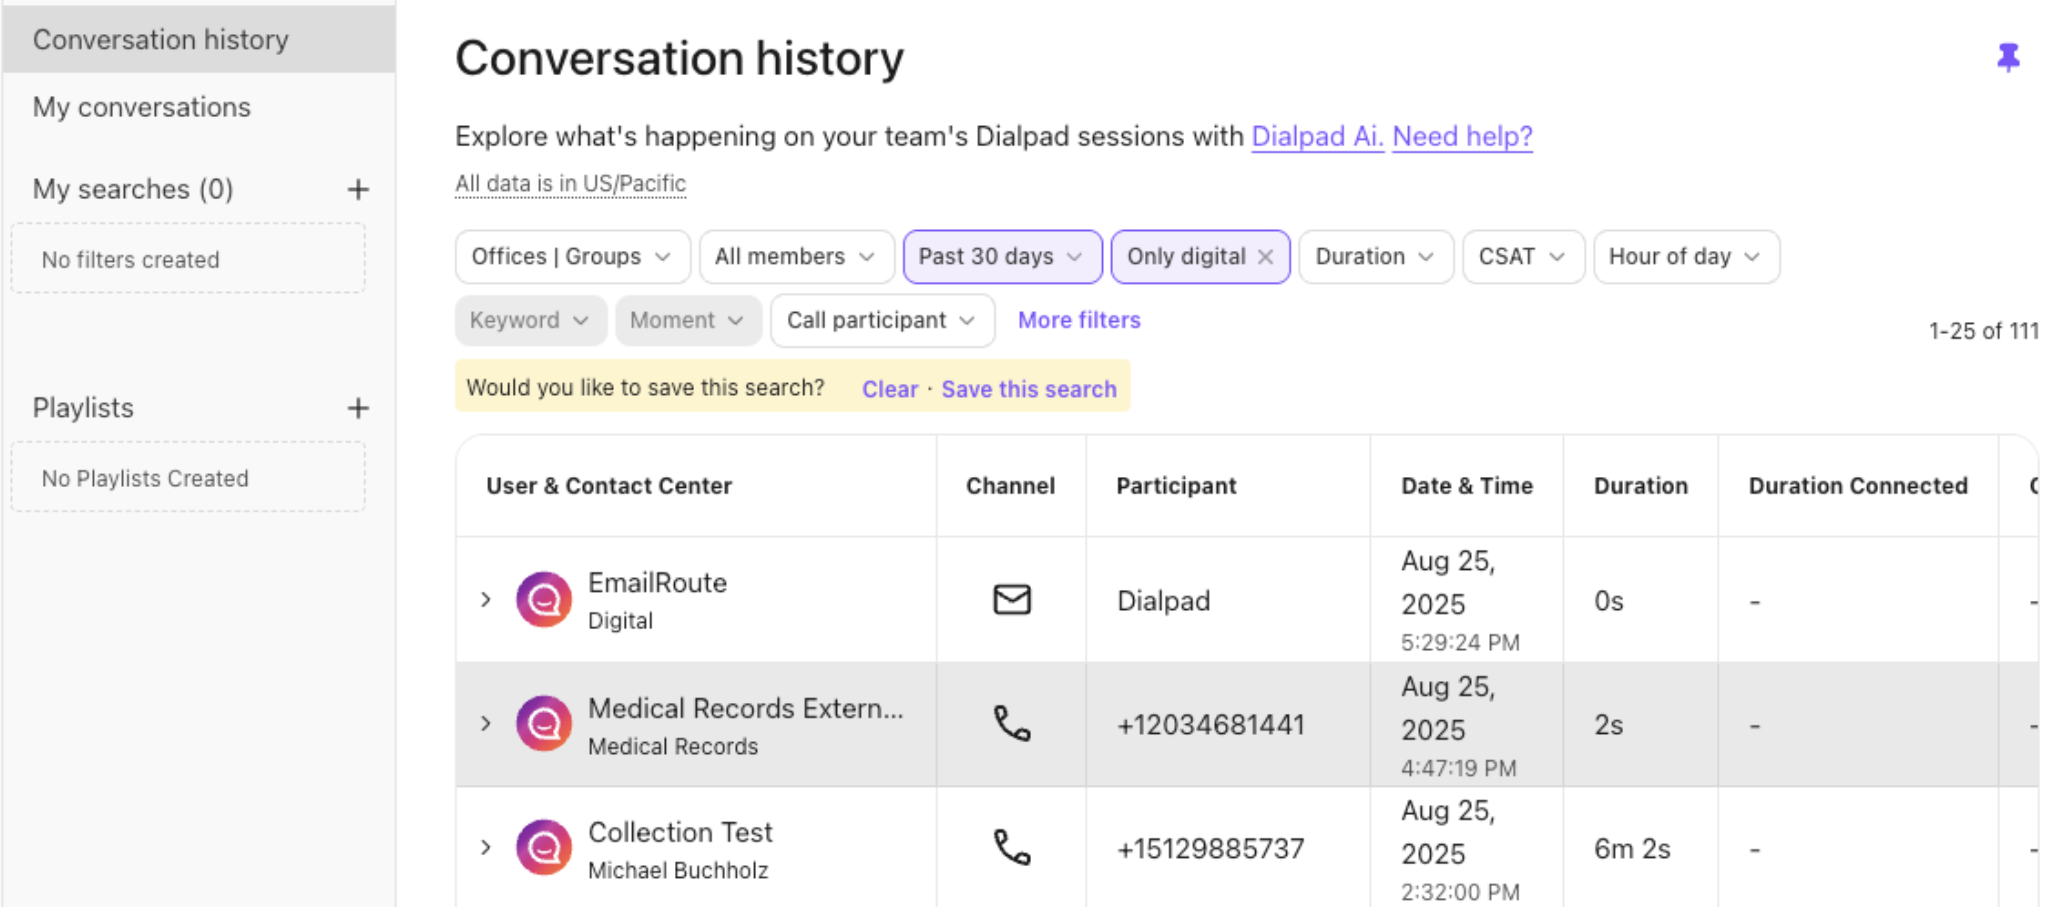
Open the session and select the Transcript to see the response values from the IVR
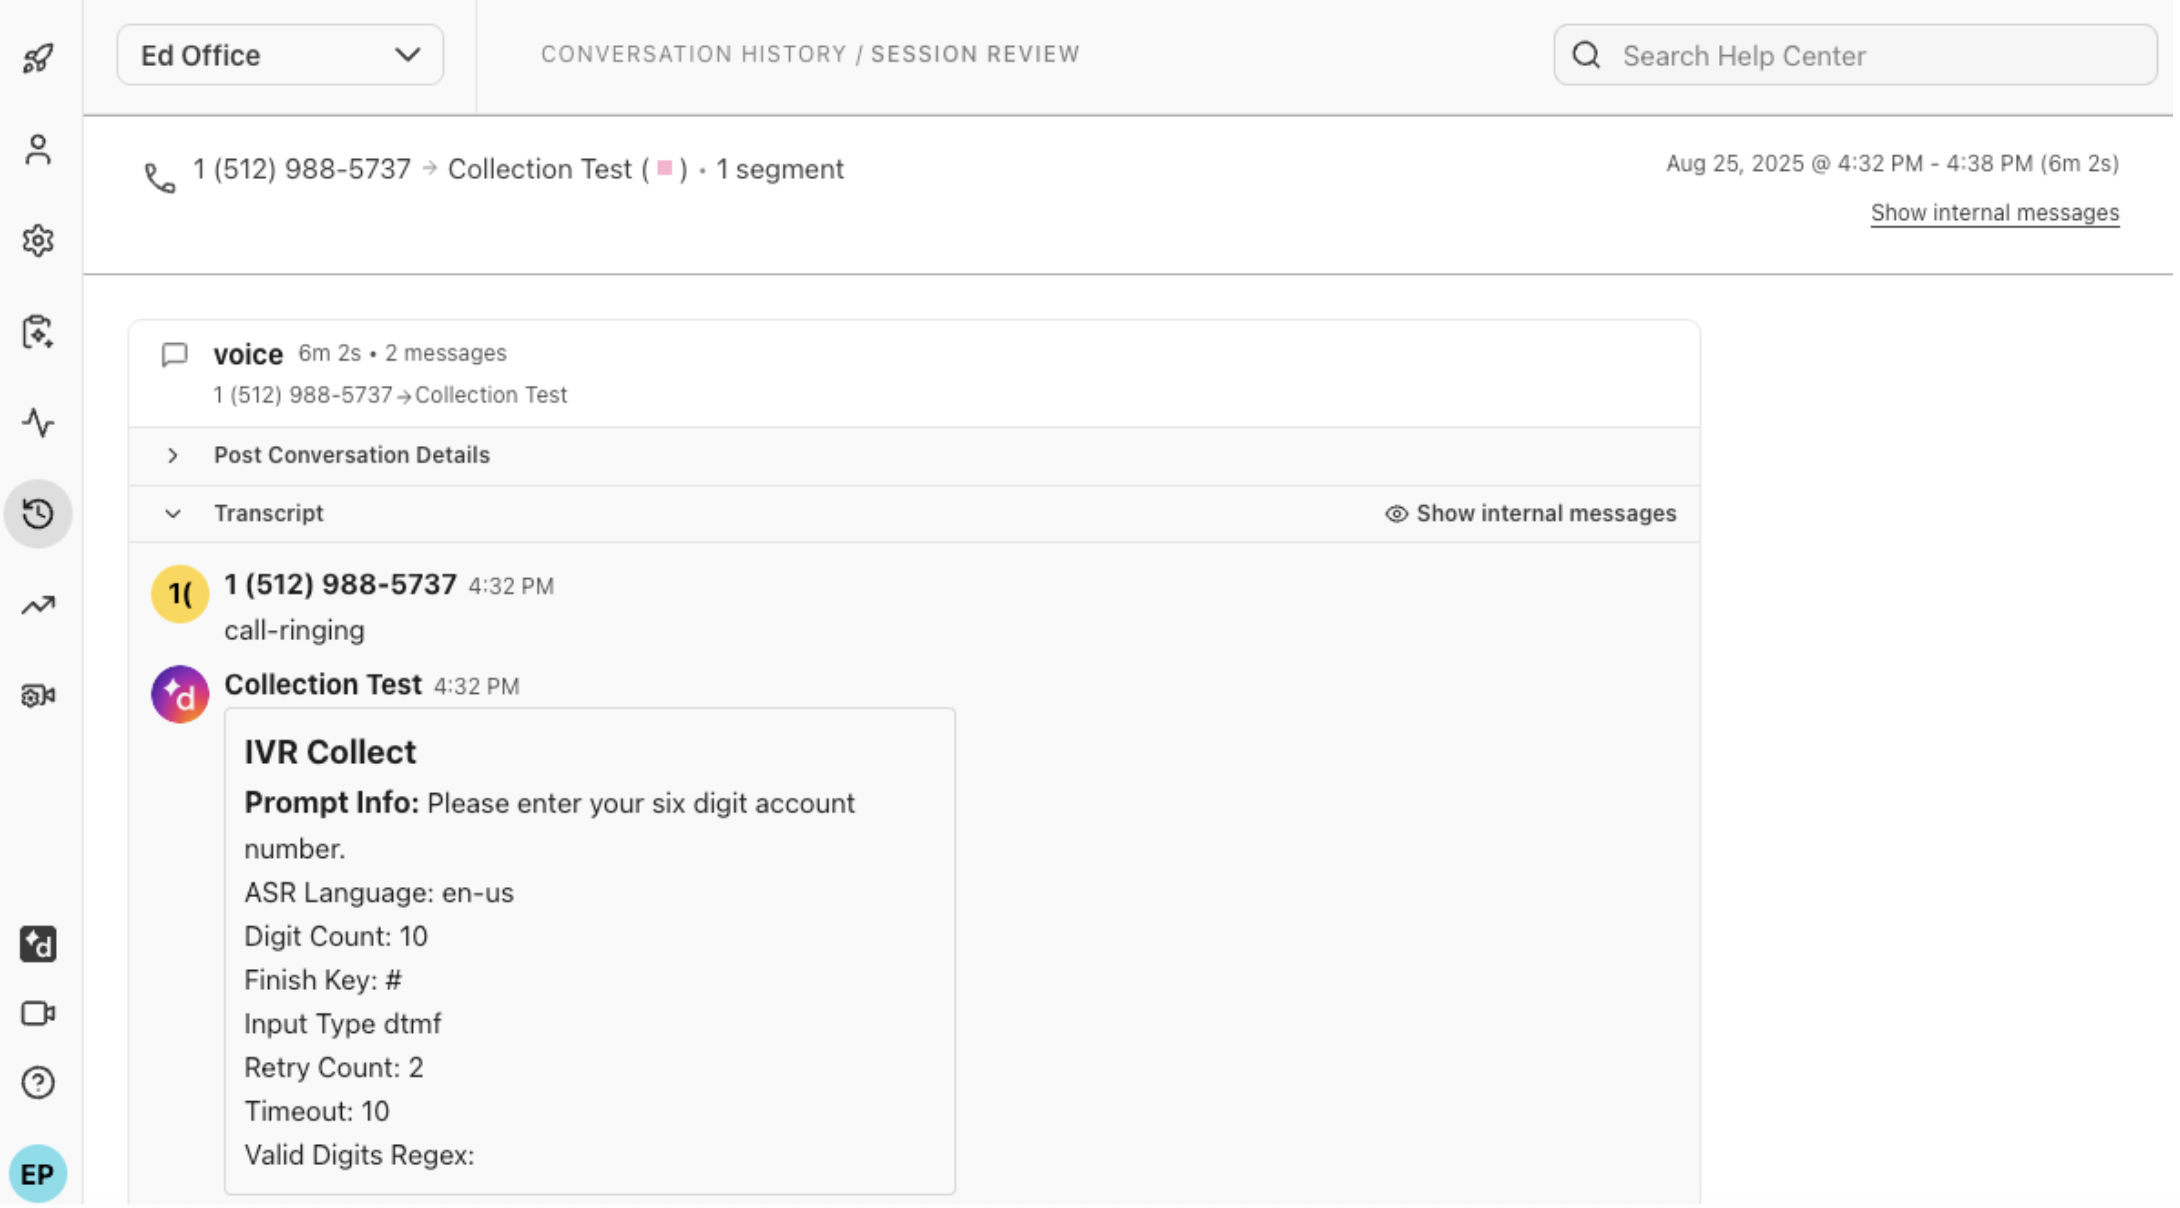
Note
The IVR Session History opens in another browser tab or window and provides basic information.
If desired, add Branches (within the Expert Node or outside) to provide prompts or messages if the API is successful or not.
Tips and tricks
Expert Workflows can be tricky, let’s look at a few important tips and requirements.
Last Node: The final node in your workflow shouldn't be an input node.
Use a "Send Message" node with a tracing message instead.
Long API Calls: Use "Voice Call-Park" before and "Voice Call-Resume" after API calls that might take longer than a few seconds.
Conditional Branches Outside Expert Workflows: You can use conditional branches even in standard workflows. Variables set in an expert workflow are accessible within standard branches.
External API Requirements: Ensure a JSON-based REST API with a reachable endpoint and standard SSL certificate (if applicable).
API-initiated campaigns: Ensure you have an assigned DID for your power dialer.
Frequently asked questions
Why is Expert Flow greyed out?
Expert workflows require configuration by Dialpad's Professional Services team. For assistance, contact your Customer Success Manager or Sales Team.
How can I prevent timeouts during API calls?
Use "Voice Call-Park" and "Voice Call-Resume" to manage potential timeouts while awaiting API responses.
Can I create a Custom Customer Context widget myself?
You can customize the client details that you want to see, however, due to the complexity of the configuration, Dialpad’s Professional Services team is required to create this feature.
Is there a cost for Custom Customer Context?
Yes. Please contact your Customer Success Manager, or our Professional Services team for more pricing information.
Will this work for any Contact Center?
Yes, Custom Customer Context is available for any Dialpad Connect, Dialpad Support, and digital configuration.
Does Custom Customer Context appear in analytics?
No, not at this time.