Dialpad's native integration with Bullhorn streamlines recruiting, sales, and HCM workflows. This powerful connection allows your teams to manage all Bullhorn record types, such as candidates, contacts, and leads, directly within the Dialpad app, improving efficiency and data accuracy.
When a call comes in, the integration automatically displays the caller's complete Bullhorn profile or all records in the case of multiple matches. This instant access to candidate and customer details empowers your team to deliver personalized experiences and make every interaction more effective, with recent notes and activities displaying in the sidebar itself
After the call, all critical details—including call status, caller name, notes, and a link to the call transcript—are automatically logged as an activity in Bullhorn. This ensures that your team always has a complete record of every conversation. The best part? Your Dialpad and Bullhorn data stay perfectly in sync across all devices, so your team can work seamlessly from anywhere.
Additionally, Dialpad supports integrations with multiple instances of Bullhorn, ensuring that international, franchise, or multi-branded staffing agencies are supported across a variety of scenarios where a single Dialpad account needs to be connected to multiple instances of Bullhorn.
Who can use this
To use the Dialpad + Bullhorn integration, your company must already use Bullhorn CRM.
Enable Bullhorn
To enable Bullhorn, go to your My Company settings.
Select Integrations
Navigate to Bullhorn
Select Options > Manage Settings
Go to Enablement and select Enable this feature
Select Save changes
Once the Bullhorn integration is enabled, it's time to configure your settings.
These settings can be enabled for the entire company, or per office.
Note
One Dialpad account can connect to multiple instances of Bullhorn and their child instances. This integration allows for one Dialpad user to be mapped to one Bullhorn seat. We don’t support multiple Bullhorn seats mapping to the same Dialpad user.
Register Bullhorn Information
To confirm your Bullhorn account company-wide, must register your Bullhorn Client information.
Head to your My Company settings.
Select Integrations
Navigate to Bullhorn and select Options > Manage Settings
Navigate to Bullhorn API User Information and enter your
Bullhorn API username
Bullhorn API password
Note
These credentials are separate from your normal Bullhorn login credentials; you'll need to create a new user account for Dialpad.
The Bullhorn team will assist you in creating this account.
Select Save changes
You'll then be taken back to the Integrations page.
Mapping users
Once you have successfully authenticated your Bullhorn account, it’s time to map users.
Head to your My Company settings.
Select Integrations
Navigate to Bullhorn and select Options > Reconnect
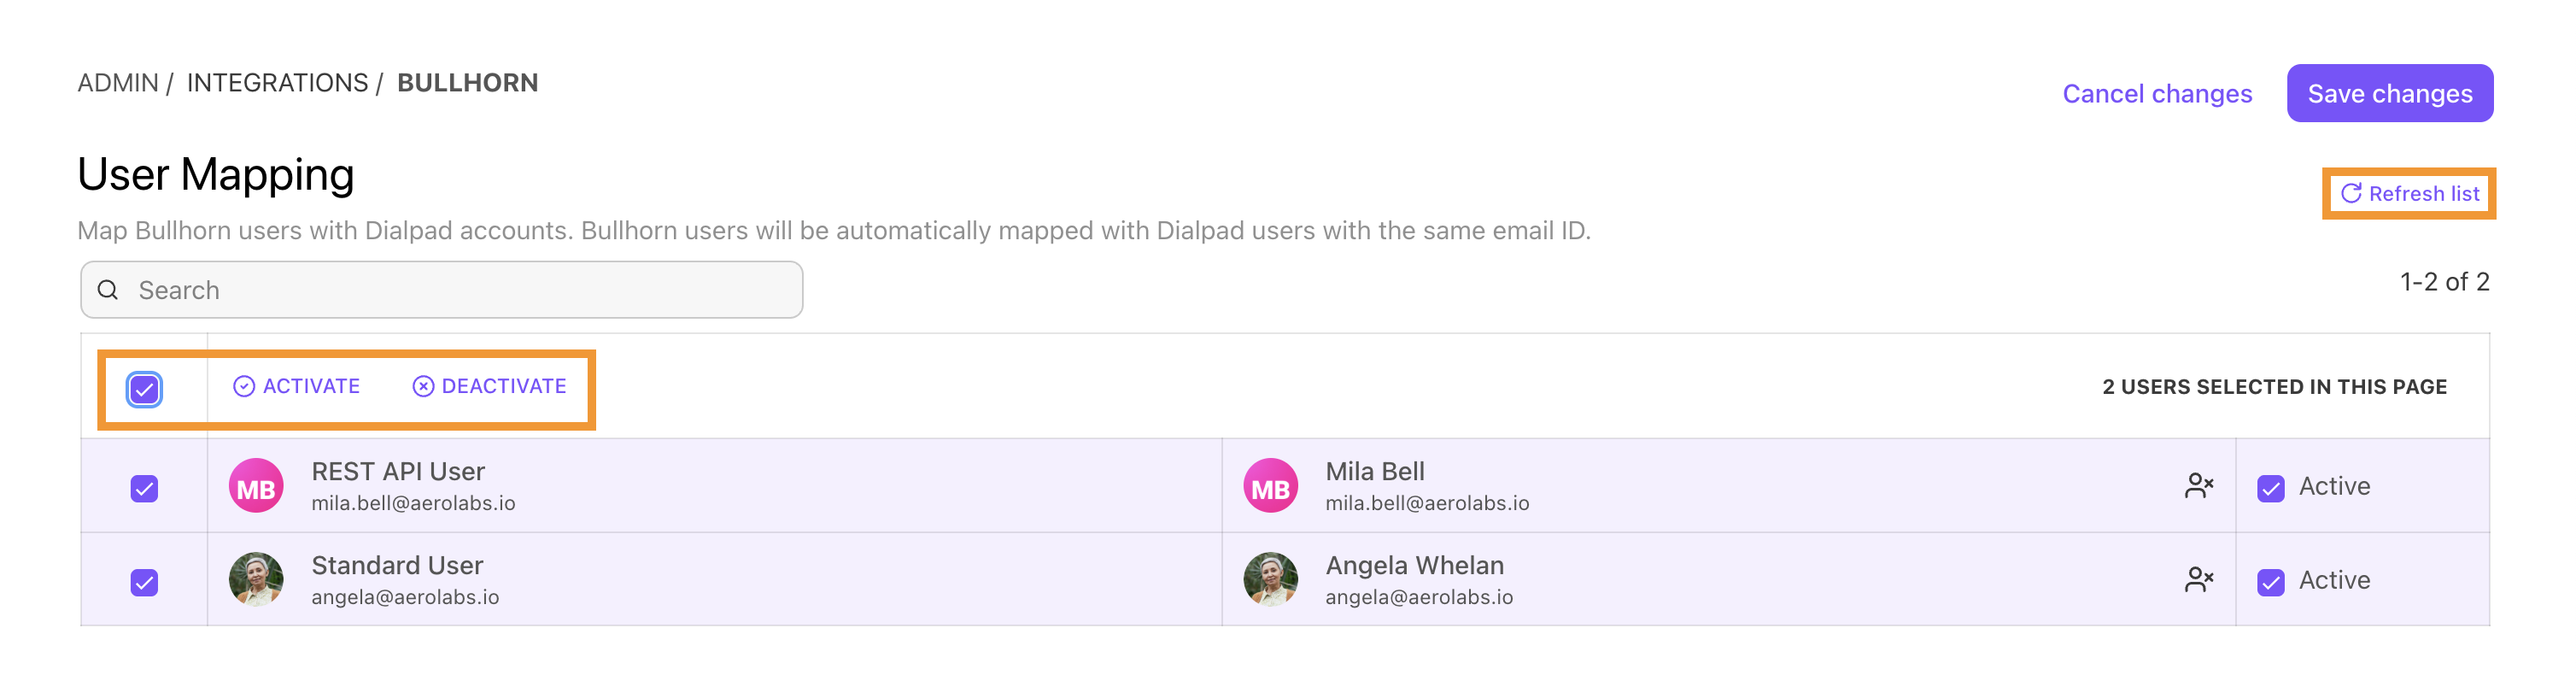
You’ll be taken to the User mapping page, which displays your team members with a Bullhorn account.
Dialpad will automatically match these accounts to their respective Dialpad accounts using their email addresses.
If any accounts need to be added, enter their email addresses in the Dialpad Users columns to find the correct account. You can also select the pencil button to modify pre-defined mapping.
Based on their mapping, users can access Bullhorn details from the right-hand sidebar of the Dialpad app.
If a user is inactive and selects the Bullhorn widget, they'll be instructed to contact their Bullhorn admin to connect to Bullhorn.
To re-fetch your Bullhorn accounts, select Refresh list.
You can also bulk-update users by selecting Activate all or Deactivate all.
Set Company-wide settings
To set company-wide settings, head to your My Company settings
Select Integrations
Navigate to Bullhorn and select Options > Manage Settings
Select Call Logging and select Log calls as activities
Note
To log your Dialpad Ai activities, select Log Ai-generated data to Bullhorn
Select Save changes
Tip
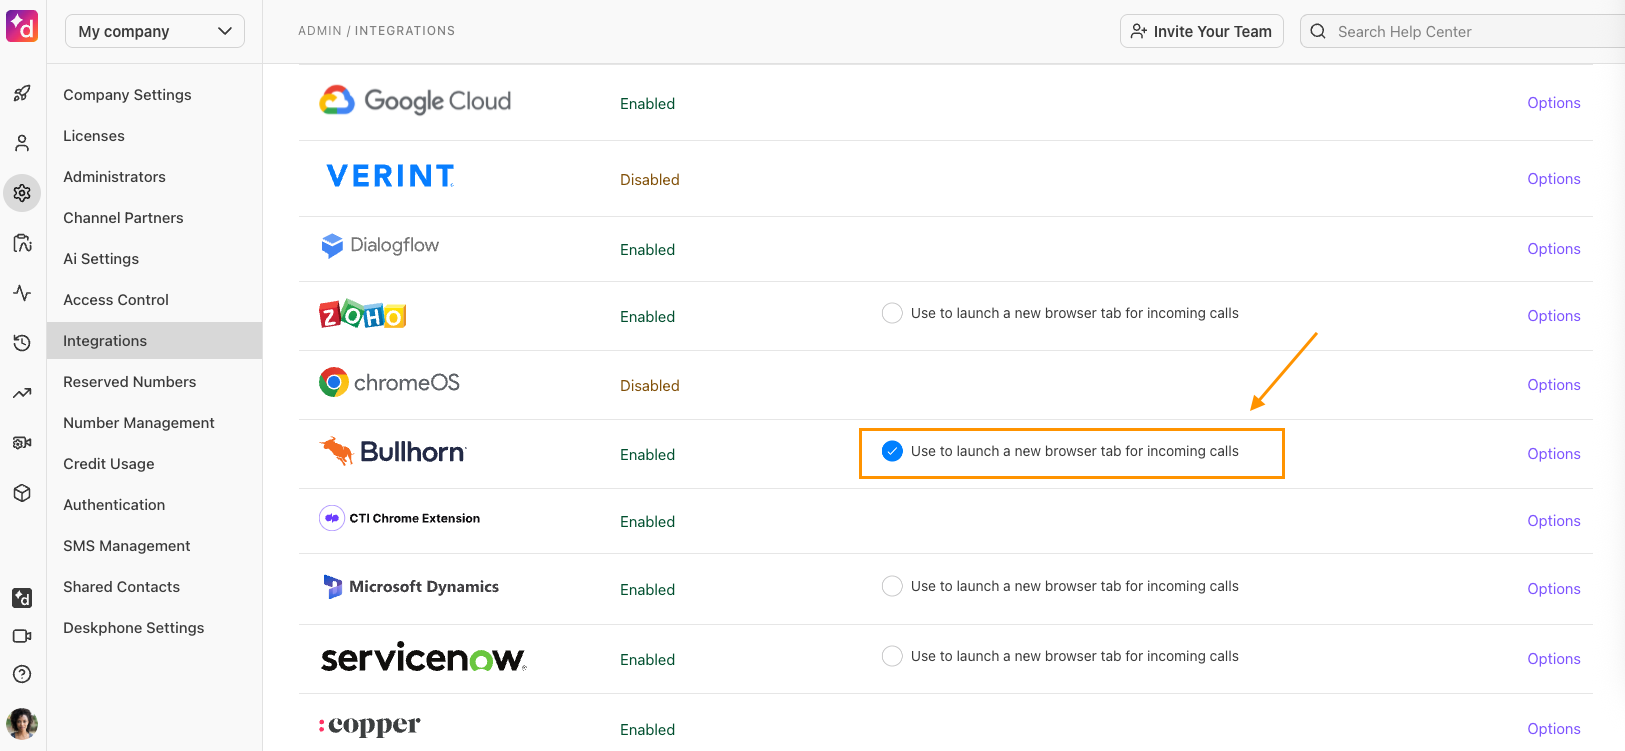
If you want to use a new browser tab for incoming calls (screen pop), select Use to launch a new browser tab for incoming calls on the Company Integrations page.
Set Office-specific settings
To set Bullhorn settings specific to an individual office, go to your Dialpad Admin Settings.
Select the desired office and select Integrations
Navigate to Bullhorn and select Options > Manage Settings
Select Customize for this office
Navigate to Call Logging and select the desired preference(s)
Select Save changes
Bullhorn contact matching
Bullhorn contacts are matched to your Dialpad Company Contacts based on the contact’s primary email, name and phone number.
Bullhorn supports three types of records: a contact, lead, or candidate. If no record is available, you will have to create a new record for Dialpad data to sync with Bullhorn.
Note
First-time users can export Bullhorn contacts and import them into Dialpad via the CSV import tool, 500 records at a time.
Once the record is created, you can view it in Bullhorn by hovering over the header area and clicking on the external link icon. This will launch your Bullhorn account. Login is required if you don’t have your Bullhorn account open on your desktop.
When matched, you’ll see the contact details in the Bullhorn widget on the right-hand sidebar of the Dialpad app. You’ll also see the 5 most recent open tasks, and the 5 most recent calls.
Contacts can be matched at any time, whether you're on an active call or not.
Let’s go over some common contact matching scenarios.
Connect a contact
To connect a Bullhorn record to a Dialpad contact, simply open the Bullhorn widget on the right-hand sidebar, enter their name into the search bar, and follow the prompts.
Note
Bullhorn supports automatic contact matching.
Multiple contact match
If multiple Bullhorn contacts are found, your Dialpad will not automatically be matched to a Bullhorn record — you'll need to assign it to the correct one.
From the Bullhorn widget:
Select Create/Connect to a record
Select the correct contact
Select Connect
Rematch a contact
Need to change the matched contact? No problem!
To rematch a contact:
Open the Bullhorn widget
Select Rematch
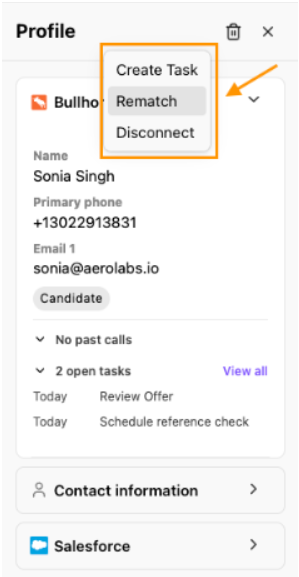
Enter the name or phone number of the contact
Select Enter
Select the desired contact
Select Connect
Create a new Bullhorn record
Three different Bullhorn entity types can be created within Dialpad:
Candidate
Contact
Lead
New records can be created at any time, including during an active call.
To create a new Bullhorn record:
Open the Bullhorn widget on the right-hand sidebar and select Create new
Select the record type and enter the record details
Note
All fields are mandatory.
If you want to change the record type, select Change and choose the record type from the drop-down.
Create a Bullhorn task
Use Bullhorn tasks to remind yourself (or someone else!) of anything you don't want to forget, such as creating reminders to follow up with a lead or a contact. Tasks can be created at any time (even during an active call) and allow you to track these specific actions and ensure you never miss out on an opportunity.
To create a Bullhorn task:
Open the Bullhorn widget and select the Options > Create task
Enter the task details, priority, and due date
Select Save
The task will now display in the Open Tasks section of the Bullhorn widget.
Note
The widget displays up to 5 open tasks. If you have additional tasks associated with the contact/record, select View all to open Bullhorn and review all tasks.
Live call notes
Add notes during live calls to capture important details and save time. This ensures accurate information and facilitates effective communication within your team. For easy post-call usage, find your Notes in the Bullhorn widget.
To take notes during a live call:
Select the contact/caller's name to open the right-hand app sidebar
Open the Bullhorn widget and enter the note details in Bullhorn
Select Save
Notes are autosaved after 30 minutes, and can be finished during the call, or after it ends.
Set Bullhorn default status option
You can enable Bullhorn to create a default status when creating a record for a contact, candidate, or lead. Every time one of these records is created in the Bullhorn integration on Dialpad, the status field is pre-loaded with the chosen default status.
To add a default status to a record, navigate to a conversation thread in Dialpad:
Open the Bullhorn integration and select Create
Choose one of the options:
Contact
Candidate
Lead
In the details, select Default new [record] to this status checkbox
Fill in the rest of the details and select Create
Supported AI Fields
Dialpad Ai tracks recaps, action items, call tags, and outcomes, so follow-ups aren’t missed. If you use Ai CSAT or Ai Playbooks, you’ll also see agents’ performance and CSAT scores.
Let's look at which AI features are logged to and supported in Bullhorn.
Field label | Data type | Description |
|---|---|---|
Rich Text | Ai Recap of a call with a 255-character limit. | |
Rich Text | The Action Items that were detected in the call, as generated in the Ai Recap. | |
Ai Outcome | Text | The AI-detected outcome of the call. Accessible in the Ai Recap object. |
Text | The AI-detected Call Purpose category assigned to the call. Accessible in the Ai Recap object. | |
Percentage | A numeric value that explains how much a person adheres to the Ai Playbook. | |
Number | AI-generated CSAT score. |
Dialpad Data in Bullhorn CRM
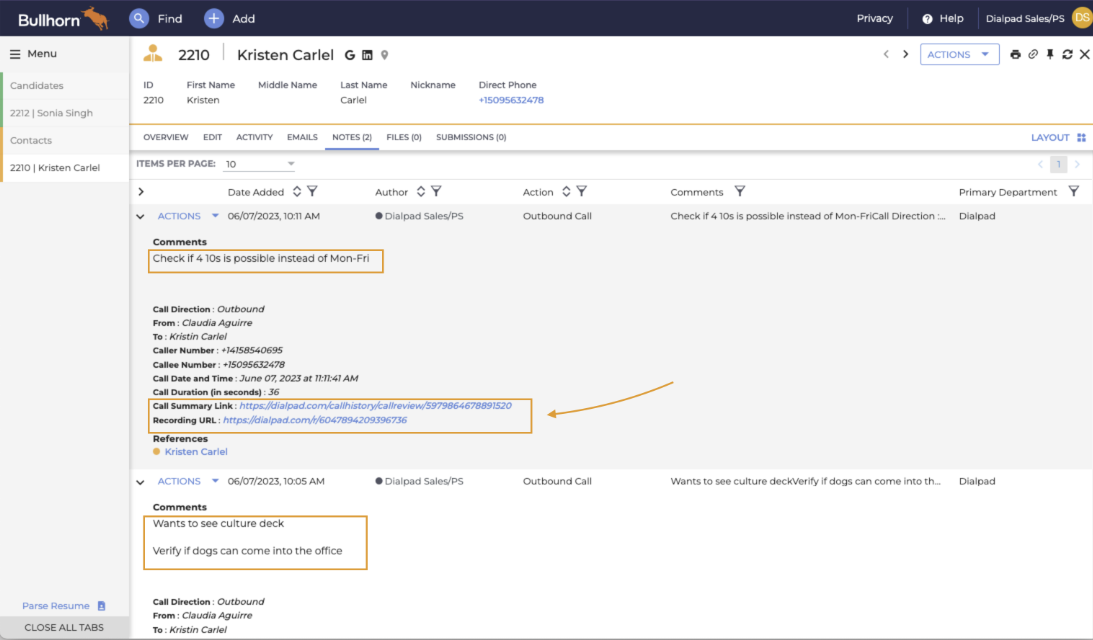
Easily view your notes, tasks, and call summaries within Bullhorn.
Select the Record's details within Bullhorn. On the overview page, you'll see any outstanding tasks.
In the Notes tab, you'll find the Dialpad Call Summary, the call recording link, and any notes taken in Dialpad.
The following Dialpad metadata is available for both individual calls and Contact Center calls.
Call Date and Time | The date and time the call was made. |
Call Direction | Incoming call / Outgoing call. |
Call Duration | The duration of the call in seconds. |
From | The caller (customer who has called the Dialpad Contact Center). |
To | The agent who answered the customer call. |
Caller Number | Caller's (customer) number. |
Callee Number | Contact Center agent's phone number. |
Recording URL | Call recording URL. |
Call Summary | Link to the conversation between the agent and the customer. |
For Contact Center calls, you'll also see the following details:
Contact Center Number | The Contact Center telephone number that the caller (outside customer) dialled. |
Contact Center Name | Name of the Contact Center. |
Call Disposition | Disposition added by the agent. |
Disposition Notes | Disposition notes added by the agent. |
For Department calls, you'll also see the following details:
Department Number | The Department telephone number that the caller (outside customer) dialled. |
Department Name | Name of the Dialpad Department. |
For Coaching Team calls, you'll also see the following details:
Coaching Teams Name | Name of the Coaching Team. |
Call Disposition | Disposition added by the agent. |
Disposition Notes | Disposition notes added by the agent. |
Frequently asked questions
Are shared line voicemails logged?
No, voicemails (for inbound missed calls) left for a shared line (Contact Center, Department) are not logged.
Are SMS's logged?
Not currently, but this feature is coming soon.