In addition to our desktop, browser, and mobile applications, Dialpad is available on desk phones.
Let's look at how to set up your Poly UCS desk phone to use with Dialpad.
Who can use this
To set up and manage a desk phone, you must be a Dialpad Admin or have permission to Activate your own phone (granted from your Admin).
Before you begin, review this Help Center article to ensure your desk phone is supported.
Compatibility
While Dialpad supports a wide variety of Poly UCS desk phones, some are completely supported, and other are supported within reasonable effort only.
If the models end with a ‘1’ (201, 301, 311, 401, 411, 501, 601), these devices are fully supported.
If the model number ends with a ‘0’ (VVX 200, 300, 310, 400, 410, 500, 600), these devices are supported within reasonable effort only.
Access deskphone admin password
Company admins can access their organization’s deskphone password directly from the Company Settings. This admin password applies to all deskphones activated with Dialpad.
To access the deskphone admin password, navigate to Dialpad Admin Portal.
Select My Company
Select Deskphone Settings
.png)
Navigate to Deskphone Admin Password
Select the eye icon to see the password
Then, log in to the deskphone's web interface using "admin" as your username and your assigned deskphone admin password.
Note
For unassigned Dialpad provisioned devices use the default deskphone password: 3425723, which spells "Dialpad" on a phone keypad.
Provision a Polycom UCS desk phone
First things first, your Polycom UCS desk phone, must be provisioned for Dialpad.
If the Poly phone was previously used with another service provider before configuring it to Dialpad, the phone must be factory reset to clear out any conflicting settings or data.
Note
Your phone must be connected to the internet throughout the reset and activation process.
To factory reset a UCS desk phone, use the phone’s navigation buttons to find the TCP/IP Parameters.
Press Home
Press Menu
Select Status
Select Network
Select TCP/IP Parameters
Note the IPv4 address
Next, in a web browser, enter the IP address of the phone into the browser's address bar (you'll need to precede the IP address with https://)
Enter the deskphone admin password
Once logged in, hover on the Utilities menu and navigate to Global Settings
Select Phone Backup & Restore → Global Settings
Select Restore phone to factory settings

Select Restore
Select Yes
The phone will restart and revert to factory conditions, erasing local data — this process takes several minutes.
Configure for Dialpad
Once the phone is ready to activate to a Dialpad User or Room account, return to the web server (Parts 1-3 in Step 1 above).
Navigate to the Settings menu
Select Provisioning Server
In the Server Address box field, enter: https://prov.dialpad.com/
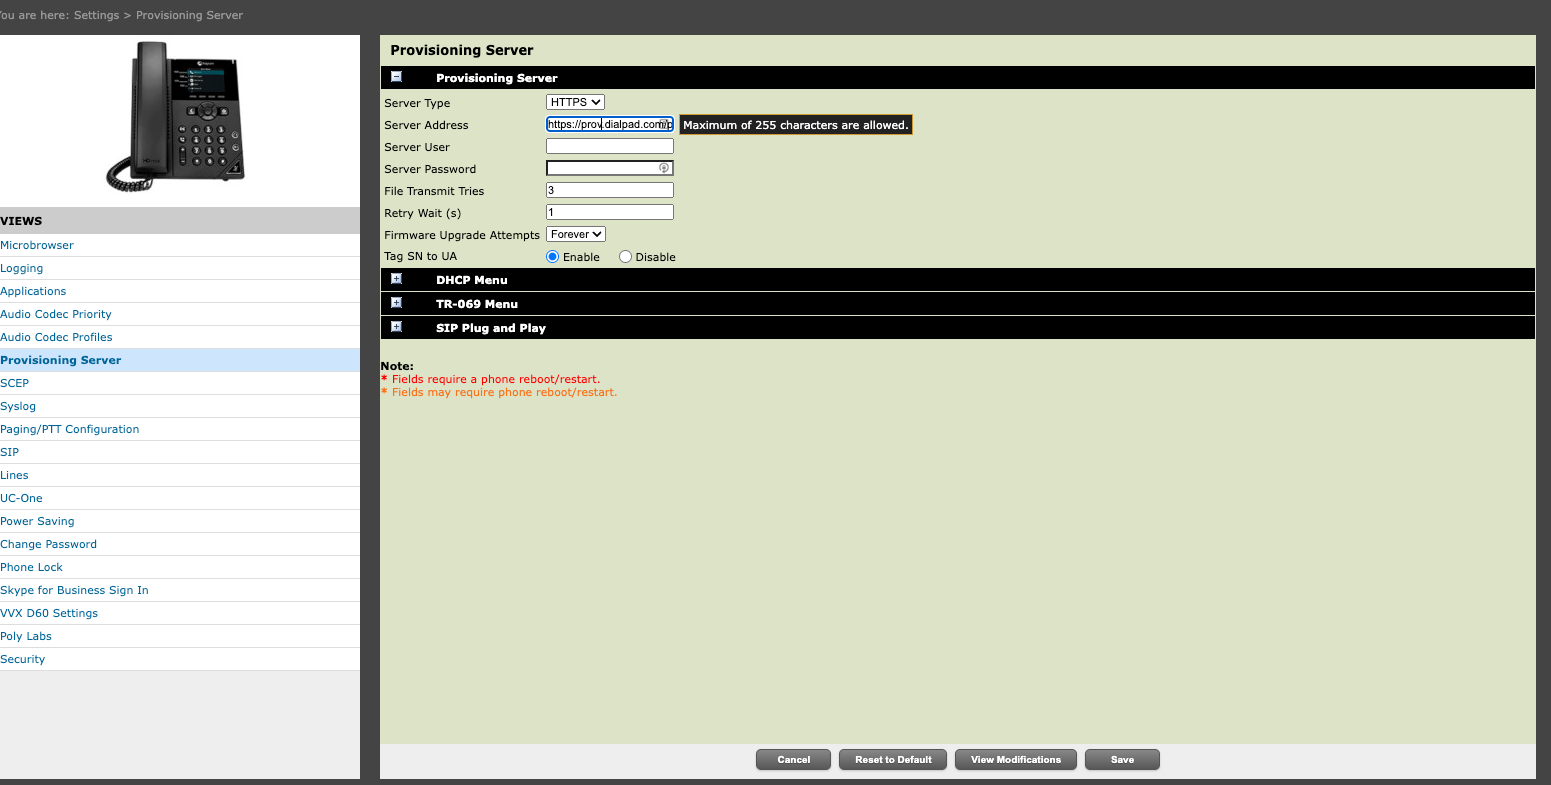
Press Save
Within 15-20 seconds, the phone will automatically restart and update its configuration. The device may also load a new Firmware version during this time.
This process can take 5-10 minutes.
If the phone doesn’t restart within 20 seconds, go to the Utilities menu on the screen and select Reboot Phone
Once the phone returns to a stable state, look at its top line key for Dialpad Activate
If you see ‘Dialpad Activate’ on Line key 1, the phone is ready to activate to your User or Room account.
If you do not see Dialpad Activate, be sure to review this Help Center article for troubleshooting details.
To complete activation, navigate to your Dialpad Settings
Select Your Devices
Select Add New
Select Other Polycom phones
Name the Device and click Next - you will then be provided a 4-digit Activation code
Pick up the receiver, and the phone will automatically dial out.
When prompted, enter the 4-digit activation code provided in the Dialpad portal.
Thats it! The phone will restart and is now registered with Dialpad.