Provision Yealink DECT Devices to Dialpad
    • 04 Apr 2024
    • 2 Minutes to read
    • Dark
      Light
    • PDF

    Provision Yealink DECT Devices to Dialpad

    • Dark
      Light
    • PDF
    • New

    Article Summary

    Dialpad now offers support for Yealink DECT devices, providing cordless options for users. The setup process involves four steps: pairing the device with the base station, provisioning the device to Dialpad, adding the device to the Dialpad Admin Portal, and activating the port for a Dialpad user or room. To pair the handset with the base station, the base station must be put into Registration Mode and the handset needs to be registered successfully. After pairing, the device is provisioned by entering the IP address in a computer browser and logging in with admin credentials. Once provisioned, the device can be added to the Dialpad Admin Portal by navigating to Office Settings and selecting Desk Phones. Finally, ports can be assigned to users or rooms by selecting Options and choosing Assign a new device. Unassigning ports and renaming devices are also possible through the Admin Settings.

    We know how much you love cordless options, and Dialpad is happy to provide support for Yealink DECT devices. 

    Let's dive into the details. 

    Who can use this feature

    Yealink DECT devices can be used with any Dialpad plan.
    You must be a Dialpad Admin to perform the provisioning and activation steps outlined in this article.
    *DECT headsets do not require activation — this article covers configuring wireless DECT base stations and handsets.

    Set up a Yealink DECT device

    Setting up your new Yealink DECT device to use with Dialpad is a 4 step process. 

    First, you’ll pair the device with the base station.

    Next, you'll provision the device to Dialpad.

    Once provisioned, the device must be added to the Dialpad Admin Portal.

    Finally, you’ll activate (assign) the port for a Dialpad user or room.

    Pair the handset to the base station

    To pair a Yealink DECT device to the base station:

    1. Put the base station into Registration Mode

      1. Press the button on the base station for 5-10 seconds until the registration LED flashes

    2. On the handset, navigate to Register Handset and select OK

      1.  Press OK > Settings > Registration > Register Handset > OK 

    After the handset has registered successfully, the phone will say Handset Subscribed and display the Base NO.  and the last 4 characters of the connected base’s MAC address).
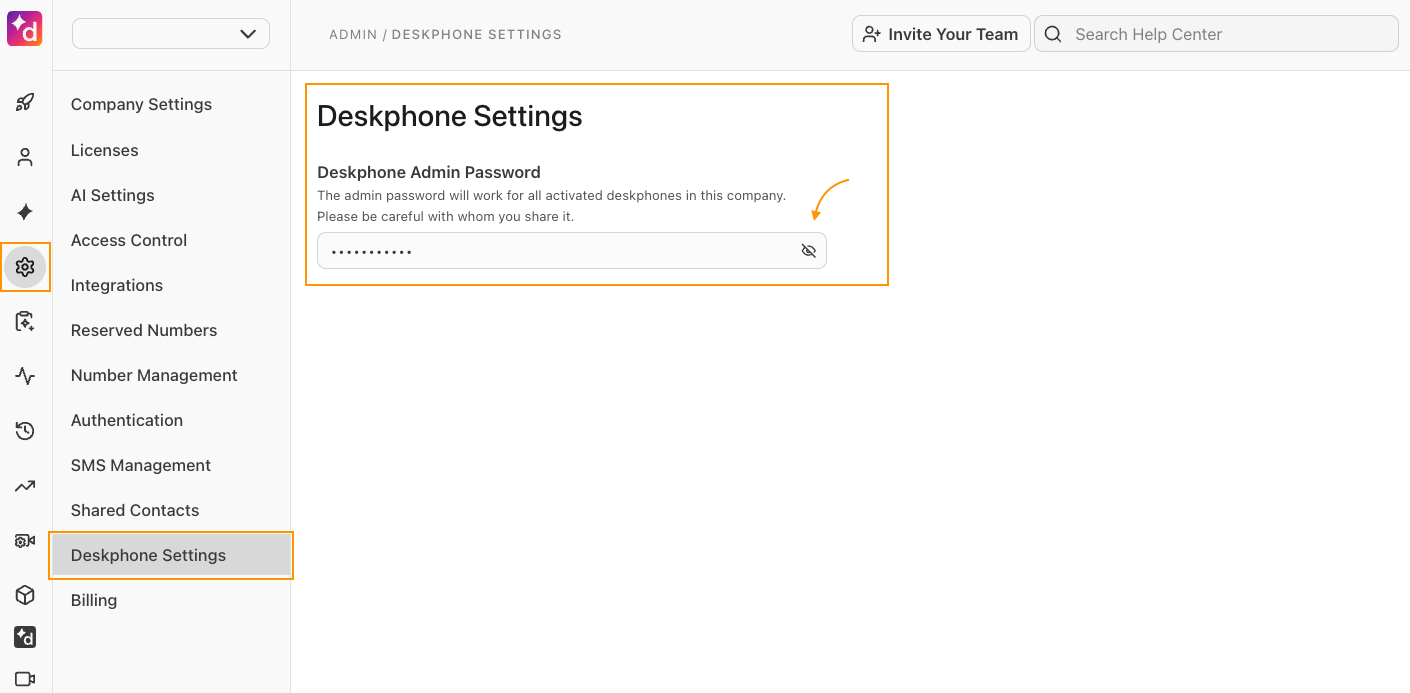
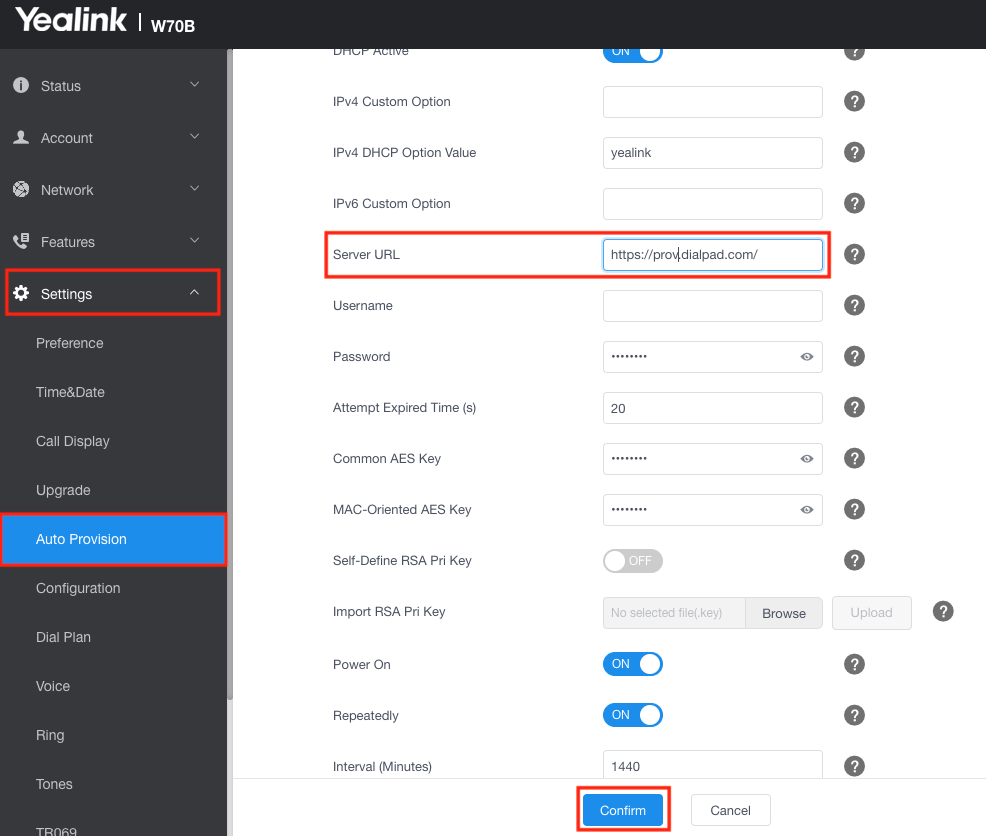
    Provision the device to Dialpad

    Now that the device has been paired to the base station, its time to provision the devices to Dialpad.

    1.  On the handset, navigate to the IPv4 Address

      1. Press OK > Status > Base 

        1. The IPv4 Address will be listed at the top

    2. Enter the IP address in a computer browser, then press ente

    3. Login using the following credentials

      1. Username: admin 

      2. Password: admin

    4. Navigate to Settings

    5. Select Auto Provision

    6. In the Sever URL enter: https://prov.dialpad.com/ 

    7. Select Confirm

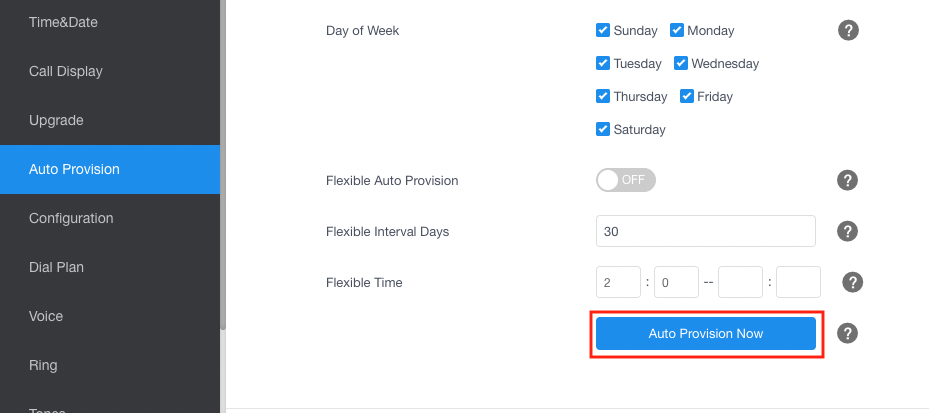
    8. Select Auto Provision Now


    Add the phone to the Dialpad Admin Portal

    Now that your Yealink device has been provisioned to Dialpad, it's time to add it to the Dialpad Amin Portal. 

    To add the device, head to your Admin Settings from Dialpad.com 

    1. Navigate to Office

    2. Select Office Settings

    3. Select Desk Phones

    4. Select the DECT/ATA Devices tab 

    5. Select Add a new DECT/ATA

    6. Enter the display name and the device's MAC address

    7. Select Add new device
       

    That's it! The device will reboot and you'll see it listed in the DECT/ADA Devices tab. 

    Assign the port

    Now that the device is provisioned and set up for Dialpad, it's time to assign the port to a user or room. 

    Assign port to a user

    To assign a port to a user, head to the DECT/ATA tab from your Admin Portal. 

    1. Select Options

    2. Select Show managed devices

    3. Select Assign a new device

    4. Select User

    5. Choose the owner, add the display name and port

      1. The port number must match the index number on the handset

    6. Select Assign port

    Once the port has been assigned, the base station will reboot.

    Assign a port to a room

    To assign a port to a room, head to the DECT/ATA tab from your Admin Portal. 

    1. Select Options

    2. Select Show managed devices

    3. Select Assign a new device


    4. Select Room phone

    5. Enter the room name and port number

      1. The port number must match the index number on the handset

    6.  Choose the number type

      1. Local

      2. Toll-free

    7. Select Assign port

    After assigning the port, the base station will reboot.

    Unassign a port

    To unassign a port, head to your Admin Settings from Dialpad.com

    1. Navigate to Office

    2. Select Desk Phones

    3. Select DECT/ATA Devices

    4. Select Options beside the device

    5. Select Show Managed Devices

    6. Select Options

    7. Select Unassign

    The device will reboot to apply the update. 

    Rename a DECT device

    To rename a DECT device, head to your Admin Settings from Dialpad.com

    1. Navigate to Office

    2. Select Desk Phones

    3. Select DECT/ATA Devices

    4. Select Options beside the device you want to rename

    5. Select Rename

    6. Enter the new display name

    7. Select Rename

    Rename a managed device

    To rename a managed device, head to your Admin Settings from Dialpad.com

    1. Navigate to Office

    2. Select Desk Phones

    3. Select DECT/ATA Devices

    4. Select Options beside the device

    5. Select Show Managed Devices

    6. Select Rename

    7. Enter the new display name

    8. Select Rename


    Was this article helpful?