Dialpad's voice workflow steps let you guide your callers through a personalized call flow, directing them to the right information and contact every time.
Let’s take a look at the voice workflow steps available in Dialpad.
Who can use this
Workflows are available to Dialpad Users on all plans and licenses.
Office and Company Admins can create Workflows for Offices, Mainline numbers, Departments, and Contact Centers.
Step types
Customize your call experience with Dialpad’s voice workflow steps. They are organized into 3 categories:
Prompt | Prompt steps provide users with greetings, options, or information to guide them through the workflow. The steps included in Prompt are:
|
Logic | Logic steps make decisions in the workflow based on user input or data. The steps included in Logic are:
|
Terminal | Terminal steps mark the end of the workflow journey—like hang-up, voicemail, or agent transfer. The steps included in Terminal are:
|
Menu
The Menu step guides callers through a simple menu, steering them to the correct department or Call Center. Callers navigate through the menu using a simple single-digit DTMF response, or with speech when Automatic Speech Recognition is enabled.
A common Menu item is “Welcome to Aerolabs Inc. For Sales, press 1; for Service, press 2; for Expert Assistance, press 3.”
To add a Menu step:
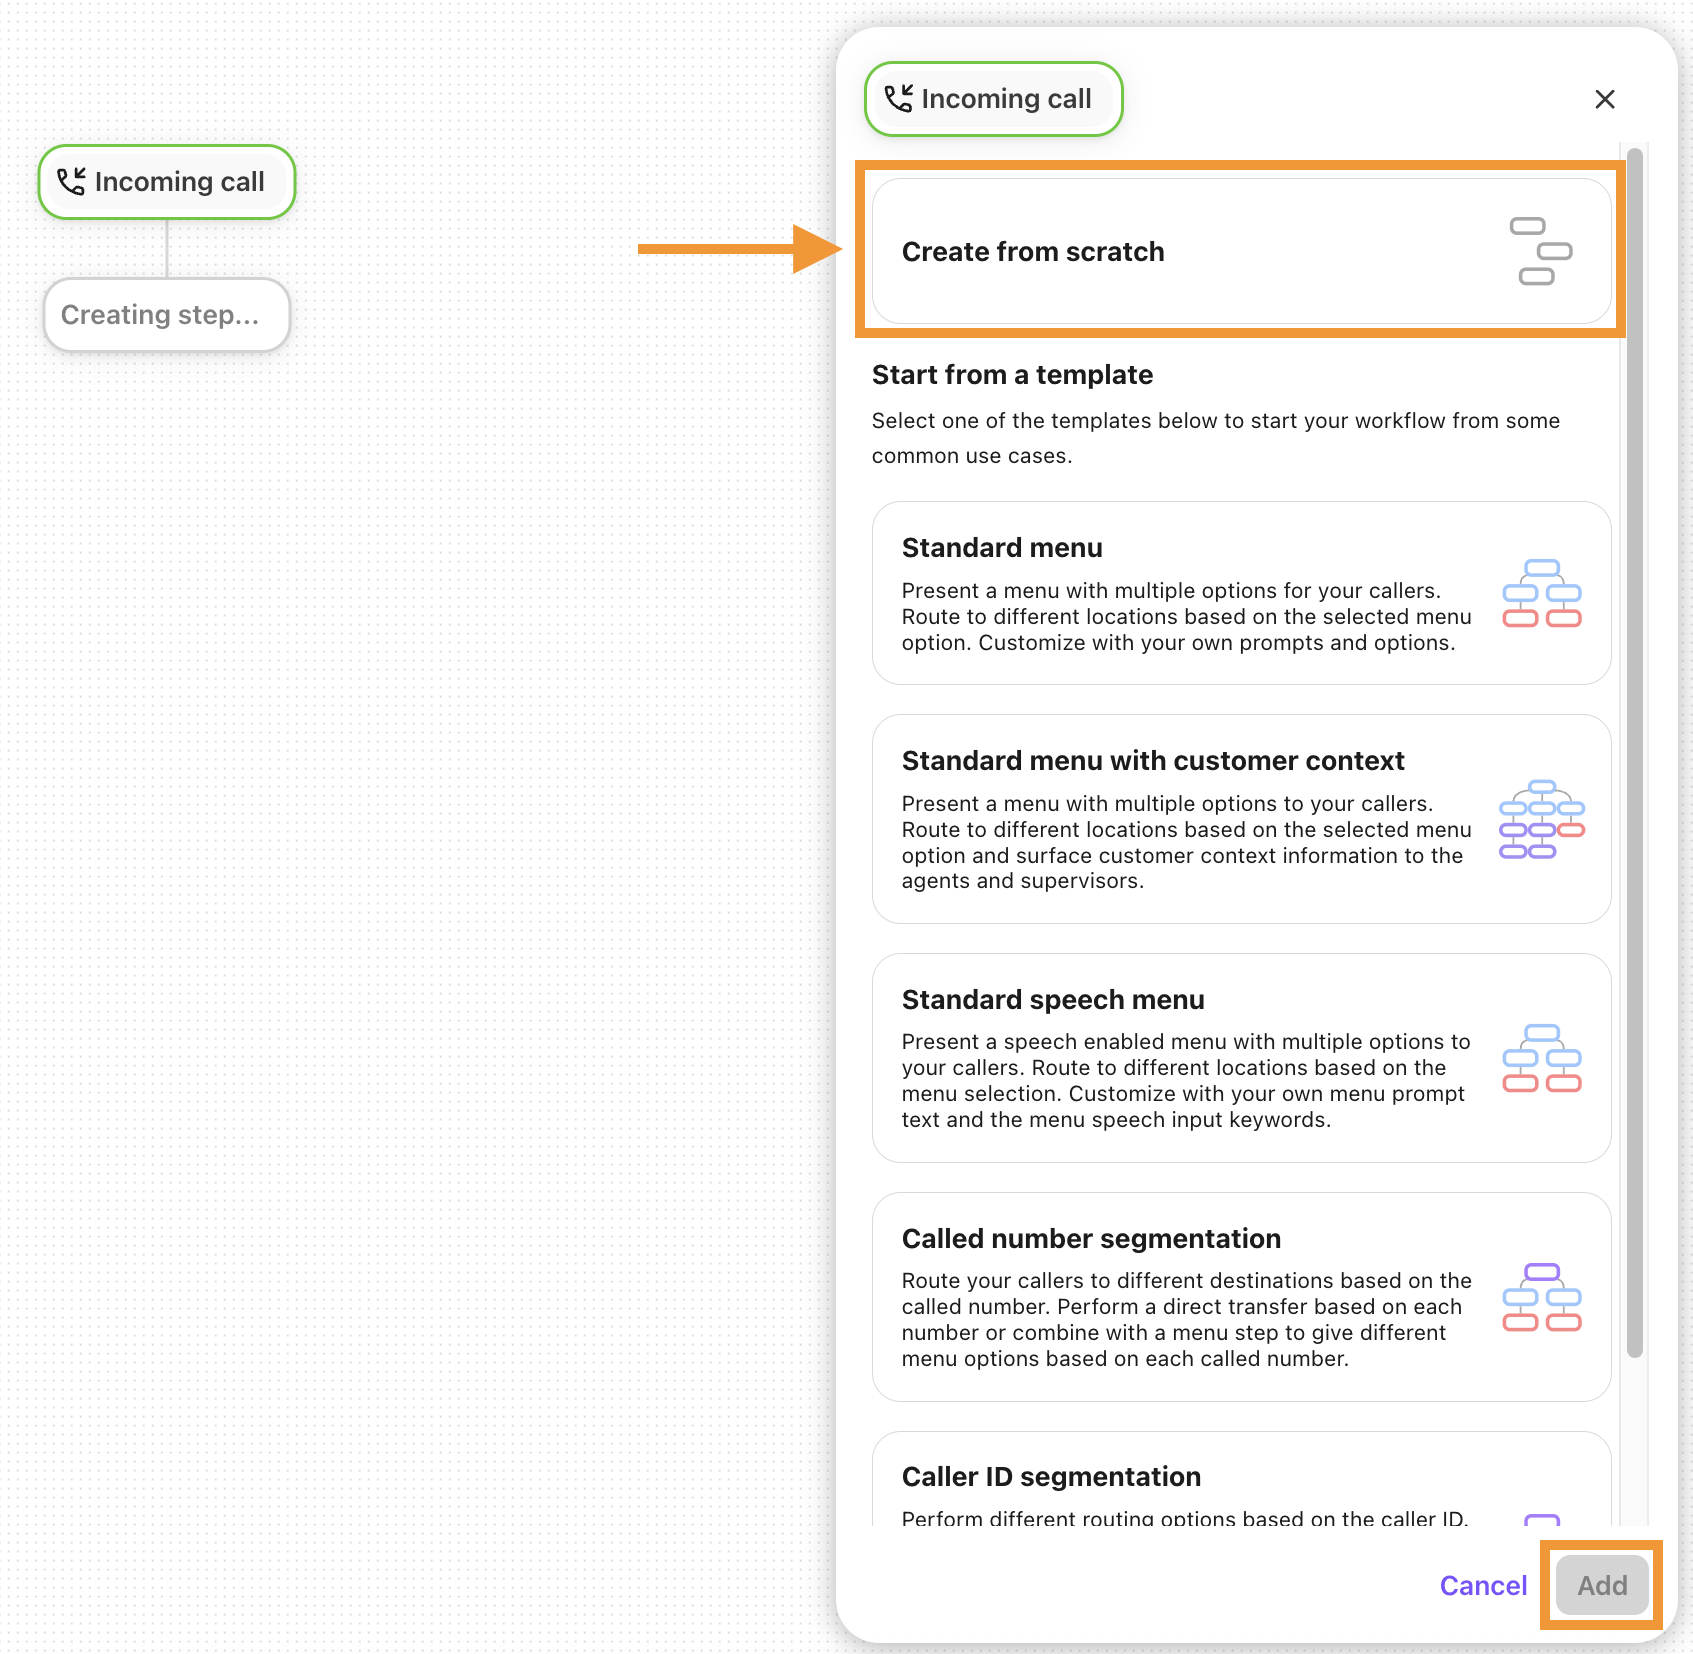
Open the desired workflow and select ‘+’ to add a new step to your workflow

Note
If this is a new workflow or an existing one with no steps added, select whether to create a workflow from scratch or from a template. Creating a workflow from scratch lets you choose which steps to include. Templates have pre-defined steps added
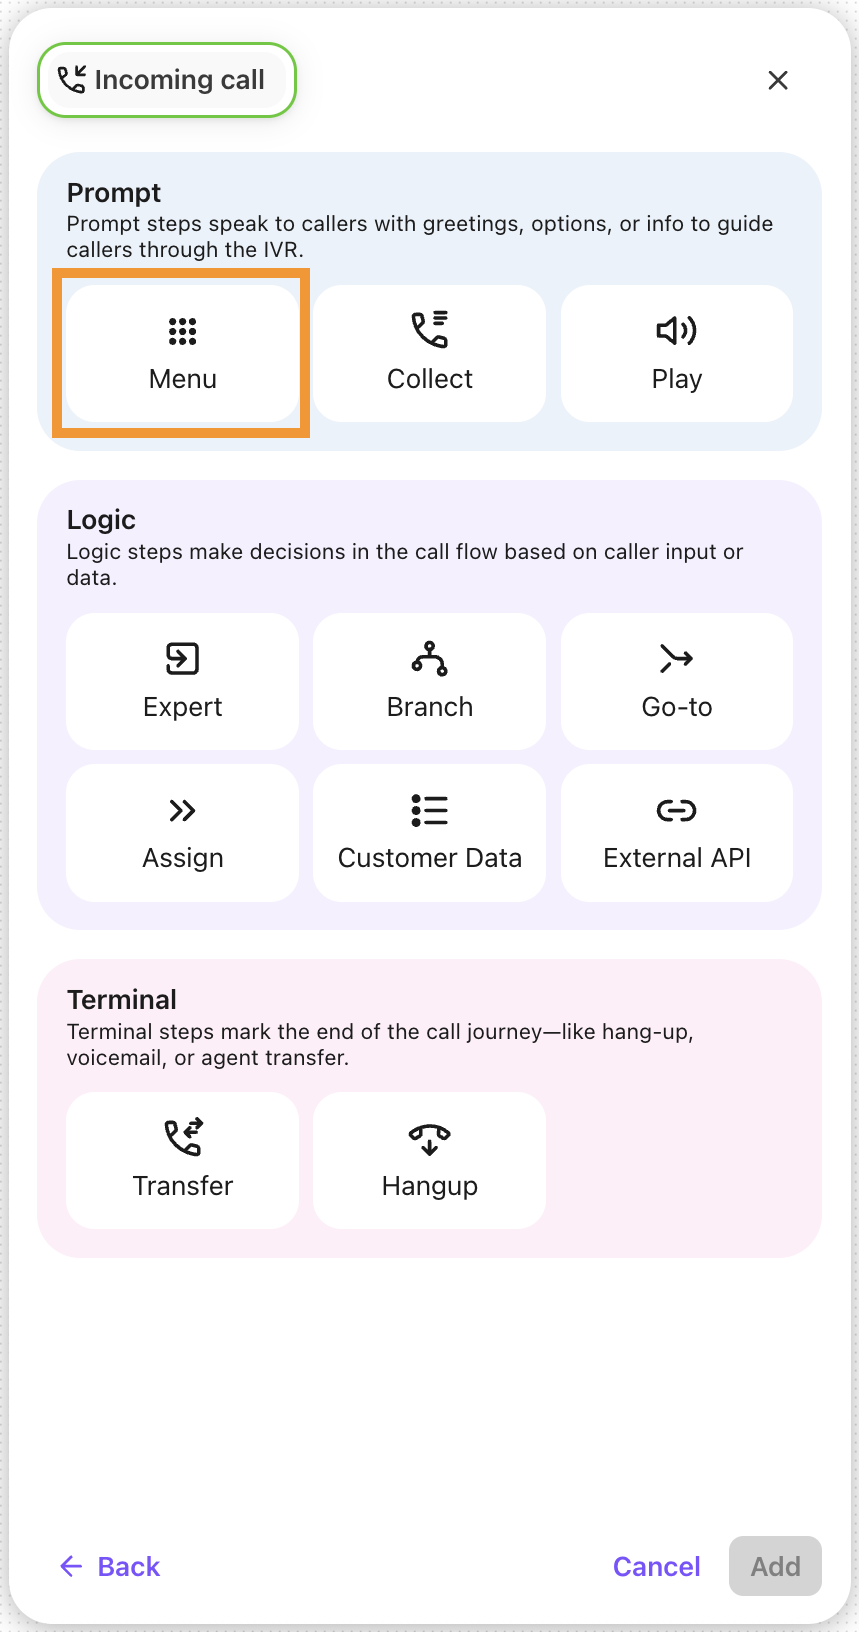
Under Prompt, select Menu
Name the menu step
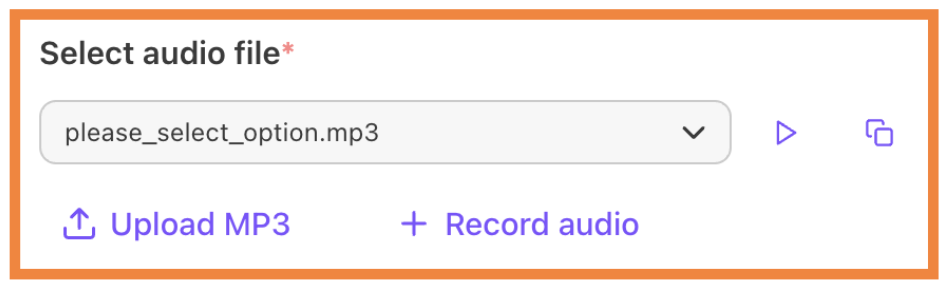
Select an audio file
Note
You can select or record an audio file as your welcome message or use our Text-to-Speech functionality. To enable Text-to-Speech functionality in your account, contact Dialpad's Customer Care team.
.png)
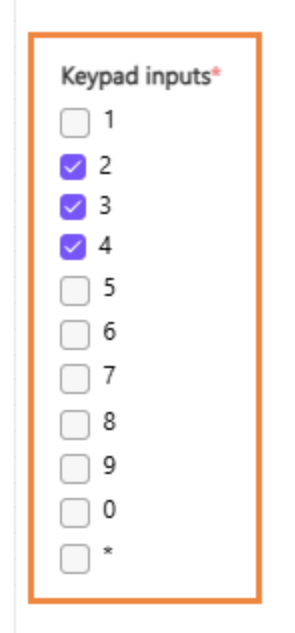
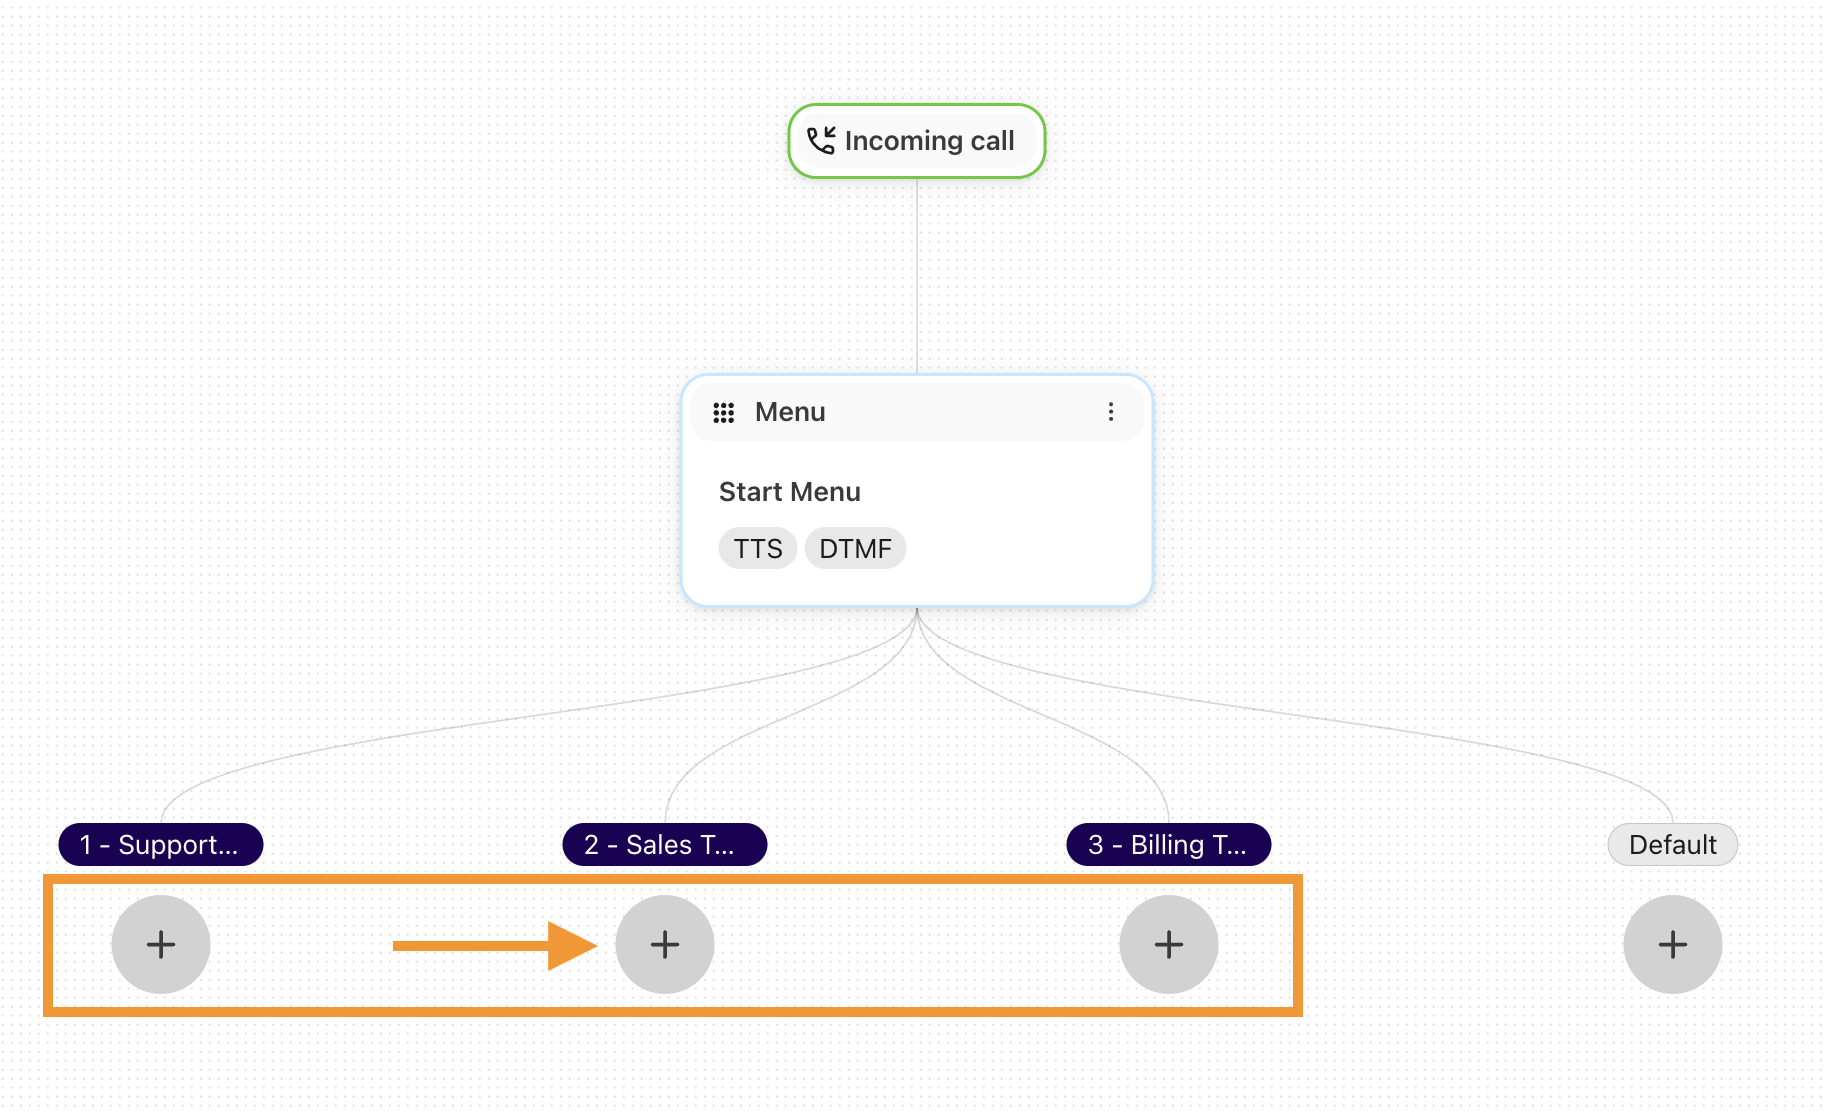
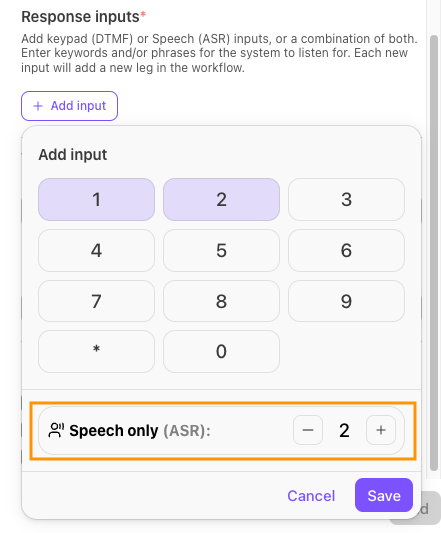
Select the number of keypad inputs (menu options). Each selected number reflects one leg/step of your menu.
Note
You can use Automatic Speech Recognition (ASR) to capture customer responses.
.png)
Name each response input, and adding keywords is a must.
Add all the terms a caller might say, and separate them with commas.
You can add up to 20 keywords per menu leg.
These can be added to any DTMF leg.
Use the “response input” counter to add speech-only legs.
Choose if you want to collect customer responses via speech, and for how many response inputs.
To enable Automatic Speech Recognition (ASR) functionality in your account, contact Dialpad's Customer Care team.
Set your timeout value (ie how long the system will wait for the caller to enter a selection)
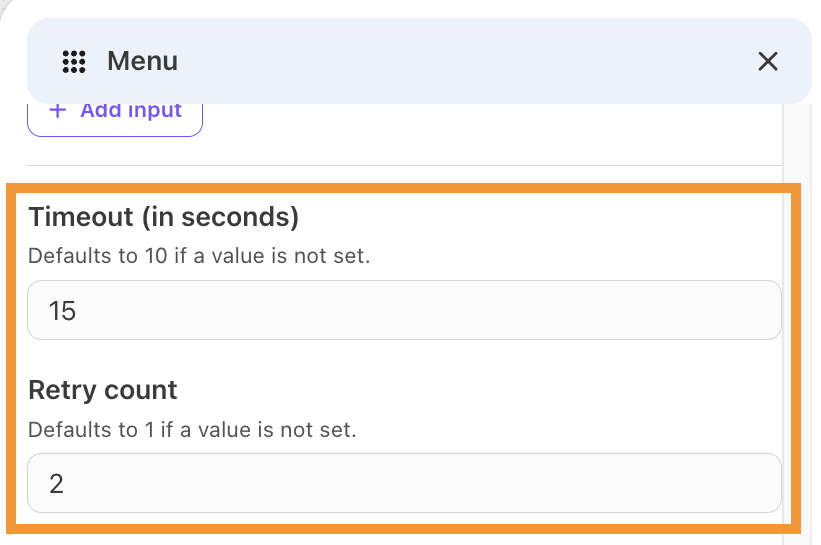
Note
The default timeout value is 10 seconds
Determine your Retry Count (the number of tries you will allow the caller to enter a selection)
Note
The default retry count is 1, meaning the system will replay the prompt once to the caller. A value of 2 will produce a second replay to the caller.
Enable your default behavior and prompts
Default behaviors can be set for:
No Match
No Input
Retry
Default behaviors play an additional prompt to the caller should any of the situations occur.
Upload a custom audio file to play a custom audio message.
Once all of the details are added for the Menu step, select Add
Add additional steps to your workflow, as desired.
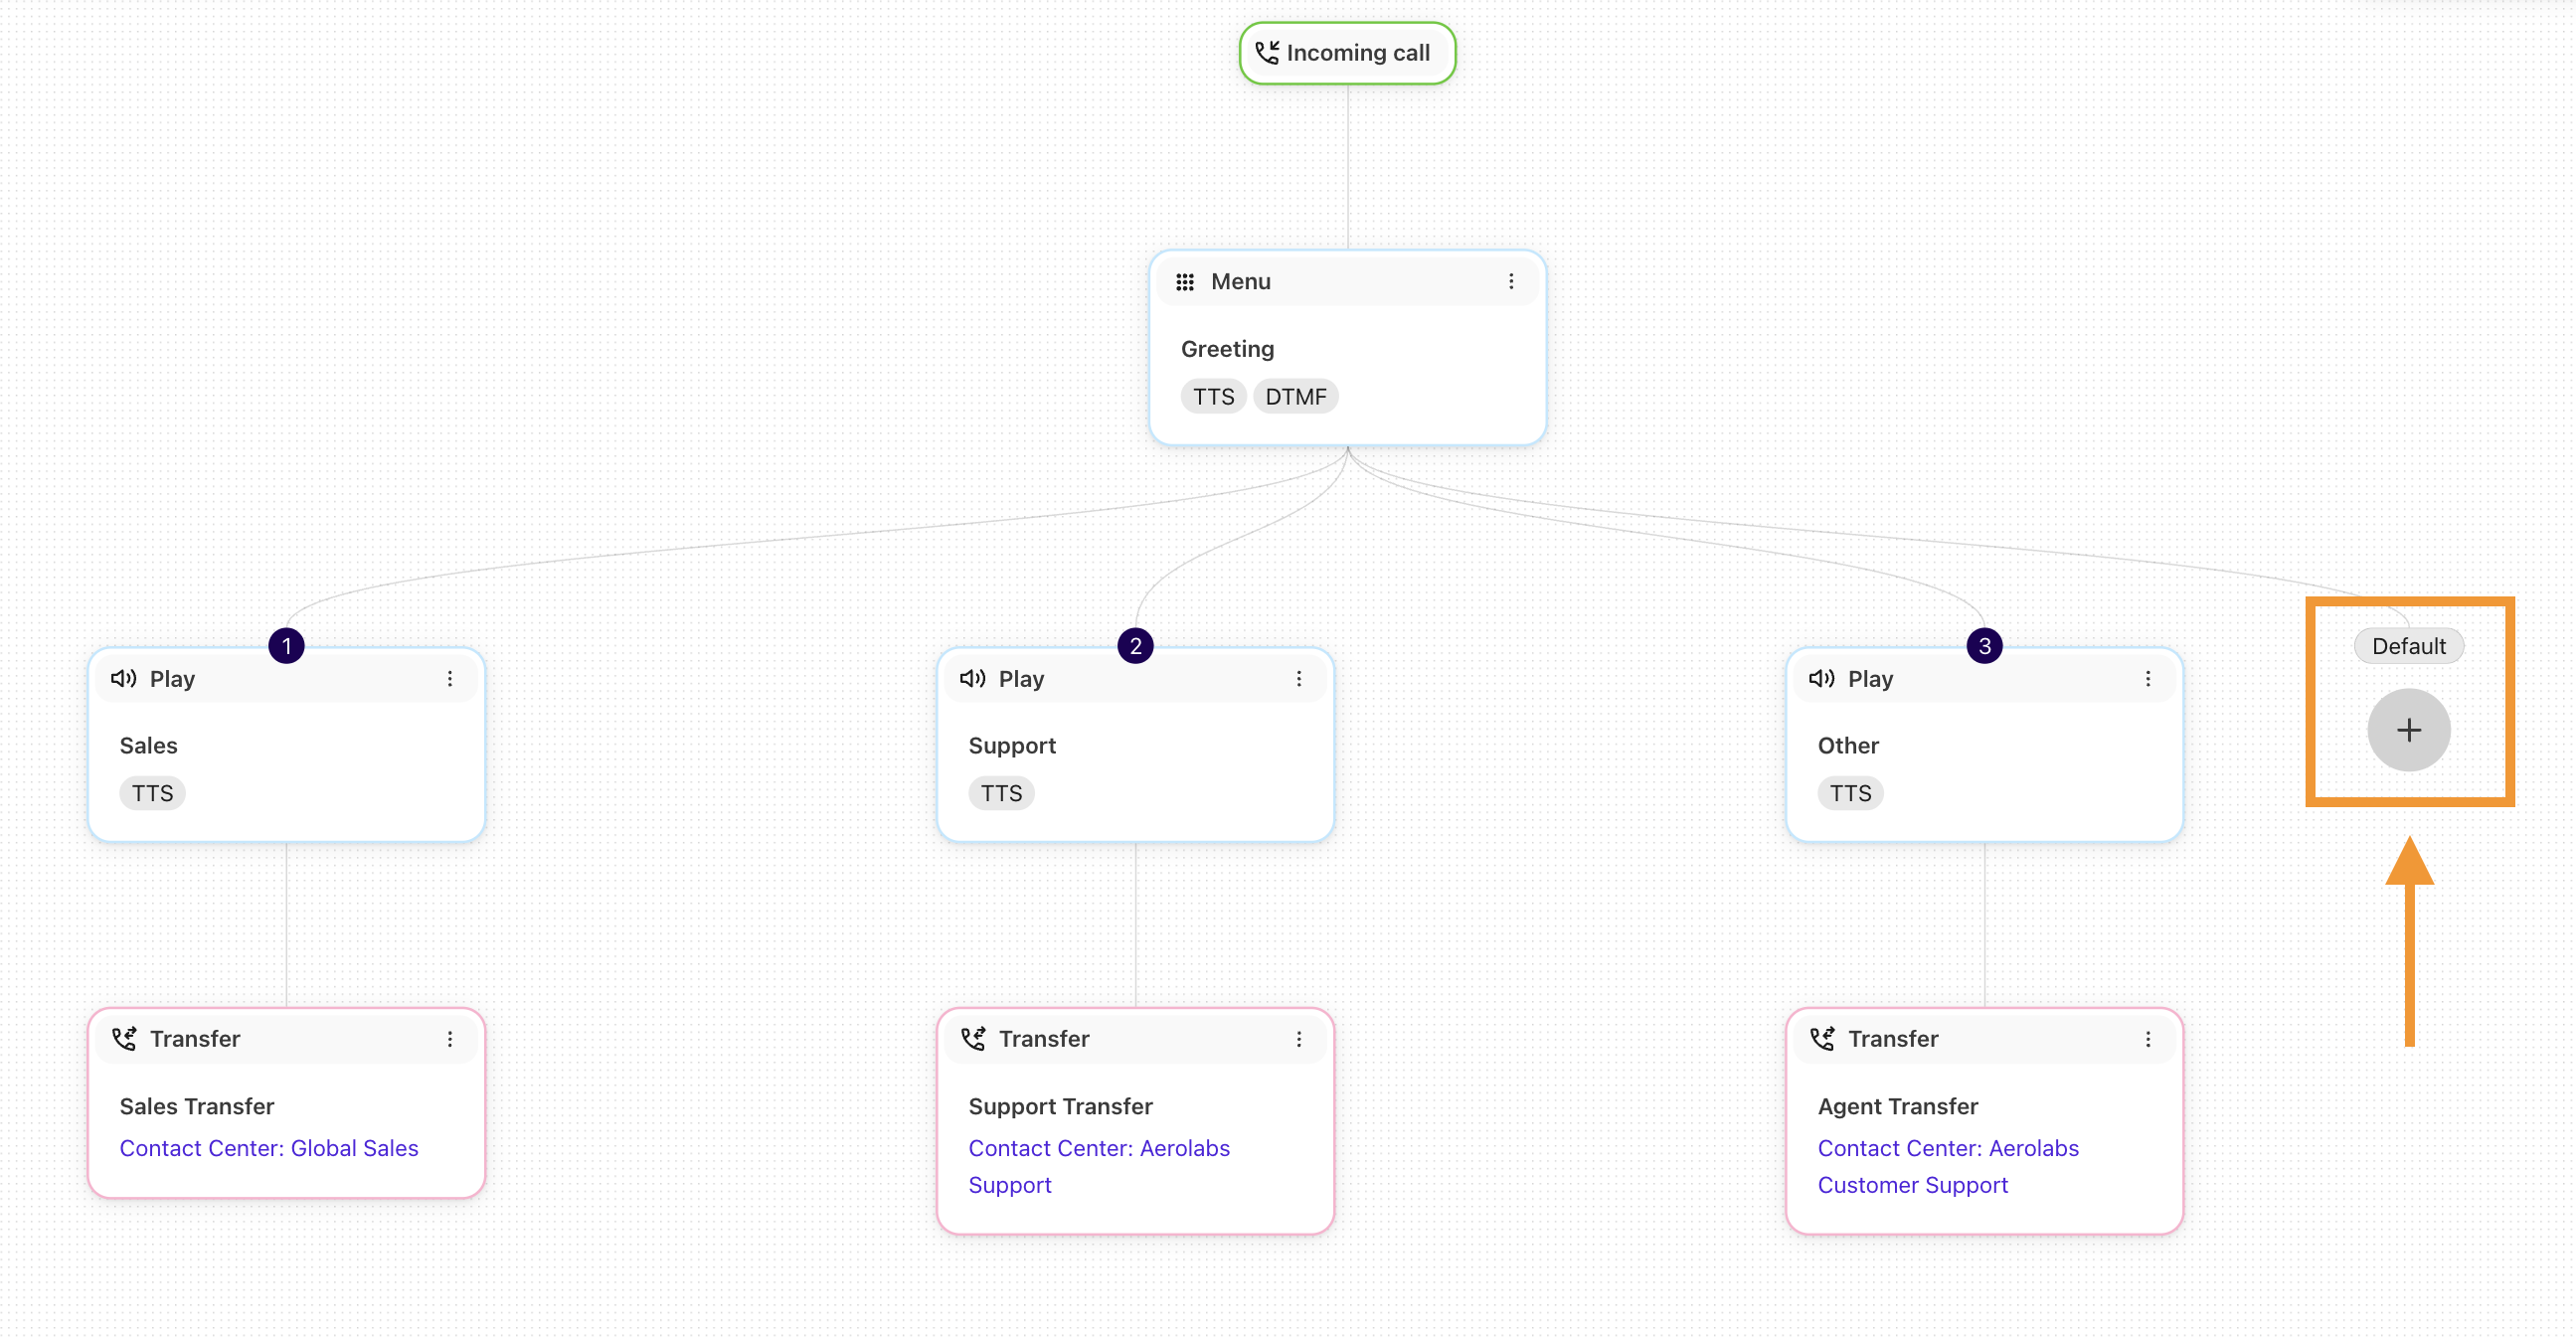
Default Menu Step
When using a Menu Step, Dialpad automatically creates a default leg that will perform specific workflow actions if:
The caller presses an invalid option.
The retry count is exceeded.
The timeout time has expired.
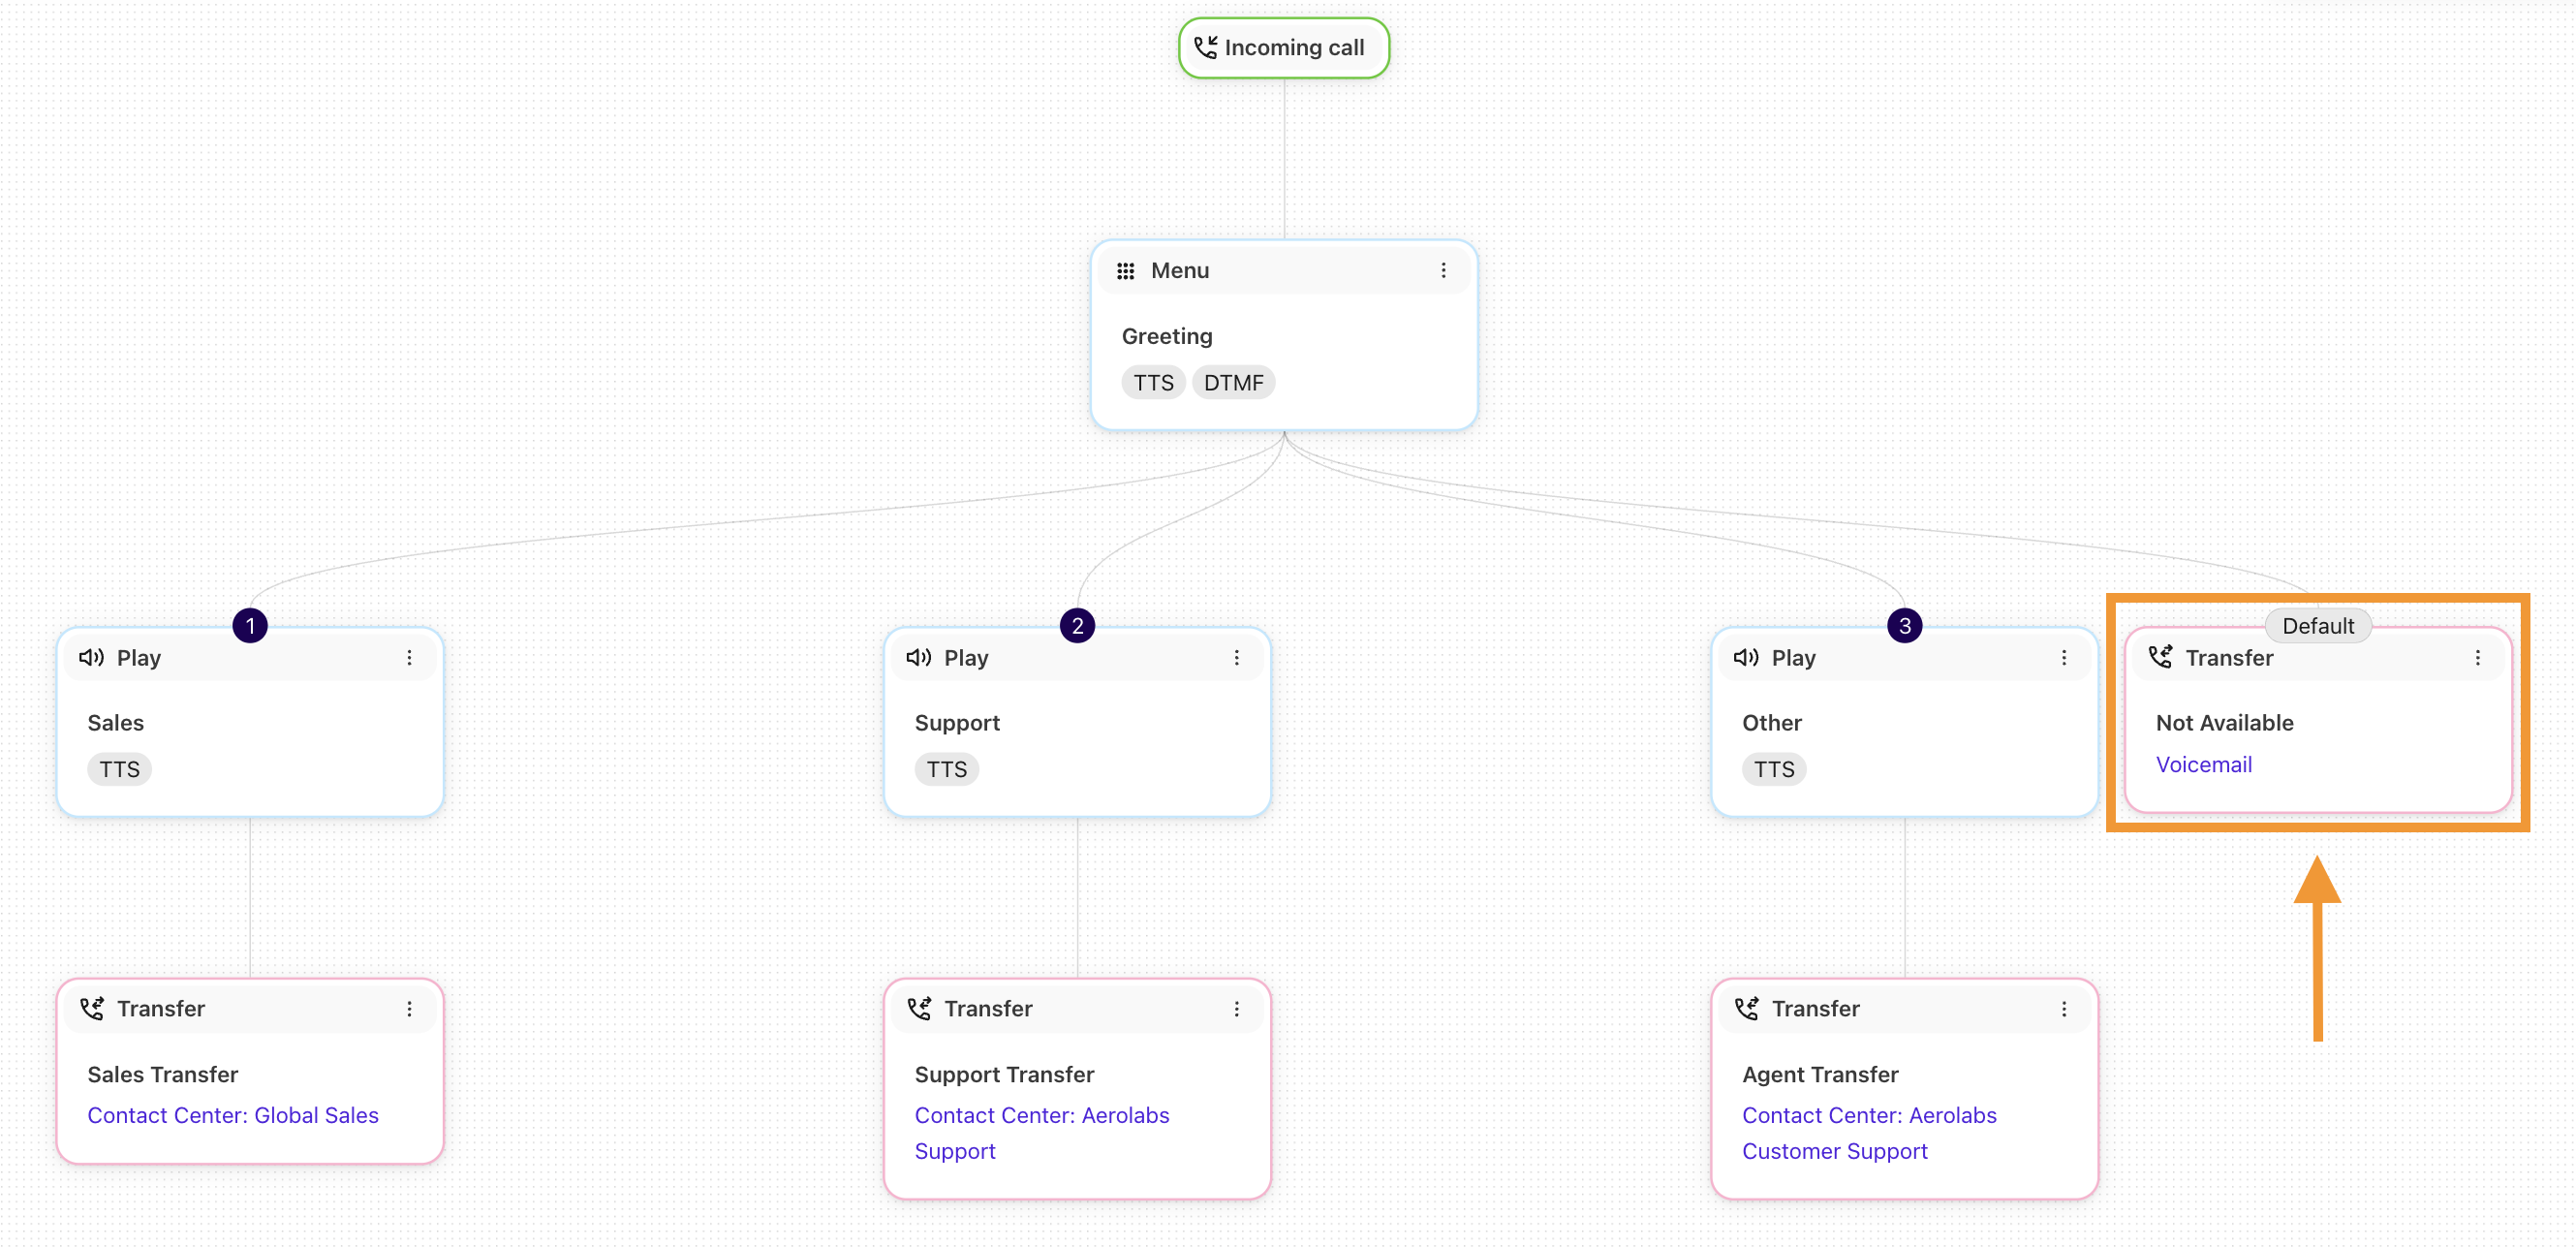
To set the default leg's action, select the + icon under Default.
Common default actions are transferring a customer to voicemail, or to a general contact center. Or, use a Go To step to send the caller to another section of your workflow.
Note
The default leg cannot be deleted and must be connected to an action — if it is unconnected, you won't be able to publish your IVR workflow.
Default steps are identifiable by the Default header and lack of number.
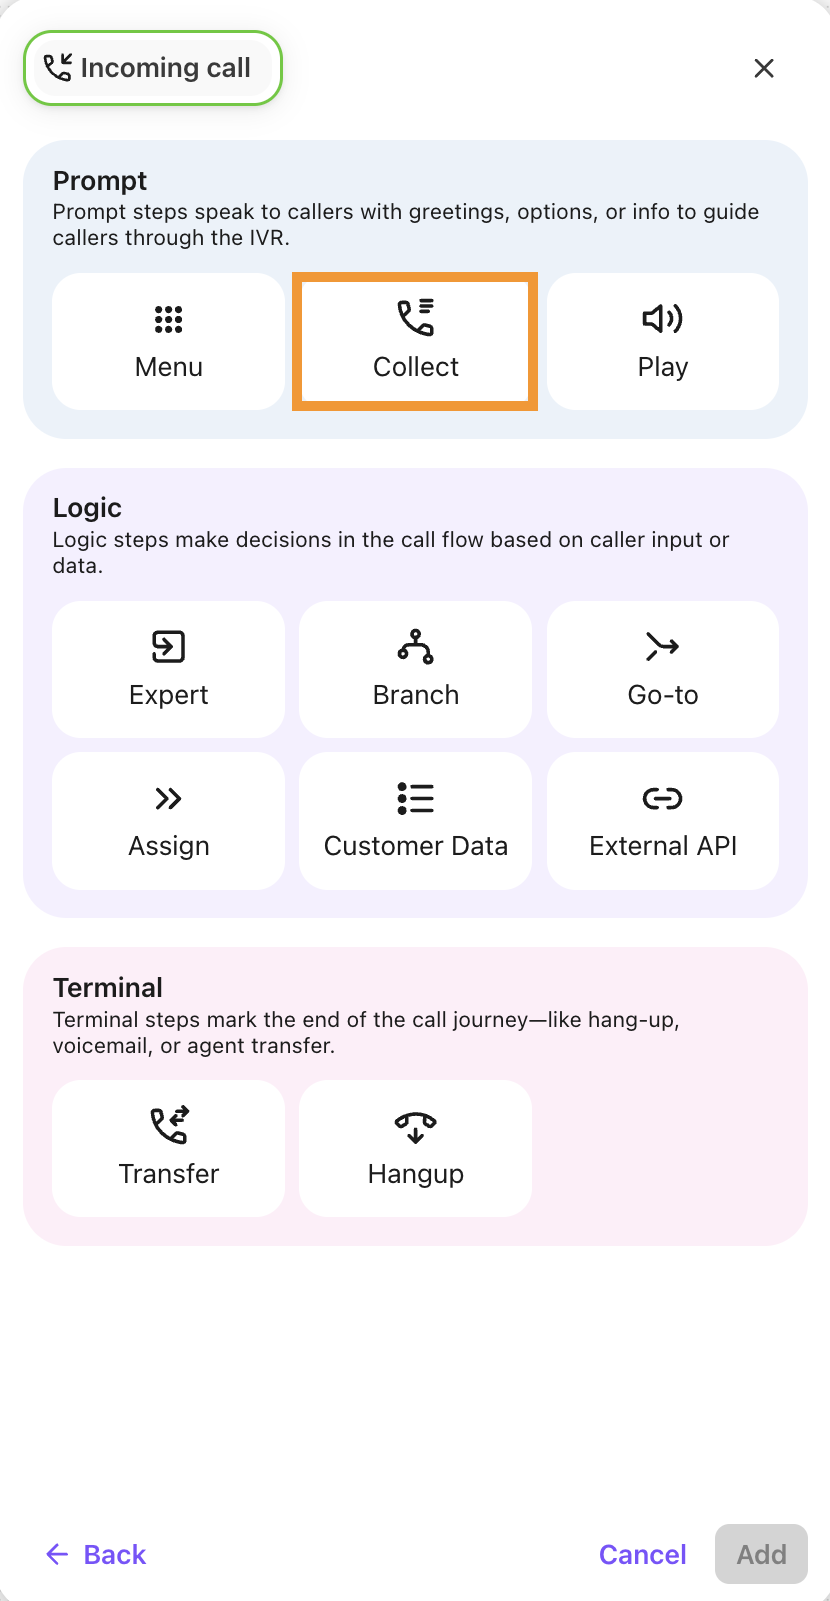
Collect
The Collect step is a great way to gather client information (think account numbers or confirmation details). This option prompts the caller for DTMF input and waits until the caller has input one or more DTMF digits.
Once entered, the value will be stored in a variable that can be used for API calls to validate a customer or pushed into a CRM system.
To add a Collect step:
Open the desired workflow and select ‘+’ to add a new step to your workflow
Under Prompt, select Collect
Name the collect step
Select an audio file
Note
You can select or record an audio file as your welcome message or use our Text-to-Speech functionality. To enable Text-to-Speech functionality in your account, contact Dialpad's Customer Care team.
Enter a variable name to store the collected value
Note
Variable names must contain only alphanumeric values such as:
accountID
customer.accountID
validationCode
Set your timeout value (ie how long the system will wait for the caller to enter a selection)

Determine your Retry Count (the number of tries you will allow the caller to enter a selection)
Note
The default retry count is 1, meaning the system will replay the prompt once to the caller. A value of 2 will produce a second replay to the caller.
If ASR is enabled, choose to collect responses via speech or DTMF.

Note
You can use Automatic Speech Recognition (ASR) to capture customer responses.
To enable Automatic Speech Recognition (ASR) functionality in your account, contact Dialpad's Customer Care team.
Enable your default behavior and prompts
Default behaviors can be set for:
No Match: The caller enters a DTMF value that does not match the configured input.
Example: A user enters 7 in a menu that only accepts 1,2,3. The user is then offered a chance to enter another value.
No Input: The caller does not enter any value.
A timeout occurs and a prompt gives the user another chance to enter something
Retry: Defines how many times a user is allowed to try again before the interaction terminates.
Default behaviors play an additional prompt to the caller should any of the situations occur.
Upload a custom audio file to play a custom audio message.
Once all of the details are added for the Collect step, select Add
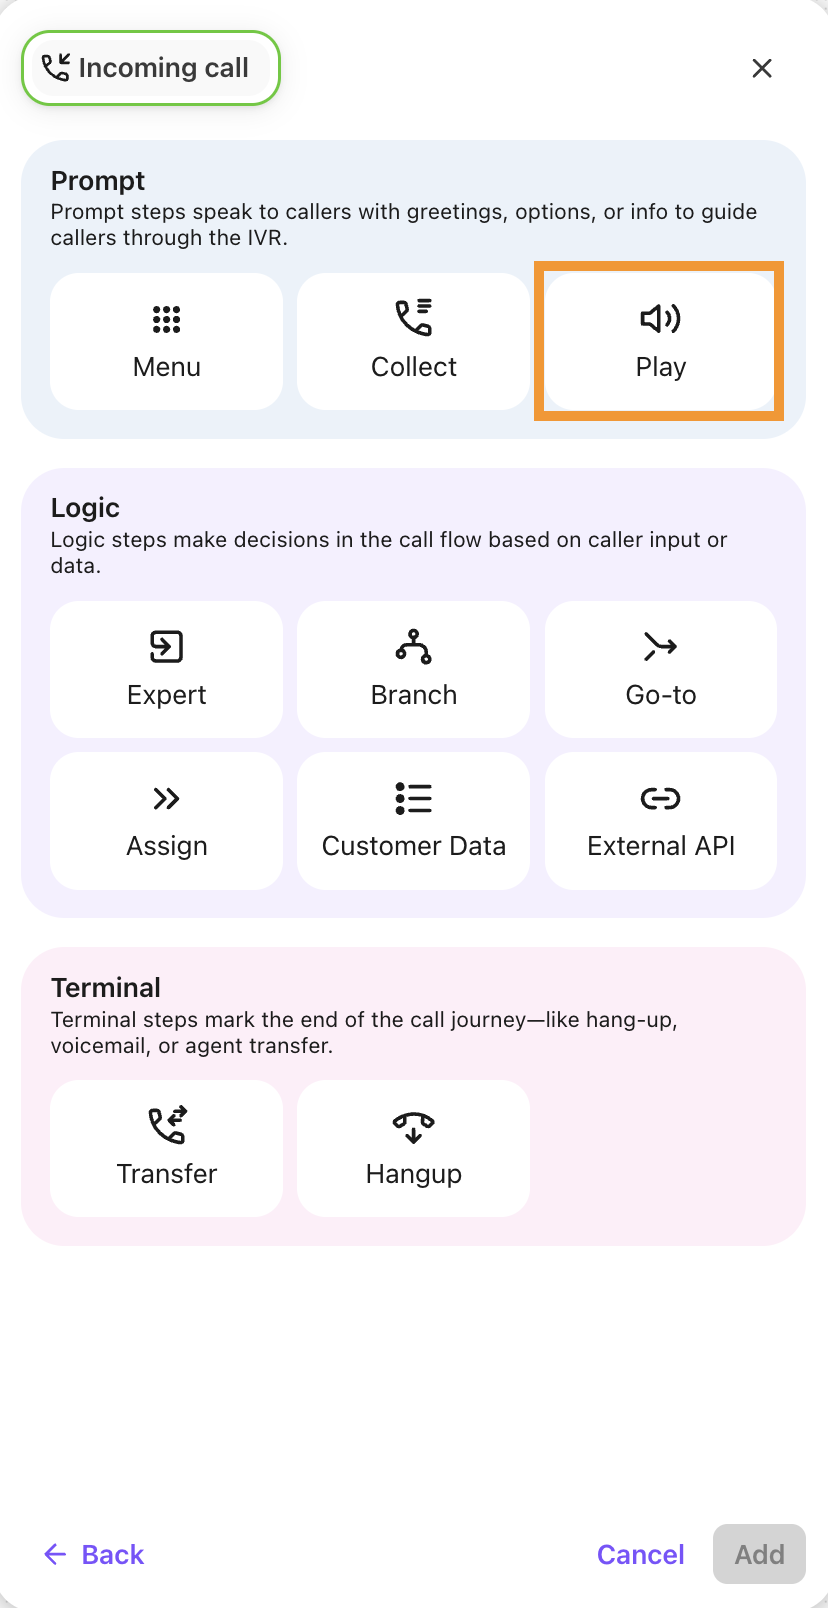
Play
The Play step plays audio to the caller. After the content is played, your workflow will continue to the next configured step.
The Play feature is commonly used to provide instructions or information to the caller. Use it to explain the menu choices, or even to provide instructions on how to find your office.
To add a Play step:
Open the desired workflow and select ‘+’ to add a new step to your workflow
Under Prompt, select Play
Name the Play step
Select an audio file
Note
You can select or record an audio file as your welcome message or use our Text-to-Speech functionality. To enable Text-to-Speech functionality in your account, contact Dialpad's Customer Care team.
Select Add
Tip
Files uploaded for a Play step can be used in other steps too! Just search for the name given in another step and select the file.
Go-To
The Go-to step moves the caller to another part of your Workflow, reducing duplication by avoiding multiple path creation. For example, if you have a transfer option that transfers callers to your Sales department, use a Go-to step to reach that configuration from multiple parts of the Workflow. This simplifies editing common functions and creates a common path for common steps. If the destination is an Workflow and there is no terminal step in the path, the execution will resume with the step following the Go-to step.
To add a Go-to step:
Open the desired workflow and select ‘+’ to add a new step to your workflow
Under Logic, select Go-to

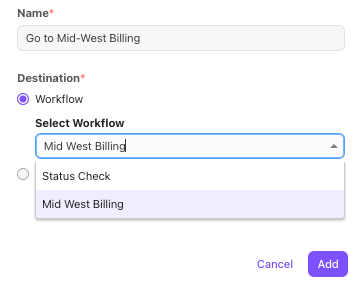
Name the Go-to step
Note
The name must be unique across your workflow and is a required field.
Select your destination, options include:
Workflow - Select one of your existing Workflows.
Step - Select one of your existing steps in the current Workflow.
Select Add
Use the ‘+’ function from the workflow editor to add a step after the Go-to step. This step will execute if the Go-to step returns from processing.
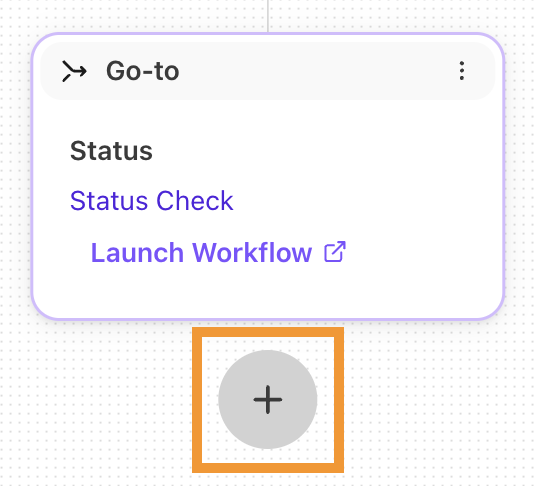
Note
Be careful to avoid looping! If you call a step that will repeatedly reach a Go-to step, you’ll create a loop. If detected, loops will stop processing and terminate the call, creating a frustrating experience for your callers.
Assign
The Assign step creates or updates variables to store information during the call, allowing for greater personalization.
Use the Assign step to:
Set a value to use later in the workflow.
If the workflow goes down the service path, you can set a 'calltype' variable to 'service' which can be used in the branch step to check for that value and perform other logic.
Save the value of an existing session variable (such as the callid or calling number).
Save and set values that can be used for API calls in Expert Workflows.
To add an Assign step :
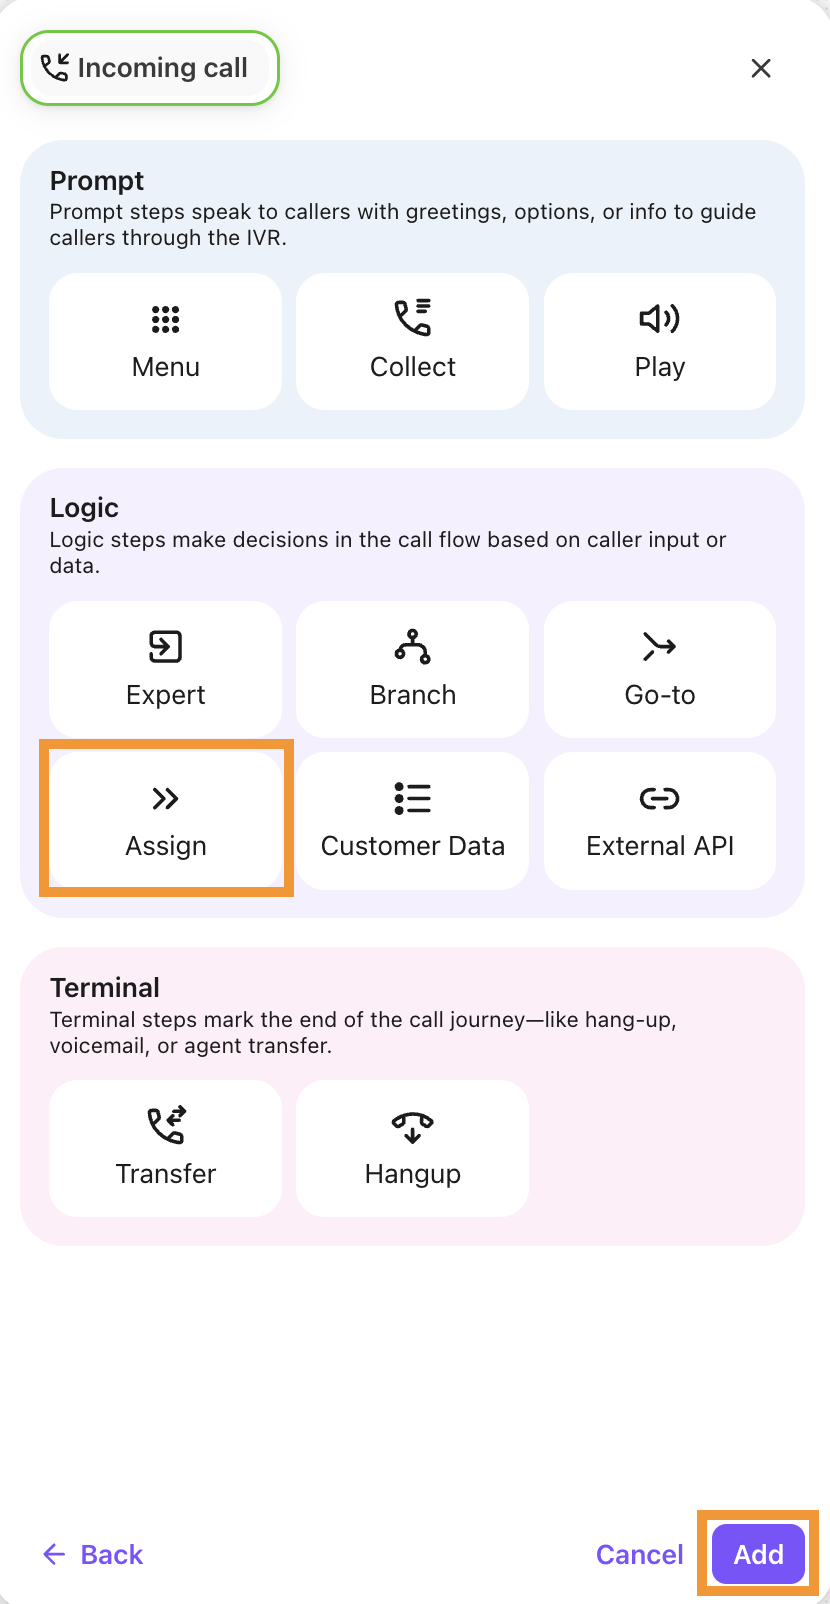
Open the desired workflow and select ‘+’ to add a new step to your workflow
Under Logic, select Assign
Name the Assign step
Enter a variable name
Note
You can use a new name or select an existing variable from the dropdown.
Enter the value or expression
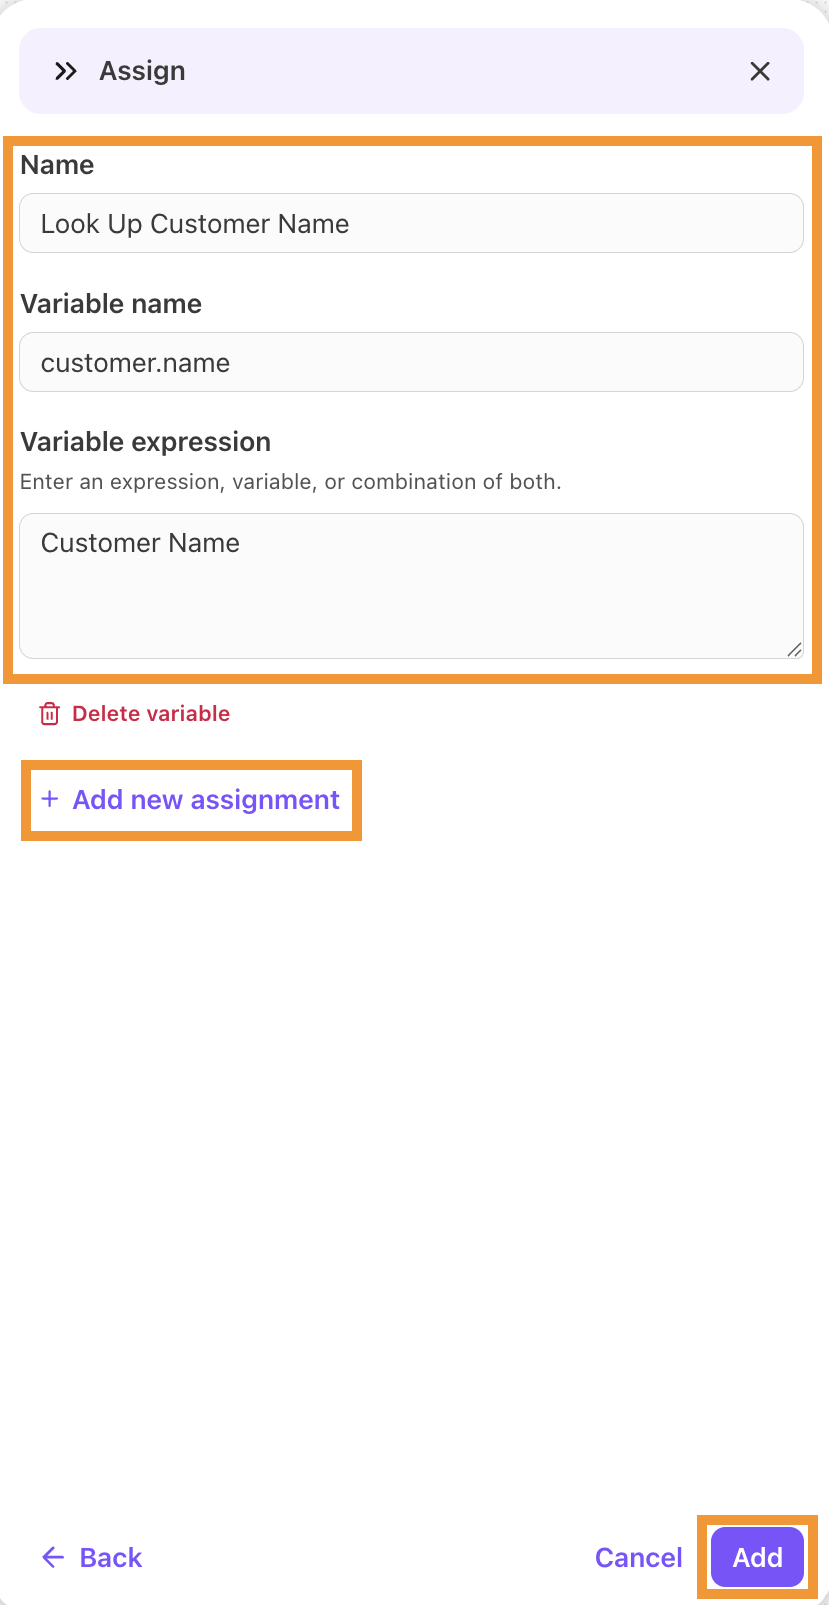
Note
You can use a variable name as the source of the Assign, or select one of the existing variables from the dropdown. New variables must be alphanumeric characters with no spaces or _ characters (if the variable already exists, the current value will be overwritten).
Select + Add new assignment if you want to add another assignment, or select Save
Select Add
Tip
Be sure to read this Help Center article for more details on variables.
Branch
The Branch Step evaluates system variables and performs specific actions based on the examined value.
Use Branches to:
Check the caller ID for a specific customer or area code to perform different actions
Example: Local numbers are direct to your local team and all other area codes direct to your national sales team.
Check the inbound Called Number variable for a specific number the user called and perform different actions based on that number.
Example: 800 numbers go one workflow step and all other numbers go a different path.
To add a Branch step:
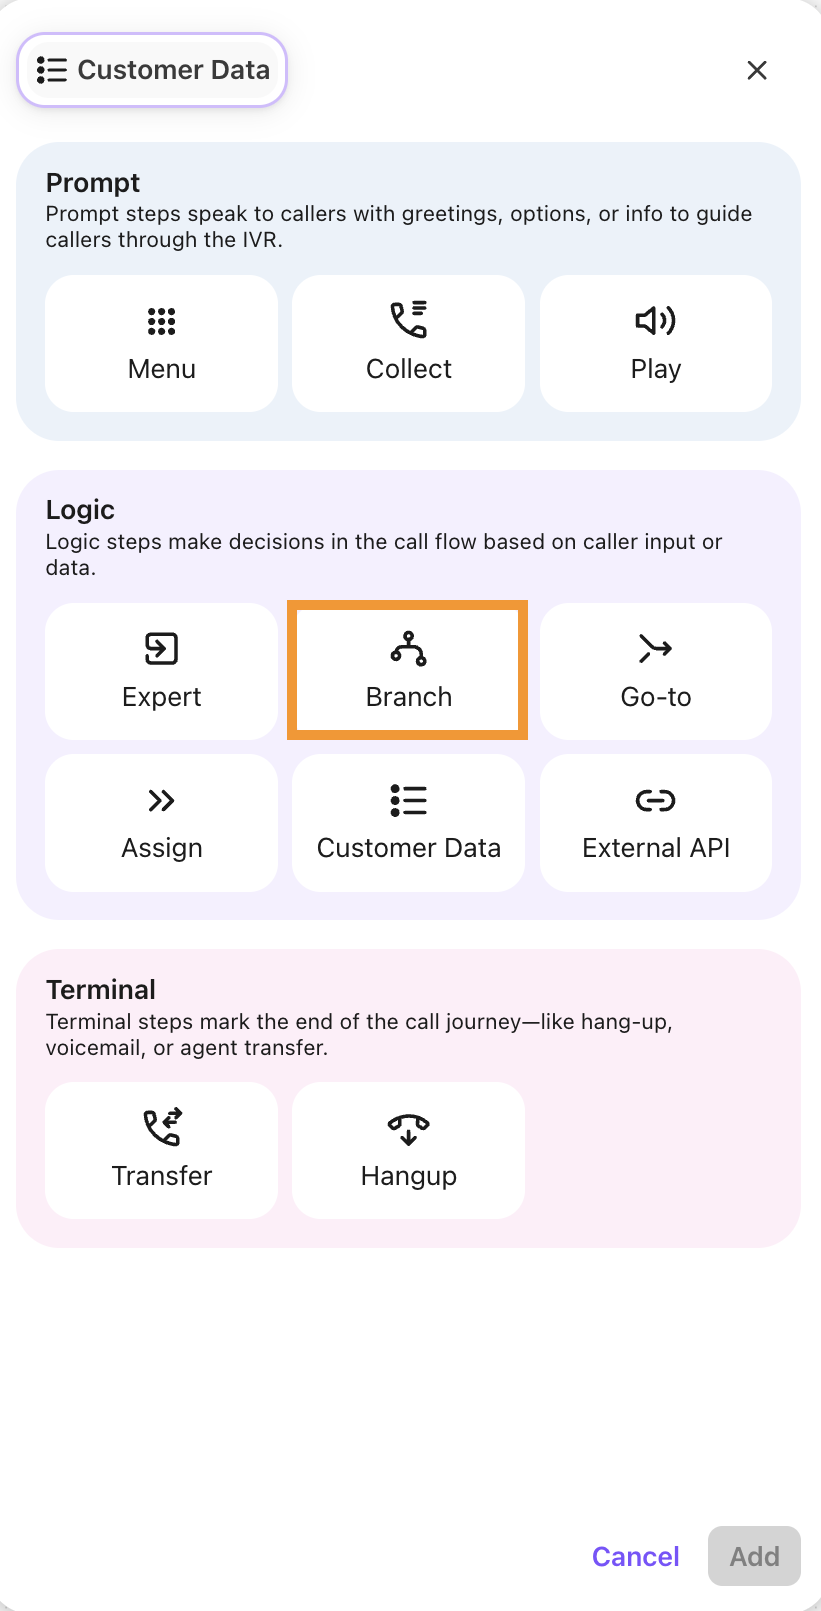
Open the desired workflow and select ‘+’ to add a new step to your workflow
Under Logic, select Branch
Name the Branch step
Select a variable to be evaluated
You can choose from the system variables in the drop-down menu, or you can type your custom variable into the edit box.
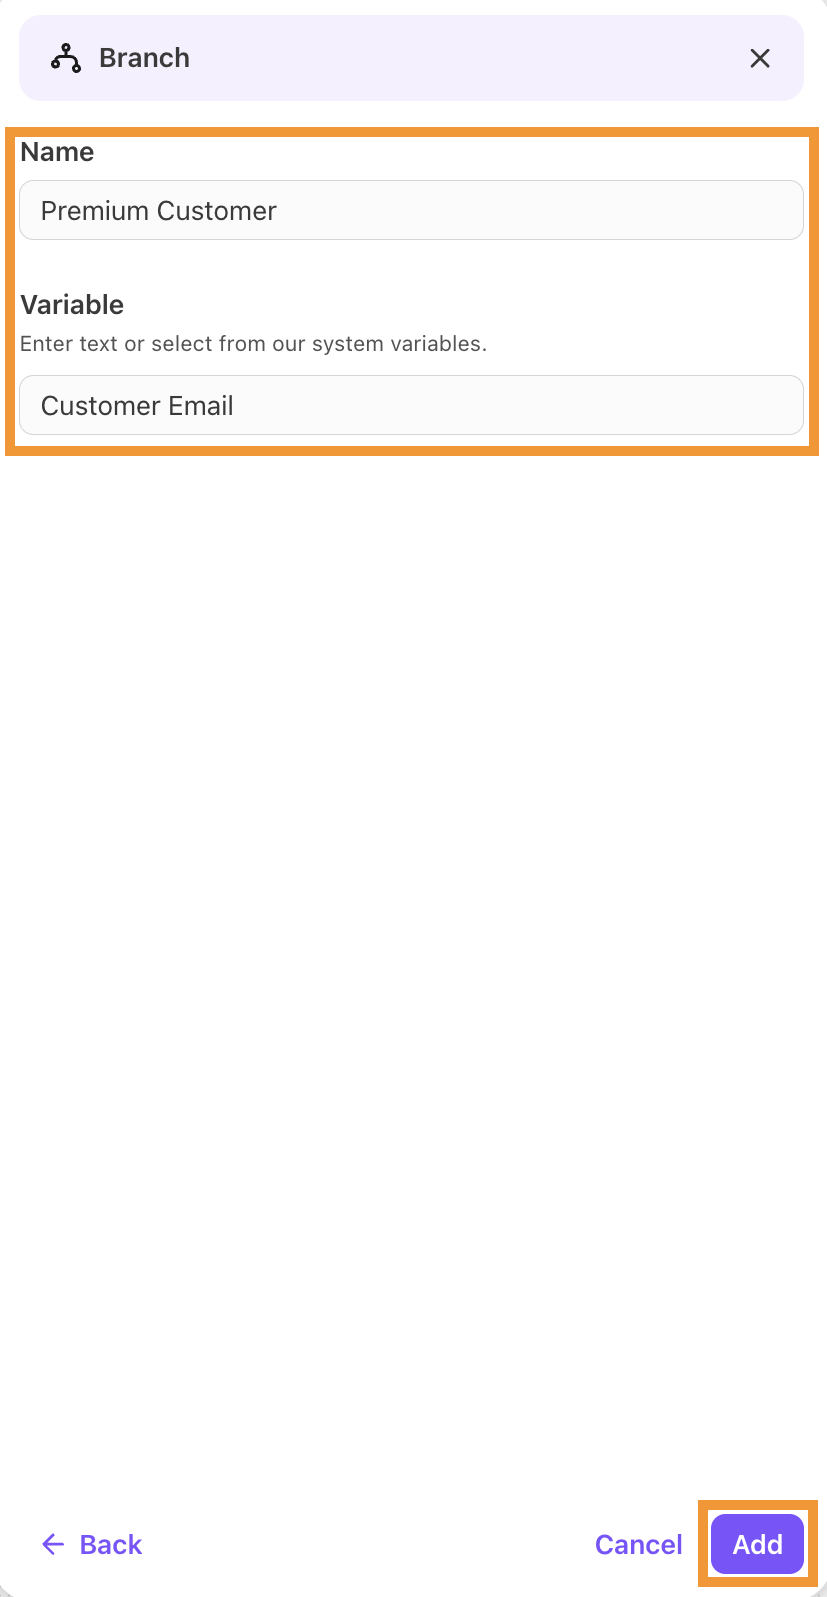
Select Add
Once the Branch step has been created, you will have an empty conditional leg with an optional no-match path.
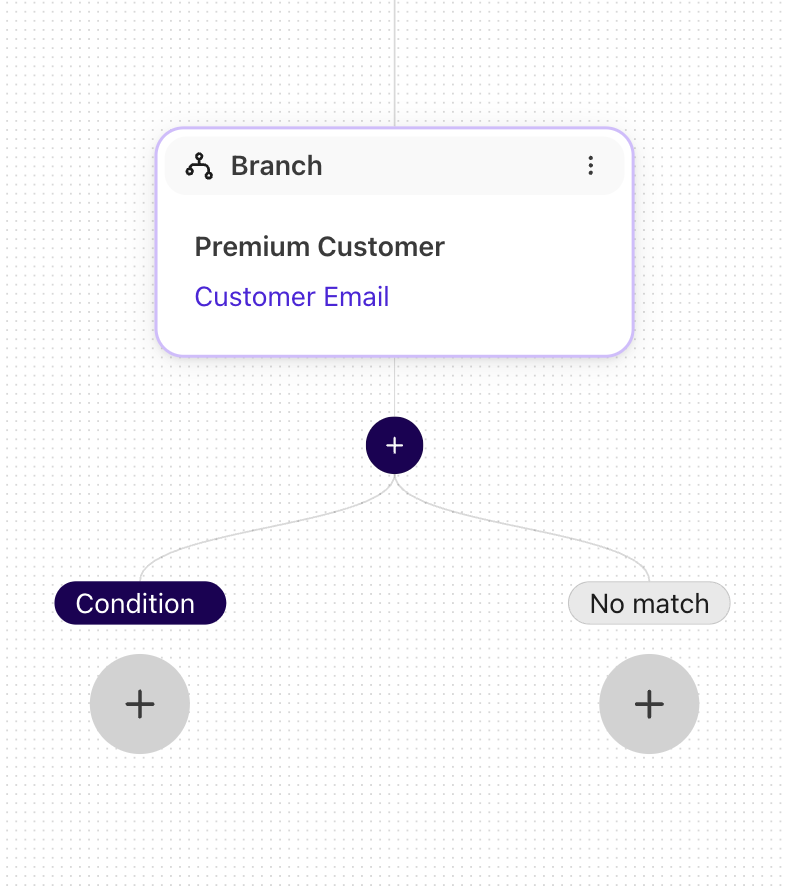
Select the Edit icon to edit the condition — this will be the text or regular expression used to match against your variable value.
For example, if you have a specific phone number used by VIPs, check for that number being called and perform the VIP actions below that matching leg.

Click the check mark to confirm the condition and save it to the leg.
Add additional steps using the + button below the condition.
Add below the “No Match” leg for items that do not match any condition.
If you want to add more conditional legs, click the + below the Branch node.
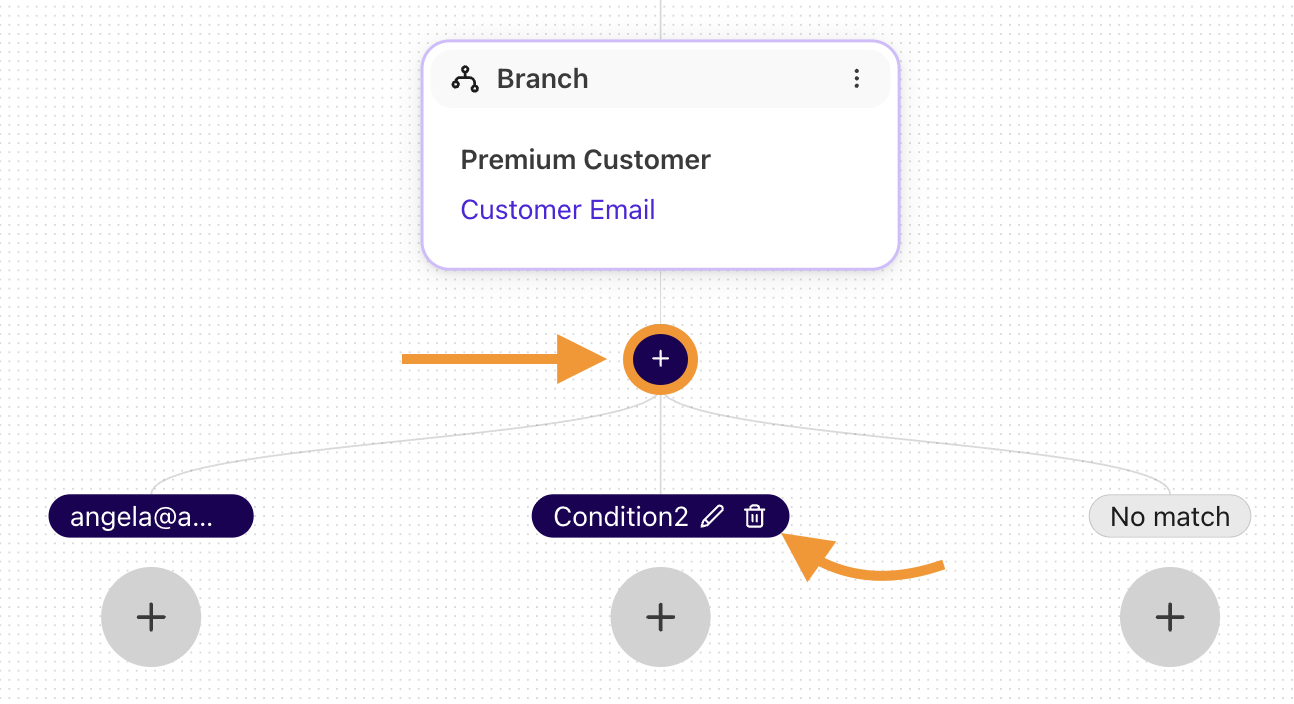
To delete a conditional leg, hover over the condition and select the Trash can.
.png)
Characters Used in Expression Patterns
These characters are used in expression patterns to help find data.
Character(s) | Description |
|---|---|
Exact Characters | You can match strings by strictly using basic characters. |
Dot (.) | Matches any character except newline. |
Caret (^) | The caret (^) is used to match the start of a string. |
Dollar sign ($) | The dollar sign ($) is used to match the end of the string. |
Asterisk (*) | The asterisk (*) matches zero or more times. |
Plus (+) | The plus sign (+) matches one or more times. |
(.*) | Matches any single character except for new line, and the string can have empty characters. |
\d | Matches any digit in the string. |
\w | Matches any word in the string. |
Group Patterns () | Group patterns together to form a full pattern. |
Pipe (|) | Used as “OR” to match one or more patterns. |
Expression Examples
Tips
It is recommended to use ^ to mark the start of any string (words or numbers) and use a $ to mark the end of the string.
The evaluation of variables can be a static string value, or you can use more powerful regular expressions like the ones listed above.
Customer Data
The Customer Data step simplifies the process of collecting and sharing key customer details that agents and supervisors can view during a call. This enables faster responses, more personalized conversations, and eliminates the need to repeat questions. To set it up, admins define key-value pairs within the workflow step to capture and pass along important customer information.
To add a Customer Data step:
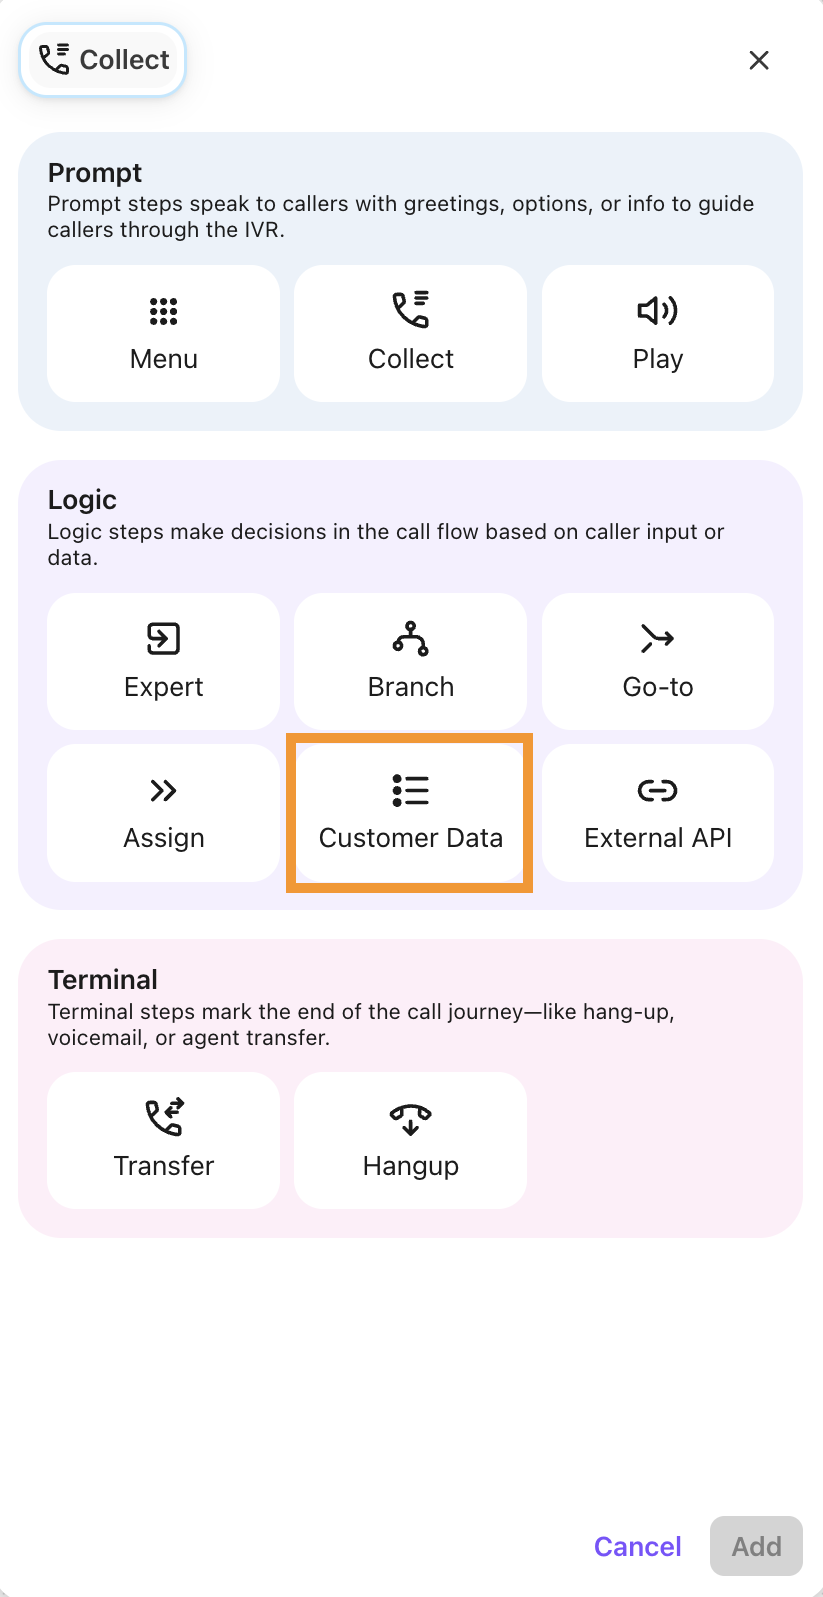
Open the desired workflow and select ‘+’ to add a new step to your workflow
Under Logic, select Customer Data
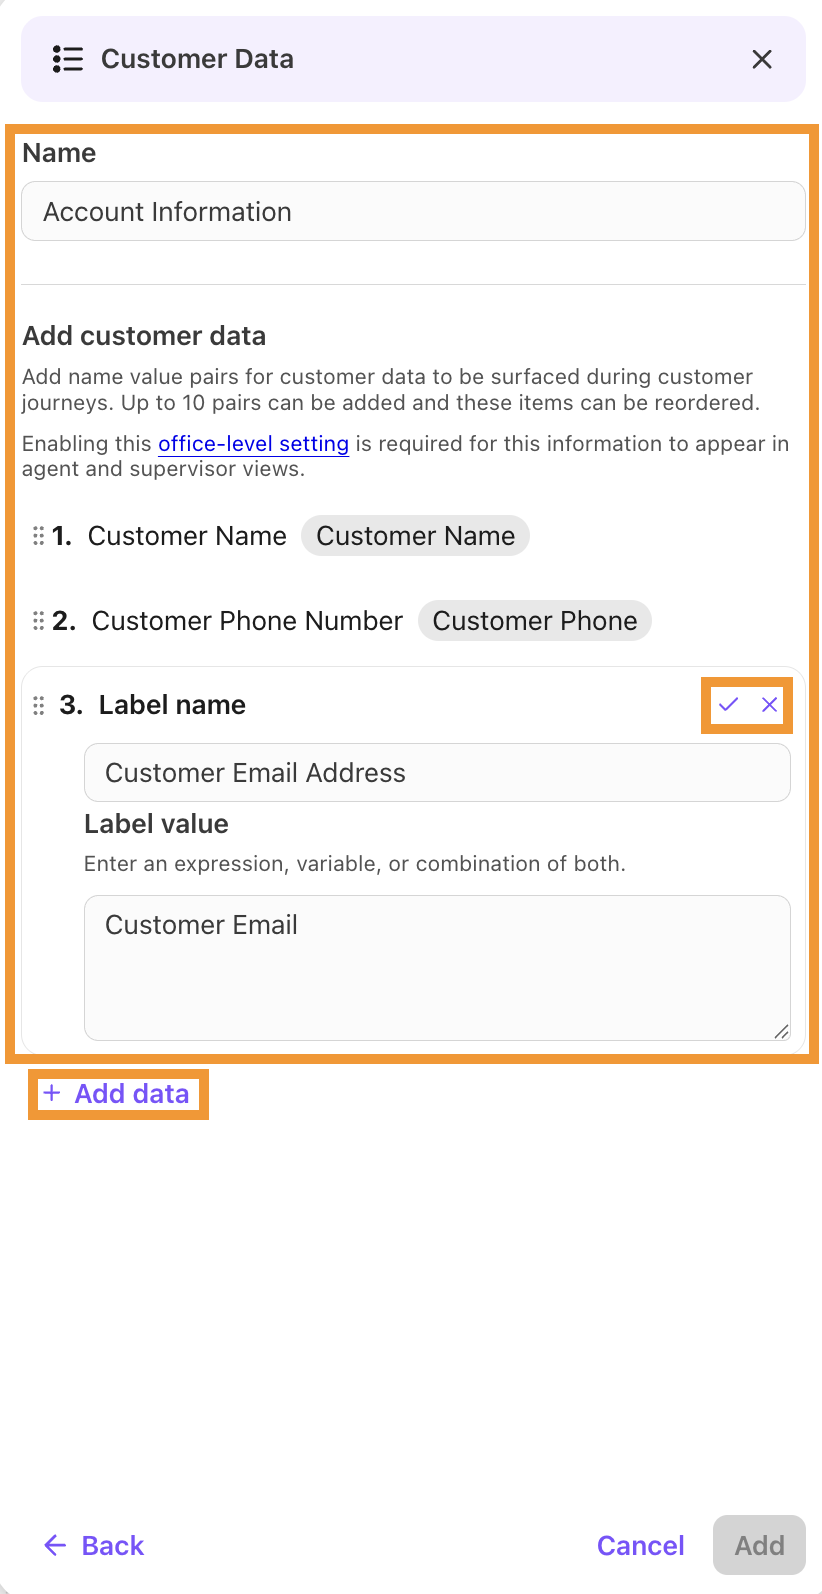
Name the customer data step
Define the Value (variable) for each key:
System Variables
Select from a list of pre-defined Dialpad variables such as Call Direction, Customer Name, Called Number, etc. These variables dynamically insert information related to the current call.
Variables from other nodes
If you have previously used other nodes (like the "Collect" node to capture digits or speech) and assigned the collected information to a variable, these variables will be available for selection in a list after the system variables.
Manually entered variables
For other existing pre-defined variables not shown in the list, you can manually type the variable name enclosed in double curly braces (e.g., {{my_custom_variable}}).
Static Values
Enter a fixed text value directly (e.g., "Sales Inquiry", "Support Queue 1").
Combination of text and variables
Combine static text with variables to create a descriptive value (e.g., "Caller selected: {{MenuChoice}}").
Note
You can add up to 10 variables per Customer Data Step.
Select Add
Tip
When using multiple values, drag and drop them into the desired order.
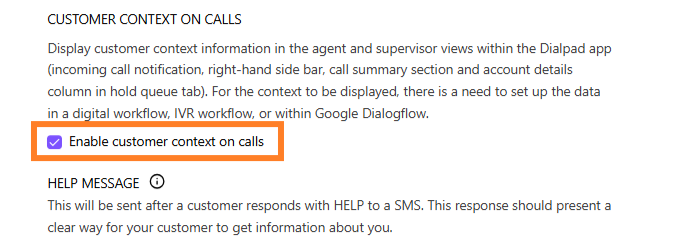
Once you’ve created a Customer Data step, go to your Office Settings and enable customer context on calls.
To enable customer context on calls, go to your Dialpad Admin Settings.
Select Office Settings
Navigate to Customer Context on Calls
Select the Enable customer context on calls checkbox
Viewing Customer Data
Here’s what agents and supervisors see when customer context is turned on for calls.
Incoming call notification
.png)
Customer profile and call summary
.png)
Hold queue
.png)
The first three values will be displayed in the incoming call notification, and you’ll see all values in the customer profile and the call summary.
When a call is in the hold queue, you’ll only see the first value.
Notes
This step is designed to use values for already-defined variables (including system variables or those from previous nodes). It's important to note that new variables cannot be created during this step; they must exist beforehand.
Customer information set by the Customer Data step does not display within the Salesforce CTI.
External API
The External API step allows you to fetch data from a separate platform (such as a CRM) via REST APIs. This is useful for retrieving information, such as a customer account or a shipping order.
Note
Make sure the API is accessible via the public internet.
To add an External API step:
Open the desired workflow and select ‘+’ to add a new step to your workflow
Under Logic, select External API
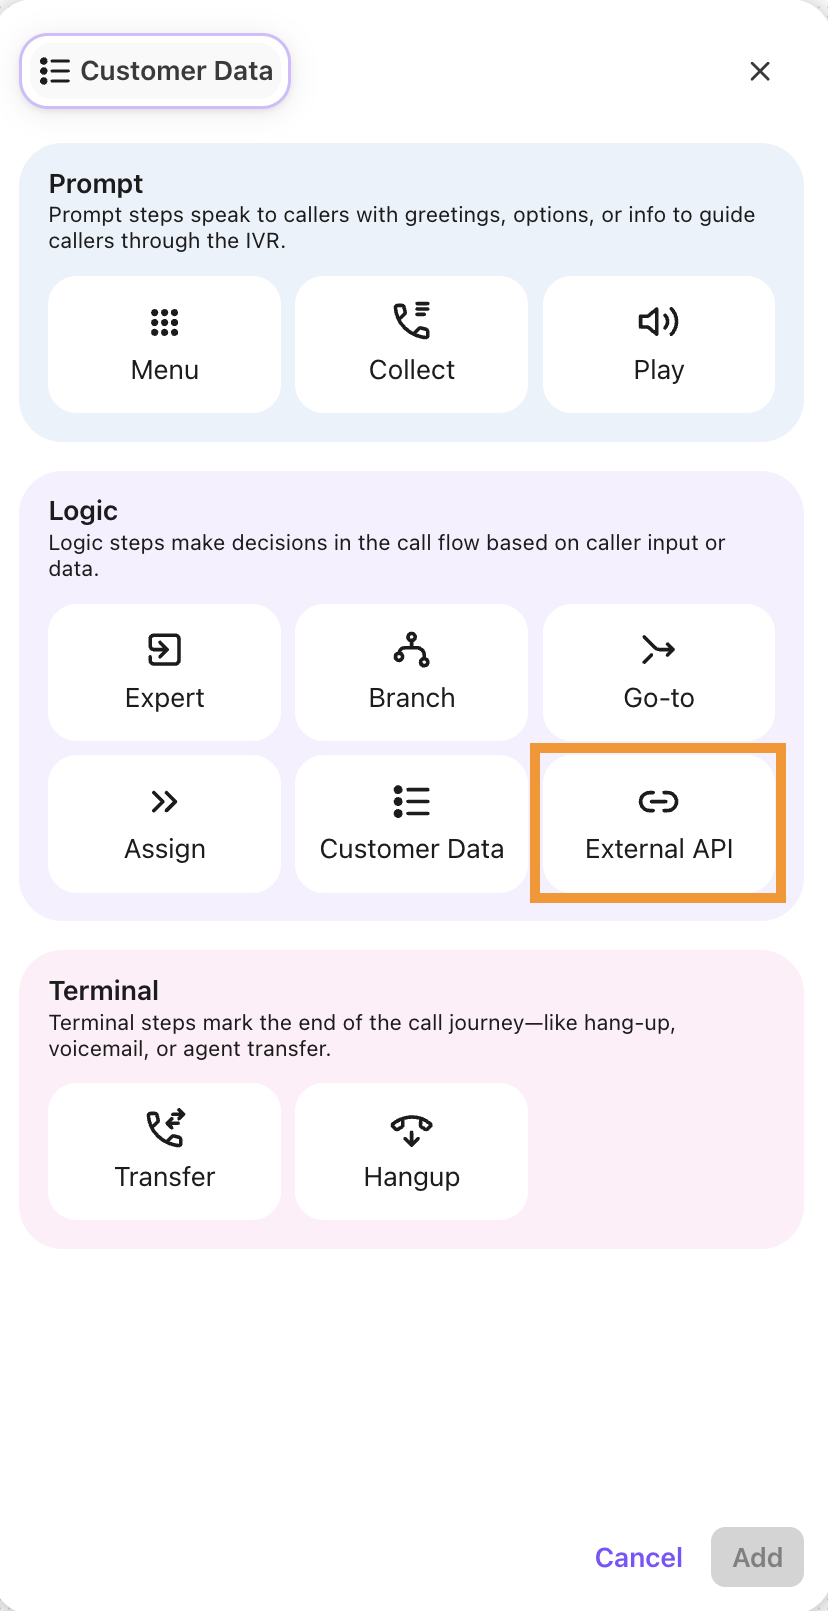
Name the External API step
Enter the URL to make the request to the external REST API
Example: https://example.com/api/users
Note
Ensure that https:// is included in the URL.
Add any URL parameters to the URL API call
Example: ?phone={{customer.businessid.phone}}
Choose the method the API will use for the operation:
GET
POST
PUT
PATCH

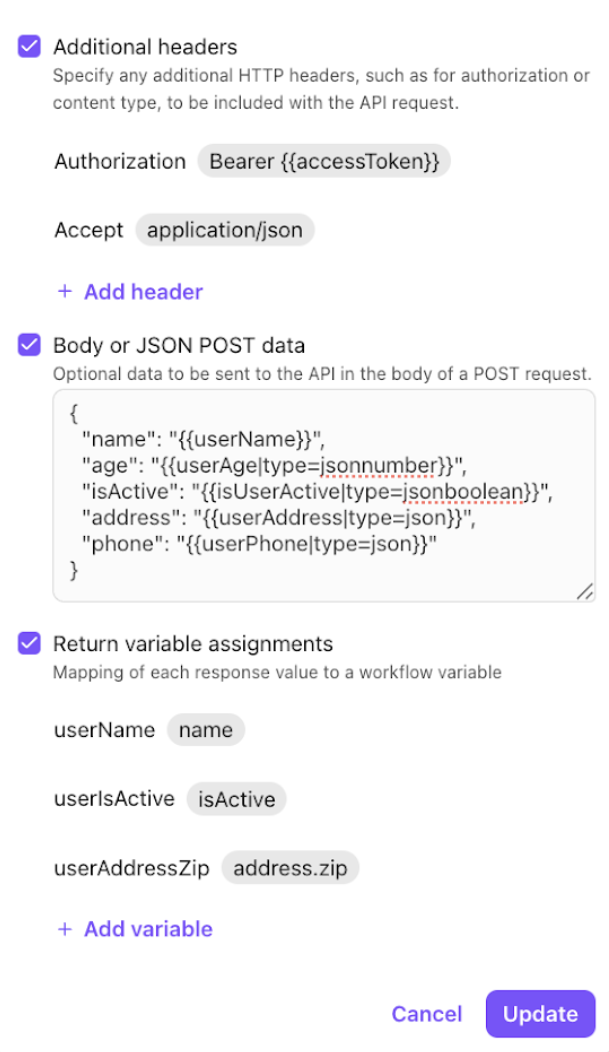
Add any additional headers to the API
Example:
Authorization: Bearer {{accessToken}}
Accept: application/json
Enter any optional Body or POST JSON data to the API
Example:
{
"name": "{{userName}}",
"age": "{{userAge|type=jsonnumber}}",
"isActive": "{{isUserActive|type=jsonboolean}}",
"address": "{{userAddress|type=json}}",
"phone": "{{userPhone|type=json}}"
}
Select any variable assignments
Examples:
Name
isActive
address.zip
Note
Variables can be URL encoded or transposed to JSON using the following formatting on the variable:
JSON: {{exampleVariableName|type=json}}
URL Encoded: {{exampleURLString|type=urlqueryvalue}}
Number in JSON Body value: "{{num|type=jsonnumber}}"
Boolean in JSON Body value: "bool":"{{bool|type=jsonboolean}}"
These examples above are used in expert mode, but highlight how you can use variables in the standard External API step.
Select Add
Note
For more complex workflows that use APIs, use the Expert Step and configure the API within an Expert Workflow.
Note
Most APIs take only a few seconds to process and can be used with the standard External API step. For APIs that require longer processing times, it’s recommended to use the Call Park and Call Resume nodes in an Expert Workflow.
Expert
Expert steps must be configured by our Professional Services team. Please contact your Customer Success Manager to get started.
To learn more about Expert Workflows, check out this Help Center article.
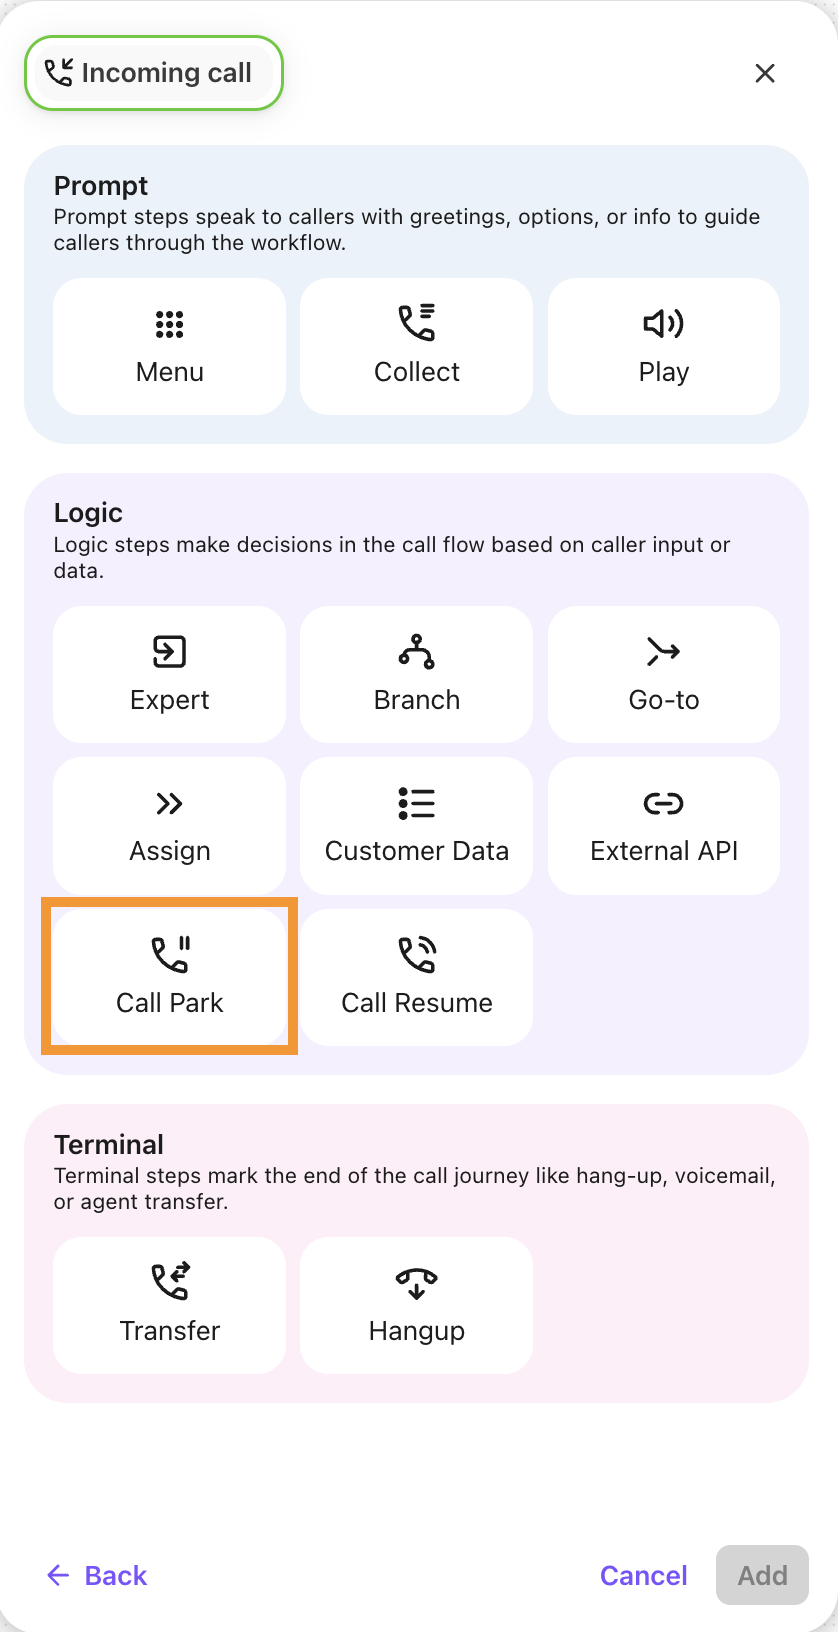
Call Park
The Call Park step allows you to park a call (put a caller on hold) in your workflow when you need more time to find or process information. This step is commonly used for API calls that are more data heavy and require more time to process. Rather than having callers wait in silence, you can park the call with music or a recorded message that plays until the call is ready to resume.
To add a Call Park step:
Open the desired workflow and select ‘+’ to add a new step to your workflow
Under Logic, select Call Park
Add these details to the Call Park step:
Name
Audio output
Timeout
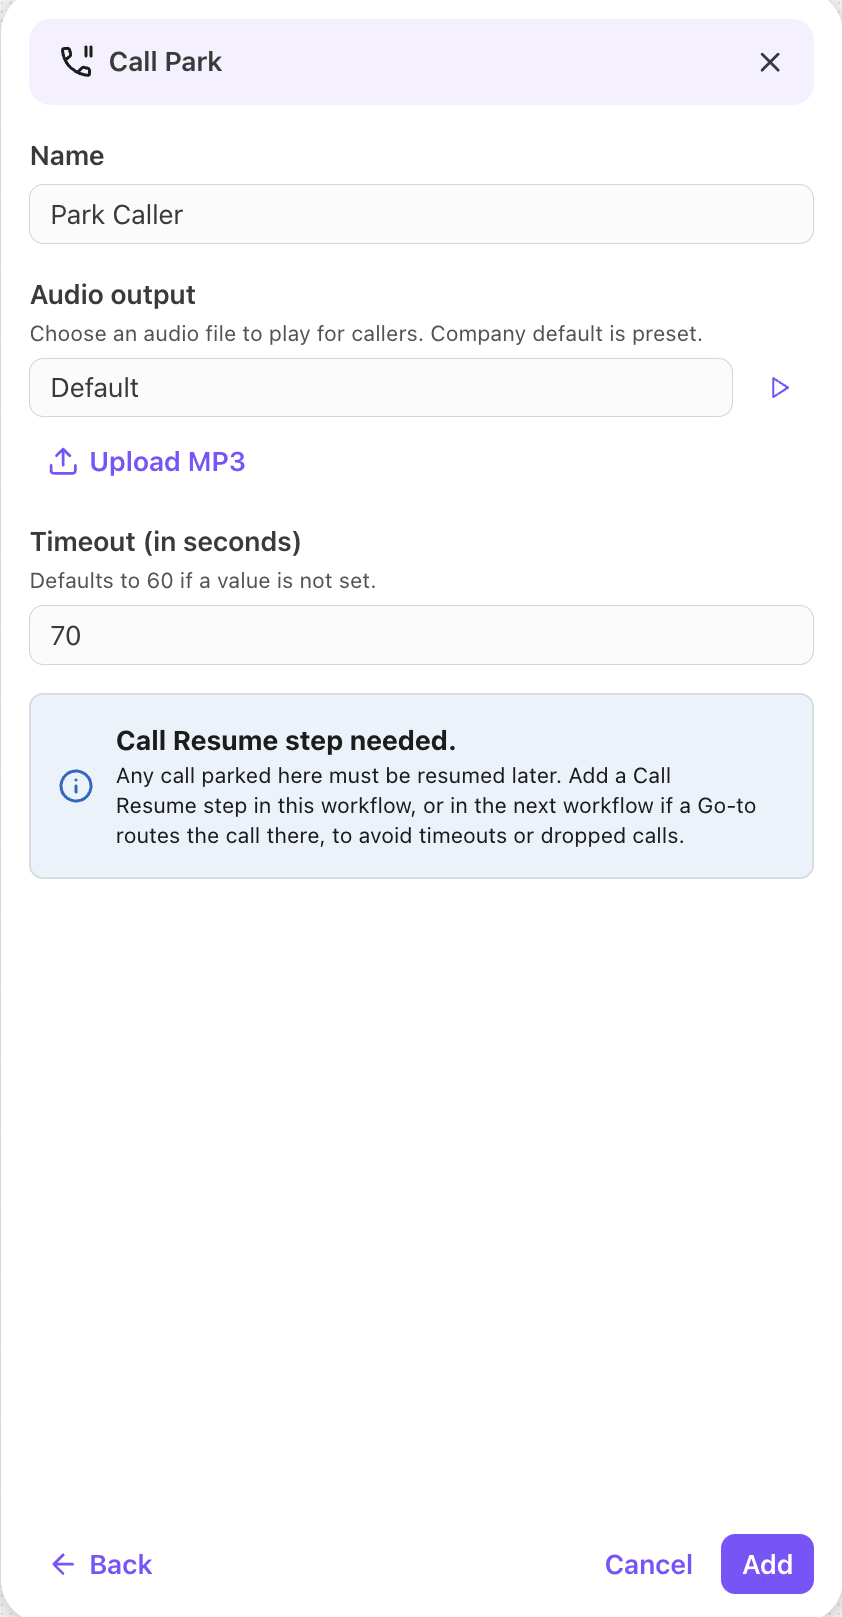
Select Add
Note
When using a Call Park step, it must be paired with a Call Resume step in the same leg of the workflow, or, if using a Go-To step to go to a different workflow. This prevents the call from timing out or being dropped.
Call Resume
The Call Resume step allows you to resume a parked call in the workflow.
Note
The Call Resume step must be paired with a Call Park step in the same leg of the workflow.
To add a Call Resume step:
Open the desired workflow and select ‘+’ to add a new step to your workflow
Under Logic, select Call Resume
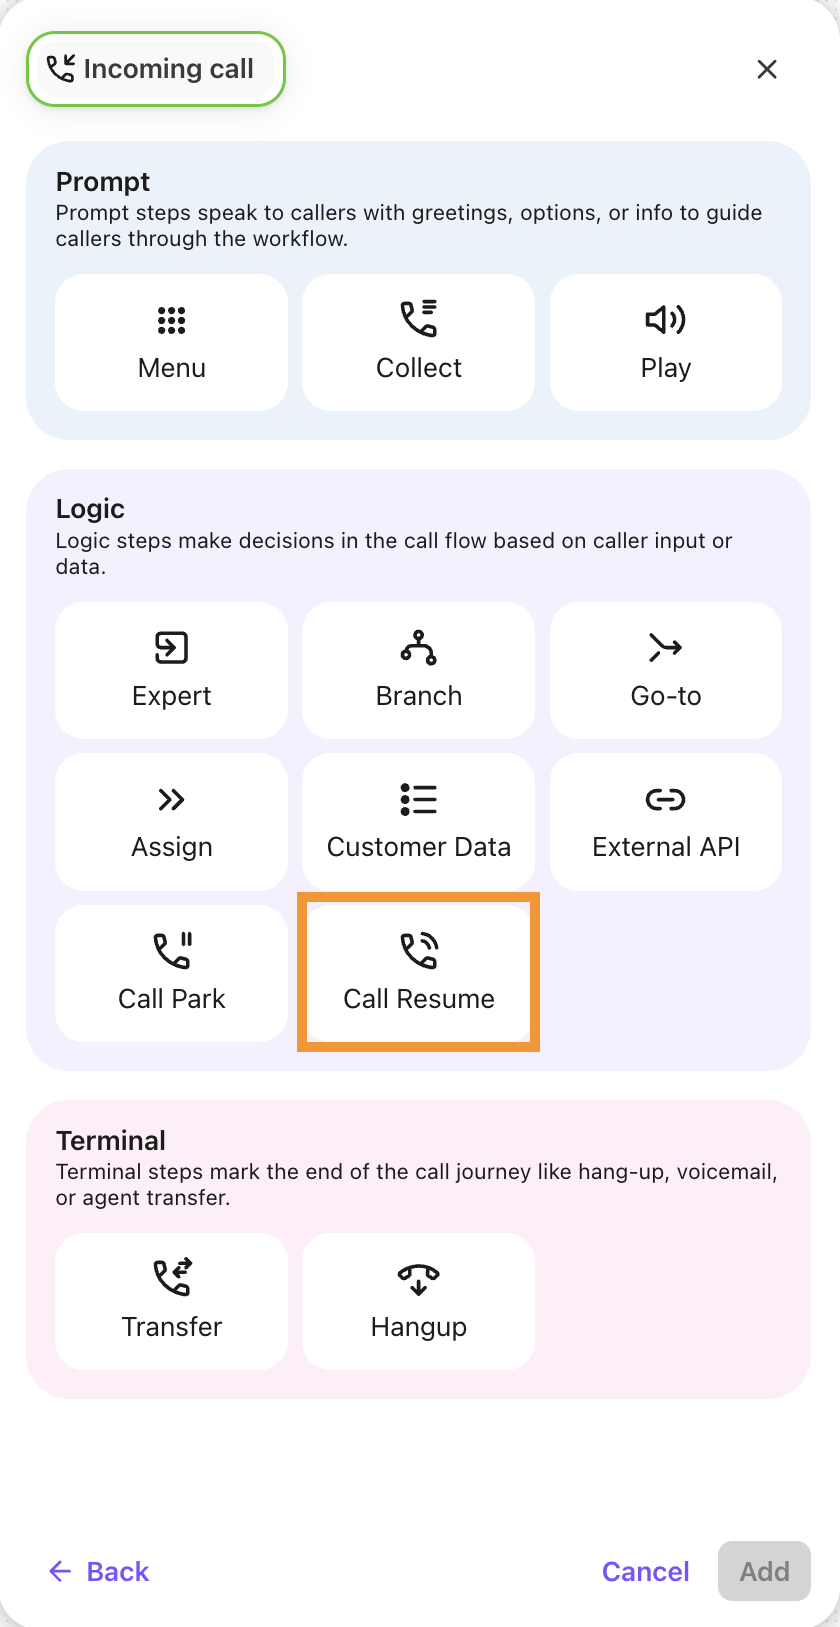
Name the Call Resume step
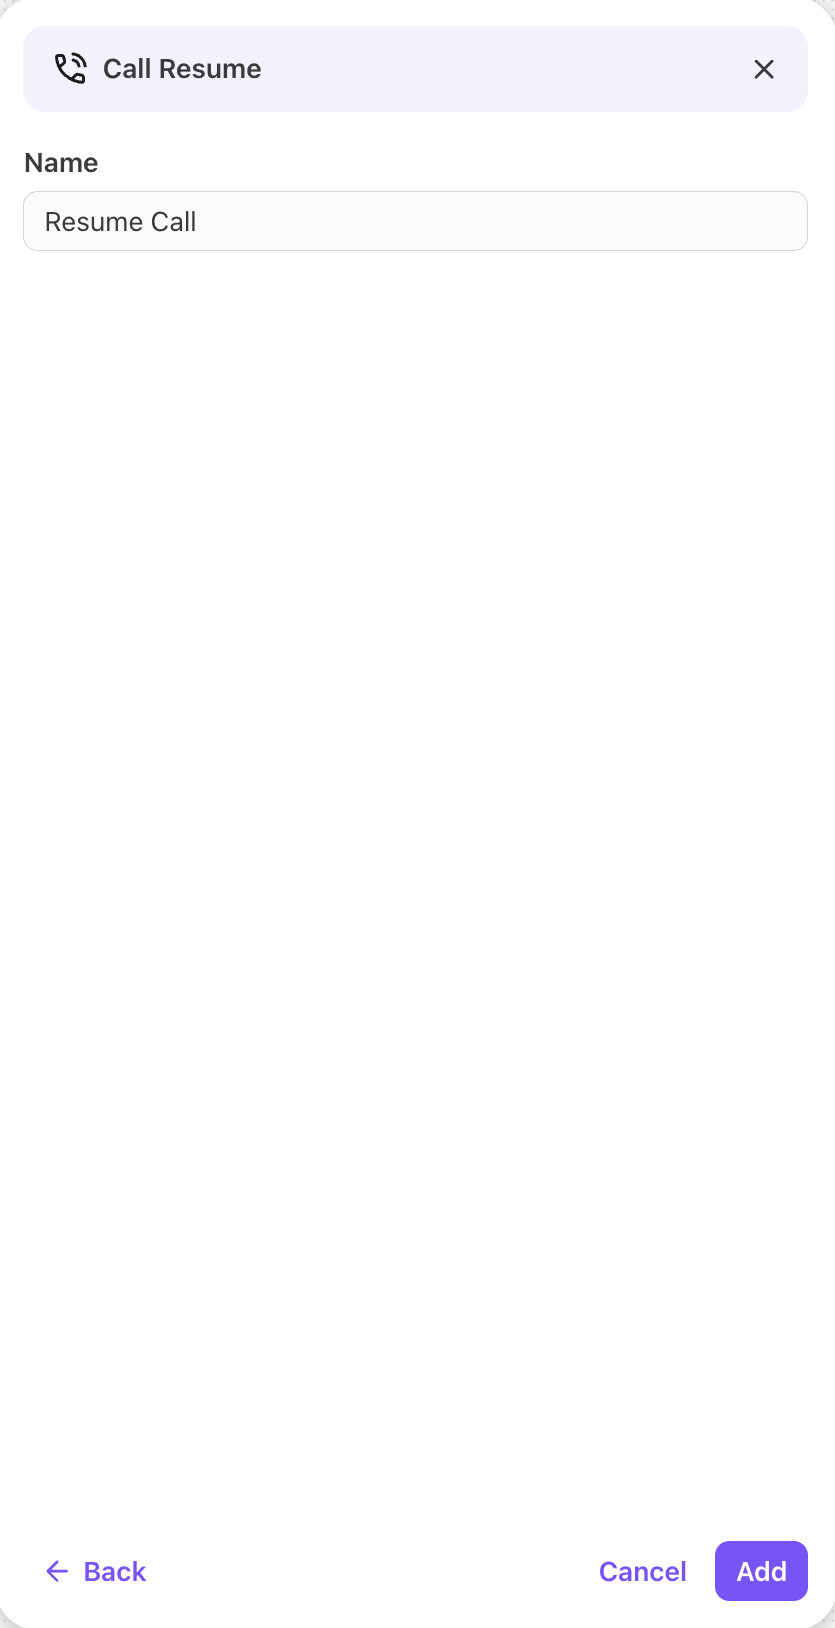
Select Add
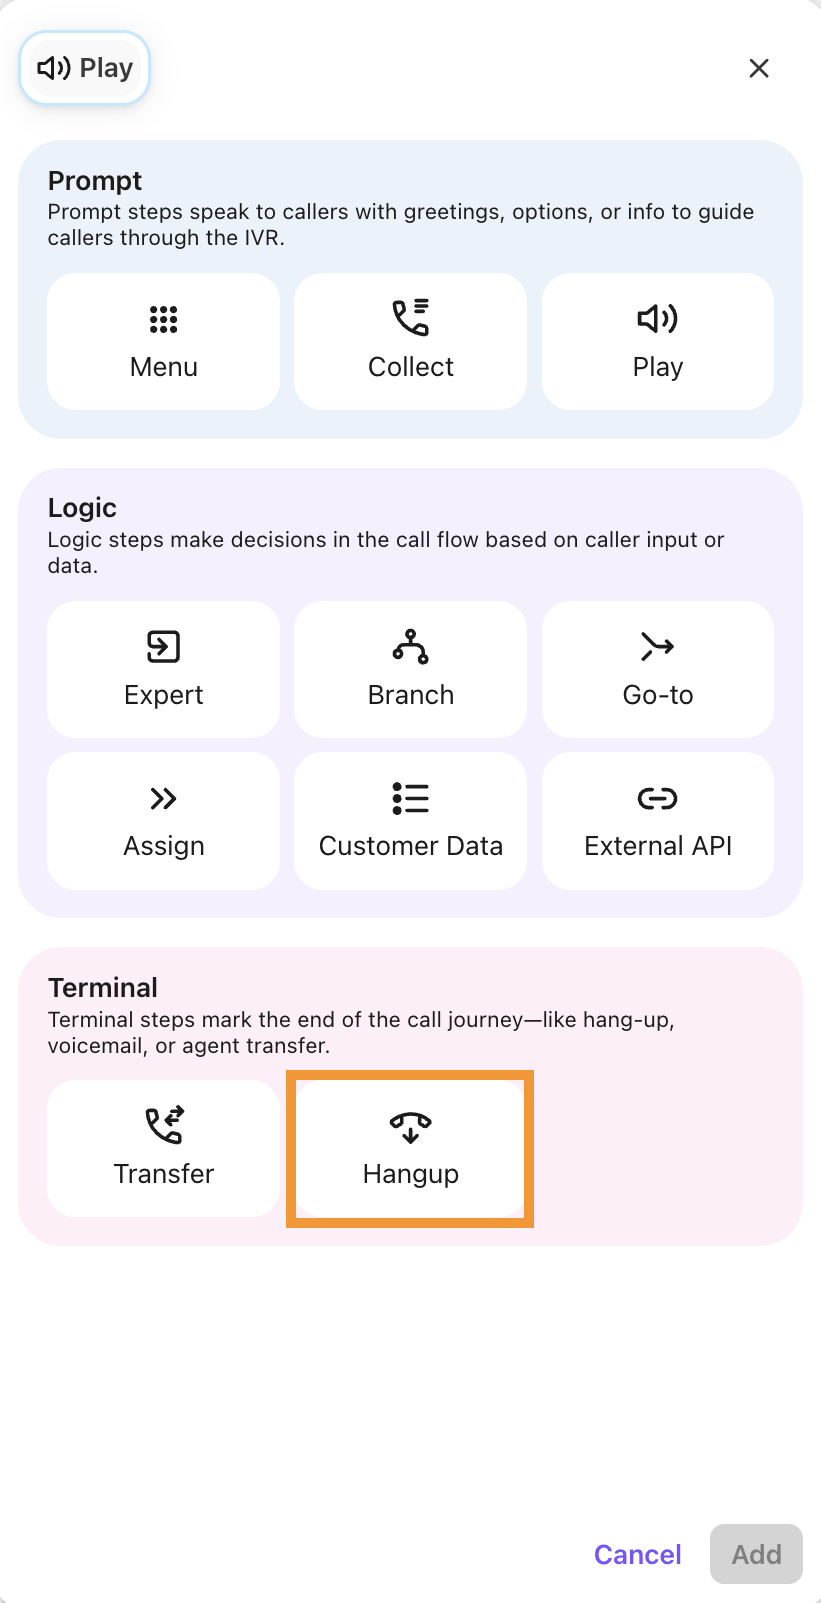
Hangup
The Hangup step is the terminal step in a call and disconnects the caller, ending the conversation. This step is commonly used once the caller has heard their order status, confirmed their appointment, checked their balance, or even selected to terminate the call.
To add a Hangup step:
Open the desired workflow and select ‘+’ to add a new step to your workflow
Under Terminal, select Hangup
Name the hangup step
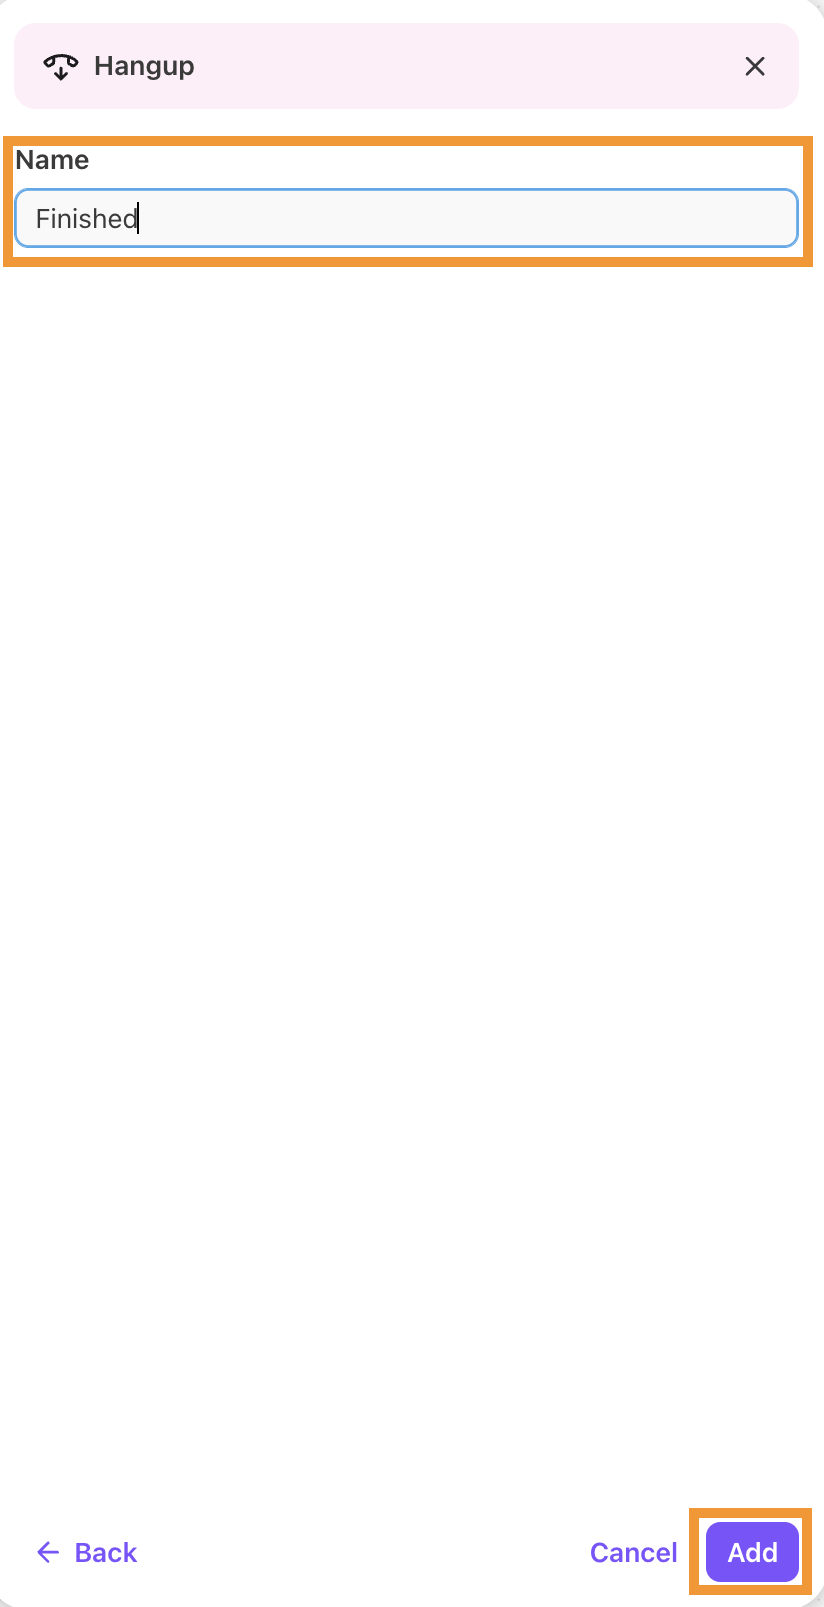
Select Add
Notes
Once a Hangup step is used, you are not able to add an additional step to that leg.
Terminal steps such as Hangup or Transfer ensure proper cleanup and help document the end result of each path in your workflow.
Transfer
Use the Transfer step to send a call to a specific destination based on the caller's menu selection. Callers can be transferred to voicemail, an Operator, a Call Center, a Department, an Office, a Team member, or to a Room Phone.
Transfers are a great way to direct callers to the team or Agent that they need. Do note that they are a terminal step and once used, the workflow path ends.
Note
Terminal steps such as Hangup or Transfer ensure proper cleanup and document the end result of each path.
To add a Transfer step:
Open the desired workflow and select ‘+’ to add a new step to your workflow
Under Terminal, select Transfer

Name the transfer step
Select the transfer target:
Voicemail - transfers to the configured voicemail.
Operators - transfers to the configured Operators.
Note
If you select Operator, you can select an Operator fallback option in case an operator isn’t available. The default fallback option is Voicemail.

Call Center / Department / Office - Transfers to the selected Contact Center / Department / Office.
Team Member - Transfers to a specific team member.
Room Phone/External Number - Transfers to a selected room phone or external number.

Select Add
Note
Please contact Customer Care to enable external number transfer capability.
When transferring to an external number, type the number into the open text box, then press enter.
Using Text-to-speech (TTS)
Text-to-speech converts written text into spoken words for callers. TTS allows the IVR system to read a custom message, like instructions, greetings, or updates, by synthesizing a human-like voice. You can also verbally collect customer responses, so they don't need to manually press a button. This eliminates the need for pre-recorded messages and allows for more dynamic, customized responses based on caller interactions within the IVR system.
TTS is available on the Menu, Collect, and Play steps.
EAP feature
Text-to-Speech is currently in an Early Adopter Program and is not yet available to all users.
To use TTS:
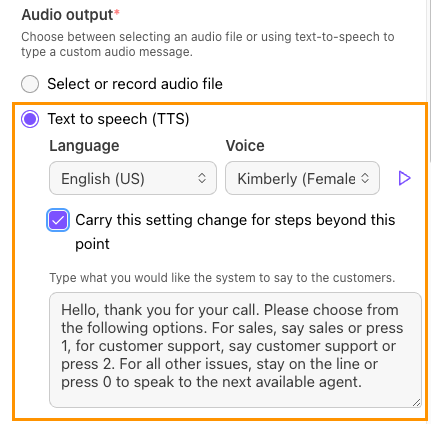
Navigate to Audio output
Select Text to speech
Choose the language
Select the voice
Press the play button to hear an audio sample
Check Carry this setting change for steps beyond this point if you want to use these changes on additional steps (optional)
Enter what you want the system to say to your customers
The text can be either static or dynamic, using embedded workflow variables. For example, a prompt might say, “Welcome back, {{name}}! How can we help you today?”
Variables can be system variables, or custom variables set by standard or expert steps.
Dialpad supports SSML tags to improve your TTS experience, letting you use XML elements to make speech sound more natural and human-like.
For example:
<speak>
        Richard's number is <say-as interpret-as="telephone">2122241555</say-as>
        </speak>
<speak>
I was born on <say-as interpret-as="date" format="mdy">12-31-1900</say-as>.
</speak><speak>
Please find your account number at the top of your invoice. <break time="3s"/> Once you have that number, enter or say the last 5 numbers.
</speak>Language and voice option
Choose your default language and voice for text-to-speech. This will be the standard for all IVR workflows in your office.
When picking a text-to-speech voice, listen for the style you like. Each has its own style, tone, and personality.
To select a voice, go to Workflows.
Select Speech tab
Navigate to Language > Select your preferred language from the dropdown
Navigate to Voice > Select a voice from the dropdown
Select Save changes
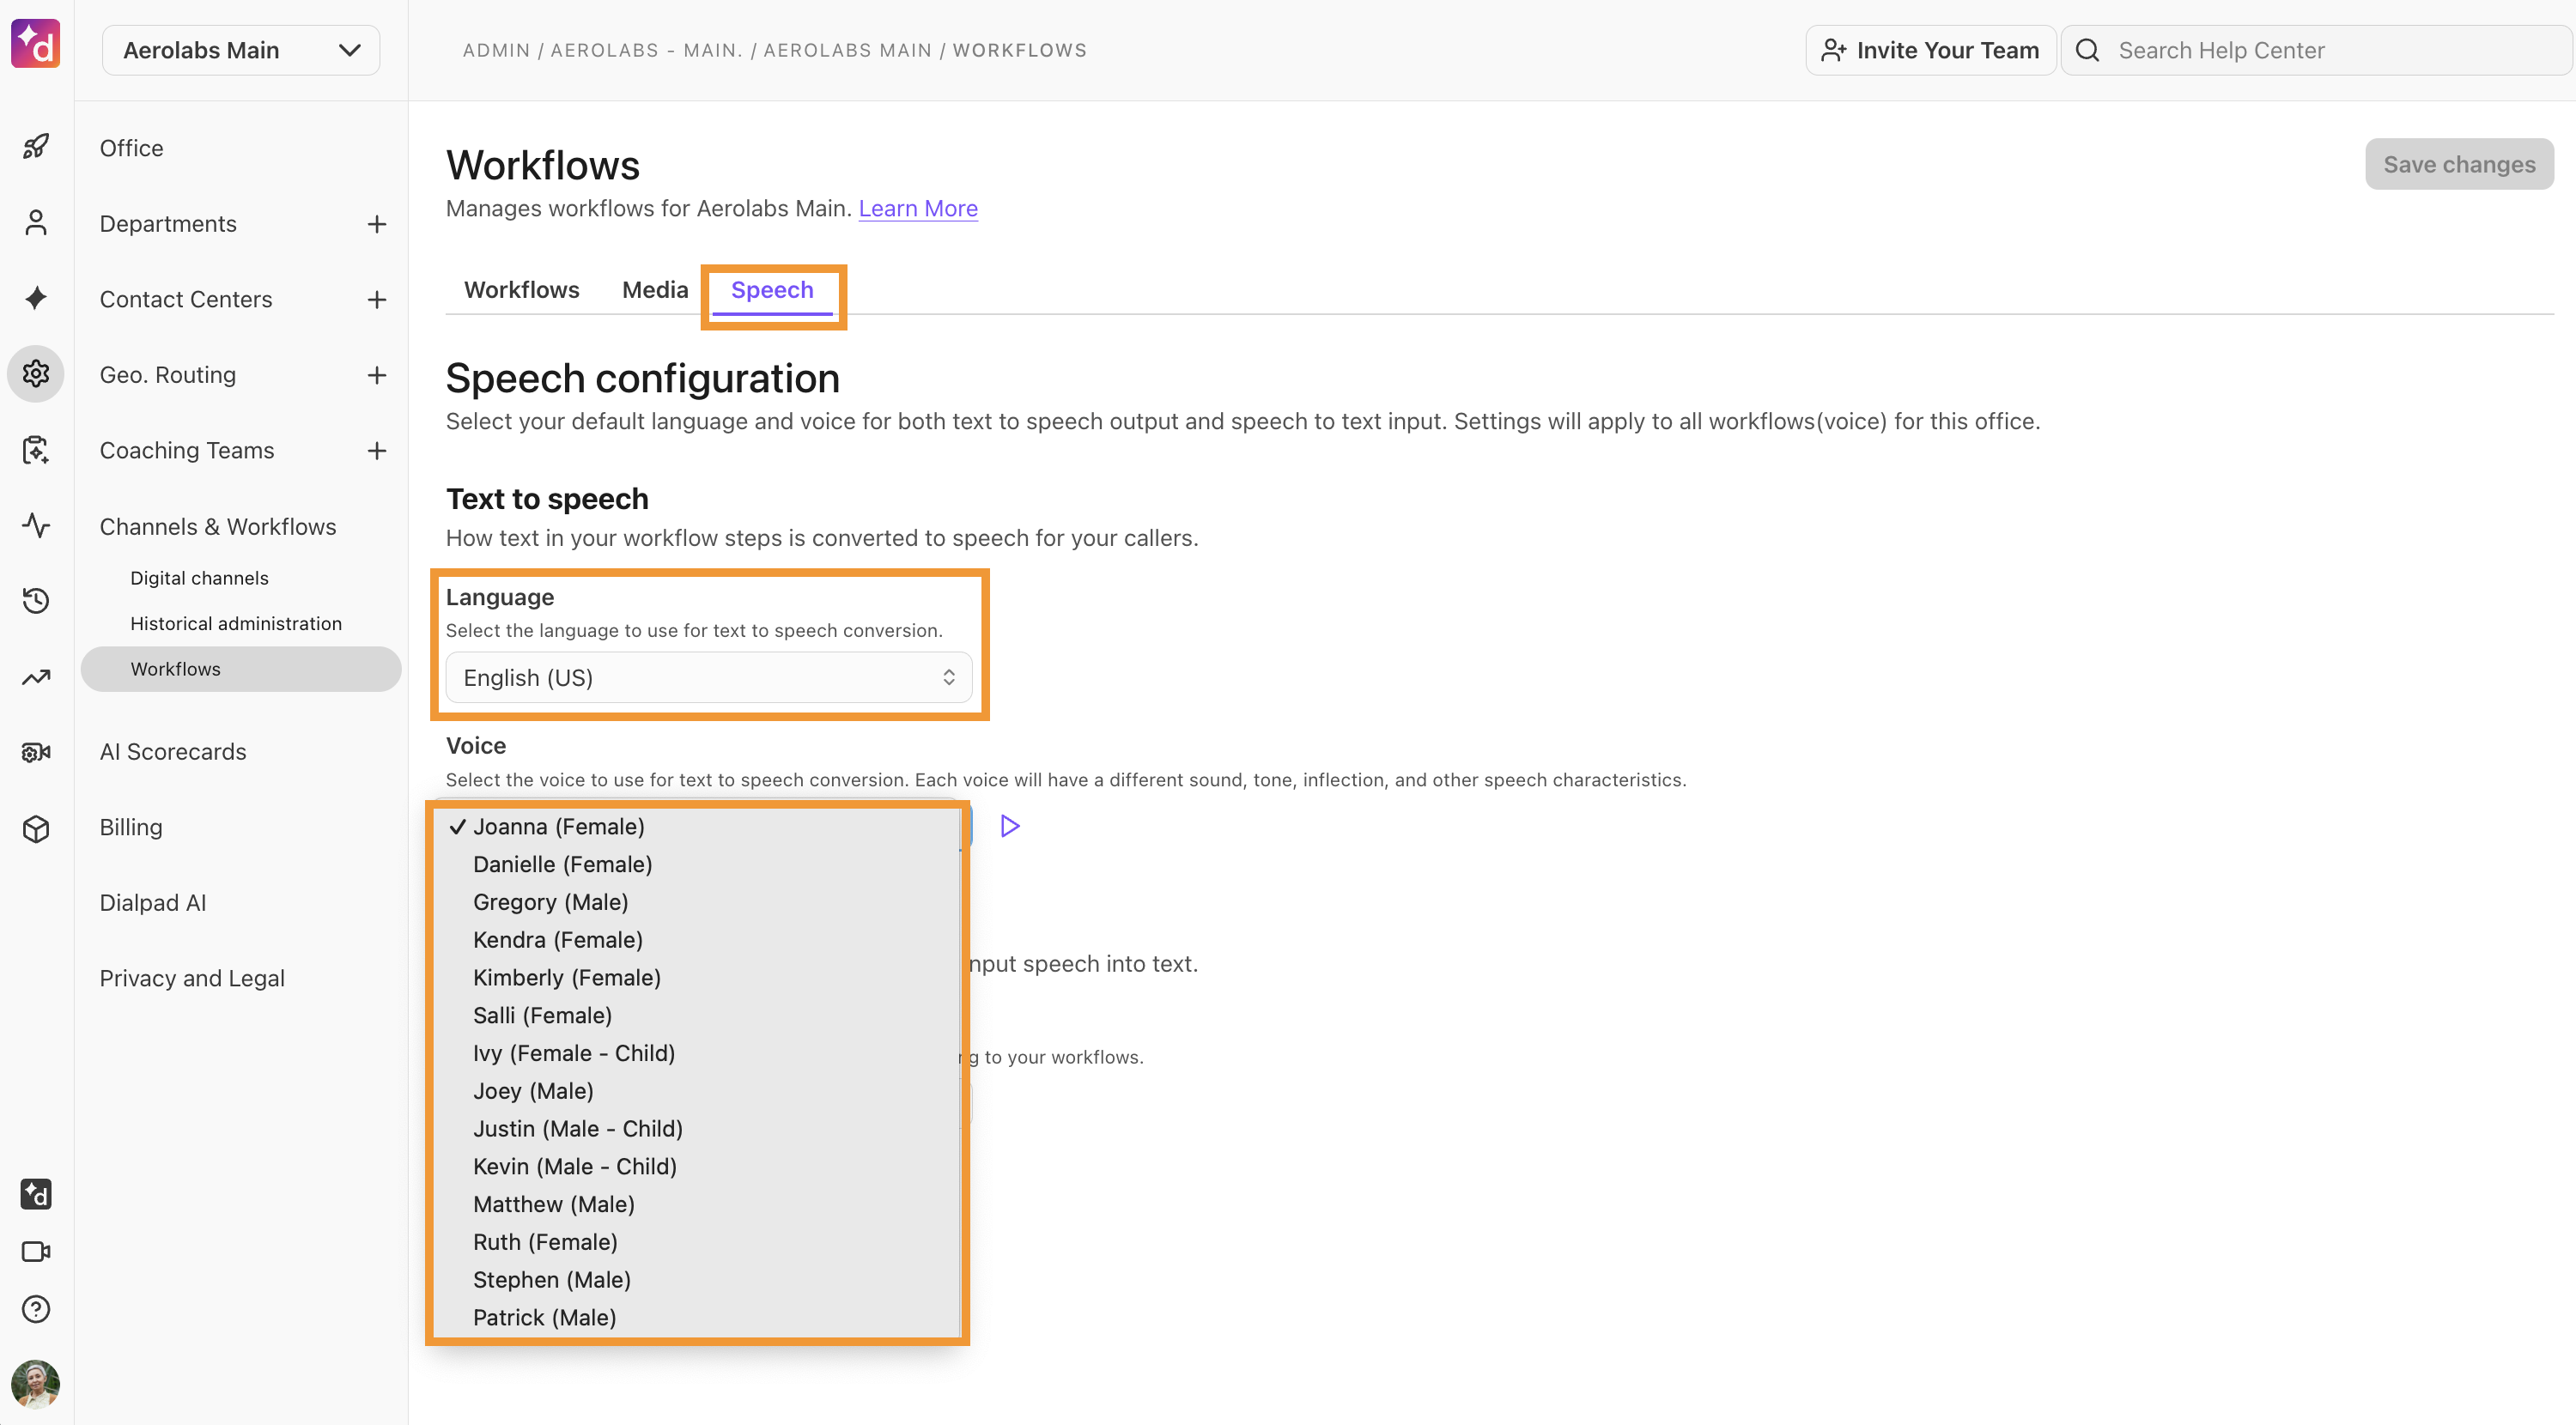
Tip
Click the play button to hear how your selected voice sounds.

Using Automatic Speech Recognition (ASR)
With a Collect or Menu step, you can use Automatic Speech Recognition (ASR) to capture customer responses. Customers can simply say their choice aloud, and Dialpad will determine the IVR action based on their verbal input.
EAP feature
Automatic Speech Recognition is currently in an Early Adopter Program and is not yet available to all users.
To use ASR:
In the Collect step, select Collect speech.
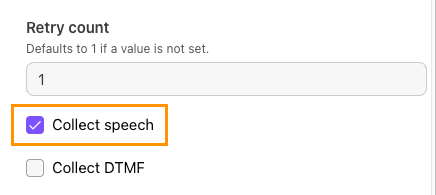
In the Menu step, navigate to Response inputs, select the number of input options, and then use the Speech-only (ASR) counter to choose how many you want to collect via speech.
When using ASR, you can add up to 20 keywords per menu leg (keywords can be added to any DTMF leg).
Speech not recognizing certain words?
Try adding industry terms or unique phrases to your company dictionary to help Dialpad Ai understand them better.