Improve your team’s productivity with Diapad’s native Zoho integration by matching Zoho contacts, leads, and accounts to Dialpad. Then, Dialpad automatically logs inbound and outbound calls into Zoho CRM against the matching customer record.
Let's take a look at the Zoho integration in Dialpad.
Who can use this
Dialpad's Zoho CRM integration is available to Zoho Standard, Professional, Enterprise, and Ultimate customers.
This integration is available to Dialpad Sell and Dialpad Support customers, as well as Dialpad Dialpad Connect users on Pro and Enterprise plans.
Important
Dialpad’s Zoho integration has been upgraded. The current version will be deprecated in June 2026 — please follow the migration steps outlined here to ensure a smooth transition.
Organize modules on Zoho
First, organize your Zoho modules and ensure the Accounts, Contacts, and Leads modules are selected.
To organize your modules, head to Setup in Zoho.
Navigate to Customization
.png)
Select Modules and Fields
Select Organize Modules
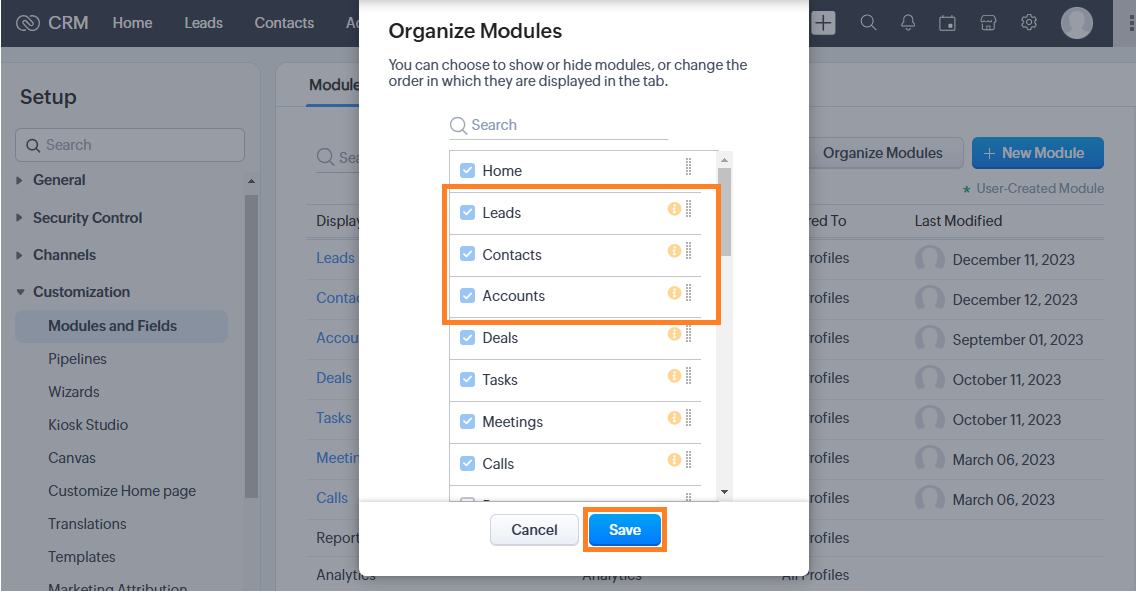
Select the checkbox for Accounts, Contacts, and Leads
Select Save
Notes
Your Zoho Admin manages these configurations, and Dialpad can provide permission details if needed.
API access is also mandatory, along with access to certain modules.
Enable Zoho integration - Company
The Zoho integration must be enabled at the company level.
To enable Zoho, head to your Dialpad Admin Portal.
Select My Company
Select Integrations
Navigate to Zoho
Select Options
Select Enablement
Select Enable this feature
Select Save
Next, configure your Zoho preferences.
Select Call Logging
Select desired preferences
Log calls as activities — creates a Zoho call activity for each call.
Post call recordings to Zoho — adds the Dialpad call recording into the Zoho activity.
Post AI Transcript URL to Zoho — adds the Dialpad AI transcript to the Zoho activity.
Select Settings
Select the region where your Zoho account is created
Select if you want your agents to create leads or contacts
Don't forget to select Save!
Enable Zoho integration - Office
To enable Zoho integration for your office, head to your Dialpad Admin Settings.
Navigate to Office
Select Office Settings
Select Integrations
Navigate to Zoho
Select Options
Select Manage Settings
Select Customize for this Office
Select desired preferences
Select Save
Connect to Zoho
Once Zoho has been enabled at the company and office level, agents must connect their Dialpad account to Zoho in the Dialpad app. While configuring the Zoho integration, ensure these module fields are accessible to Dialpad:
Note
The User Role of the user trying to connect must have access to Modules as well in order to have access to the module fields. These modules include:
Accounts
Contacts
Leads
Vendors
CONTACTS (If the user has Vendor access) |
|
CONTACTS_WITHOUT_VENDOR |
|
LEADS |
|
ACCOUNTS |
|
VENDORS |
|
To connect a Dialpad account to Zoho:
Navigate to any contact
Select their name to open the profile menu, or select the Skinny Bar icon
Select the Zoho widget

Select Connect Zoho
Sign in with your Zoho credentials
Select Accept to allow Dialpad to communicate with Zoho

That's it! Now that Dialpad is connected to Zoho, you'll see matching records from Zoho CRM in Dialpad. Just look for the Zoho section in the right-hand sidebar of your Dialpad app.
Contact matching
Dialpad uses your Dialpad contact’s name, primary email, and primary phone number to search for matching contacts, leads, accounts, and vendors in Zoho CRM.
Once matched, the Dialpad sidebar shows related information like open deals and open activities from Zoho CRM.

Select Deals or Activities to open the details in Zoho CRM.
Create new Zoho record from Dialpad
New Zoho records can be created live during Dialpad calls.
To create a Zoho record from the Dialpad app:
Select the Zoho widget on the right-hand sidebar
Select Create Contact

Enter the record details
Select Save
You can only create a Zoho contact (or lead) and log a call to that record during an active call with that caller. This is intentional, it ensures the call doesn’t remain unlogged in Zoho CRM.
Logging calls to Zoho
After a Zoho CRM record has been matched to a Dialpad contact, calls to/from that contact will automatically be logged to the matched Zoho record.
After each call, agents can save the subject and call description in the call activity that gets created in Zoho.

Multiple contact matches
When multiple matches are found in Zoho, the Zoho integration widget displays a link stating the number of available matches.
To match the correct record from the Zoho widget:
Navigate to multiple matches available on the Zoho widget
Select the correct match
Select Connect

Note
When there are multiple contact matches, the correct match must be selected before, or during, a call for that call to be logged.
You can unmatch a Zoho record from a Dialpad contact by selecting Wrong Match?
Supported AI fields
Dialpad AI tracks recaps, action items, call tags, and outcomes, so follow-ups aren’t missed. If you use AI CSAT or AI Playbooks, you’ll also see agent’s performance and CSAT scores.
Let's look at at which AI features are logged to, and supported in Zoho.
Field label | Data type | Description |
|---|---|---|
Rich Text | AI Recap of a call with 255 character limit. | |
Rich Text | The Action Items that were detected in the call, as generated in the AI Recap. | |
AI Outcome | Text | The AI-detected outcome of the call. Accessible in the Ai Recap object. |
Text | The AI-detected Call Purpose category assigned to the call. Accessible in the AI Recap object. | |
Percentage | Numeric value that explains how much a person adheres to the AI Playbook. | |
Number | AI-generated CSAT score. |
Frequently asked questions
How does Dialpad identify matching records from Zoho CRM?
Dialpad uses the name, primary email address, and primary phone number of the contact and matches it against Zoho records. Information is matched against the details stored in the name, email, phone, and mobile fields in Zoho CRM for all records. To identify the ones matching the Dialpad contact, if there are multiple matching records, you'll see them in the right-hand sidebar of the Dialpad app.
My Dialpad contact exists in Zoho CRM with the same phone number. Why is Dialpad not identifying it as a match?
Check to see if the phone number is entered in Zoho using the standard Phone and Mobile field. The Dialpad integration does not support phone numbers captured in Zoho custom fields.
I am based in Canada, which Region Setting do I use?
While there is a separate Canadian Zoho cloud, Dialpad’s integration will only work if you use the ‘accounts.zoho.com’ access URL.
The “United States” Region Setting covers all regions in North America.
Are calls made from deskphones logged?
Yes. All calls made with Dialpad are logged.
Do all deal stage types sync?
No. With Dialpad’s Zoho integration, only deals in the following stages will sync between Dialpad and Zoho:
Qualification
Negotiation/Review
Proposal/Price Quote
Value Proposition
Needs Analysis
Identify Decision Makers
Can I access recordings for all Dialpad calls within Zoho?
No. Currently, Dialpad’s Zoho integration only provides access to call recordings associated with Contact Centers and Coaching Team calls. Call recordings for calls made via Mainlines and Departments are not supported in Zoho at this time.