Dialpad lets you manage active users and reserved numbers within a single menu. You can see names, email addresses, numbers, license types, and other account details.
Let's take a look at managing users in Dialpad.
Who can use this
Company and Office Admins can manage users.
If you're a Company Admin on an Advanced or Premium plan (as well as our legacy Pro or Enterprise plans), you’ll have proxy access to remotely access users' accounts and can even transfer licenses and users between offices.
Read this Help Center article to learn more about admin privileges.
View active users
To view your active users, go to your Dialpad Admin Settings.
Navigate to Office
Select Users
By default, you’ll land on the Active or Pending Users tab.
.png)
Tip
Use the search bar to find specific users, or users with specific permissions or licenses.
View reserved numbers
When an admin deletes a user or removes a previously assigned number in Dialpad, the number goes into your Reserved Pool.
To view your Reserved Pool, head to your Dialpad Admin Settings.
Navigate to Office
Select Users
Select Reserved Numbers
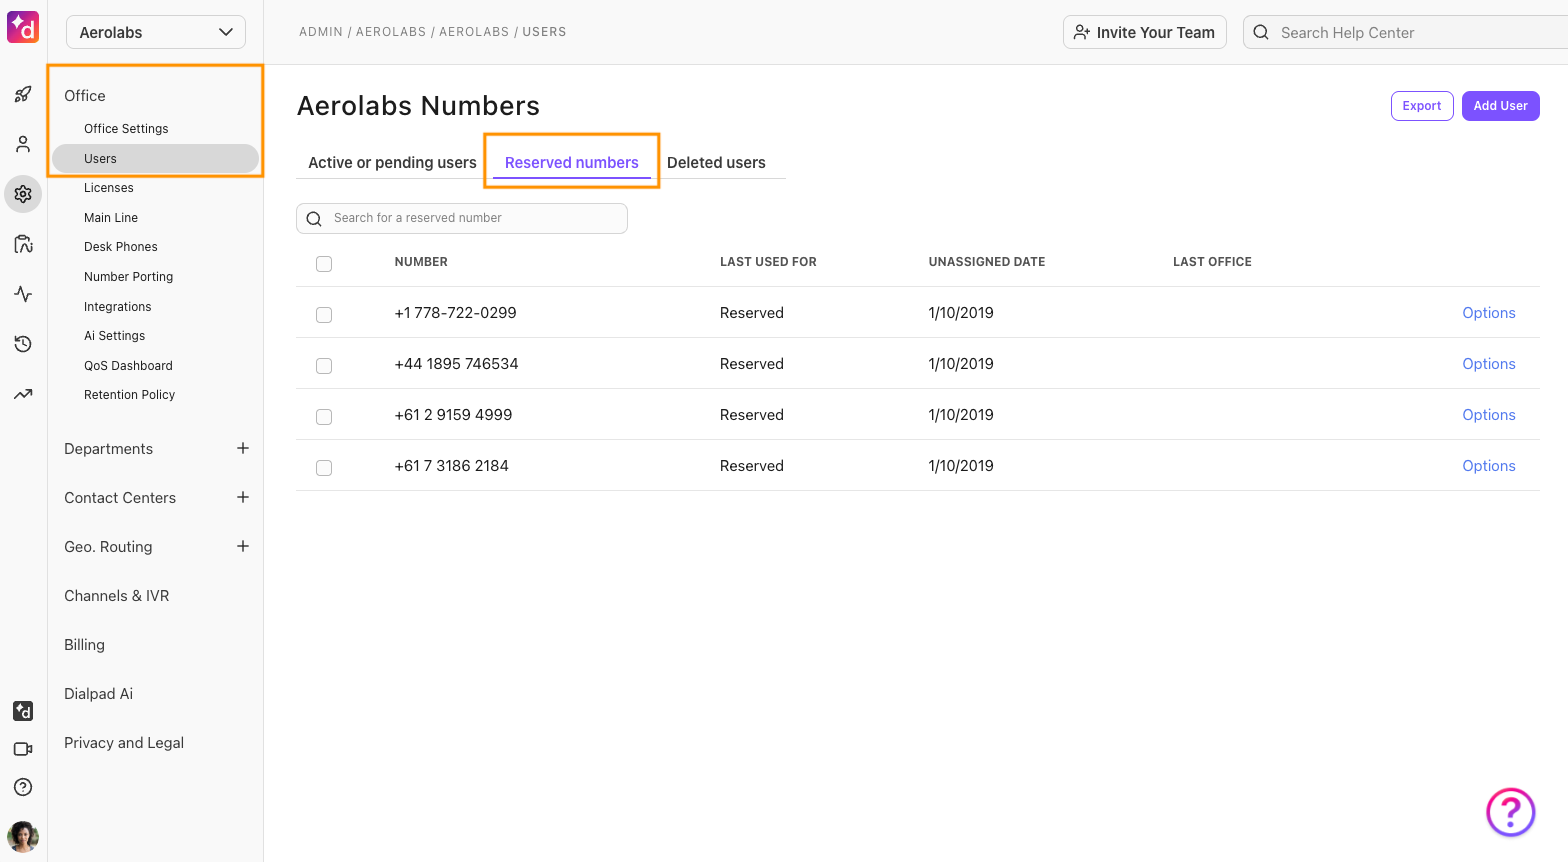
This tab displays all your unassigned numbers and shows you who the number was last for, in what office, and the date it was unassigned.
Easily reassign or delete reserved numbers from this tab.
View deleted users
Need to see a list of your recently deleted users? Deleted users can be restored for up to 72 hours after the initial deletion.
To view your deleted users, head to your Dialpad Admin Settings.
Navigate to Office
Select Users
Select Deleted Users
.png)
Here, you’ll see any users that have been deleted within the last 72 hours.
After 72 hours, users are permanently deleted, and all records associated with those users will be anonymized.
Note
Once a user has been anonymized, Dialpad cannot access, export, or restore its associated data or records.
Bulk user management
Easily update multiple users at the same time using our simple checkbox selector. The following actions can be applied in bulk:
Delete user
Add or remove admin access
To bulk update users:
Select the checkbox to the left of their names
Choose which action you'd like to apply
Proxy access into the user account
Need to take a closer look at a user’s account or troubleshoot an issue? Proxying lets you view their account and web settings directly. Note that proxying does not provide access to the Dialpad app itself—only account and settings information.
To proxy into an user’s Dialpad account, go to your Dialpad Admin Settings:
Select Users
Select Options
Select Admin > Proxy Login
.png)
When proxying, you’ll see a red banner informing you that any changes you make will be applied immediately. Select the back button to exit the proxy login.
Note
Users, even Office Admins, must be granted proxy access before they are able to proxy into someone’s account.
Proxying is also available through the Enterprise Support Portal.
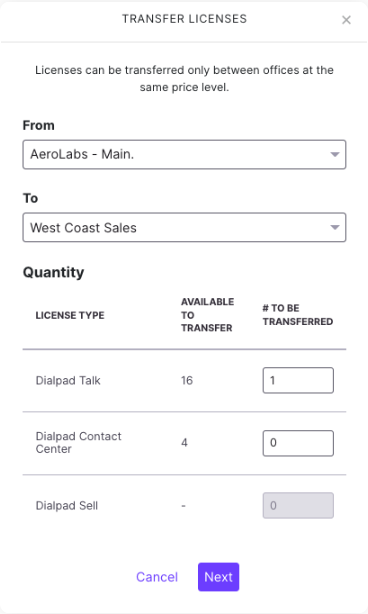
Transfer licenses
Company Admins on an Advanced or Premium plan can transfer licenses across all of their offices.
Licenses can only be transferred between Offices at the same price level.
To transfer licenses, head to your Company Settings.
Select Licenses
Choose the type of license you'd like to transfer
Dialpad
Dialpad Meetings
Add-on
Select Transfer Licenses

Select the Office you need to transfer licenses to, then select Next
Select the quantity and type of licenses to be transferred, then select Next
Review the transfer and select Confirm transfer
Note
Only unassigned licenses can be transferred, however, users can be transferred to different Offices on the same pricing plan, as noted below.
Transfer users to a different Office
Did a team member move to a new Office? No problem! If you're on a Premium or Advanced plan (as well as our legacy Pro or Enterprise plans), Company Admins can transfer users from one office to another.
When a user is transferred to a new office, they keep the license, phone number, and settings they had previously. There is no other change to the user's account besides the office they are associated with.
To transfer a user to a different office, head to your Dialpad Admin Settings.
Navigate to Office
Select Users
Select Options beside the user you'd like to transfer
Select Admin
Select Transfer user

Choose the office you would like to transfer the user to
Select Next
.png)
Review the transfer summary, then select Confirm transfer
Notes
If you transfer a user to an office located in a different country than the user’s current office, any local numbers and fax numbers currently assigned to this user will be removed, and a new number will be assigned to the user (in the country of their new office) but their license will remain the same.
Transferring users internationally is only possible if the two offices are on the same price level.
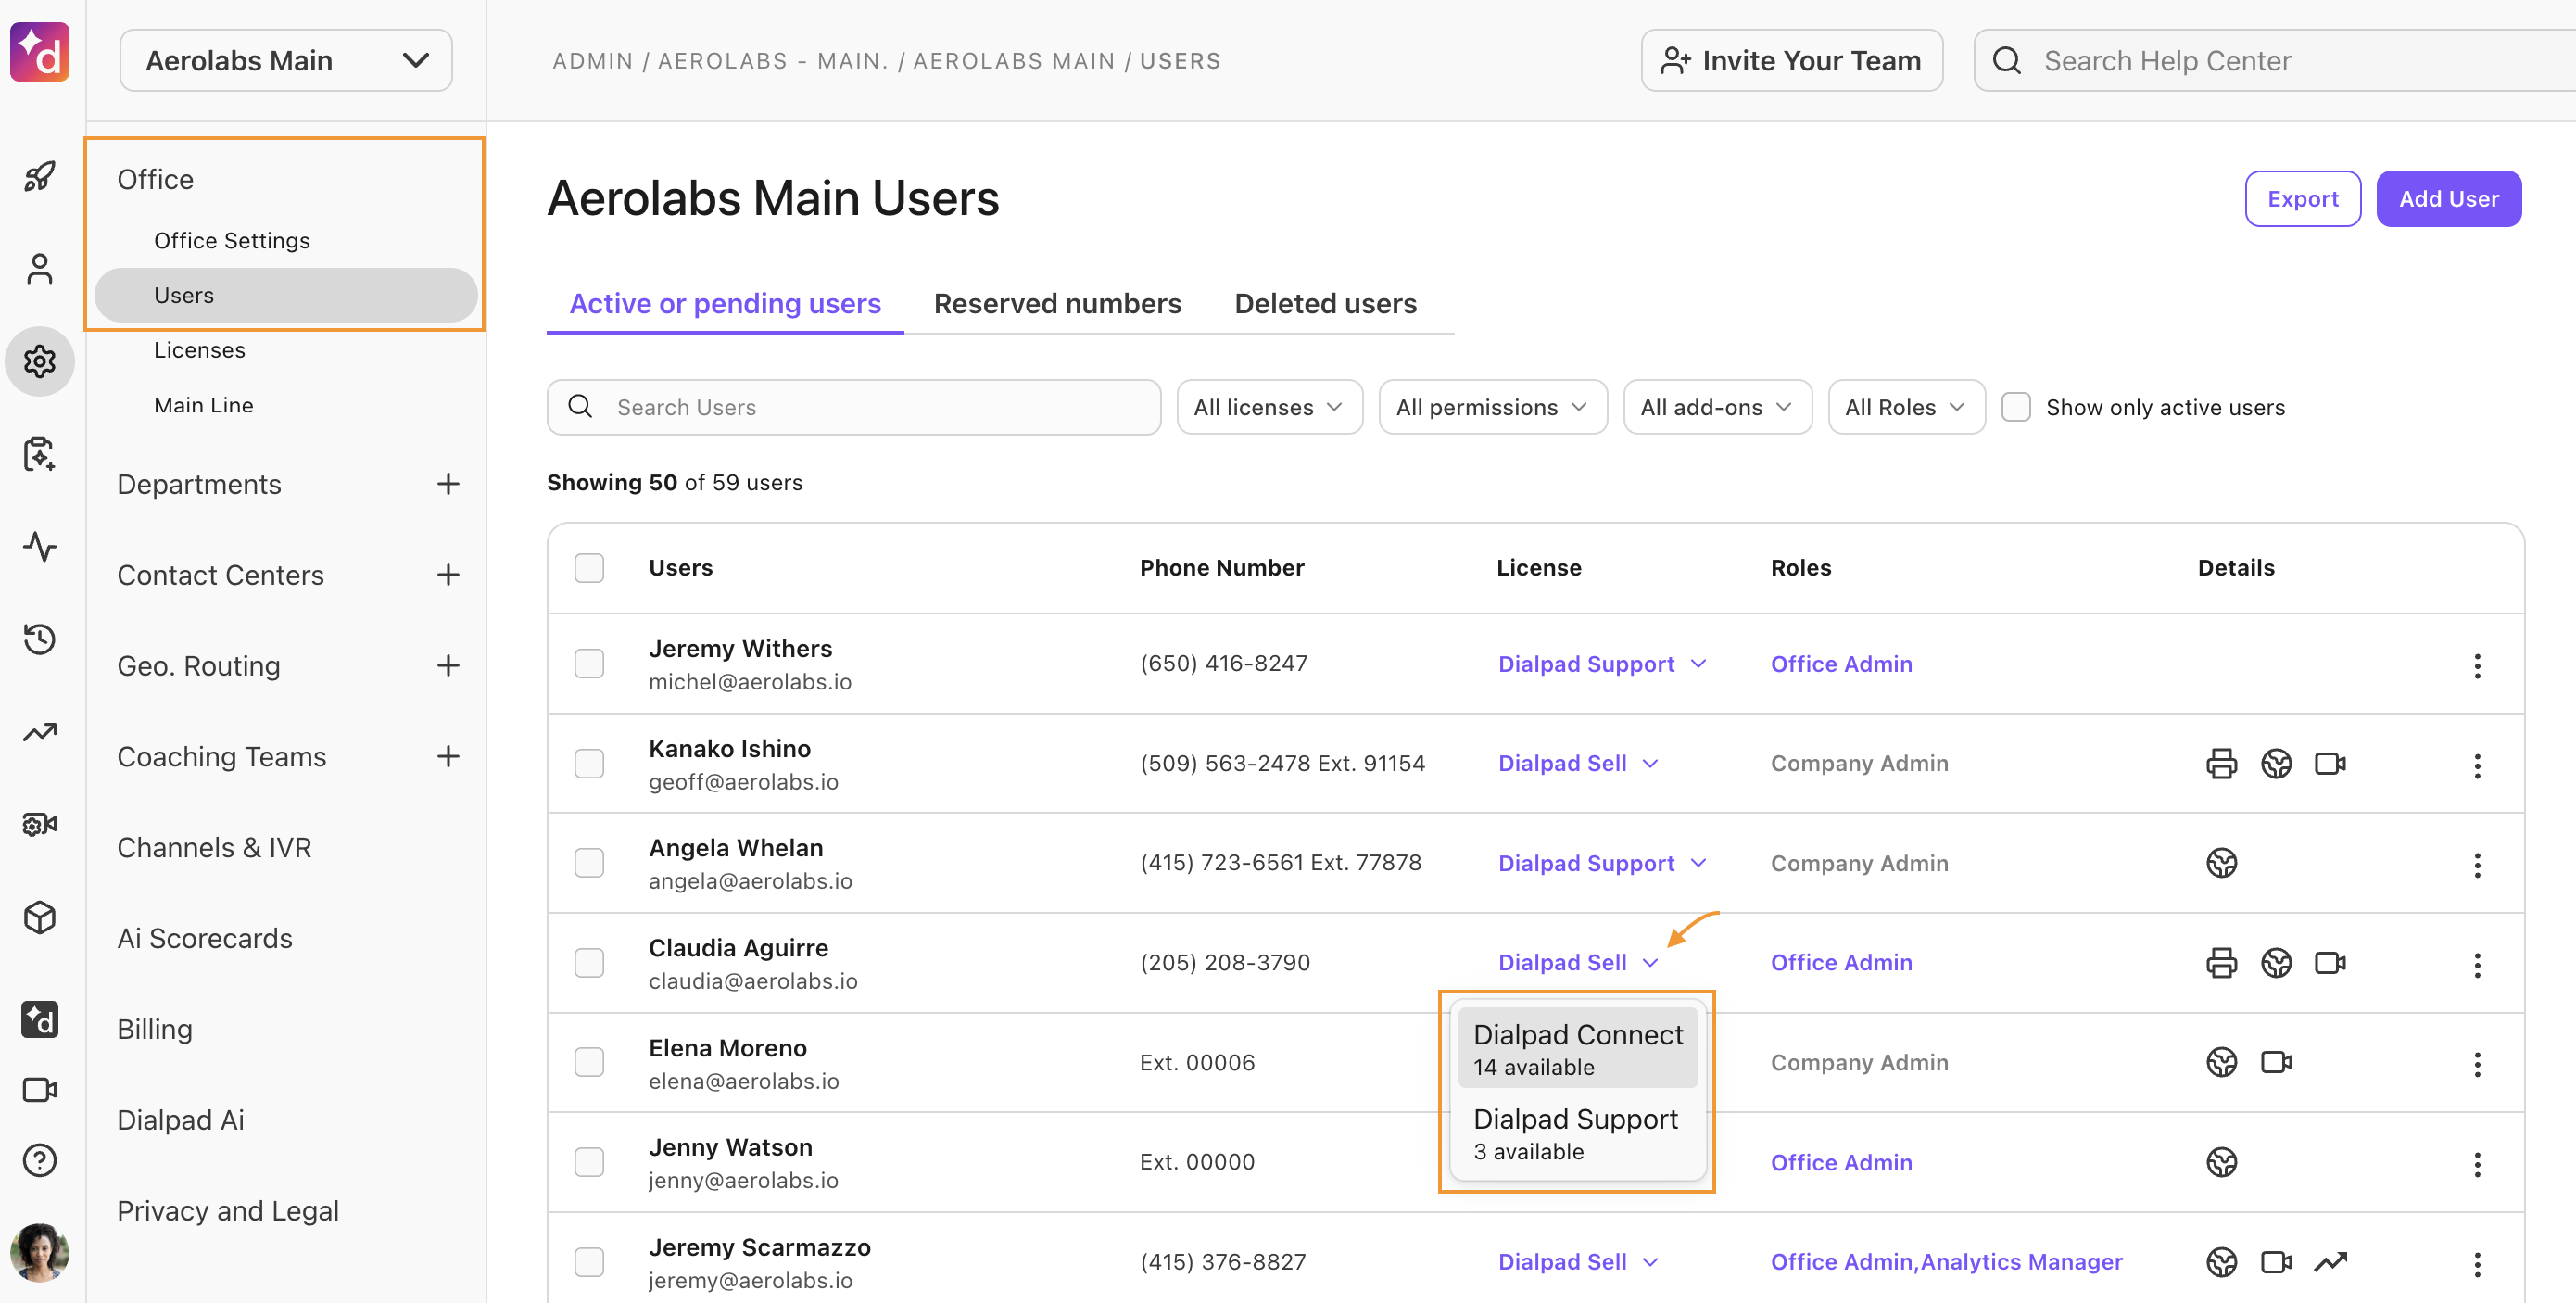
Change user license type
Need to change a user's license type? Admins can swap and reassign user licenses as their business needs change.
To change a user’s license type, go to your Dialpad Admin Settings.
Go to Office Settings > Users
Select the arrow beside the user’s license type
Select the license type
Confirm the license switch
Note
When a user’s license is changed, they are automatically unassigned from any groups that are no longer eligible.
Swapping from a Connect to a Sell or Support license
If you’re switching a user from a Connect license to a Sell or Support license and want to keep the number, note that Sell and Support licenses don’t include a local number by default.
To keep the user’s existing DID (number) during the license change, an Office Admin must purchase an additional local number license. If no local number licenses are available in the office, the number can’t be retained during the swap.
Want to learn more?
Check out Dialpad University's free courses covering our products and services, as well as insightful tips and best practices.