Grandstream Analog Telephone Adapters (ATAs) are compact devices that connect traditional landline phones to internet-based phone systems (VoIP networks), such as Dialpad, providing the benefits of digital communication without requiring device replacement.
Let’s set up your ATA device.
Who can use this
ATA devices can be used on any Dialpad plan.
Supported Grandstream models
To determine which Grandstream models are supported by Dialpad, refer to this Help Center article.
Note
If you purchased your Grandstream ATA device directly from Dialpad, you don’t need to provision the phone, as it’s already provisioned for Dialpad. Go to the Add the ATA to the Dialpad Admin Portal section below to set up your Grandstream ATA device.
Deskphone admin password
Company admins can access their organization’s deskphone password directly from the Company Settings. This admin password applies to all deskphones activated with Dialpad.
To access the deskphone admin password, go to your Dialpad Admin Portal.
Select My Company > Deskphone Settings
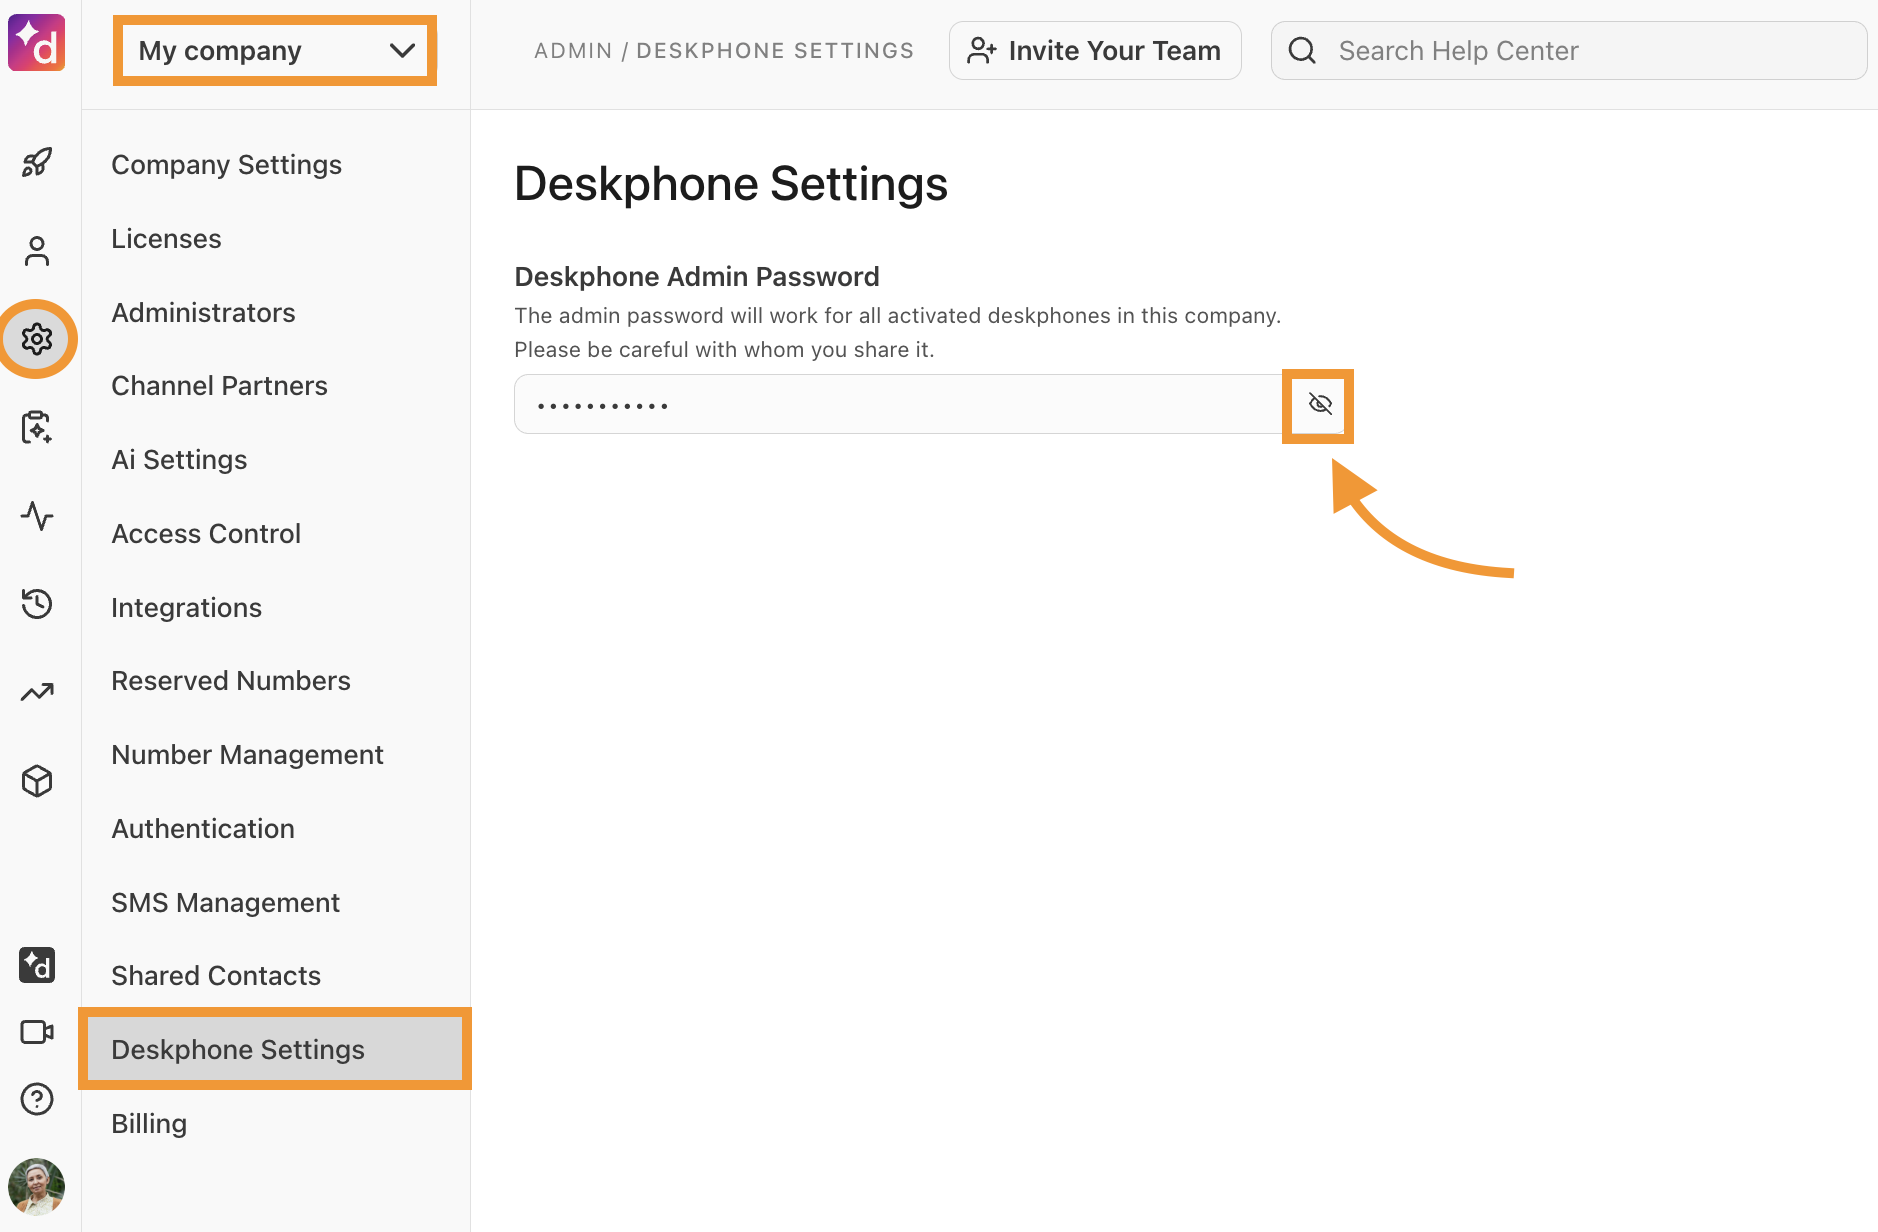
Navigate to Deskphone Admin Password and select the eye icon to see the password
Then, log in to the deskphone's web interface using ‘admin’ as your username and your assigned deskphone admin password.
Note
The deskphone admin password cannot be changed.
Set up process
Setting up your Grandstream ATA device with Dialpad is a 4-step process.
Factory reset the ATA device
Provision the ATA device to Dialpad
Add the ATA device to the Dialpad Admin Portal
Activate (assign) the port for a Dialpad user or room
Factory reset
Now, we need to perform a factory reset to ensure that any previous configuration data has been removed and will not interfere with your Dialpad service.
There are three ways to factory reset your Grandstream devices:
Factory reset via the reset button
To reset to factory default settings using the reset button:
Unplug the Ethernet cable
Locate the reset hole on the back panel of your HT812/HT814
Insert a physical pin into the pin hole
Press for ~7 seconds
Take out the pin
All device settings will be restored to their factory settings.
Factory reset via IVR command
To reset factory settings using the IVR prompt:
Dial *** on the phone
Enter 99 on the keypad
Wait for the Reset voice prompt
Enter the encoded Device MAC address
Follow the guide below on how to encode the Device MAC address.
Wait for 15 seconds, and the device will automatically reboot and restore to its factory settings.
To encode the Device MAC Address:
Locate the Device's MAC address
Tip
The 12-digit HEX number is located at the bottom of the unit.
Enter the Device MAC address using the following mapping:
Key
Mapping
0-9
0-9
A
22 (press the “2” key twice, “A” will show on the LCD)
B
222
C
2222
D
33 (press the “3” key twice, “D” will show on the LCD)
E
333
F
3333
For example, if the Device MAC address is 000b8200e395, it should be keyed in as “0002228200333395”.
Note
Grandstream ATAs have two MAC addresses: one for the LAN and one for the WAN. Ensure that you enter the LAN address, listed as the Device's MAC address.
Factory reset via web interface
To reset factory settings using the web interface:
Connect the device to the internet
Plug the Ethernet cable into the ATA device
Plug the phone cable into an analog phone
Locate the IP address of the phone
Dial ***
Dial 02
Wait for the IVR to read out the device’s IP address
Note the device’s IP address
Enter the IP address in a web browser
Log in using the deskphone admin credentials

Select Basic Settings
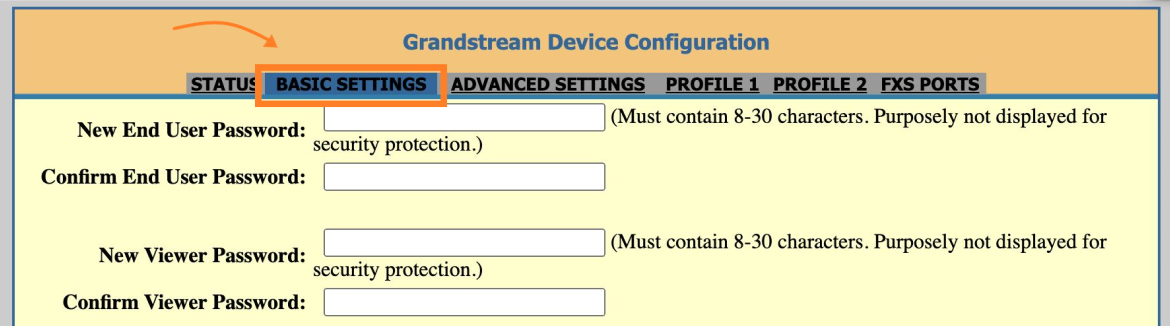
Navigate to Reset Type
Select Full Reset
.jfif)
Provision Grandstream ATA Device
Note
Ensure your Grandstream ATA device is running the firmware installed by Dialpad before provisioning.
To provision a Grandstream ATA device for Dialpad, first access the desk phone's web interface.
Connect the device to the network and wait for the device to complete the boot process
Plug the Ethernet cable into the ATA device
Plug the phone cable into an analog phone
Locate the IP address of the phone
Dial ***
Dial 02
Wait for the IVR to read out the device’s IP address
Note the device’s IP address
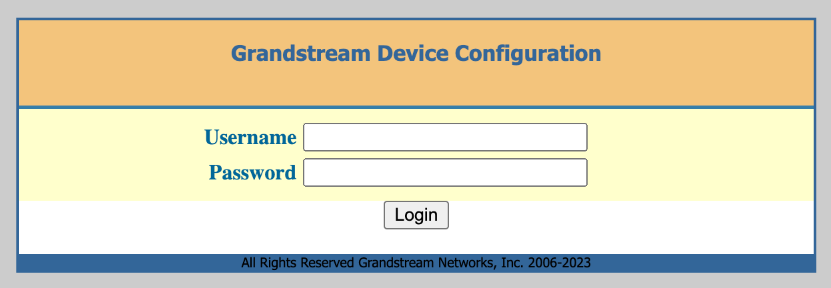
Enter the IP address in a web browser
Log in using the deskphone admin credentials
Next, go to the Basic Settings tab on your device's web interface to continue with the provisioning setup.
Navigate to the IPv4 Address section and fill in these fields:
1st Preferred DNS server: 8.8.8.8
2nd Preferred DNS server: 8.8.4.4
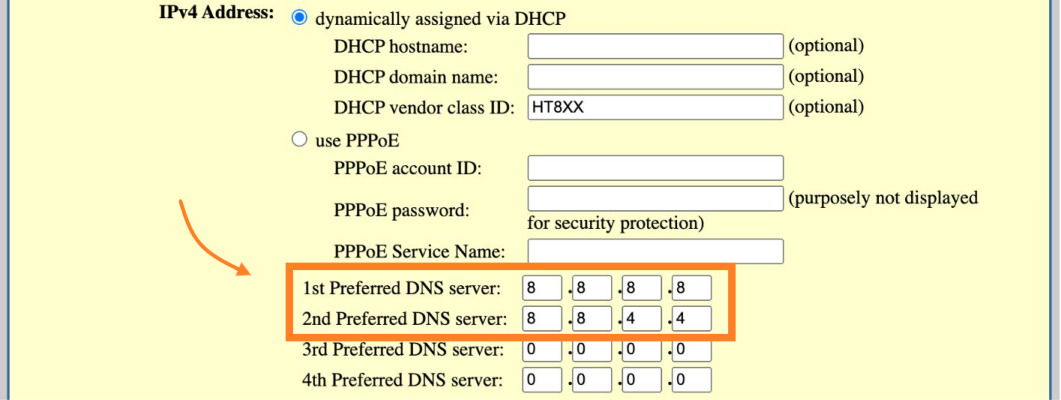
Select Apply

Navigate to Advanced Settings
Navigate to Firmware Upgrade and Provisioning
Select HTTPS and fill in this field:
Config Server Path: prov.dialpad.com
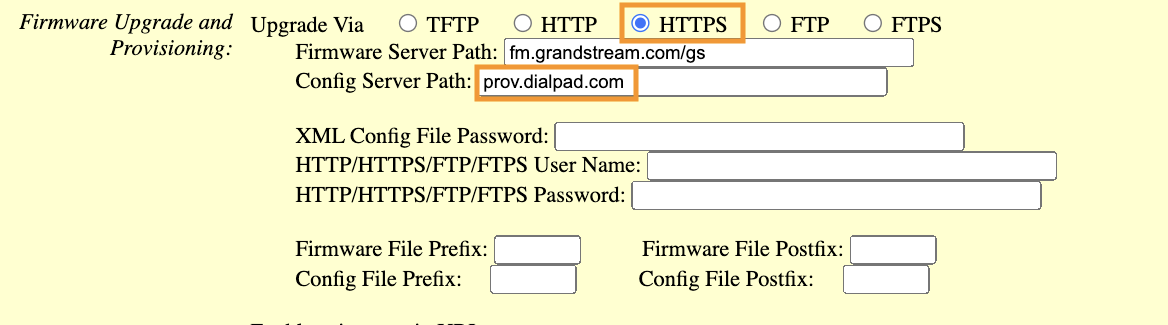
Select Apply

Then, navigate back to the Advanced Settings tab and select Reboot.
Note
We currently do not support remote rebooting for Grandstream devices.
Add the ATA to the Dialpad Admin Portal
Now that your Grandstream ATA device has been provisioned to Dialpad, it's time to add it to the Dialpad Admin Portal.
To add the device, go to your Dialpad Admin Settings.
Navigate to Office > Desk Phones
Select the DECT/ATA Devices tab
Select Add a new DECT/ATA
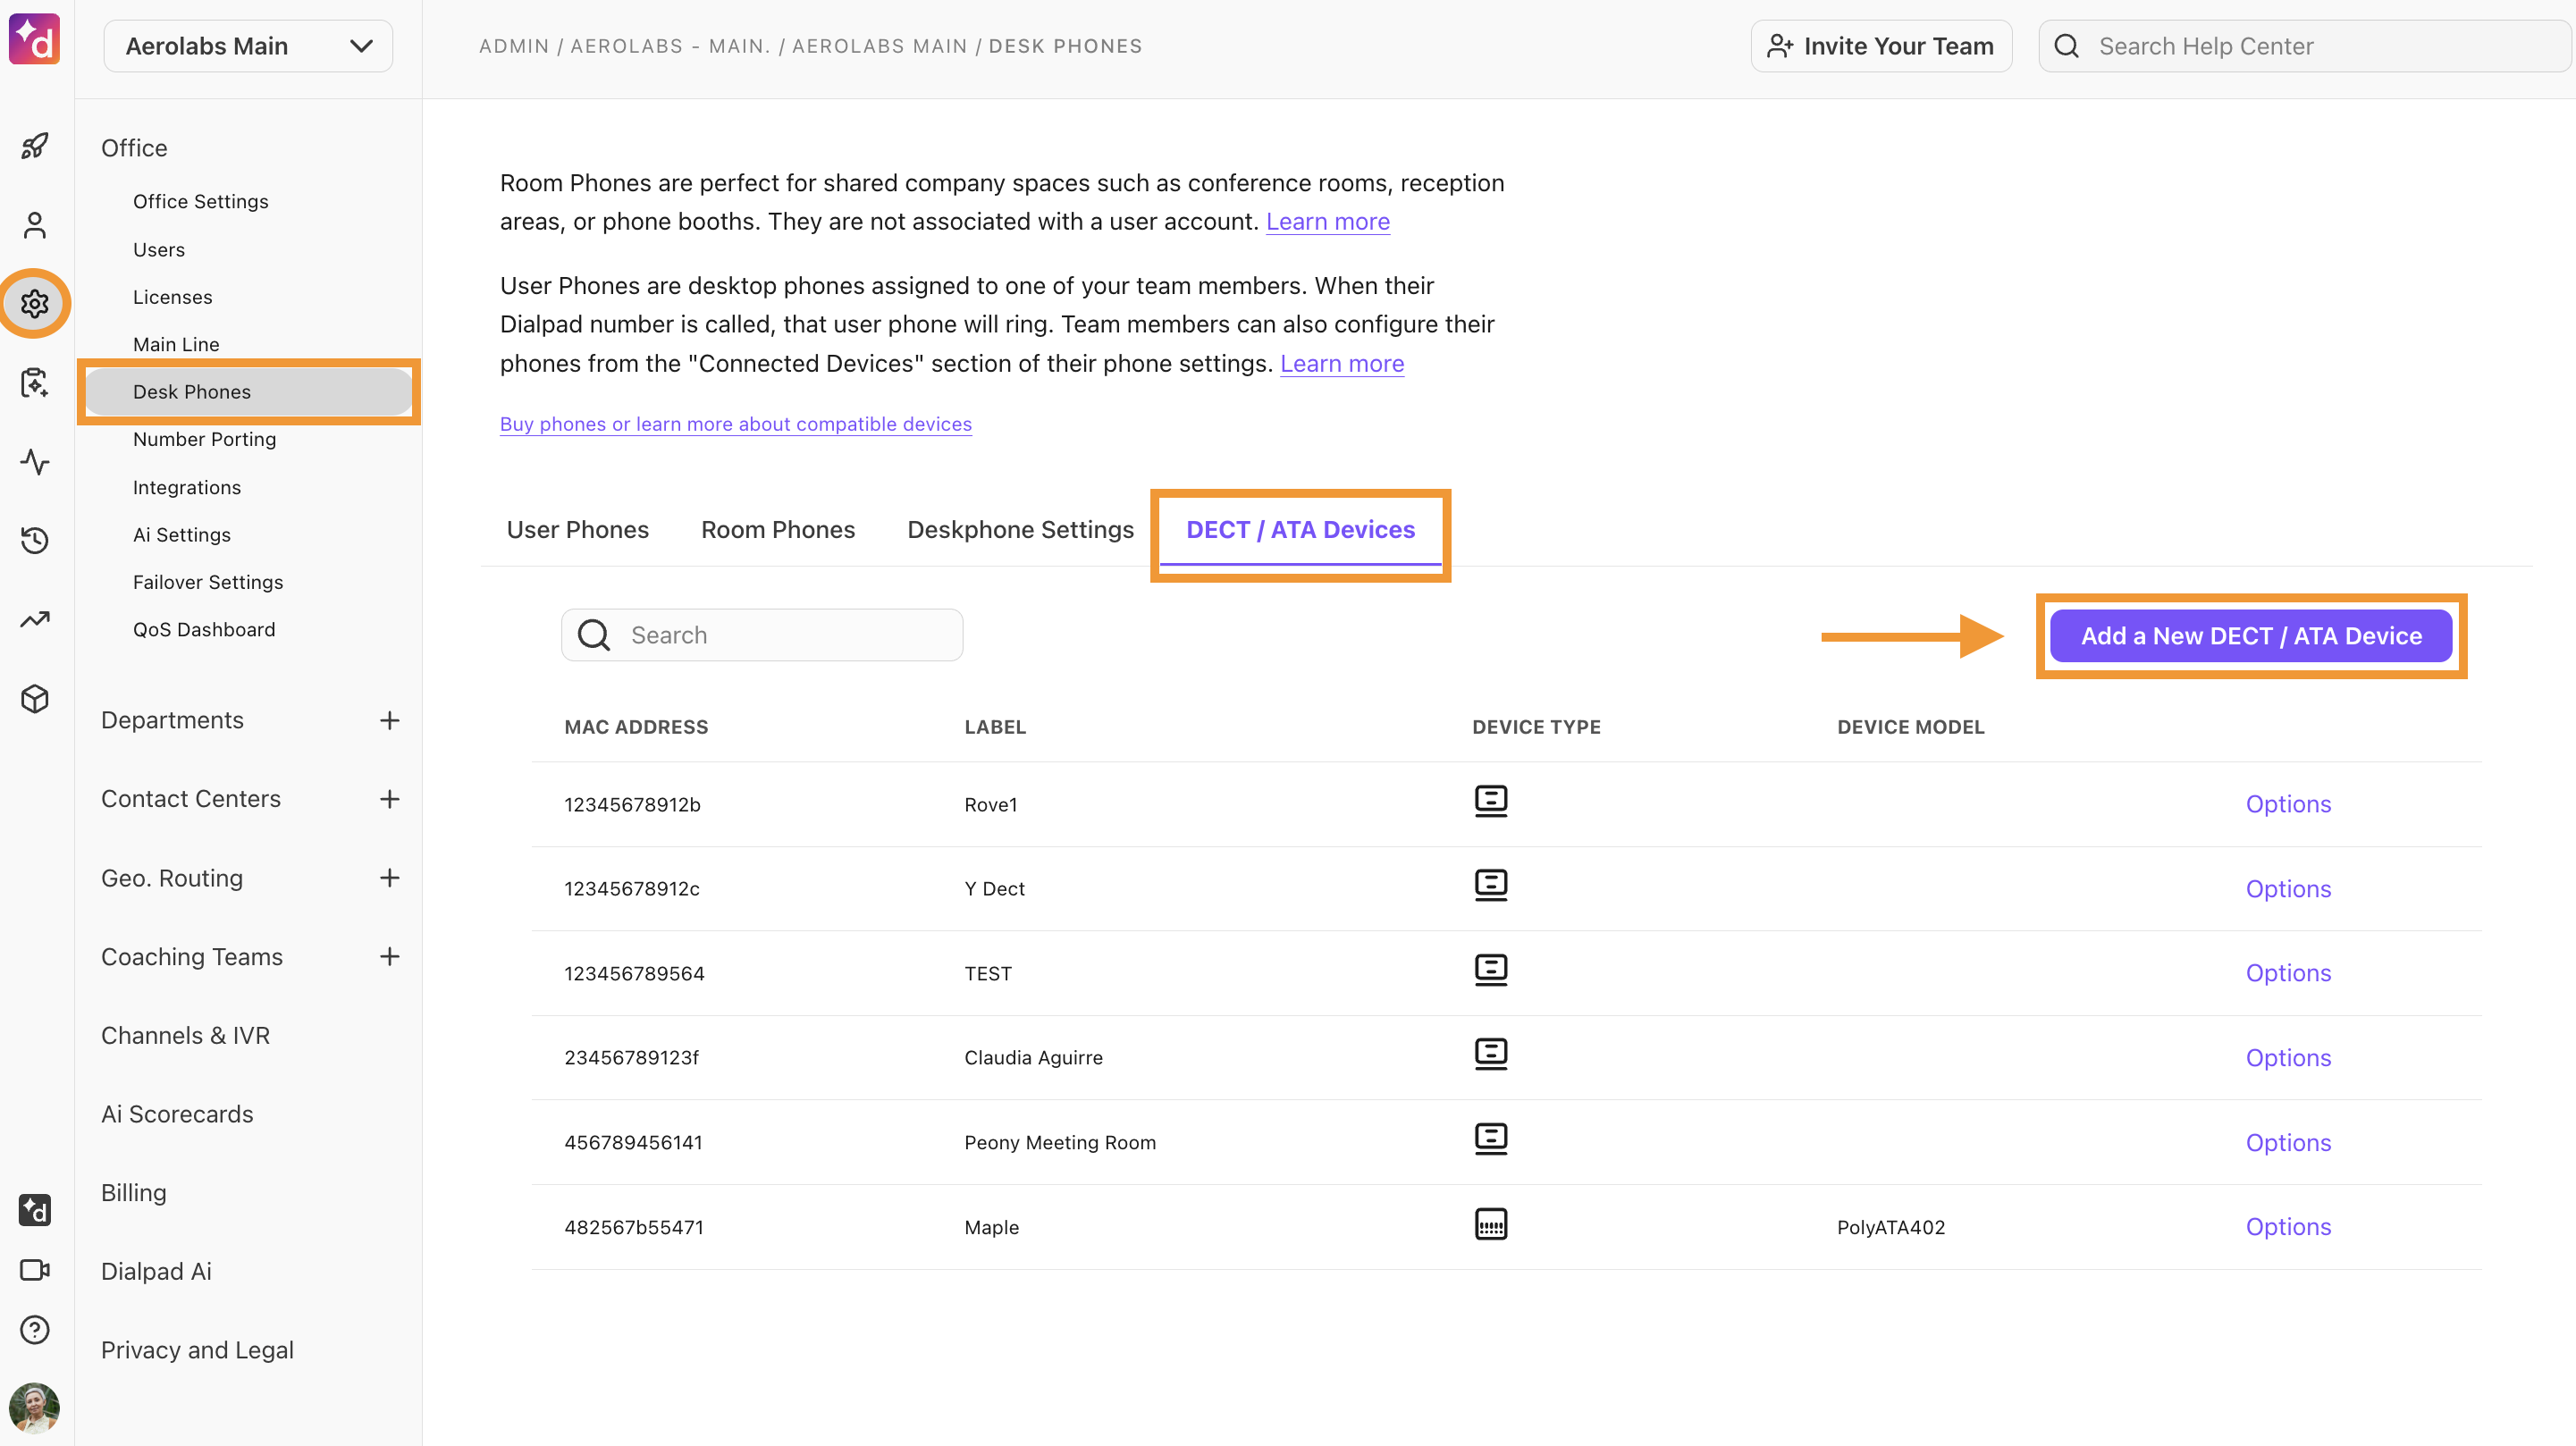
Select the Device Type
Enter your desired name for the device
Enter the Device MAC address, followed by a dash and then the serial number
You must use the LAN address, also listed as the Device MAC.
Select Add new device
.jfif)
That's it! The device will reboot, and it will be listed in the DECT/ATA Devices tab.
Assign the port
Now that the device is provisioned and set up for Dialpad, it's time to assign the port to a user or room.
Assign a port to a user
To assign a port to a user, go to your Dialpad Admin Settings.
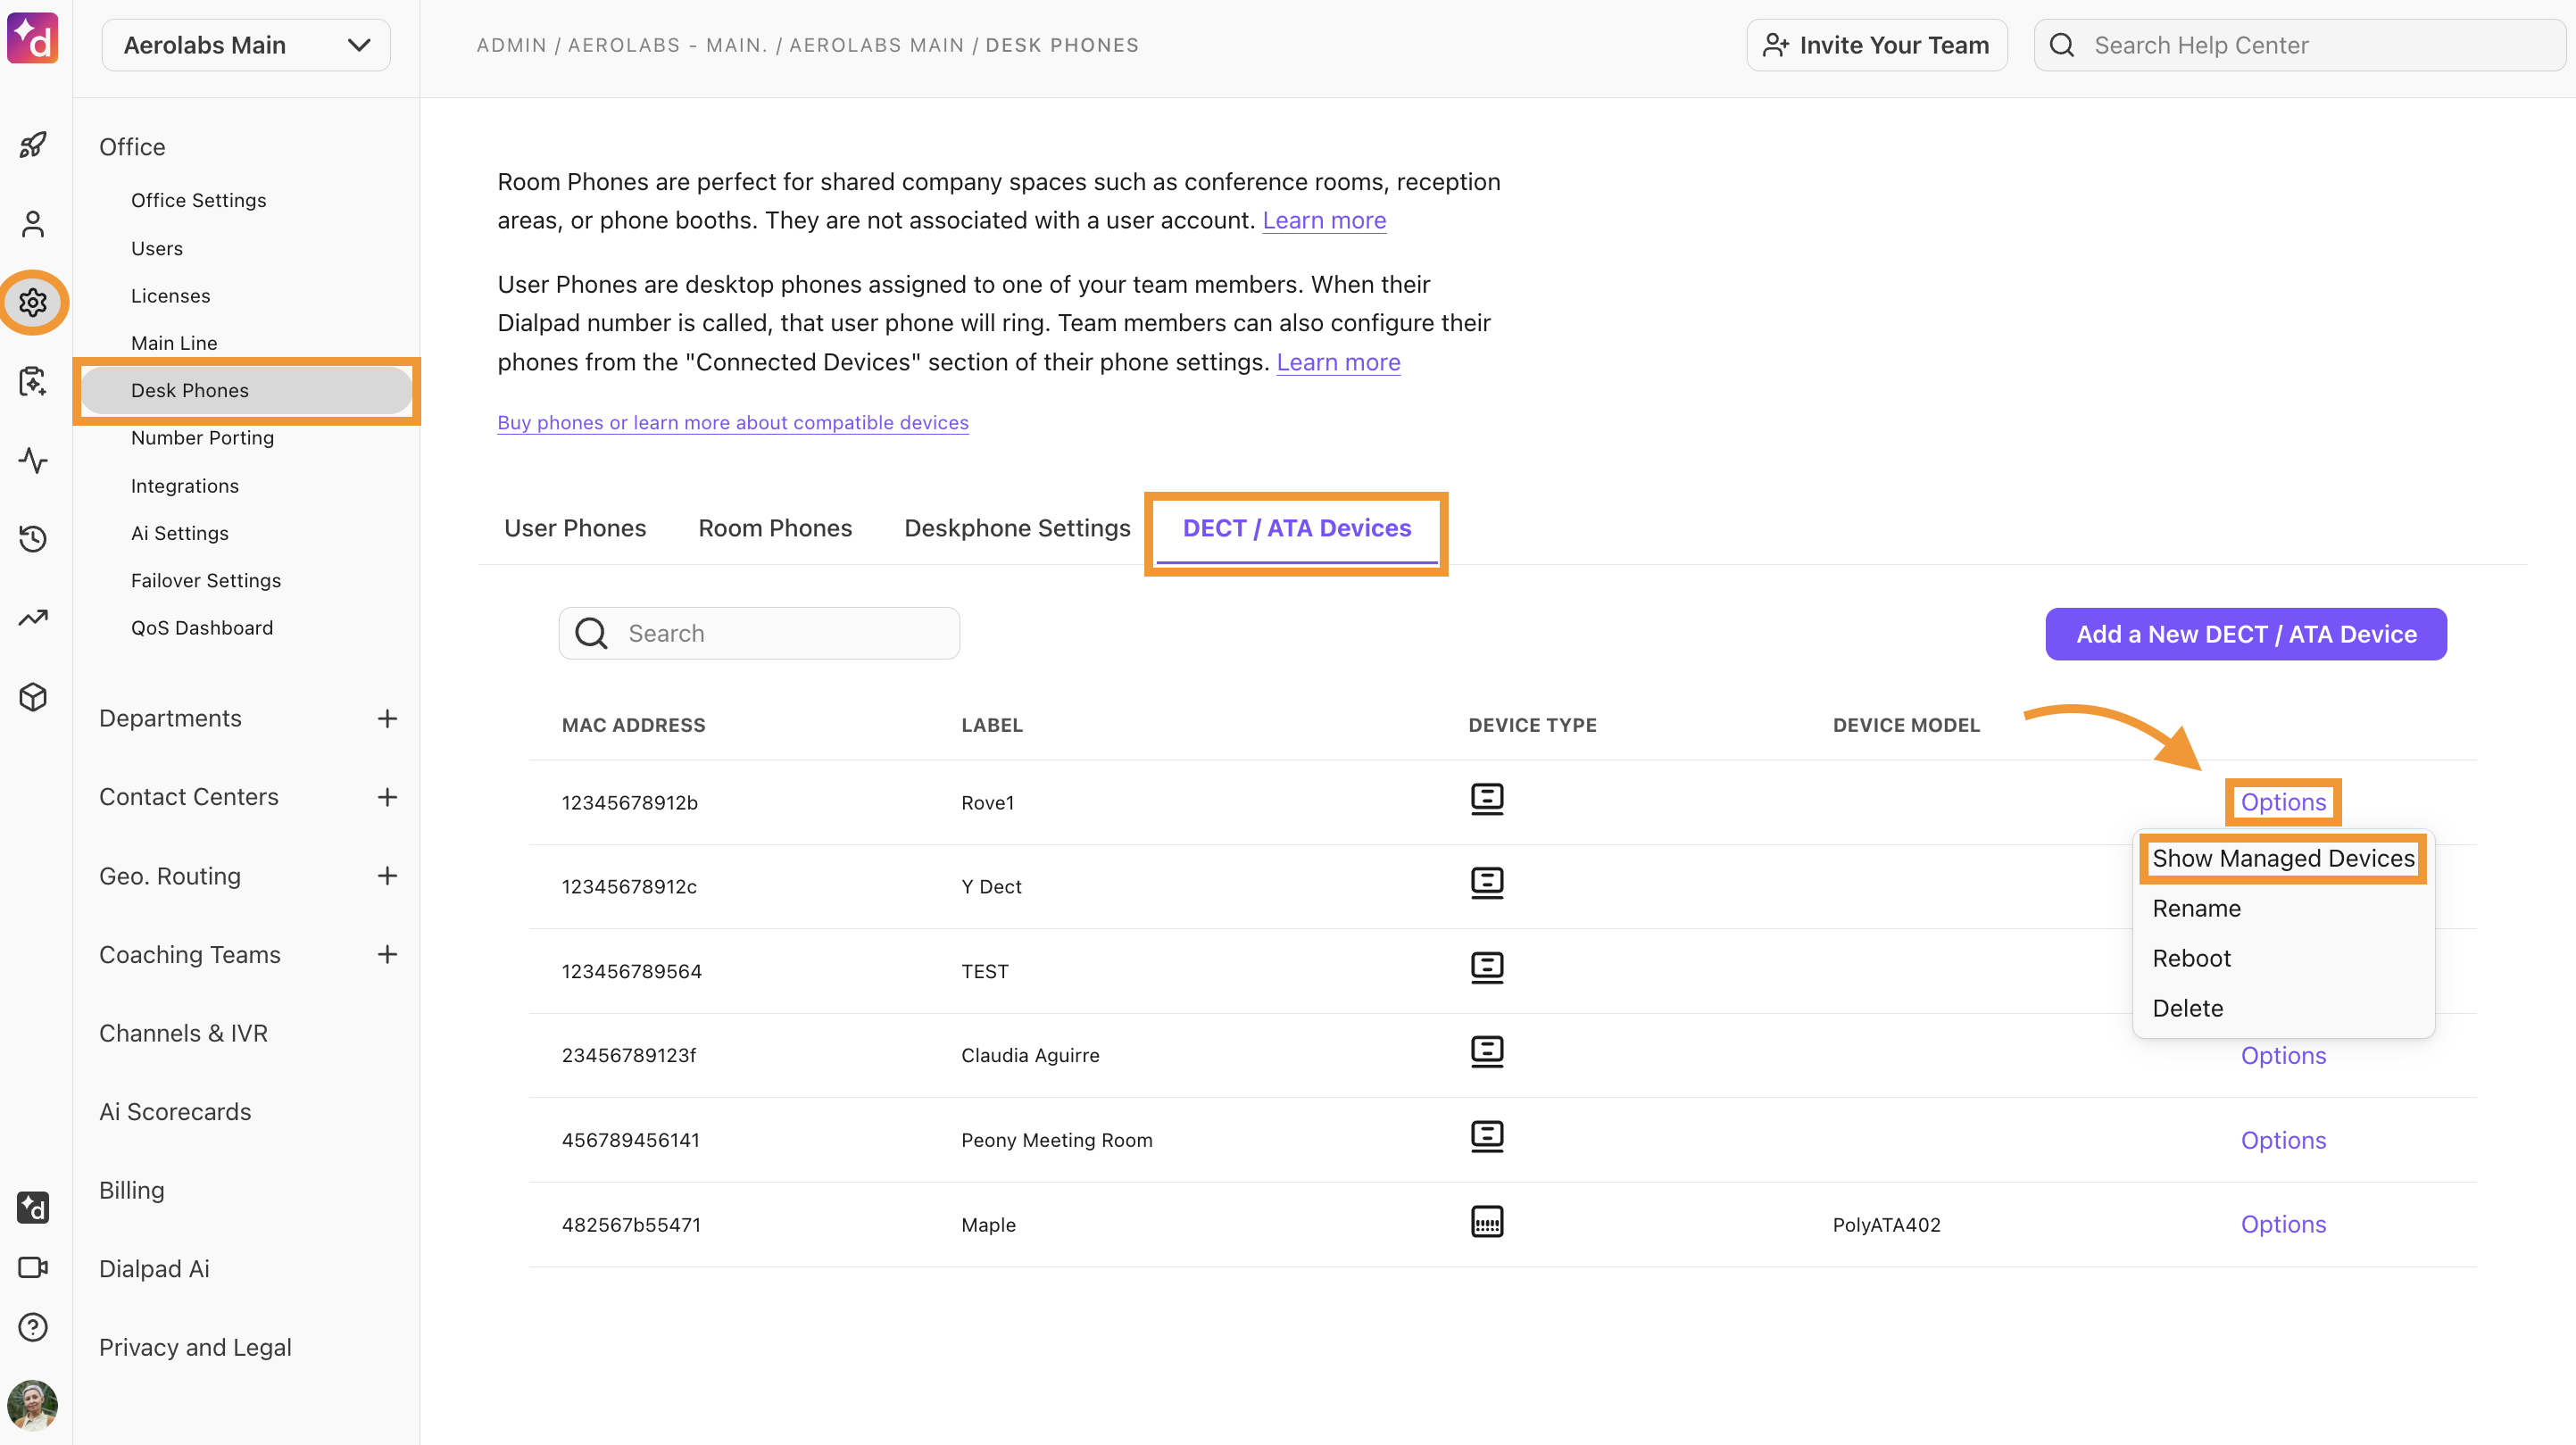
Select Office > Desk Phones
Select the DECT/ATA tab
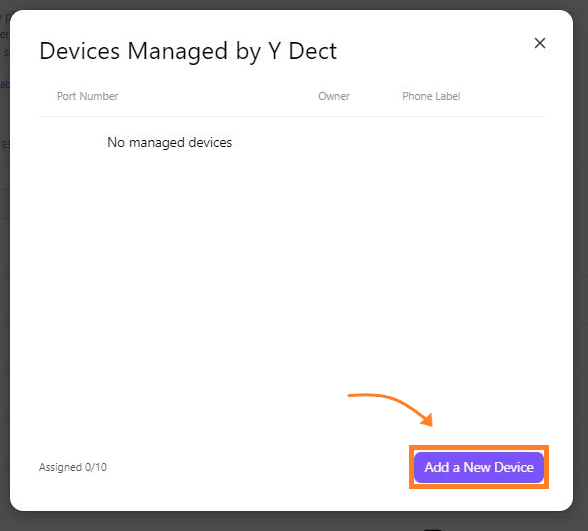
Select Options > Show Managed Devices
Select Add a new device
Select User
Choose the owner, add the display name and port
The port number depends on which port you use when plugging in an analog phone.
Select Assign port
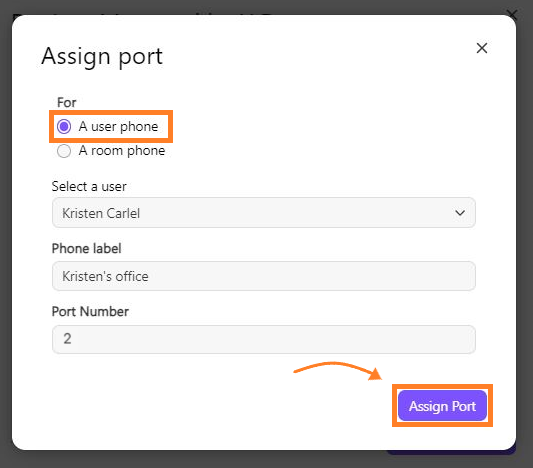
Once the port has been assigned, the base station will reboot.
Assign a port to a room
To assign a port to a room, go to your Dialpad Admin Settings.
Select Office > Desk Phones
Select the DECT/ATA tab
Select Options > Show Managed Devices
.png)
Select Add a new device
Select Room phone
Enter the room name and port number
Note
The port number must match the index number on the handset.
For Grandstream HT812 ATAs, port numbers should be set to only one or two.
For Grandstream HT814 ATAs, port numbers should be set to only one through four.
Choose the number type
Local
Toll-free
Select Assign Port
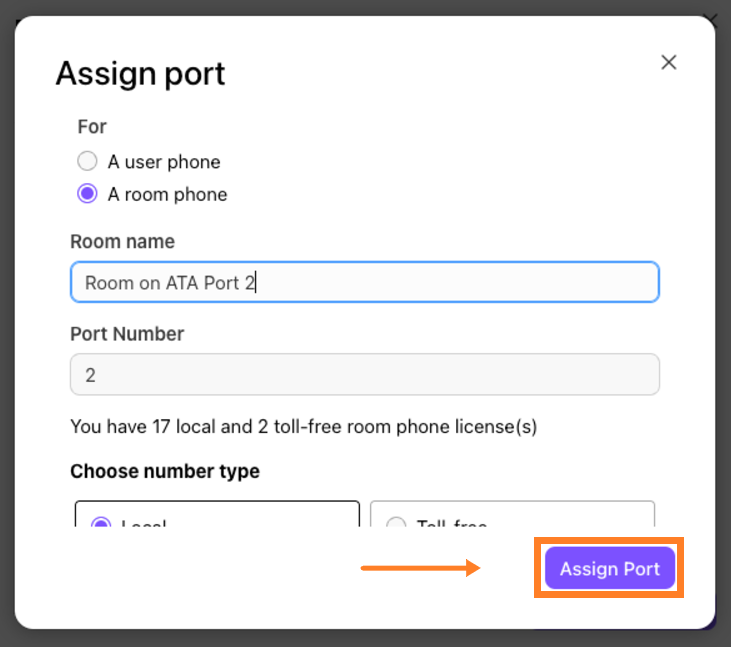
After assigning the port, the base station reboots.
Note
ATA devices set as room devices can be configured for faxing.
Head to this Help Center article to learn how.
Unassign a port
To unassign a port, go to your Dialpad Admin Settings.
Select Office > Desk Phones
Select the DECT/ATA tab
Select Options > Show Managed Devices
.png)
Select Options > Unassign
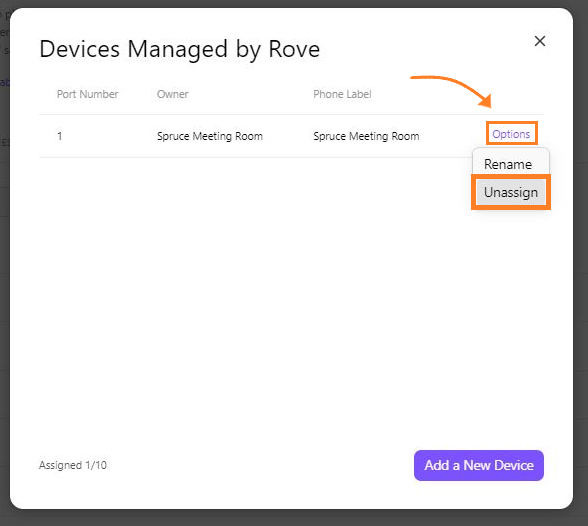
The device will reboot to apply the update.
Note
You’ll need to manually reboot the devices after assigning/unassigning ports.
Rename the ATA device
To rename an ATA device, go to your Dialpad Admin Settings.
Select Office > Desk Phones
Select the DECT/ATA tab
Select Options > Rename
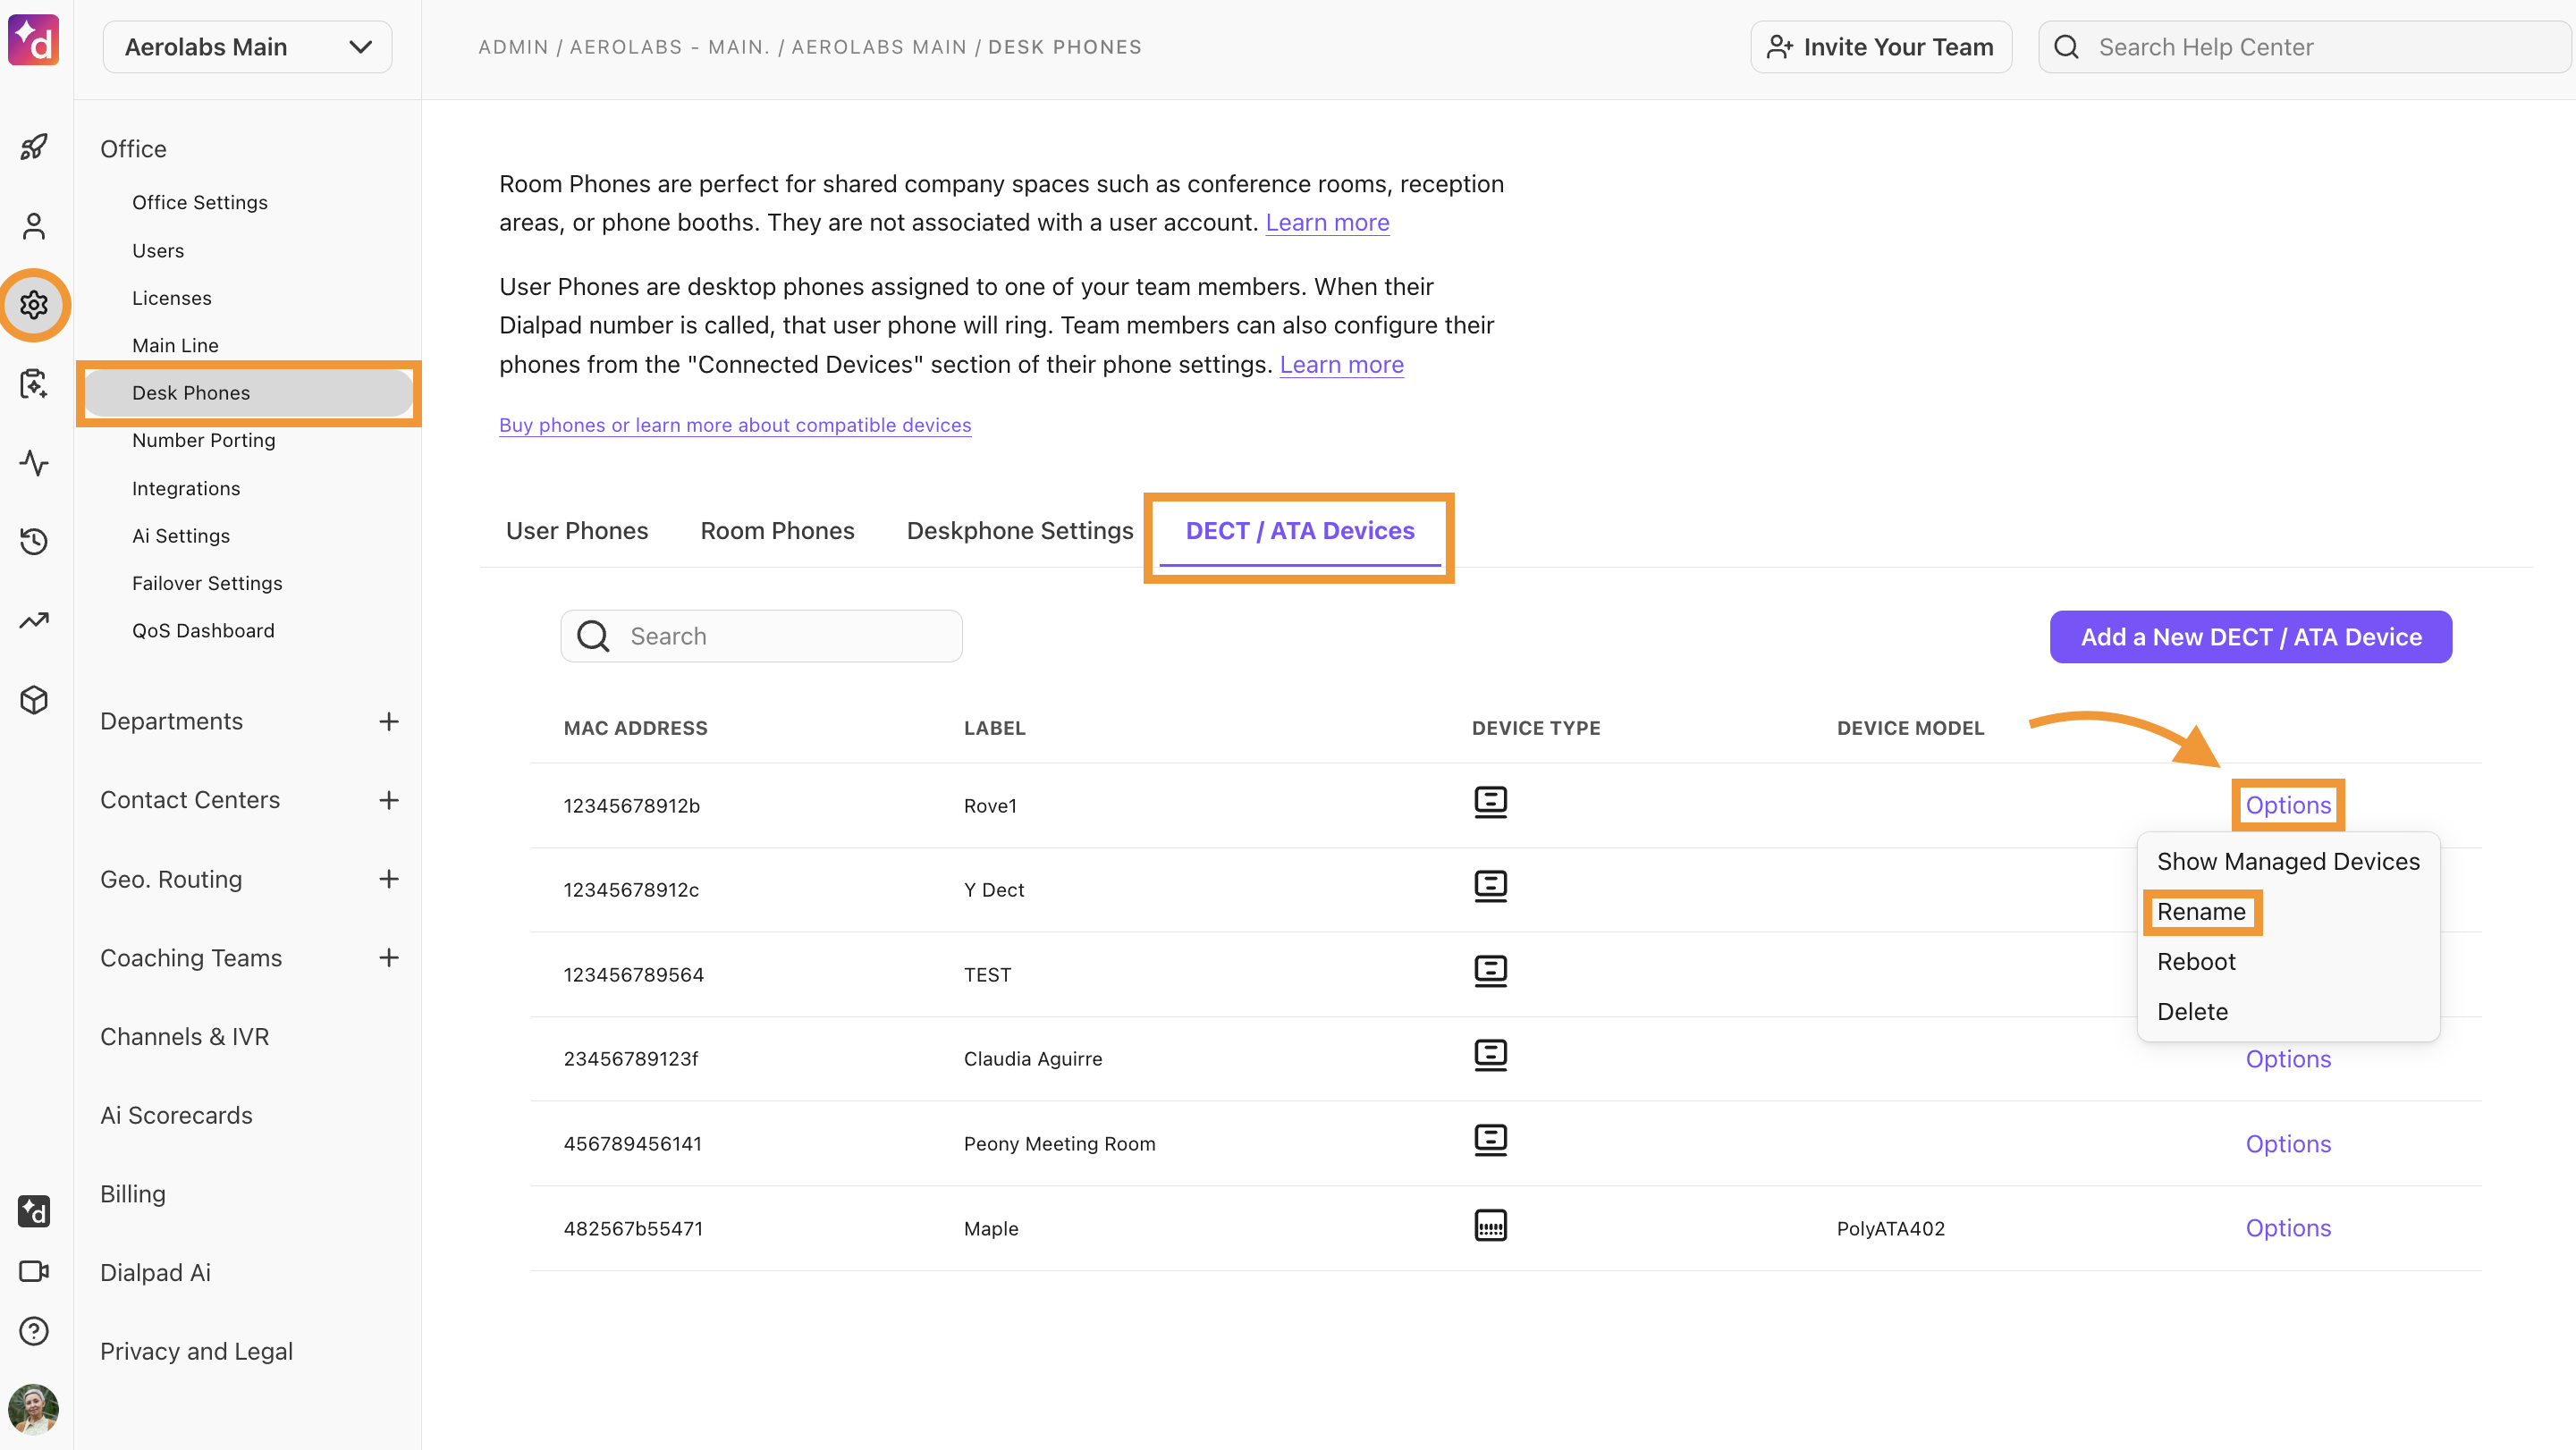
Enter the new display name
Select Rename
Rename a managed ATA device
To rename a managed ATA device, go to your Dialpad Admin Settings.
Select Office > Desk Phones
Select the DECT/ATA Devices tab
Select Options > Show Managed Devices
.png)
Navigate to the device you want to manage and select Options > Rename
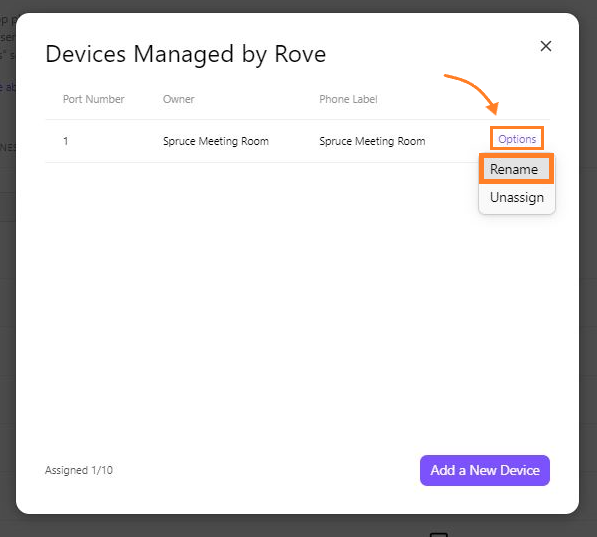
Enter the new display name and select Rename
Frequently asked questions (FAQ)
Why is there a pause before my ATA phone call goes through?
When you make a call with your ATA device using VoIP, there’s usually a 4-second delay after you dial a number. Since VoIP calls go over the internet, the process is more complex than with regular phone lines, which causes this delay.