Dialpad for HubSpot brings better call and SMS logging, streamlined note and task creation, and smarter AI features to help you work more efficiently.
Let’s dive into the details.
Who can use this
Dialpad’s HubSpot integration is currently available to Dialpad Support and Dialpad Sell customers, as well as Dialpad Connect users on a Pro or Enterprise plan.
Requirements
To use the HubSpot integration, you need a HubSpot license on a HubSpot Sales Free, Starter, Professional, or Enterprise plan.
Users need the following permissions:
CRM / CRM Objects / Contacts (View and Edit)
CRM / CRM Objects / Deals (View and Edit)
CRM / CRM Objects / Tickets (View and Edit)
CRM / CRM Objects / Tasks (View and Edit)
Account / Settings access / Edit property settings
Account / Settings access / App marketplace access
Enable Dialpad for HubSpot
To enable the Dialpad for HubSpot connection, you'll need to be a Dialpad Company Admin, with HubSpot Super Admin access (or a user with App Marketplace access).
Note
If you have HubSpot and HubSpot (Legacy) enabled, multiple activities will be logged to HubSpot.
To enable HubSpot for your company, go to your Dialpad Admin Settings.
Select My Company > Integrations
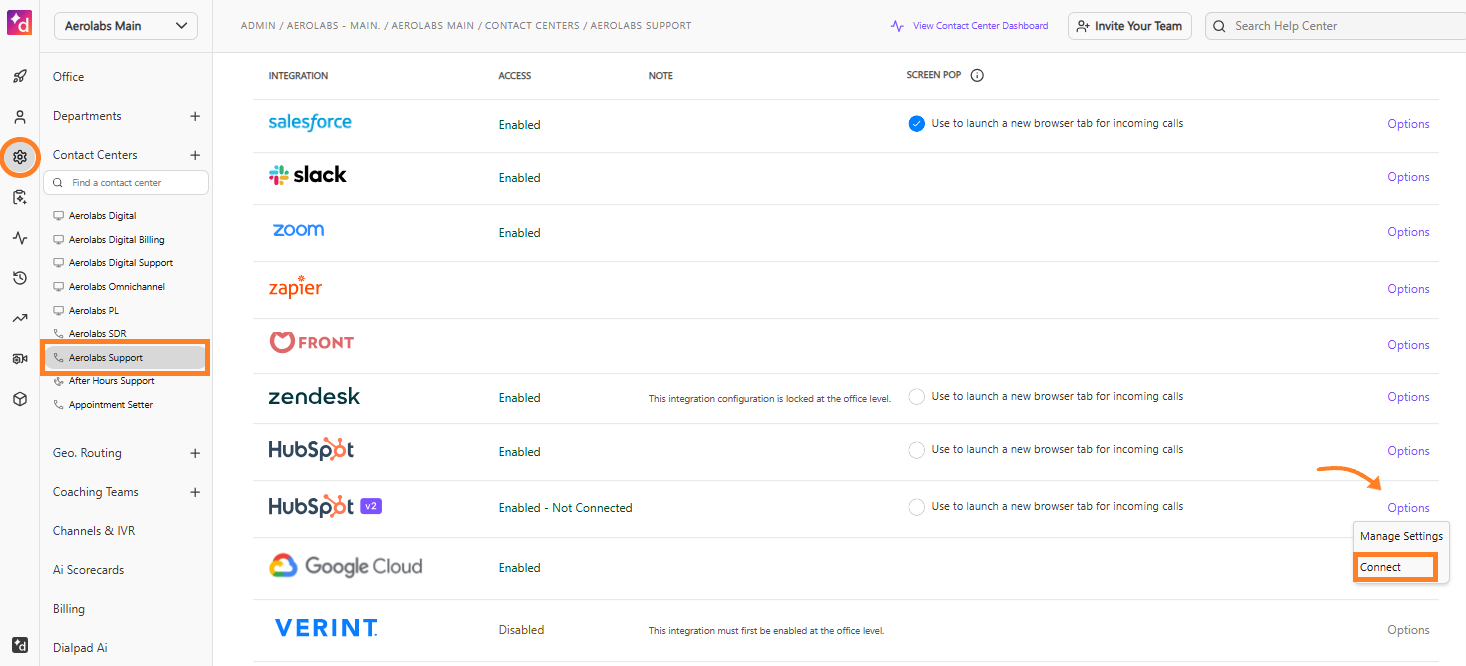
Beside HubSpot, select Options
Select Manage Settings
(1).png)
Check Enable this feature, then select Save
.png)
Return to the Integrations page
Beside HubSpot, select Options > Connect
(3).png)
Choose which HubSpot account you’d like to connect
Follow the prompts to grant permissions
HubSpot may bypass the consent screen if you have already authorized Dialpad to access HubSpot. It may appear as if the authentication is not complete, but if there is no error message, this means the authentication was successful.
Return to the Integrations page and customize as needed
Note
If you don’t want your Contact Centers, Departments, or users to be able to customize their HubSpot settings, check the box beside Lock settings for all users, departments, and contact centers.
.png)
Connect your HubSpot account
Once HubSpot has been enabled at the company level, it’s time to connect the integration for your Contact Centers. HubSpot must be enabled for each Contact Center.
Head to your Dialpad Admin Settings > Contact Centers
Select the desired Contact Center
Select Integrations
Beside HubSpot, select Options > Connect
Enter your HubSpot login credentials
Choose which HubSpot account you’d like to connect
Follow the prompts to grant permissions
Return to the Integrations page and customize as needed
Note
By default, Offices and shared lines inherit the Company-set HubSpot settings.
Admins can customize settings for each Contact Center, Office, and Department by selecting Customize for this Office in the line’s integration settings.
.png)
Connect your HubSpot account - user level
Once HubSpot has been enabled for your company, each team member must connect their HubSpot account.
To connect your HubSpot account, go to your Dialpad app
Open a conversation > Go to the Skinny Bar
Navigate to HubSpot > Connect HubSpot
.png)
Enter your HubSpot credentials, then grant permissions
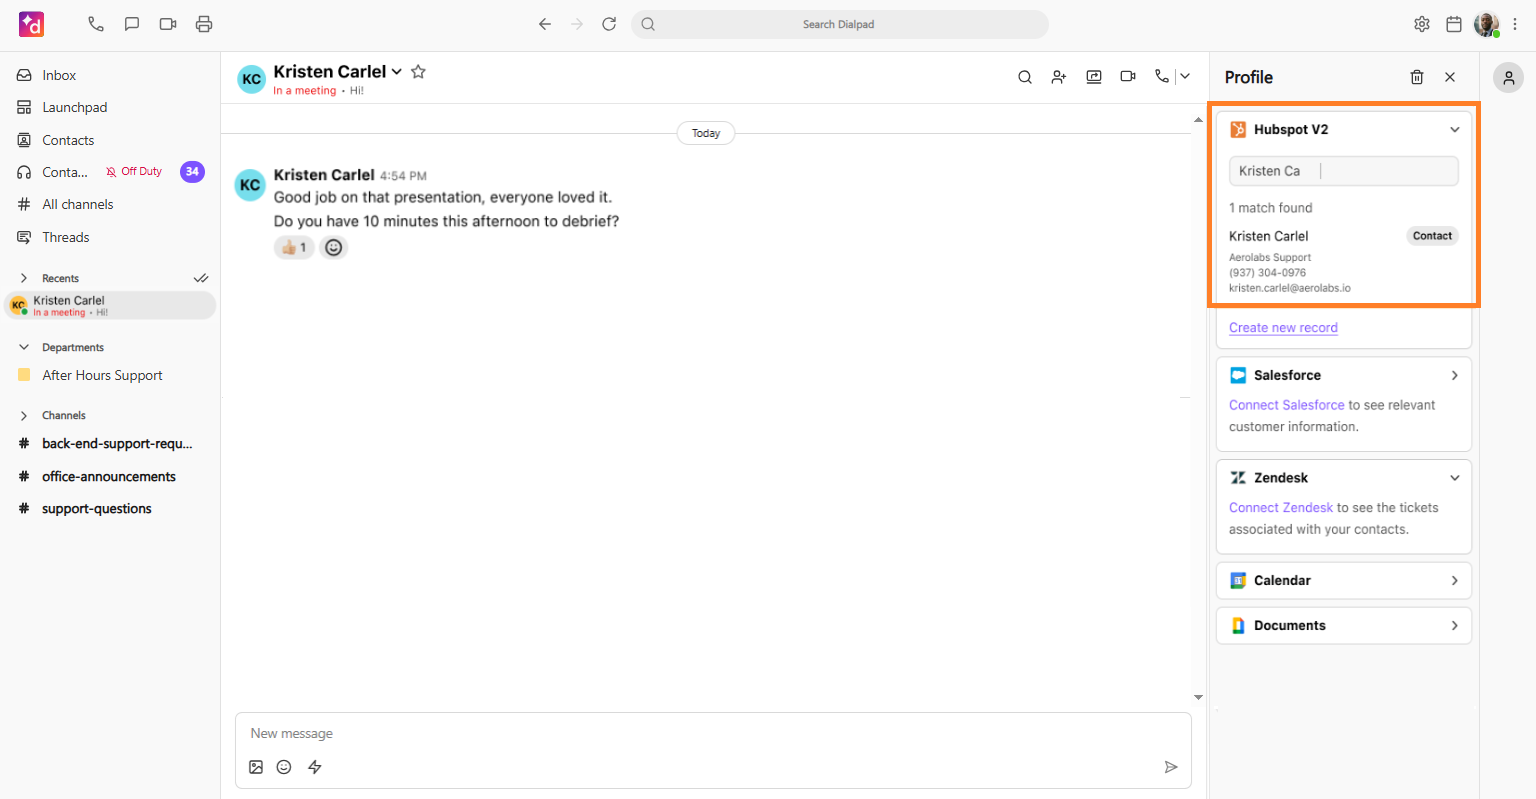
Contact matching
Once connected, your recent HubSpot contacts are fetched and loaded on the Dialpad sidebar whenever you load a contact. Please note, Dialpad does not currently sync or update Dialpad Contacts with HubSpot contacts.
.png)
Anytime you select a contact on Dialpad, their HubSpot information will appear on the sidebar.
Rematch a contact
Need to change the matched contact? No problem!
To change (rematch) a contact:
Hover over the contact details in the HubSpot widget
Select Rematch
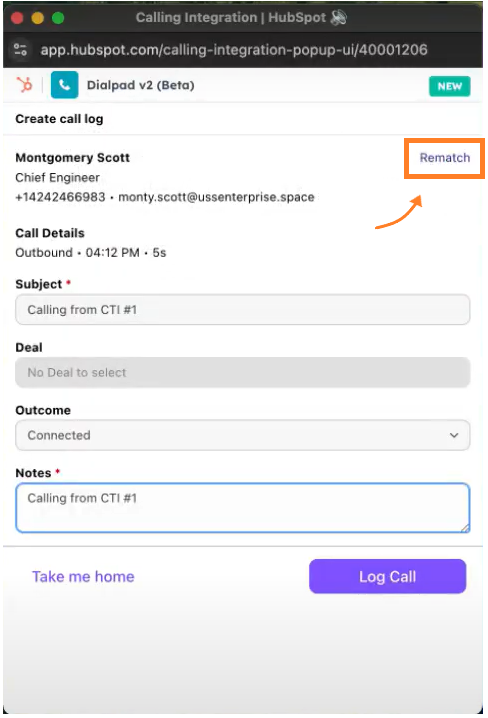
Enter a different contact’s name or number in the search bar
Select the name of the contact you’d like to match
Multiple contact match
If multiple contacts are found, you’ll see potential matches listed in the HubSpot widget.(3).png)
To match the Dialpad contact to the correct HubSpot contact, select the name.
Note
If you do not select a contact, the call will be logged in HubSpot, but it won’t be associated with a contact record.
No contact match
If the Dialpad contact or number is not already assigned to a HubSpot contact, use the search bar to find an existing HubSpot contact.
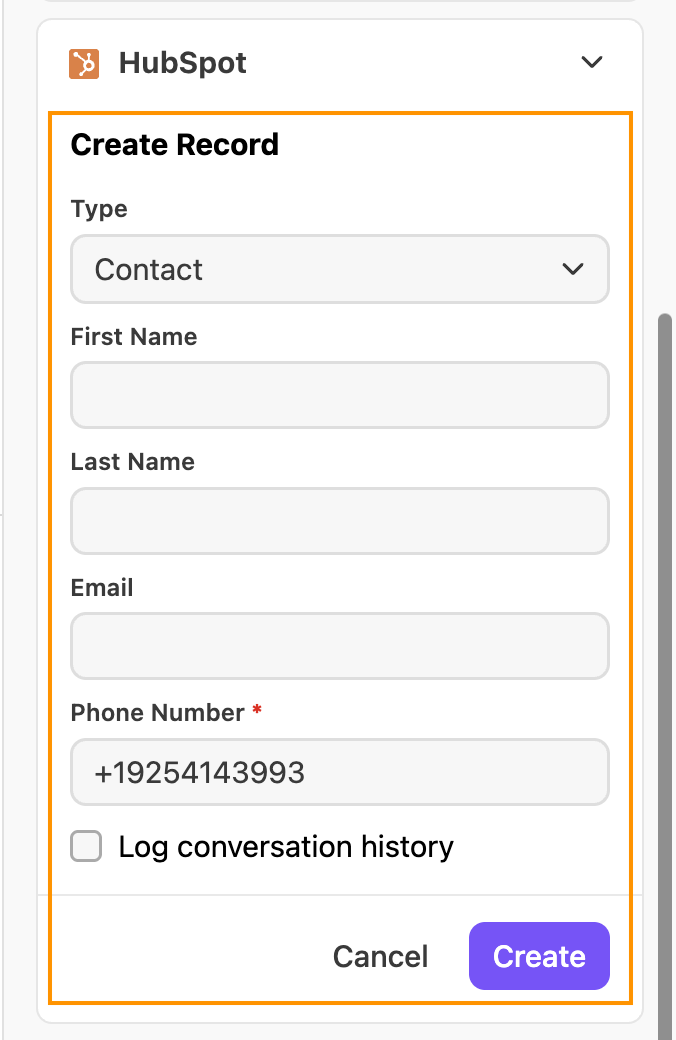
Create HubSpot contact
If the Dialpad contact or number does not match to an existing HubSpot contact, create a new HubSpot contact right from the Dialpad app.
To create a new HubSpot contact:
Access the HubSpot widget from the conversation
Find the widget by selecting the contact’s name, or opening the Skinny Bar
Select Create new record
(2).png)
Enter the contact’s details > Create
Tip
HubSpot contacts can be created at any time. You can create them from the conversation panel or during an active call.
Automatically create a HubSpot contact
Save time on manual data entry by automatically creating contacts in HubSpot when you interact with a new number.
If Dialpad can’t find any matching records in HubSpot and this setting is enabled, a new contact can be created automatically for these events:
Incoming answered call
Missed call with voicemail
Missed call without voicemail
Outgoing answered call
Outgoing unanswered call
Incoming SMS
Outgoing SMS
If there are multiple matches, Dialpad does not create a new contact — you’ll need to pick the correct HubSpot contact instead.
Note
By default, automated contact creation is turned off. Your admin can enable it in the HubSpot Contact management settings.
Call logging
HubSpot contacts are matched automatically. However, in the case of duplicate contacts, you need to match them manually.
If no matching contact is found, the call will still be logged, but it will not be linked to a HubSpot record. Once matched, you can log a call by logging a note during the call.
You can disable automatic call logging for records with no matching contacts by checking the box next to Log calls when a match is found in the HubSpot integration settings.
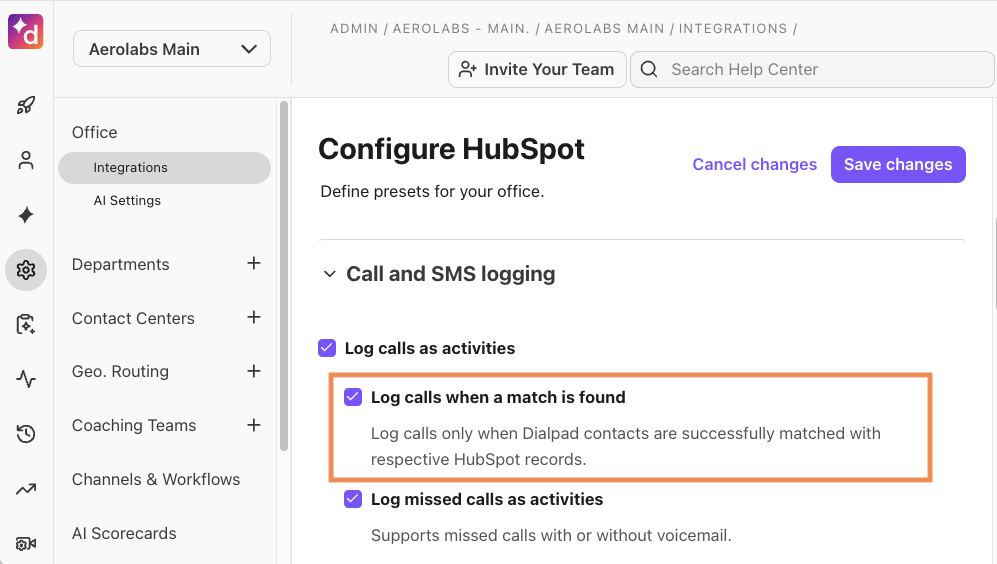
Visit this Help Center article to learn more about the data shared when a call is logged in HubSpot.
.png)
Tips
You can make and receive calls in HubSpot without using any plugins.
Find your HubSpot calls by going to CRM > Calls. You can also create a filter for calls where the Contact field is empty.If you want to find the calls that were not associated with a record, add a filter to find calls that have the 'Call → Contacts' field empty.
Note
If AI is enabled and the 'Add AI-generated data setting ’ setting is turned on, Dialpad AI details are also logged to the call.
Note
The HubSpot Outcome doesn’t update based on Dialpad dispositions. You must manually select the Outcome when logging a call.
.png)
Call logging settings
In the Call Logging section, define how and when you’d like calls to be logged to HubSpot.
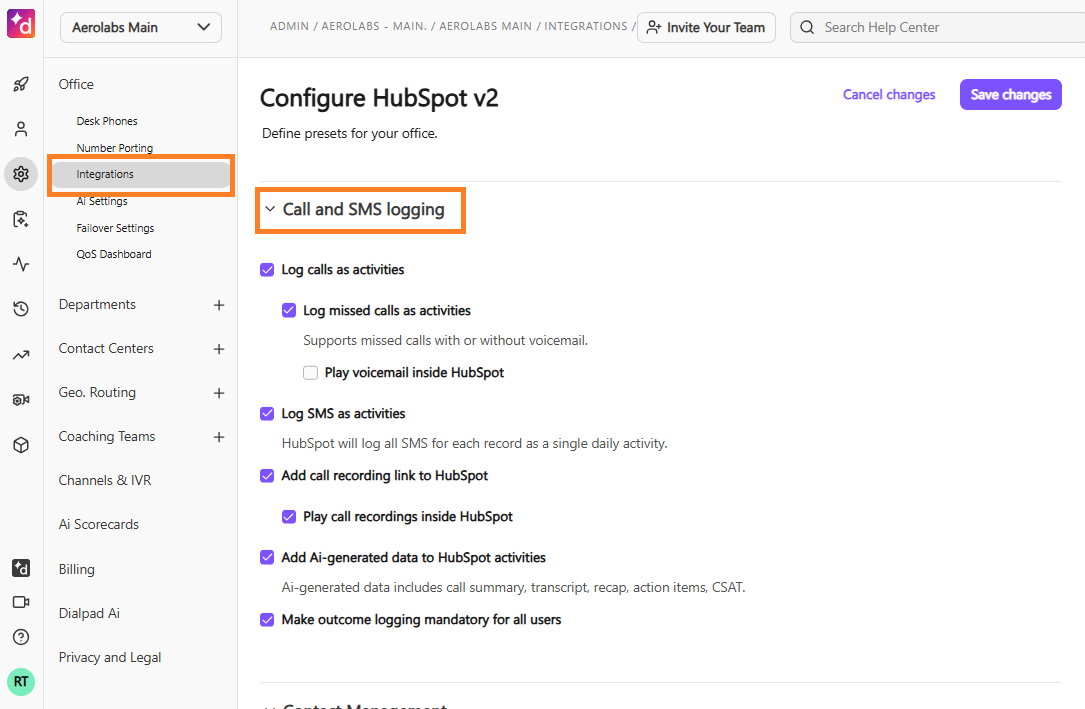
Log calls as activities: When enabled, automatically logs each Dialpad call as a HubSpot activity.
Log missed calls as activities: When enabled, HubSpot will still create an activity for missed calls, whether or not a voicemail was left.
Play voicemail inside HubSpot: Voicemail recording will be embedded directly in HubSpot, making it accessible to anyone with access to the contact, even if they can’t access the voicemail in Dialpad.
Add call recording link to HubSpot: When enabled, a link to the user’s call recording will be posted to the HubSpot activity, following your Dialpad recording permission.
Play call recording inside HubSpot: Call recording will be embedded in HubSpot, making it accessible to anyone with access to the contact even if they can’t access the voicemail in Dialpad.
Add AI-generated data to HubSpot: When enabled, AI-generated call summary, transcript, recap, action items, and CSAT will be posted to the HubSpot activity.
Make outcome logging mandatory: Requires users to select a call outcome in HubSpot before the call is logged.
Check the box beside each setting you want to define, then select Save.
Log Dialpad AI in HubSpot
No manual activity tracking — Dialpad does it for you. Among other things, AI Recaps and Action Items are logged as custom fields to your inbound and outbound calls, ensuring important follow-ups are not forgotten and additional meetings are scheduled when needed. The call's AI Outcome and Call Purpose tags are also logged to your calls, making it easy to find specific calls and clients. If you're using AI CSAT, or AI Playbooks, you'll also see the rep's adherence to your AI Playbook, and the call's AI CSAT score.
When the Add AI-generated data to HubSpot activities setting is enabled, Dialpad will send AI data to every call activity..png)
Supported AI fields
The following Dialpad AI features are logged to custom fields, and supported in HubSpot.
AI Field | Field Type | Description |
|---|---|---|
AI Summary | Rich Text (255-character limit) | The AI Recap of the call, noted in a Rich Text format. |
AI Action Items | Rich Text (132, 072) | The Action Items that were detected in the call, as generated in the AI Recap. |
AI Outcome | Drop down select | The AI-detected outcome of the call. |
AI Call Purpose | Checkboxes | The AI-detected Call Purpose category assigned to the call. |
AI Playbook Adherence | Percentage | Numeric value that describes the rep's adherence to the AI Playbook. |
AI CSAT | Number (1-5) |
Notes
Dialpad AI data shows up as plain text in the Note field, along with the support call summary link. It doesn’t sync to custom HubSpot fields.
AI data logging is only supported for Dialpad calls at this time.
Create a task
Once a HubSpot contact has been assigned to the number, use the HubSpot widget to create a task that will log to HubSpot, and appear in Dialpad.
To create a task:
Open the HubSpot widget
Access the widget by selecting the contact’s name, or by opening the Skinny Bar
Select Create Task
.png)
Enter the Task details
Be sure to set the Priority and Task type
Select Create
.png)
Once created, you’ll see your Task in HubSpot.
Log a note
Once a HubSpot contact has been assigned to the number, use the HubSpot widget to create a note that will log to HubSpot, and appear in Dialpad.
To create a note:
Open the HubSpot widget
Access the widget by selecting the contact’s name, or by opening the Skinny Bar
Select Log Note
.png)
Enter the note details
If the contact has any assigned deals, you’ll also see the option to link one of their deals to the note.
Select Log
.png)
Logged notes appear under the Activities section for a matched HubSpot contact.
SMS logging
If a HubSpot contact is matched to a Dialpad SMS interaction, and SMS logging is enabled in HubSpot, SMS messages sent via Dialpad are automatically logged to HubSpot. Dialpad consolidates SMS logs based on the day, instead of logging individual messages as a separate activity.
Note
In case you can’t view SMS activities, head to your Activity tab in HubSpot. Under Filter activity, check the box beside SMS.
To enable SMS logging from a Contact Center, your Admin needs to (re)authenticate the Contact Center from its integration settings. This is a one-time activity.
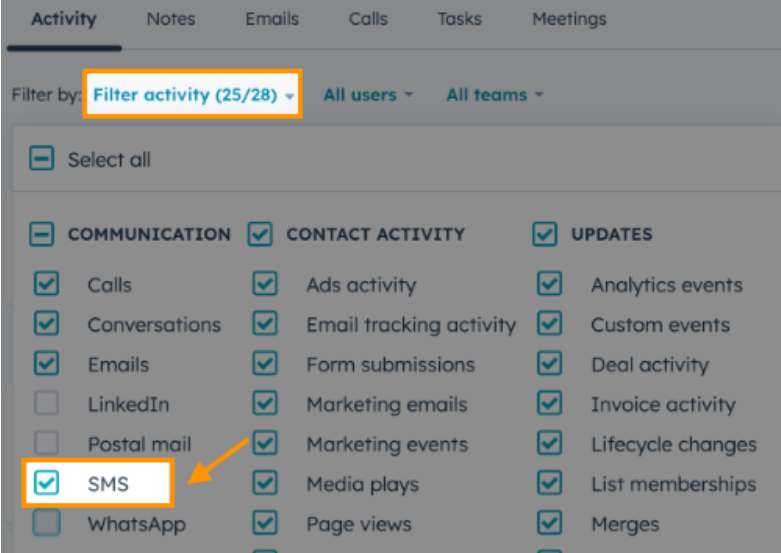
To enable SMS logging, head to your Activity tab in HubSpot. Under Filter activity, check the box beside SMS.
Learn more
Read our FAQ guide for setup tips, how to’s, and helpful answers.