In the world of customer service, voicemail management is key to keeping clients happy and ensuring a smooth agent workflow. With Dialpad’s newest feature, Voicemail Management, managers can assign voicemails to specific agents (or themselves!) to ensure the customer receives a call back from the right team member.
Not only that, Agents, Supervisors, Operators, and Coaches can leave notes when they resolve a voicemail, explaining why they resolved the voicemail, and what was discussed.
Let’s dive into the details.
Who can use this
Voicemail Management is available to users on a Dialpad Support or Dialpad Sell plan.
If your Dialpad Connect plan includes a Department, you are also eligible for this feature.This feature is available in the Dialpad Desktop and Browser apps, but is not yet available on our mobile apps.
Assign a voicemail
Voicemails can be assigned to agents, supervisors, coaches and operators within a Contact Center or Department.
To assign a voicemail:
Navigate to your Contact Center or Department
Select Voicemails
Hover over the voicemail
Select Assign
.png)
Choose the assignee
When a voicemail is assigned to an agent, they’ll receive a Dialbot notification stating who assigned the voicemail, and from which Contact Center or Department.
To see the voicemail, select View Voicemails.

Once a voicemail has been assigned, it can only be resolved by the assignee.
However, other agents can re-assign the voicemail to themselves and then resolve the voicemail if needed.
Resolve a voicemail
Voicemails can be resolved by the assigned agent, or supervisor.
If the assigned agent has not resolved the voicemail, it can be reassigned and resolved by another agent or supervisor as needed.
If a voicemail is unassigned when resolved, it will automatically be assigned to the resolving agent.
To resolve a voicemail:
Navigate to your Contact Center or Department
Select Voicemails
Hover over the voicemail
Select Resolve
.png)
Enter the resolution notes
Select Resolve
.png)
Tip
You can also resolve a voicemail from the conversation.
Enable resolution notes
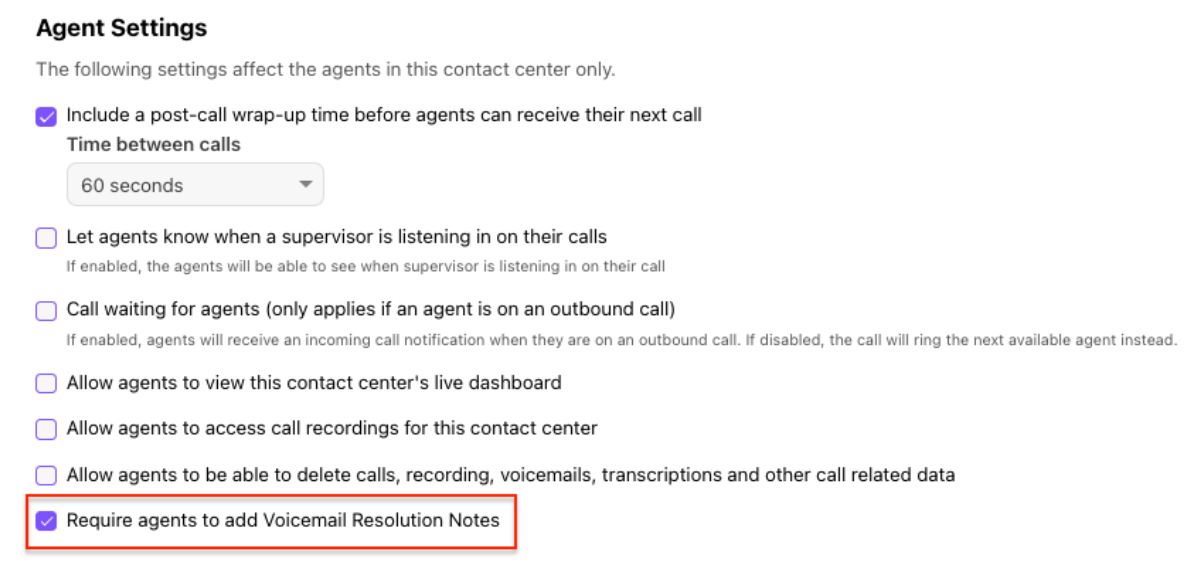
Enabling the 'Require agents to add Voicemail Resolution Notes' setting makes resolution notes mandatory.
This setting is managed within the Contact Center or Department's Advanced Settings.
Unresolve a voicemail
Need to reopen a resolved voicemail? No problem!
To unresolve a voicemail:
Navigate to your Contact Center or Department
Select Voicemails
Hover over the voicemail
Select Resolved

Enter the reason you’re unresolving the voicemail
Select Unresolve
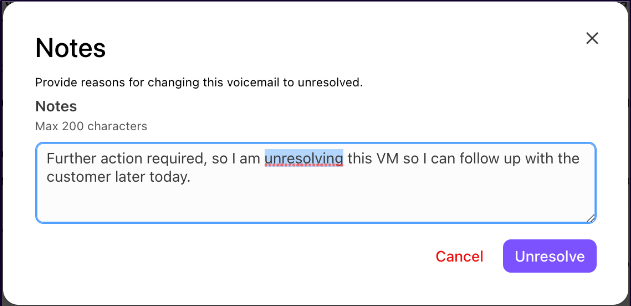
Once unresolved, the voicemail can be re-assigned or resolved.
Call back
For quick callbacks, agents can use the Call Back button.
To return a voicemail:
Navigate to your Contact Center or Department
Select Voicemails
Hover over the voicemail
Select Call back

Once the call has finished, you’ll be prompted to enter resolution notes.
Voicemail history
Use voicemail history to see the full details of what happened with the voicemail, including actions and notes.
To access the voicemail history:
Navigate to your Contact Center or Department
Select Voicemails
Hover over the voicemail
Select Options (that’s the 3 vertical dots on the right)
Select History
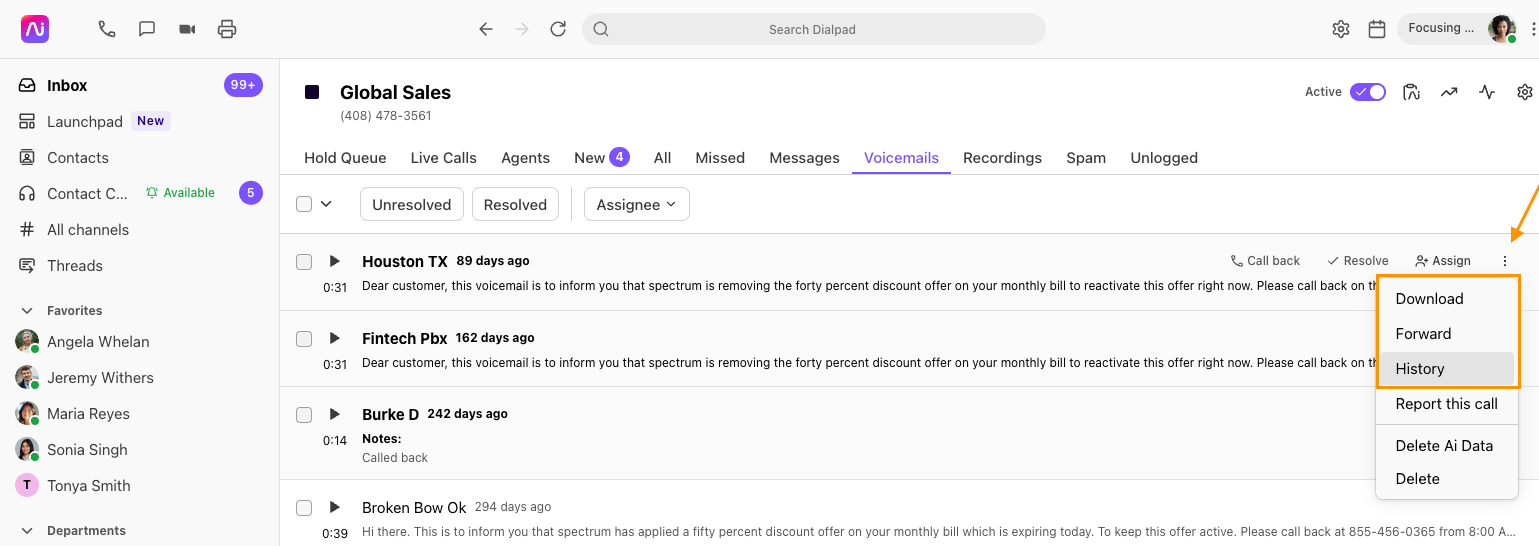
The voicemail's history displays a summary of the voicemail, including who resolved it, notes and more.
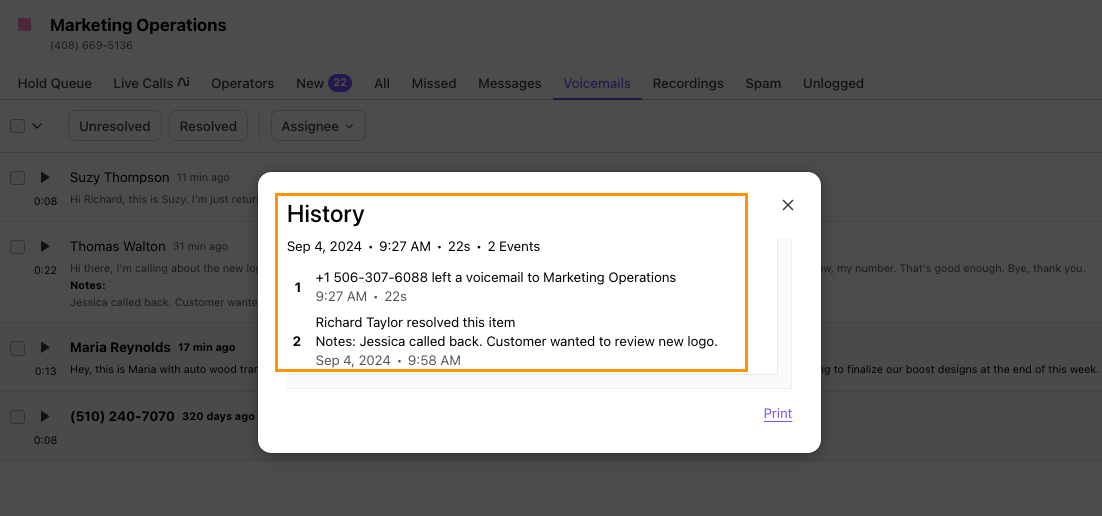
Select Print to print a copy of the voicemail history.
Forward a voicemail
Want to share a voicemail? Easily forward it to colleagues for their review.
To forward a voicemail:
Navigate to your Contact Center or Department
Select Voicemails
Hover over the voicemail
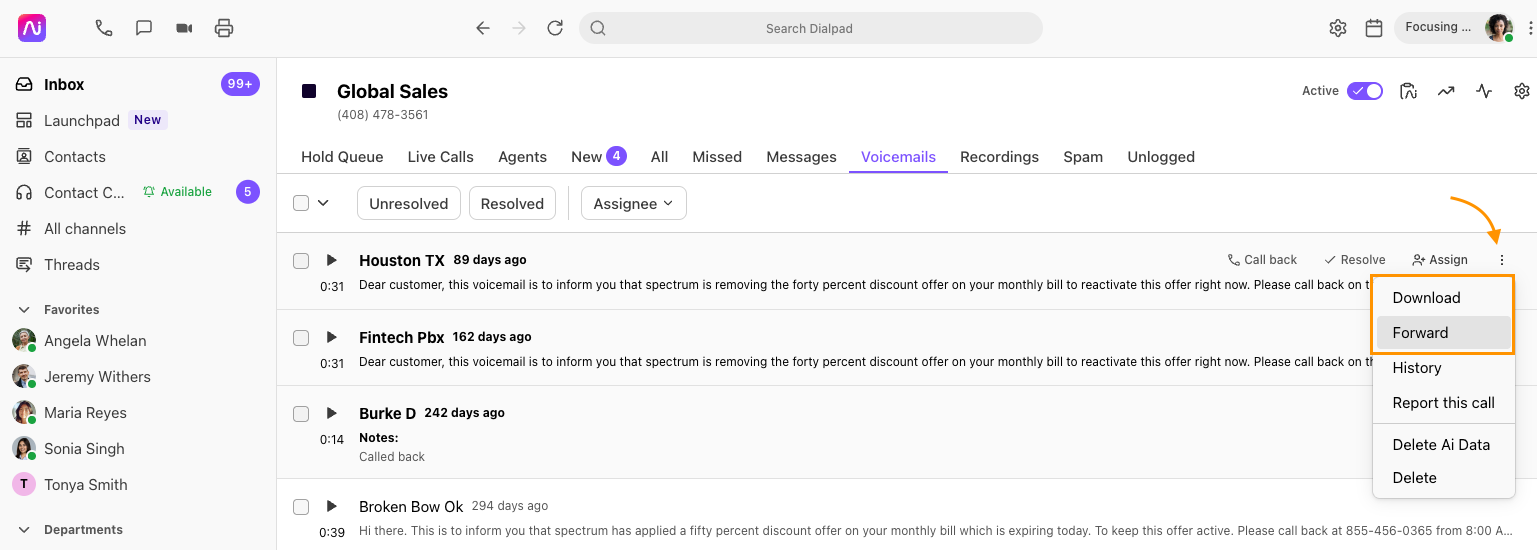
Select Options (that’s the 3 vertical dots on the right)
Select Forward
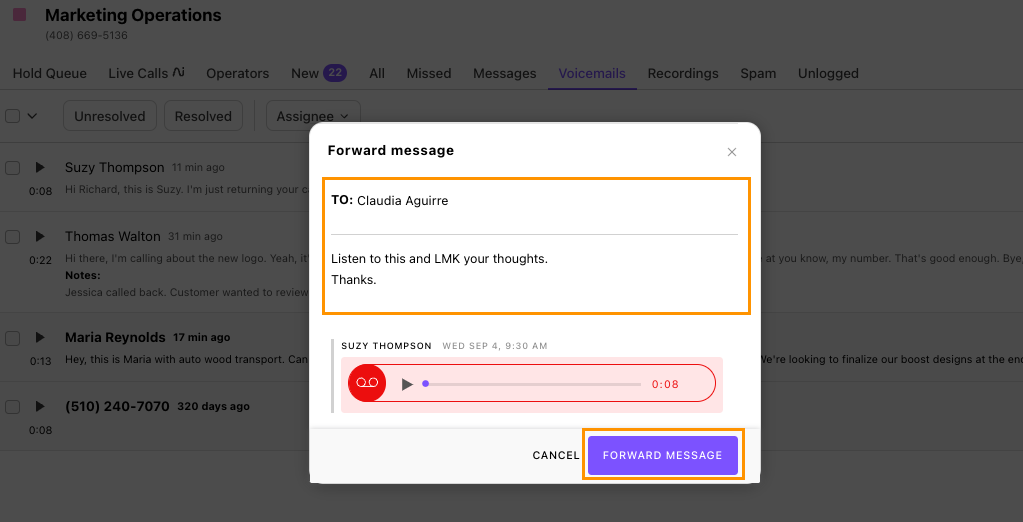
Enter the recipient's name
Add a note (optional)
Select Forward Message
Bulk voicemail management
Supervisors can take the following actions on any voicemail.
Assign / Reassign
Resolve / Unresolve
Delete
Agents can only resolve and unresolve voicemails that are assigned to themselves. If enabled, they can also bulk delete their own voicemails.
Assign and reassign multiple voicemails
To assign (or reassign) multiple voicemails:
Navigate to your Contact Center or Department
Select Voicemails
Select the Voicemail tab
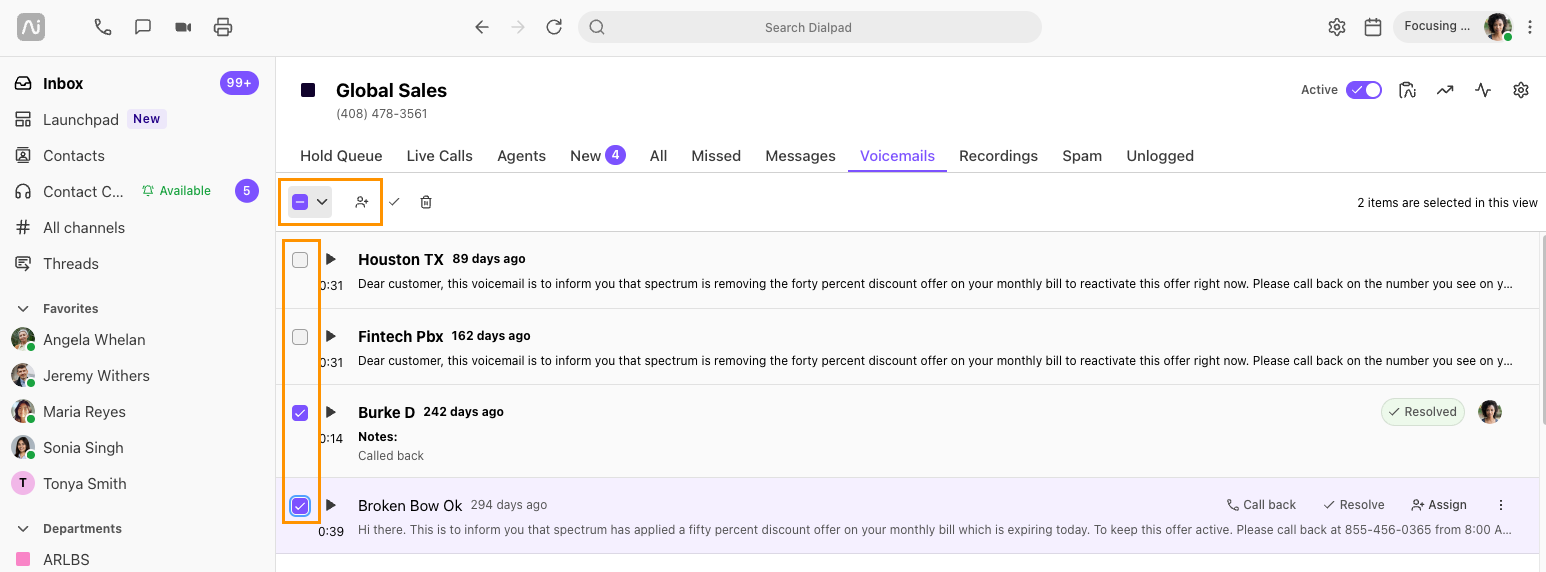
Check the boxes beside the voicemails you want to assign/reassign
Select Assign
Select the agent to handle the voicemails
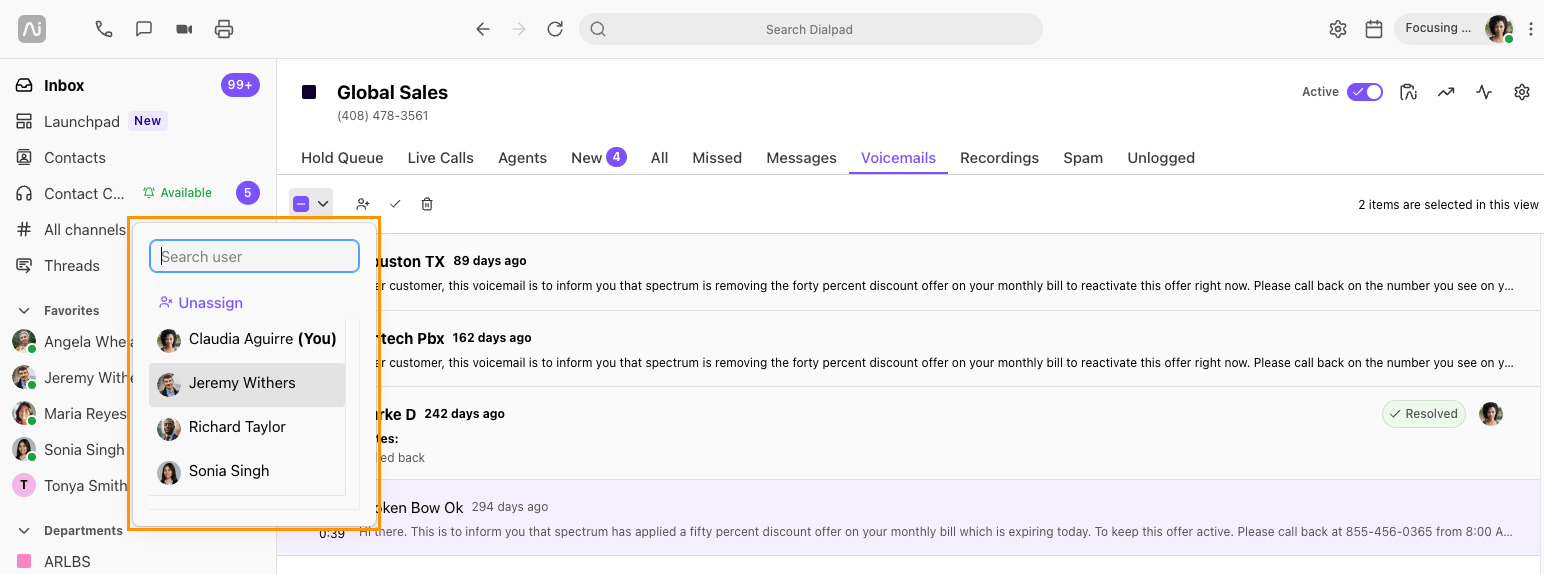
Select Assign all
Once the voicemails are assigned, the agent will receive a Dialbot alert with the total number of voicemails assigned, the assignor, and the shared line to which the voicemails were assigned.
If the voicemails are reassigned, the previous agent will receive a Dialbot alert informing them of the assignor, and the number of voicemails that have been removed.
Resolve multiple voicemails
Supervisors can resolve voicemails assigned to other agents or supervisors. The voicemails will then automatically be reassigned to the supervisor.
Agents can only manage voicemails assigned to them. If they resolve an unassigned voicemail, it will be automatically assigned to the user who resolves it.
To resolve multiple voicemails:
Navigate to your Contact Center or Department
Select Voicemails
Select the Voicemail tab
Check the boxes beside the voicemails you want to resolve or unresolve
Select Resolve
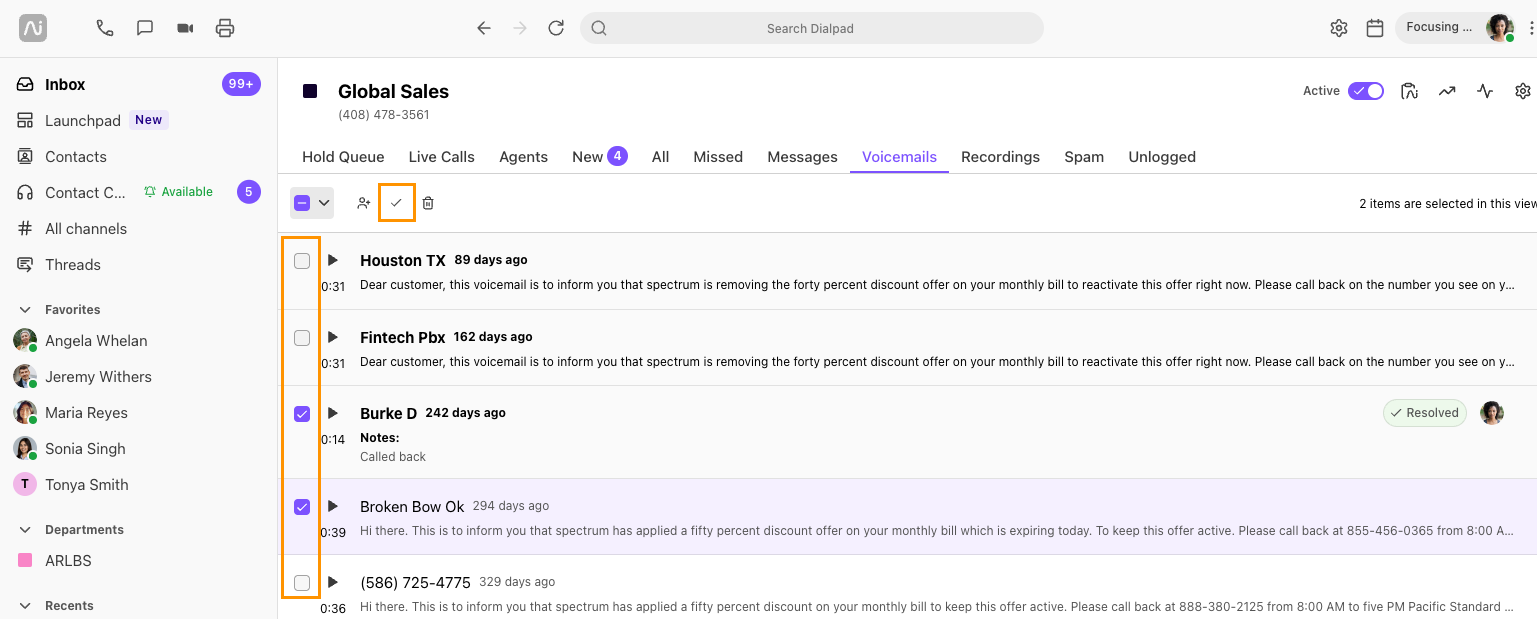
Enter resolution notes
Select Resolve all
Tip
If an agent resolves a voicemail assigned to someone else, the action will not affect the voicemails not assigned to them. The pop-up message will show a slightly different message.
Note
Unresolved voicemails will stay assigned to the original agent or supervisor and can then be either reassigned or resolved by a supervisor.
Unresolve multiple voicemails
Supervisors can unresolve voicemails assigned to other agents or supervisors. The voicemails will then automatically be reassigned to the supervisor.
Agents can only manage voicemails assigned to them.
To unresolve multiple voicemails:
Navigate to your Contact Center or Department
Select Voicemails
Select the Voicemail tab
Check the boxes beside the voicemails you want to unresolve
Select Unresolve
.png)
Enter resolution notes
Select Unresolve all
Delete multiple voicemails
Looking to remove multiple irrelevant or outdated voicemails all at once? No problem.
Supervisors can delete multiple voicemails assigned to other agents and supervisors.
To delete multiple voicemails:
Navigate to your Contact Center or Department
Select Voicemails
Select the Voicemail tab
Check the boxes beside the voicemails you want to delete
Select Delete
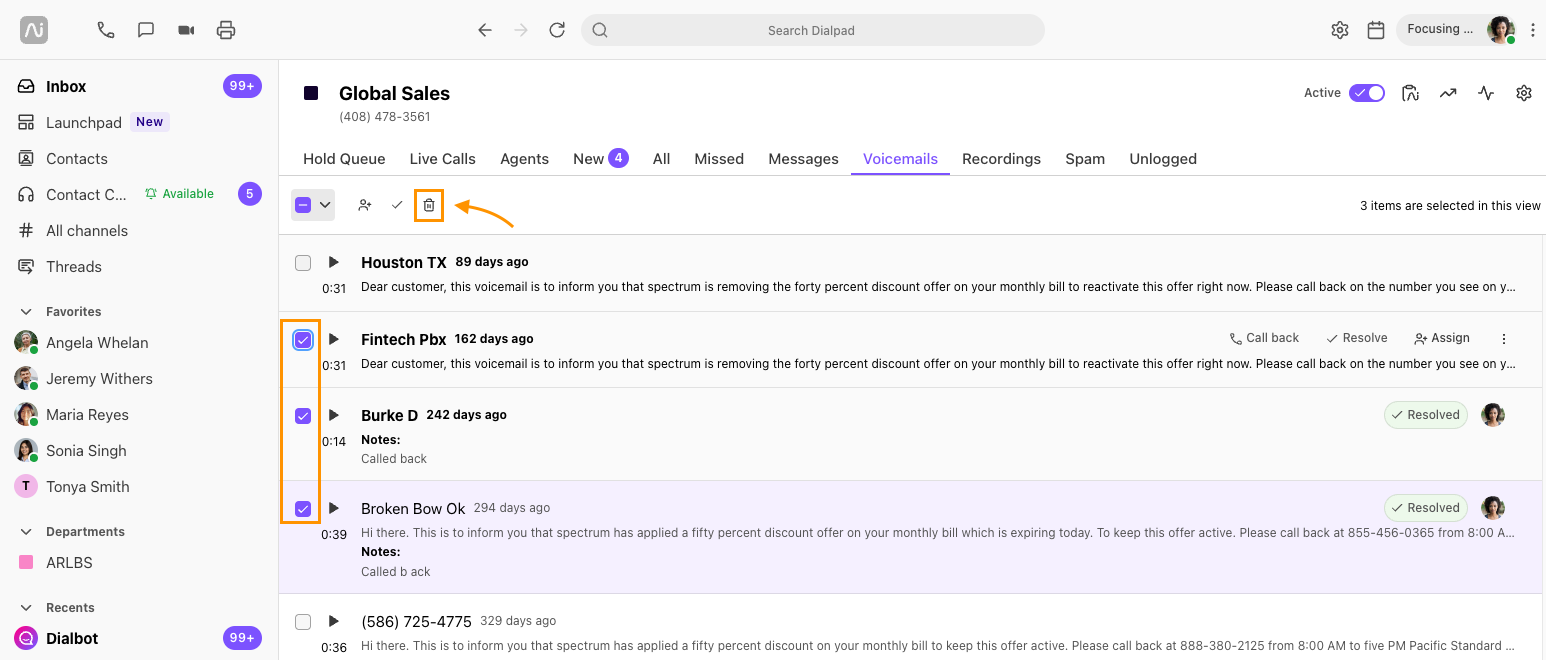
Select Delete all
Be careful — deleted voicemails cannot be recovered.
Note
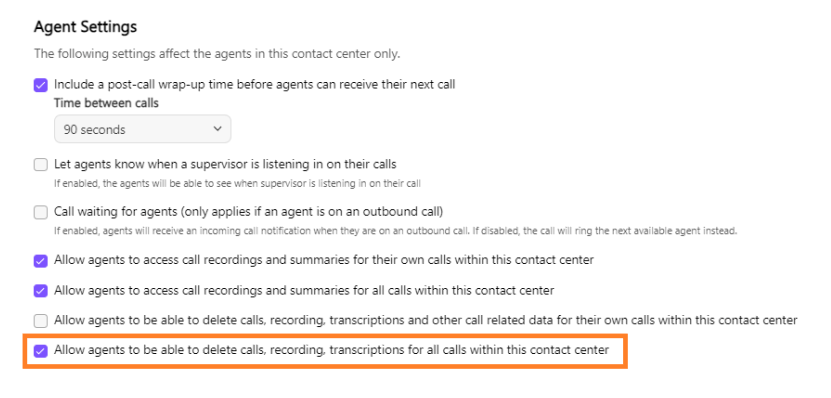
Agents can only delete voicemails if the option is enabled in the Contact Center Advanced Settings.
Frequently asked questions
Why don’t I see the Resolve button on my personal voicemails?
Voicemail management is only available for Contact Centers and Departments, not your personal voicemails.
Do assigned voicemails or resolution notes appear in analytics?
Not yet, however, we plan on adding Voicemail Management details to our analytics very soon. Stay tuned!
