The Dialpad for Salesforce integration brings smarter workflows, increased call efficiency, and better customer interactions to Salesforce—so your teams can focus on driving more sales and closing deals faster.
Let's dive into the details of this integration.
Who can use this
The Salesforce integration is free to install but requires an Dialpad Connect, Dialpad Support or Dialpad Sell license.
Dialpad for Salesforce is compatible with both Service and Sales Cloud.
Connect Salesforce
First things first, your Company Admin must enable the Salesforce integration.
Navigate to your Dialpad Admin Settings.
Select My Company
Select Integrations
Navigate to Salesforce
Select Options
.png)
Select Manage Settings
Go to Enablement details, then check Enable this feature
.png)
Select Save changes
For information on Custom Objects, read this Help Center article.
Once Salesforce has been enabled for your company, your Salesforce Admin will need to connect their Salesforce account from the Dialpad app. .png)
Contact matching
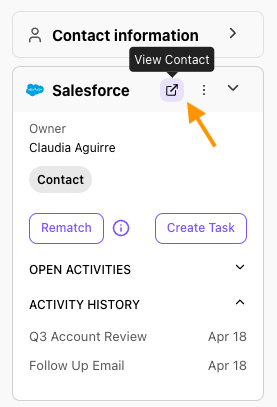
Once you’ve connected your Salesforce account, any time a Salesforce contact matches the Dialpad contact, you'll see their Salesforce details in the Salesforce widget on the right-hand sidebar.
.png)
Here, you'll see who owns the Salesforce record, open activities, their activity history (completed tasks), and opportunity stage (if applicable).
To view the contact in Salesforce, select View Contact.
Let's go over common contact matching scenarios.
Create a contact
New Salesforce contacts can be created from Dialpad at any time.
To create a contact from the Dialpad app:
Open a one-on-one conversation
Open the right-sidebar
Select the contact's name, or
Select the skinny bar icon
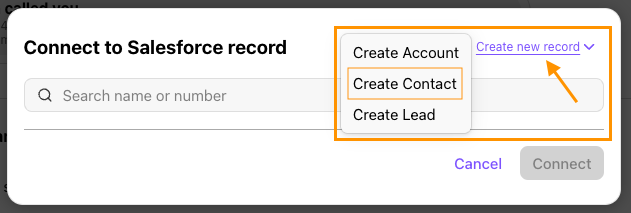
Open the Salesforce widget > Select Create/Connect to a record
.png)
Select Create new record
Select Create Contact
Enter the contact details
Select Save
Connect a contact
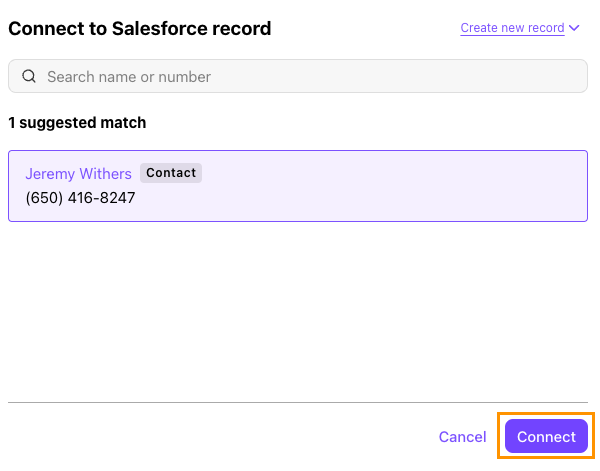
Connecting a Dialpad contact to an existing contact couldn't be easier! Dialpad searches Salesforce for contacts that match either the phone number, email, or contact name of the Dialpad contact.
To connect a Dialpad contact to a Salesforce contact:
Open the Salesforce widget
Select Create/Connect to a record
.png)
Select the matching record
Select Connect
Multiple contact match
If multiple Salesforce contacts are found, your Dialpad will not automatically be matched to a Salesforce record — you'll need to assign it to the correct one.
From the Salesforce widget:
Select Create/Connect to a record
.png)
Select the correct contact
Select Connect
.png)
Note
If none of the listed contacts are correct, you can also use the search bar to find a different contact, or select Create new record to create a new contact.
Rematch a contact
Need to change the matched contact? No problem!
To rematch a contact:
Open the Salesforce widget
Select Rematch
.png)
Enter the name or phone number of the contact
Select Enter
Select the desired contact
Select Connect
Log a Task
No need to switch between Dialpad and Salesforce, you can log Tasks right from the Dialpad app.
Tasks are logged as open activities and can be created before or after a call (but not during).
To log a Task from the Dialpad app:
Select the Salesforce widget
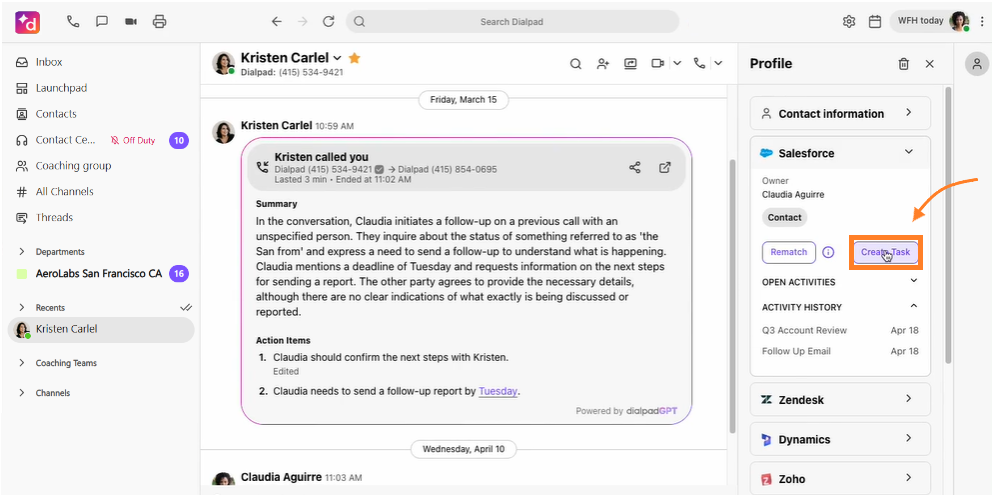
Click Create Task
Enter a subject
Enter the Task details
Select Save Activity
.png)
Your new activity will now appear in the Open Activities section.
Note
Call Tasks are created in Salesforce, not Dialpad. As Dialpad does not keep these records, we cannot backfill previous calls.
Log a note
Notes, also known as Completed Activities, can also be created from the Dialpad app, and are logged during a live call.
From the Dialpad app:
Navigate to the conversation
Open the Salesforce widget
Enter the note details
Select Save activity
.png)
Dialpad for Salesforce on mobile
You can also view Salesforce activities on your mobile device.
From your Contact's profile page, navigate to the Salesforce section.
Here, you'll see any open and past activities.To log a new activity, select the + icon.
If you enter notes during a call, we'll automatically log them as closed activities.
Log a call
As long as you’ve matched the right contact in Dialpad to Salesforce, all active inbound and outbound calls will automatically log in Salesforce as completed activities.
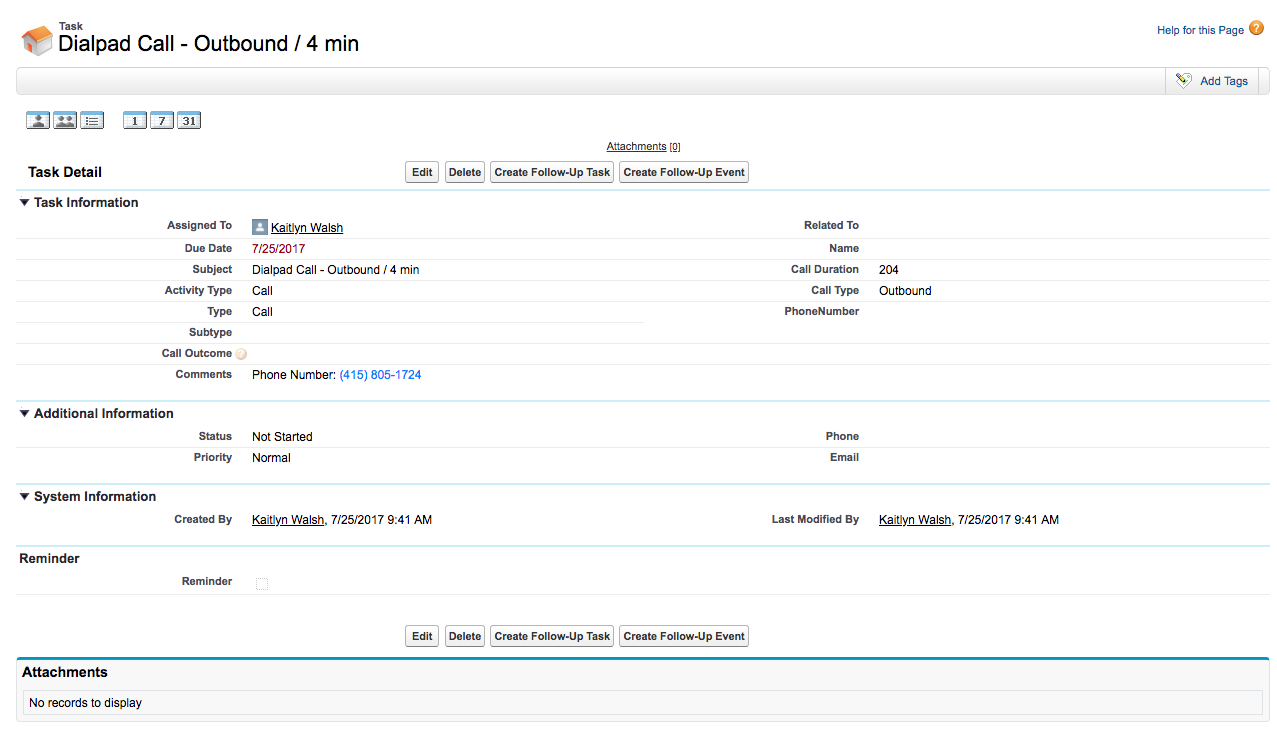
The activity will be listed with the default title Dialpad Call and basic call info (call duration, call type).
Record a call or leave a voicemail in Dialpad and we'll automatically log it back to the associated record in Salesforce.
Notes
If you receive a call from a Dialpad user in your company, the call will not log to your Salesforce.
Calls placed via desk phones will still automatically log as long as there is a contact match. If multiple contacts are found, you'll need to select the contact before the call is logged.
Call Tasks are created in Salesforce, not Dialpad. As Dialpad does not keep these records, we cannot backfill previous calls.
Log a missed call
Automatically log missed calls and voicemails to a Salesforce user or queue tied to your contact center, department, or main office line.
There are 2 ways to log missed calls in Salesforce:
Salesforce user: Log missed calls to a specific user
Salesforce queue: Log missed calls to a specific shared line
To enable missed call logging in Salesforce, head to Dialpad Admin Settings.
Navigate to departments or contact centers > Select the desired department or contact center
Select Integrations > Options

Select Manage Settings > Navigate to Activity logging and linking
Select Log missed calls as activities
Select Salesforce user
Select Salesforce queue
Save changes

Missed calls will follow the call activity setting you’ve chosen for Salesforce calls.
Activity history
Under Activity History, completed tasks will include:
Assigned To: The Dialpad user who received/placed the call.
Subject: Dialpad Call, inbound/outbound, and call duration.
Call Type: The Record's call direction.
Call Duration: The Record's call duration (in seconds).
Start Date/Due Date: The date the call was received/made.
Note
We do not currently log against Type.
To view all activities in Salesforce, select Show all activities in the Activity History section.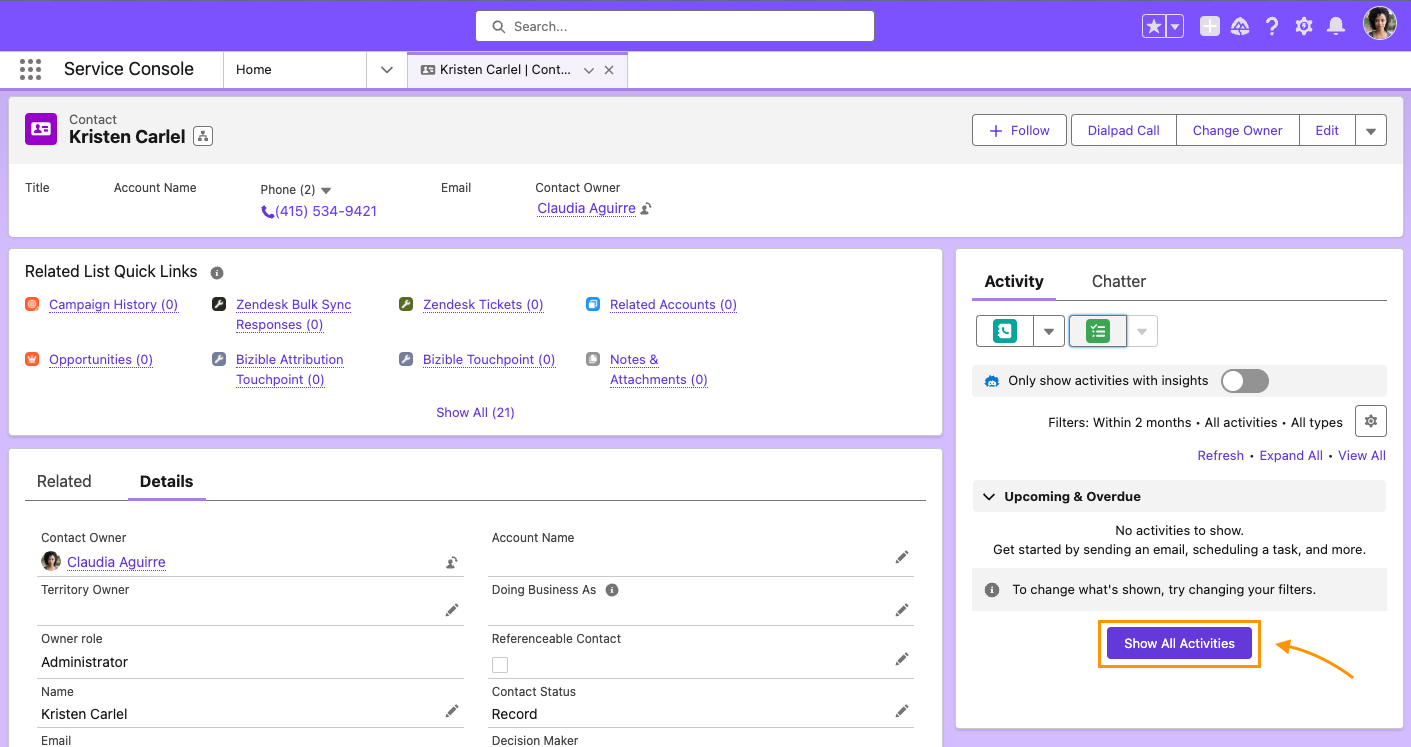 Make sure you have the latest version of our package installed in your Salesforce instance before you click on the hyperlink.
Use the following links to install a Salesforce production or Sandbox package.
Questions?
Read our Dialpad for Salesforce FAQs for more information.