Dialpad's cloud-based phone system lets you stay connected in real-time across all your existing devices, including those that run Android.
If you haven't already done so, download the Dialpad for Android app from the Google Play Store.
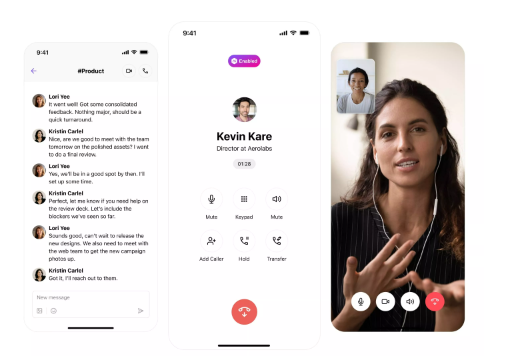
Let's set you up to use your Dialpad Android App.
Note
Make sure you're using the most recent version of the Dialpad app so that you can enjoy all of our robust mobile features.
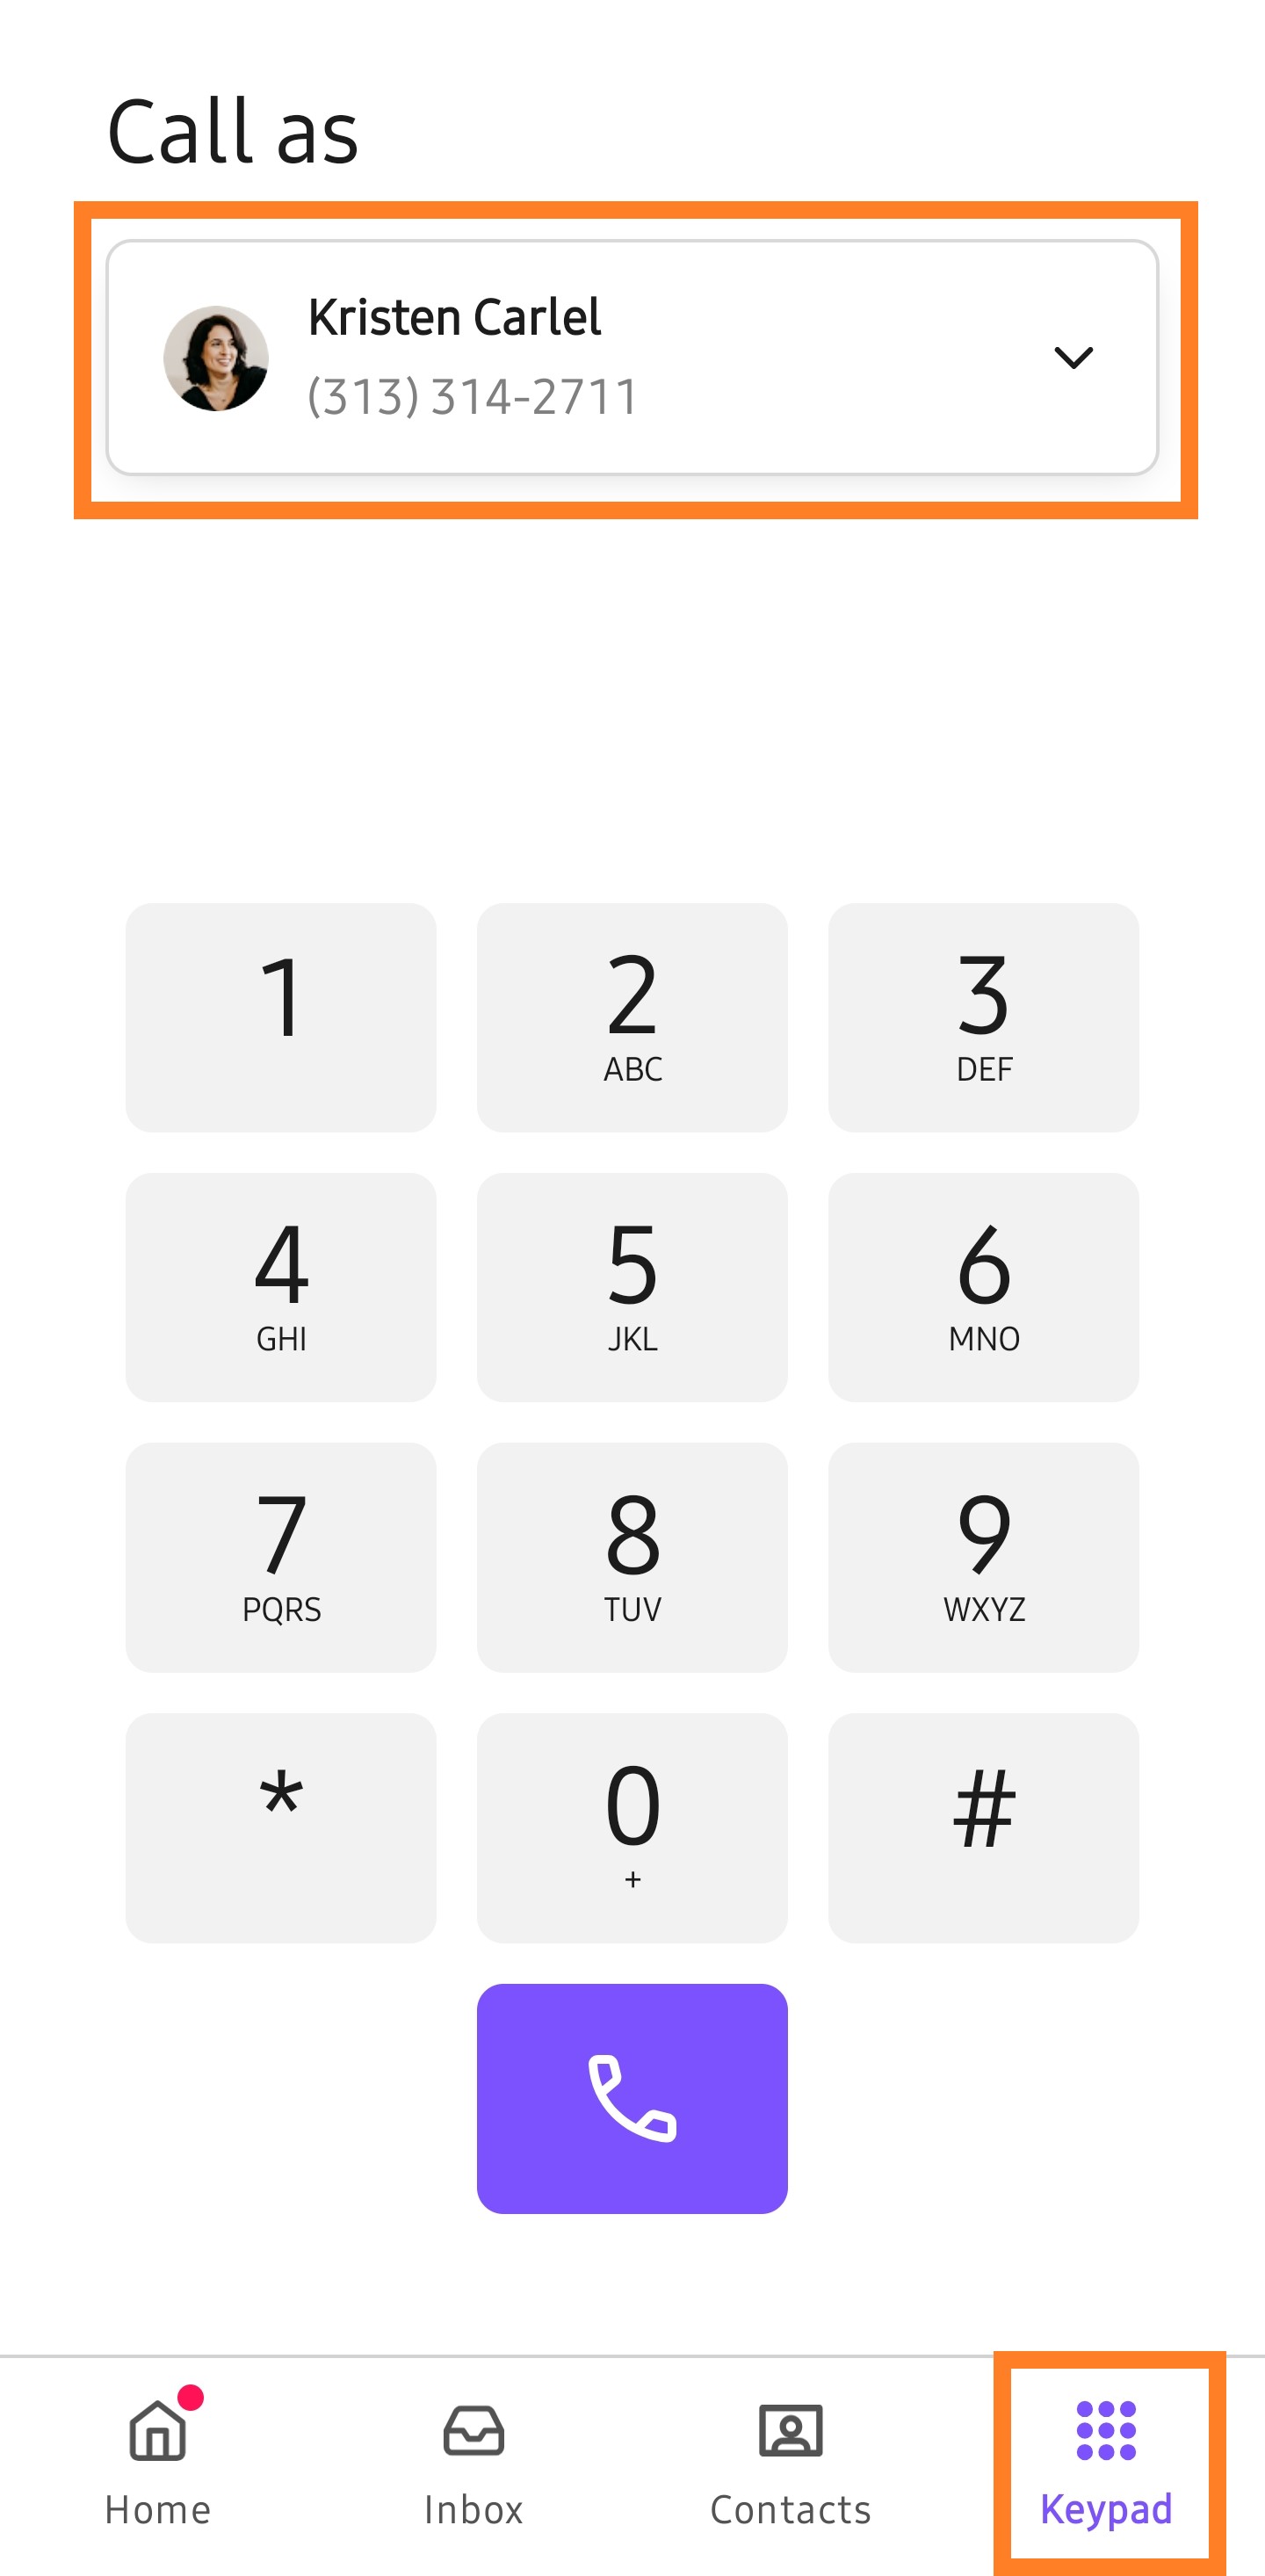
Place a call
To place a call:
Select the Keypad from the bottom menu
Enter the phone number, or select the contact’s name
Select the Phone icon
Go to Call As dropdown to select another number.
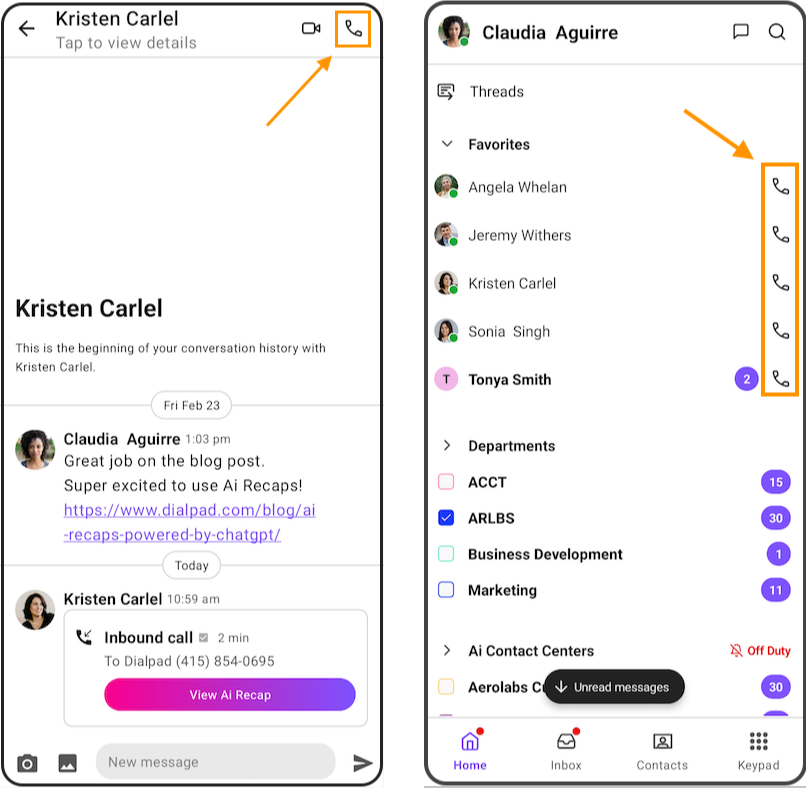
You can also start a call by selecting the Phone icon beside a contact’s name in the conversation thread, or in your inbox.
Receive a call
To answer a Dialpad call, select Answer from the pop-up notification.
If you can't take the call, select Decline.

Record a call
To record a call from your Android device, select the More button during your call.
Beside Audio Recording, toggle the slider on or off.
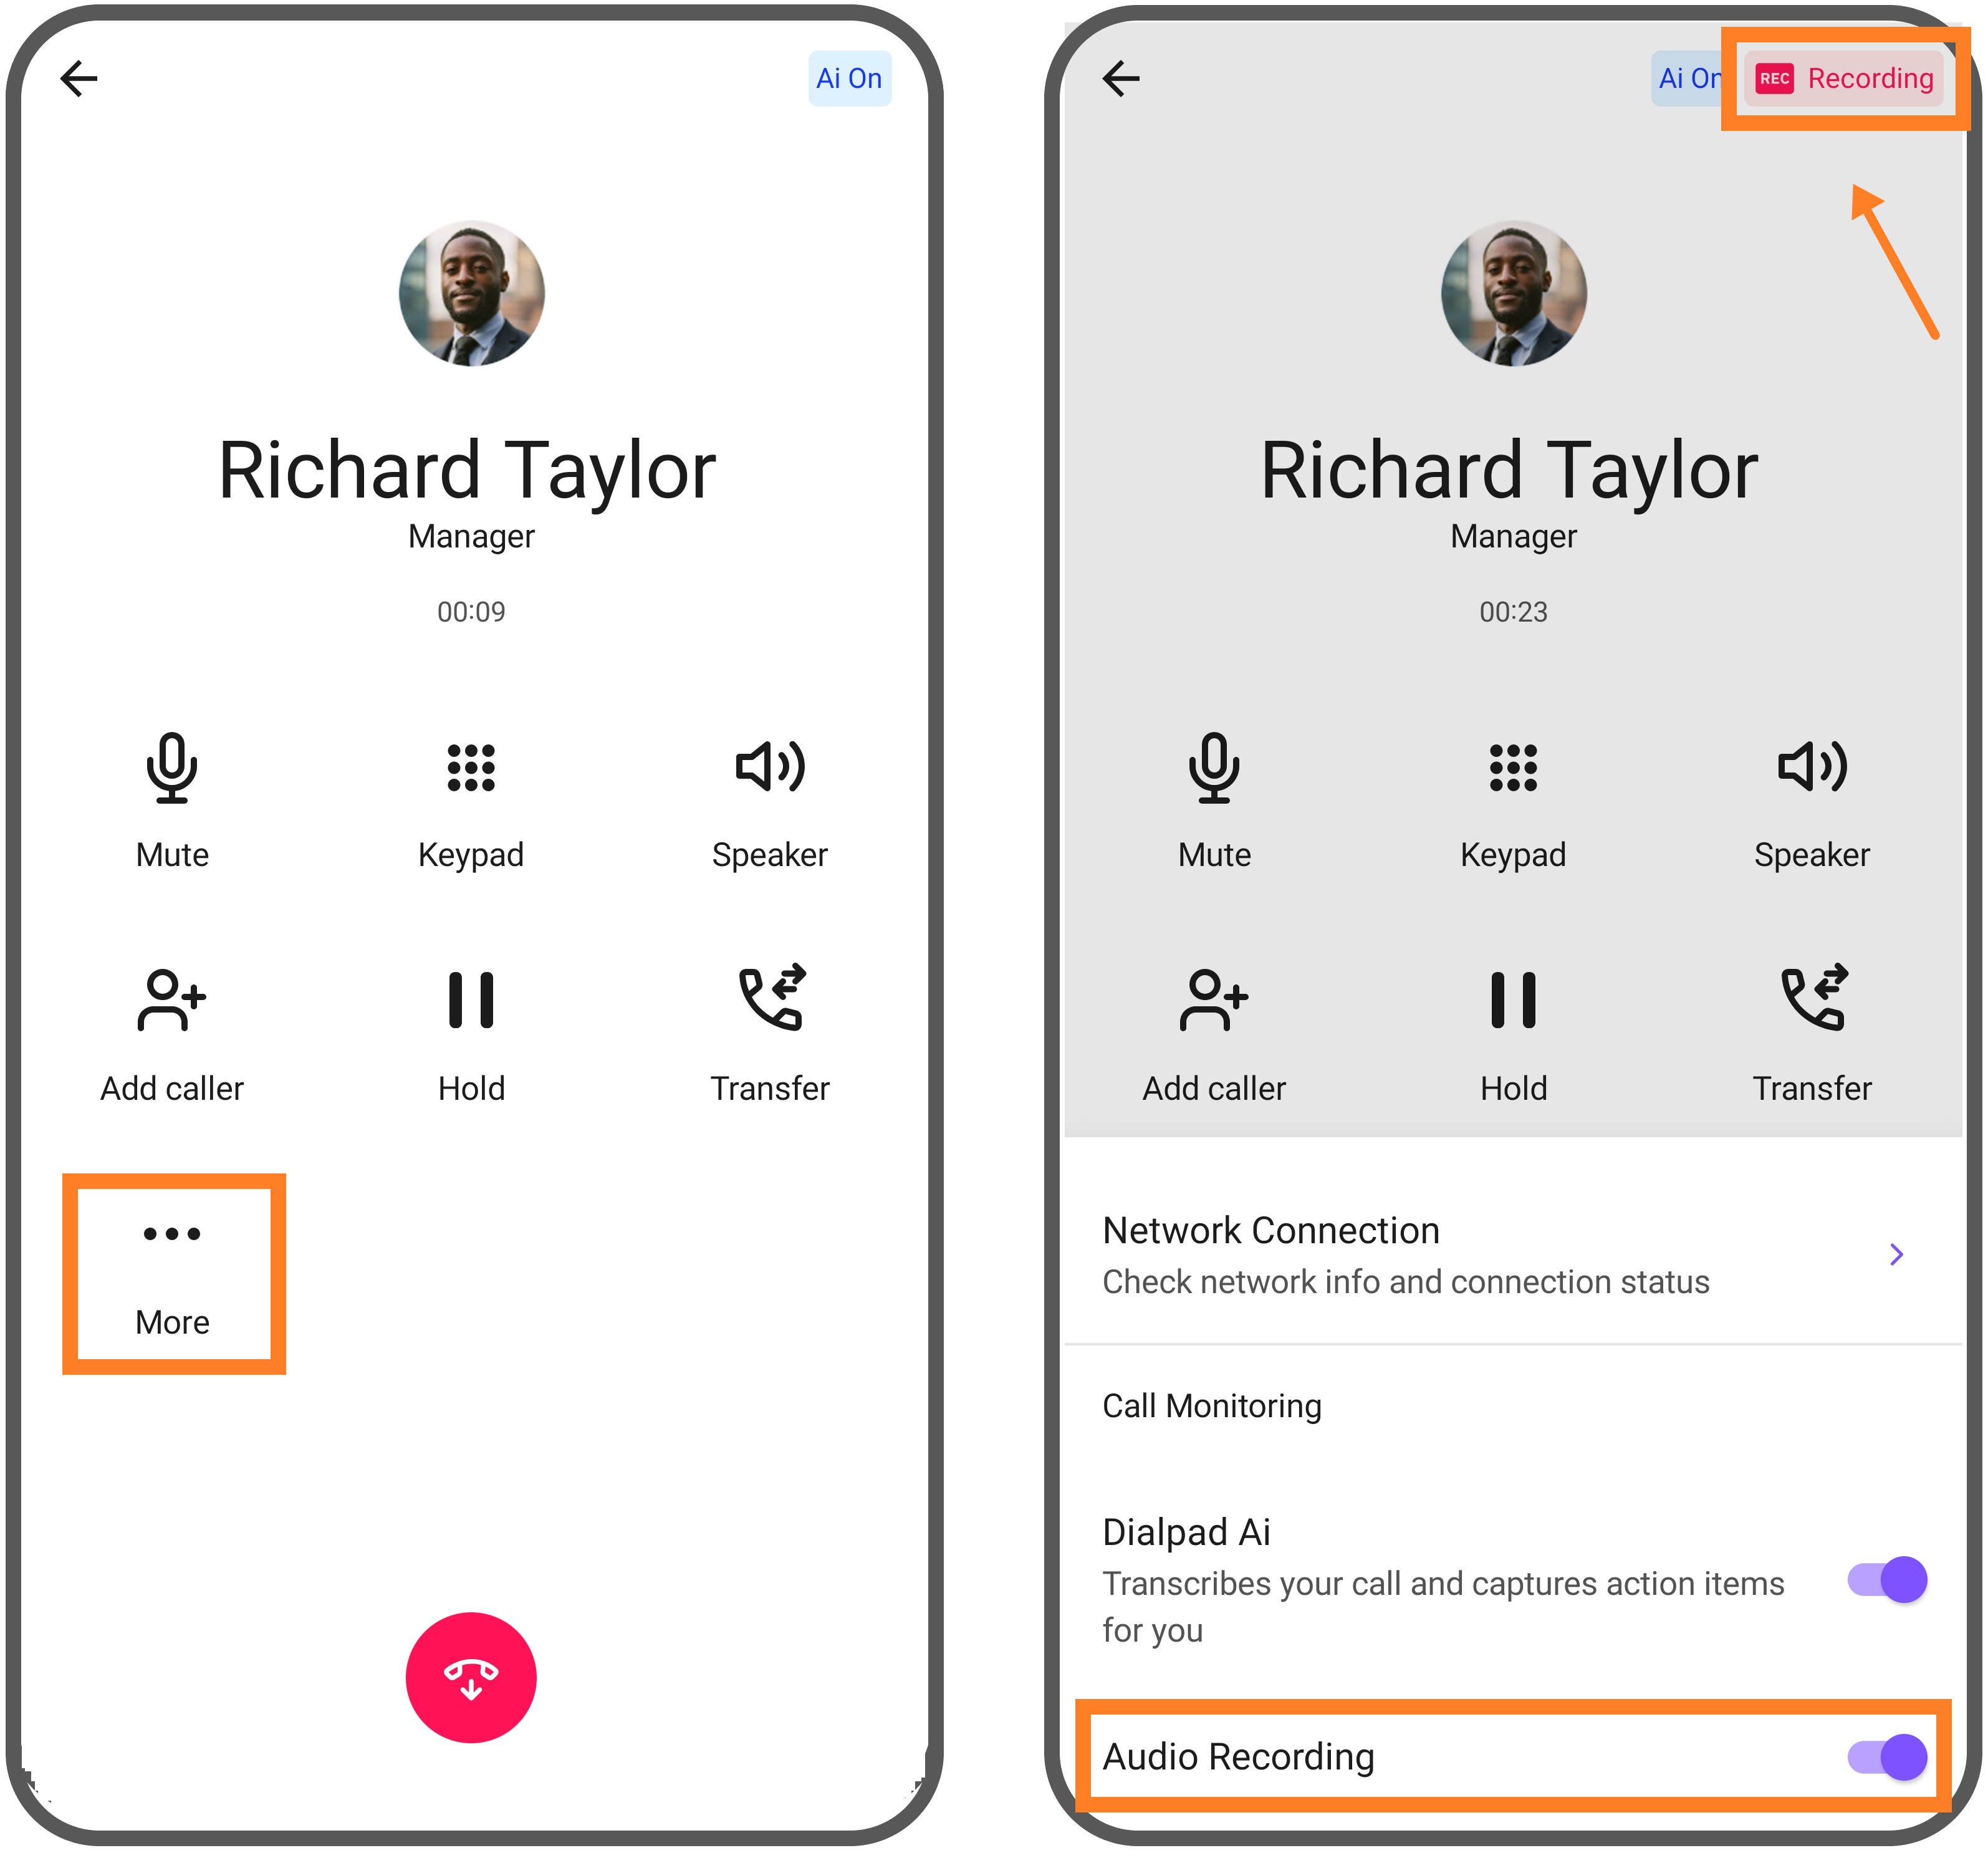
Callers will be notified when call recording has been turned on.
When the call is being recorded, you’ll see a red ‘Recording’ banner on the top right of your screen.
Transfer a call
To transfer a call:
Select Transfer
Enter the number or contact name
Choose the desired transfer type (warm, direct, or to voicemail or to hold queue)
.png)
Park a call
To park a call:
Select Transfer
Select the Main line or a department line to park your call
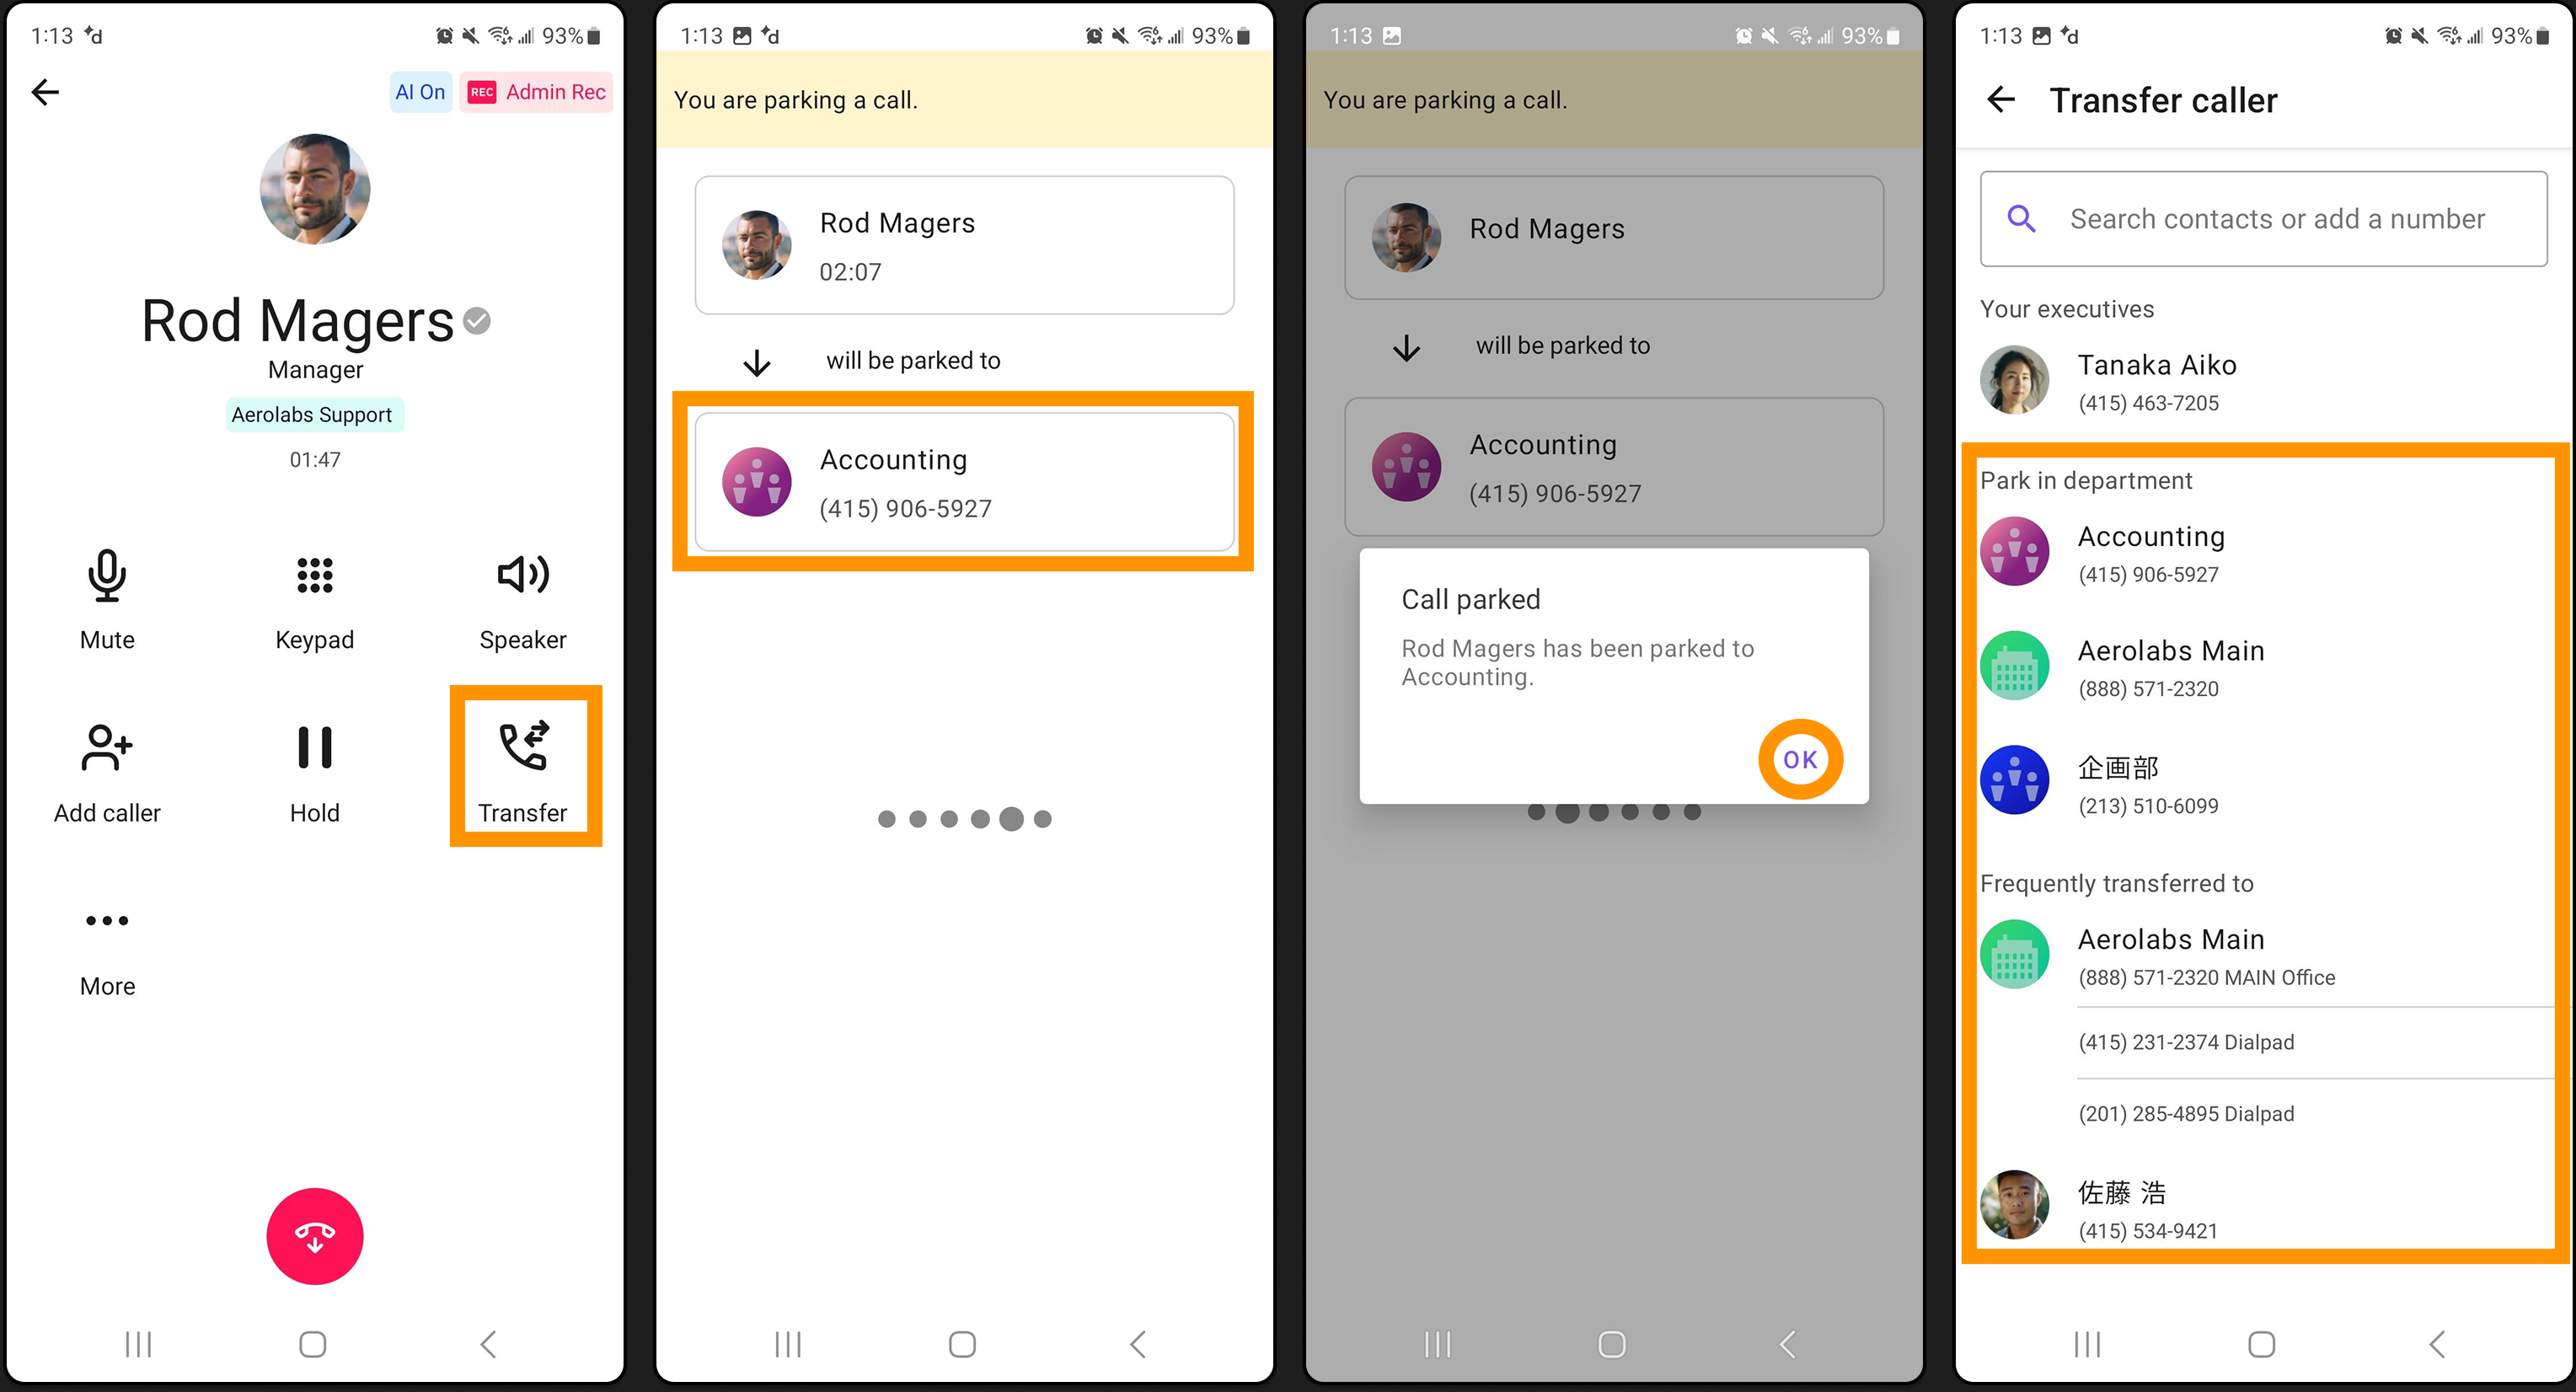
Access the parked call by going to your Main line or department inbox, where you'll find the caller's name or caller ID, along with details of who parked the call and the time it was parked.
You can select the call again to unpark it.
Add a caller
To add a caller, select Add caller from your active call.
Enter the phone number or choose the contact
Select Add caller
.png)
You can add up to 3 callers to an active call.
Call with Android Dialer
Decide whether your personal number or your Dialpad number is displayed when placing calls through your Android device's Phone app (native dialer).
By default, we'll use your personal, carrier-issued number.
To change your outbound caller ID number
Select your avatar
Select Calling preferences > Caller ID
.png)
Then, select the number you want to display when making an outbound call.
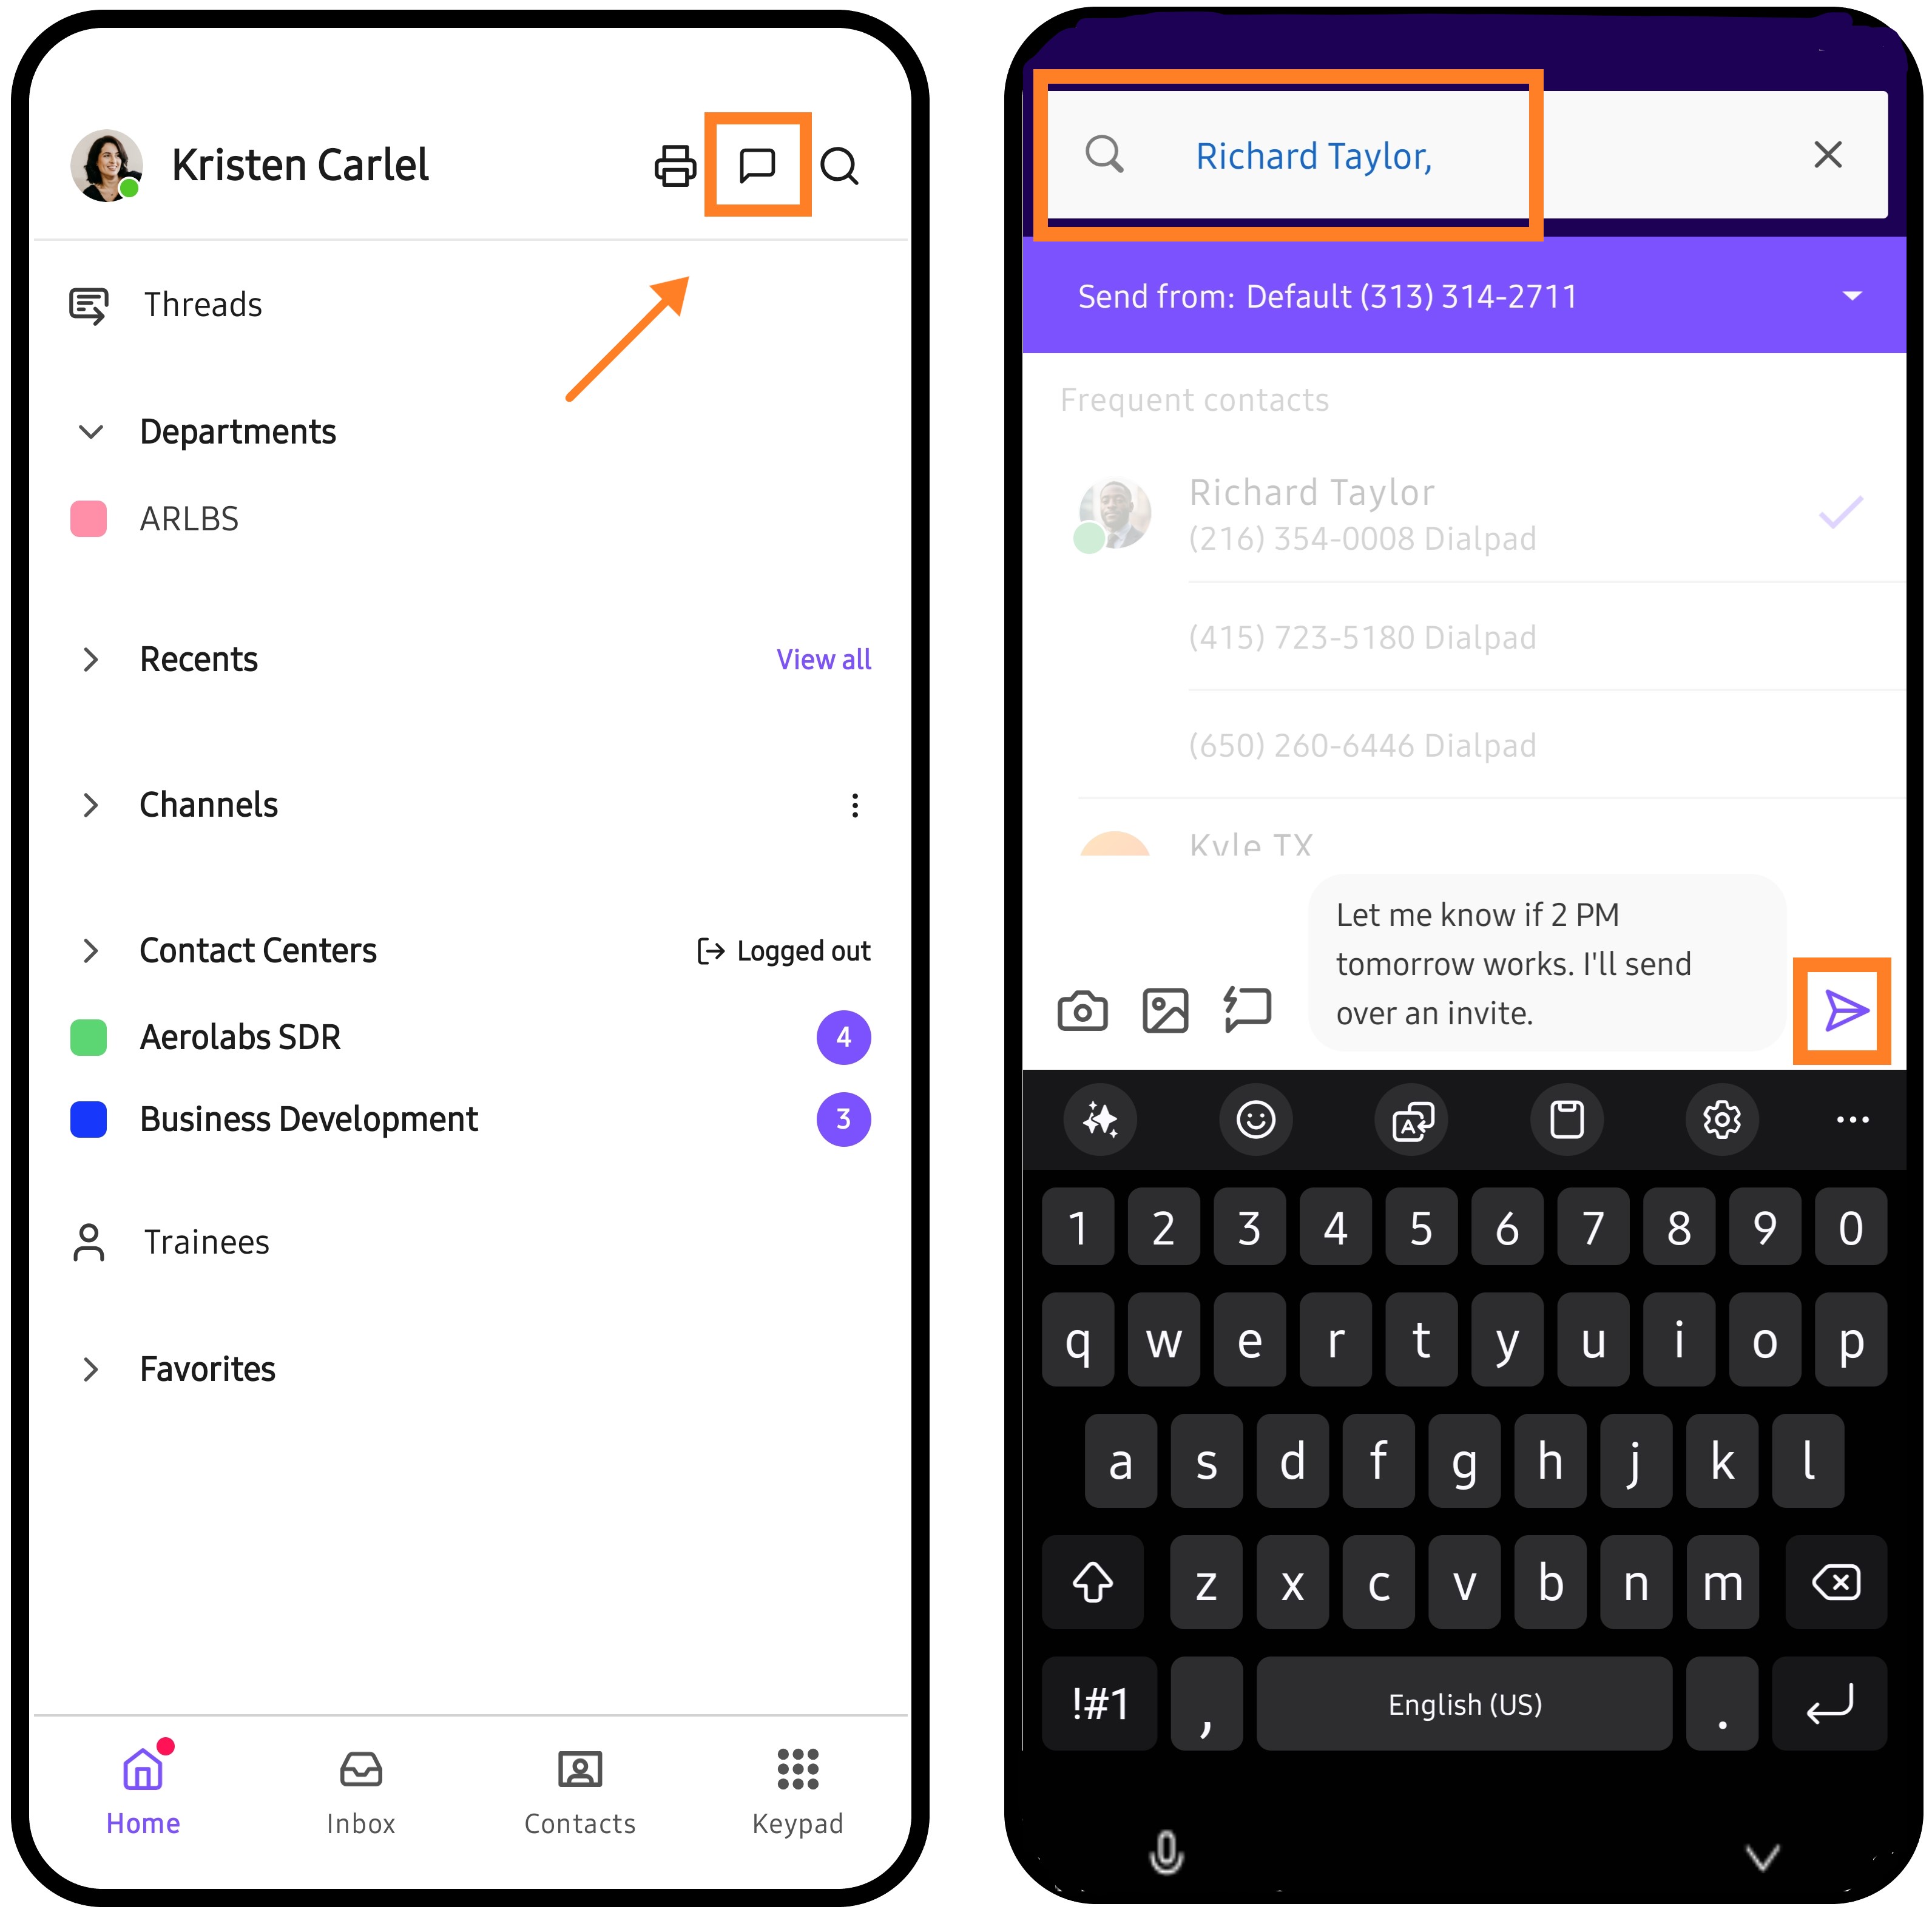
Send a message
To send a message from the Android app:
Navigate to the Home screen
Select the Message icon
Enter the contact's name or number
Select a contact
Write your message in the text box
Select the purple arrow to send the message
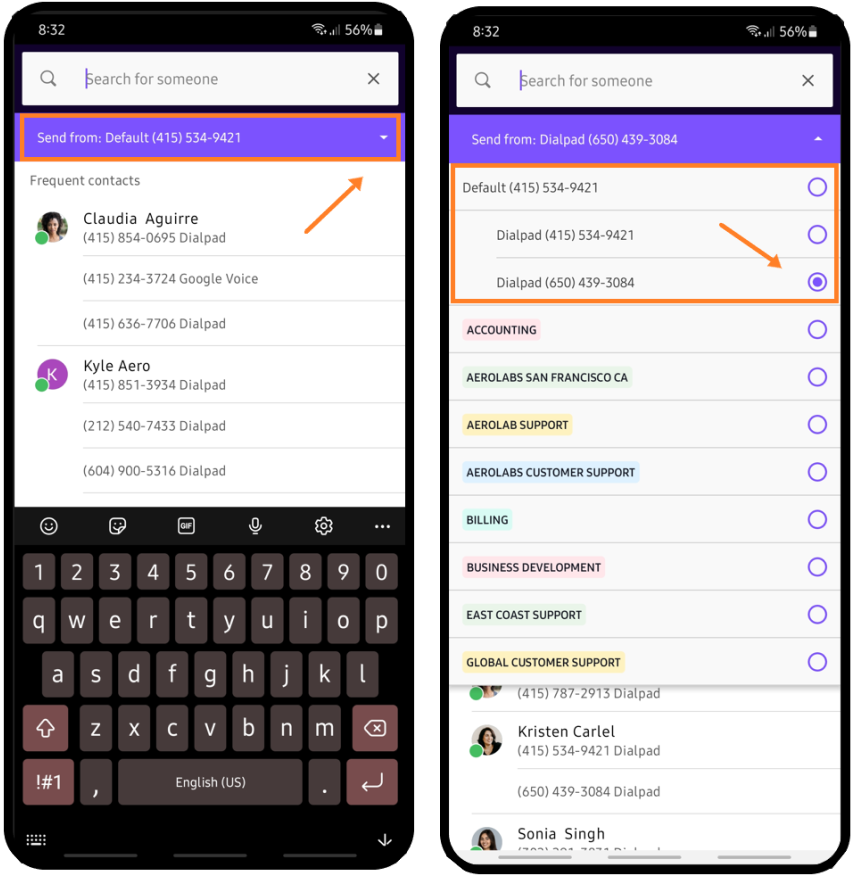
Tip
You can send a message with a secondary number by picking one from the drop-down icon next to the "Send From" number.
Personal Templates
You can search by keyword or by tags to find the right message fast.
Note
You can only use quick replies that are created in the Dialpad desktop or web app. You can’t add or modify quick replies on a mobile device.
To send a personal template on the Dialpad Android app:
Open any conversation and slide up from the bottom of the screen
Tap Templates
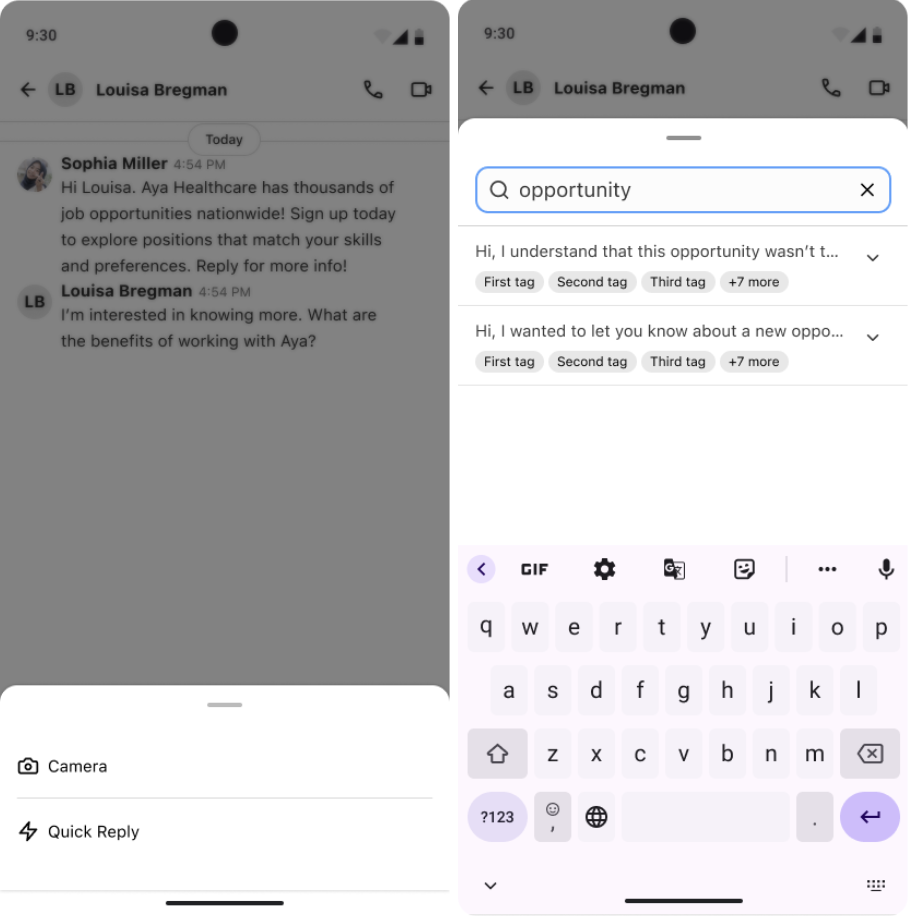
Search for and tap the quick reply you want to send
Tap Send
Receive a message
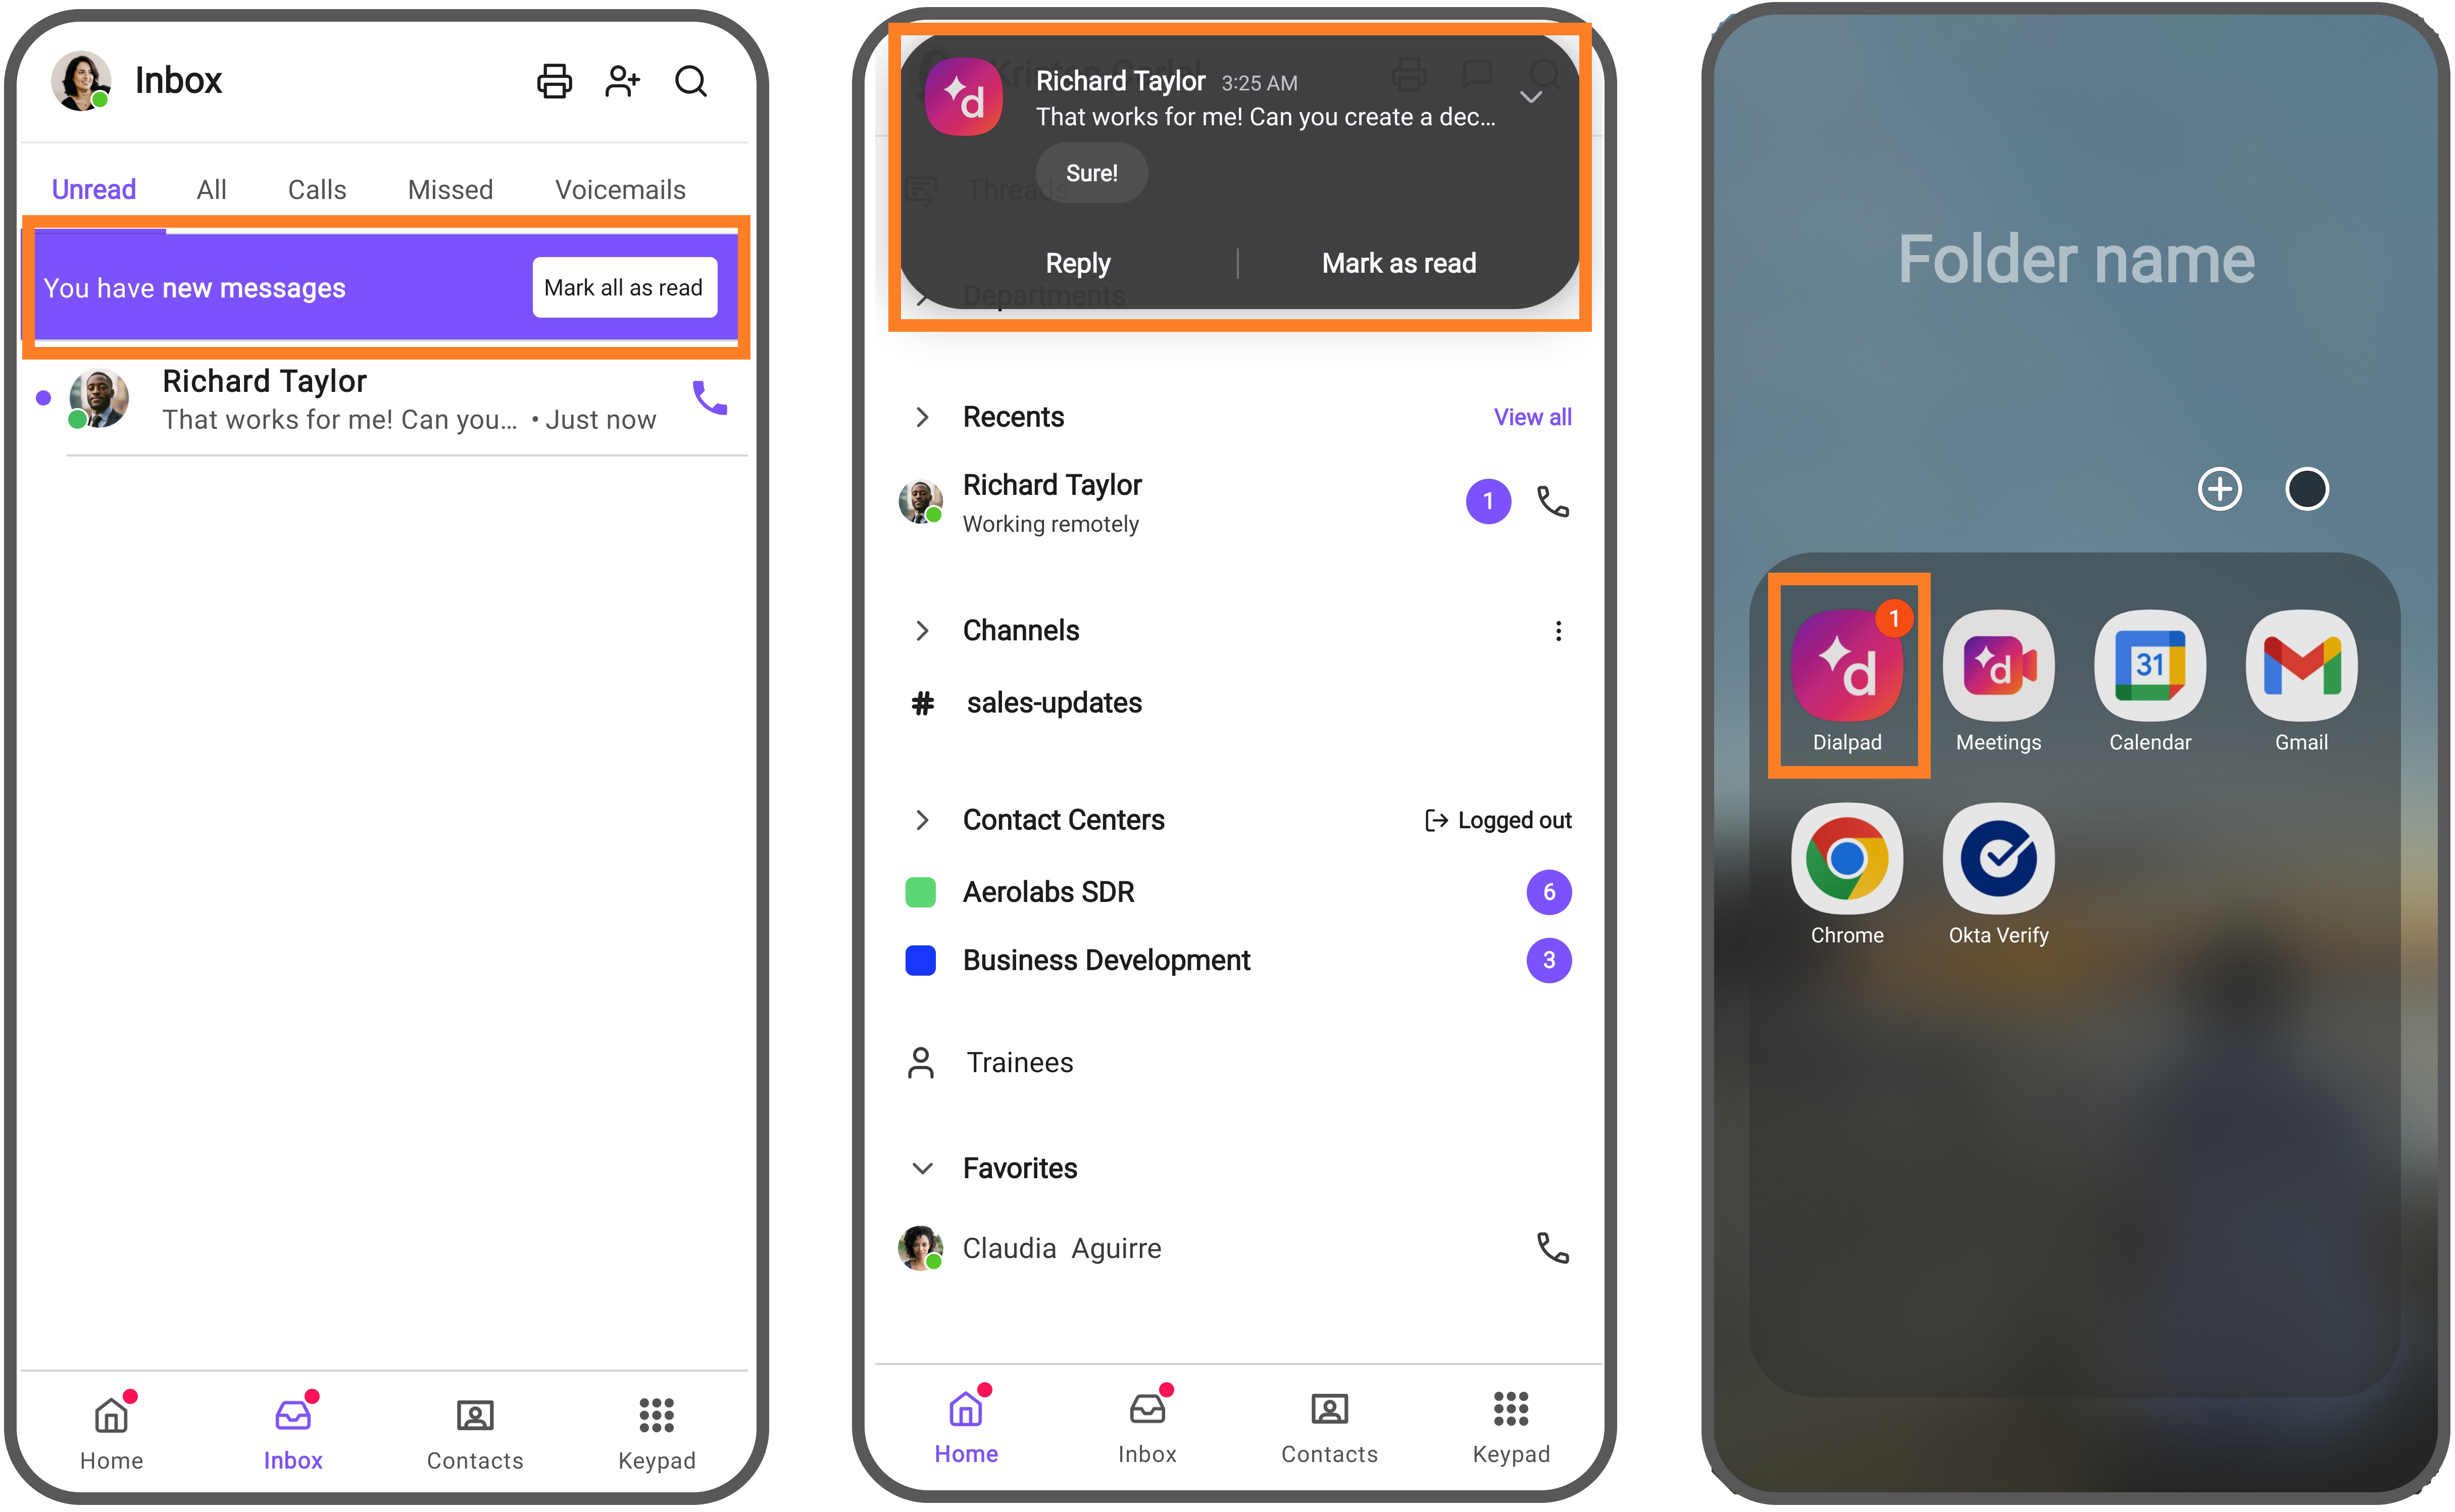
When you receive a message, you'll see notifications in three different forms:
In-App: In the Dialpad app, you'll see the contact’s name written in bold with a purple dot next to their profile picture. Additionally, a list of 'new events' will appear at the top and bottom of your screen.
Push Notification: If you’re not actively in the Dialpad app at the time you receive a message, you’ll see a push notification at the top of your device. You can mark the message as read, respond using a prompted quick reply, or reply directly from the notification.
Notification Badge: A small, colored dot will appear attached to the Dialpad app's icon on your home screen and in your app drawer.
Tap their name to open the conversation thread and write a message from the existing conversation.
Send a fax
To send a fax:
Navigate to your Home tab
Select the Fax icon
Choose a recipient
Navigate to Add document
Scan a document
Upload a file from your device
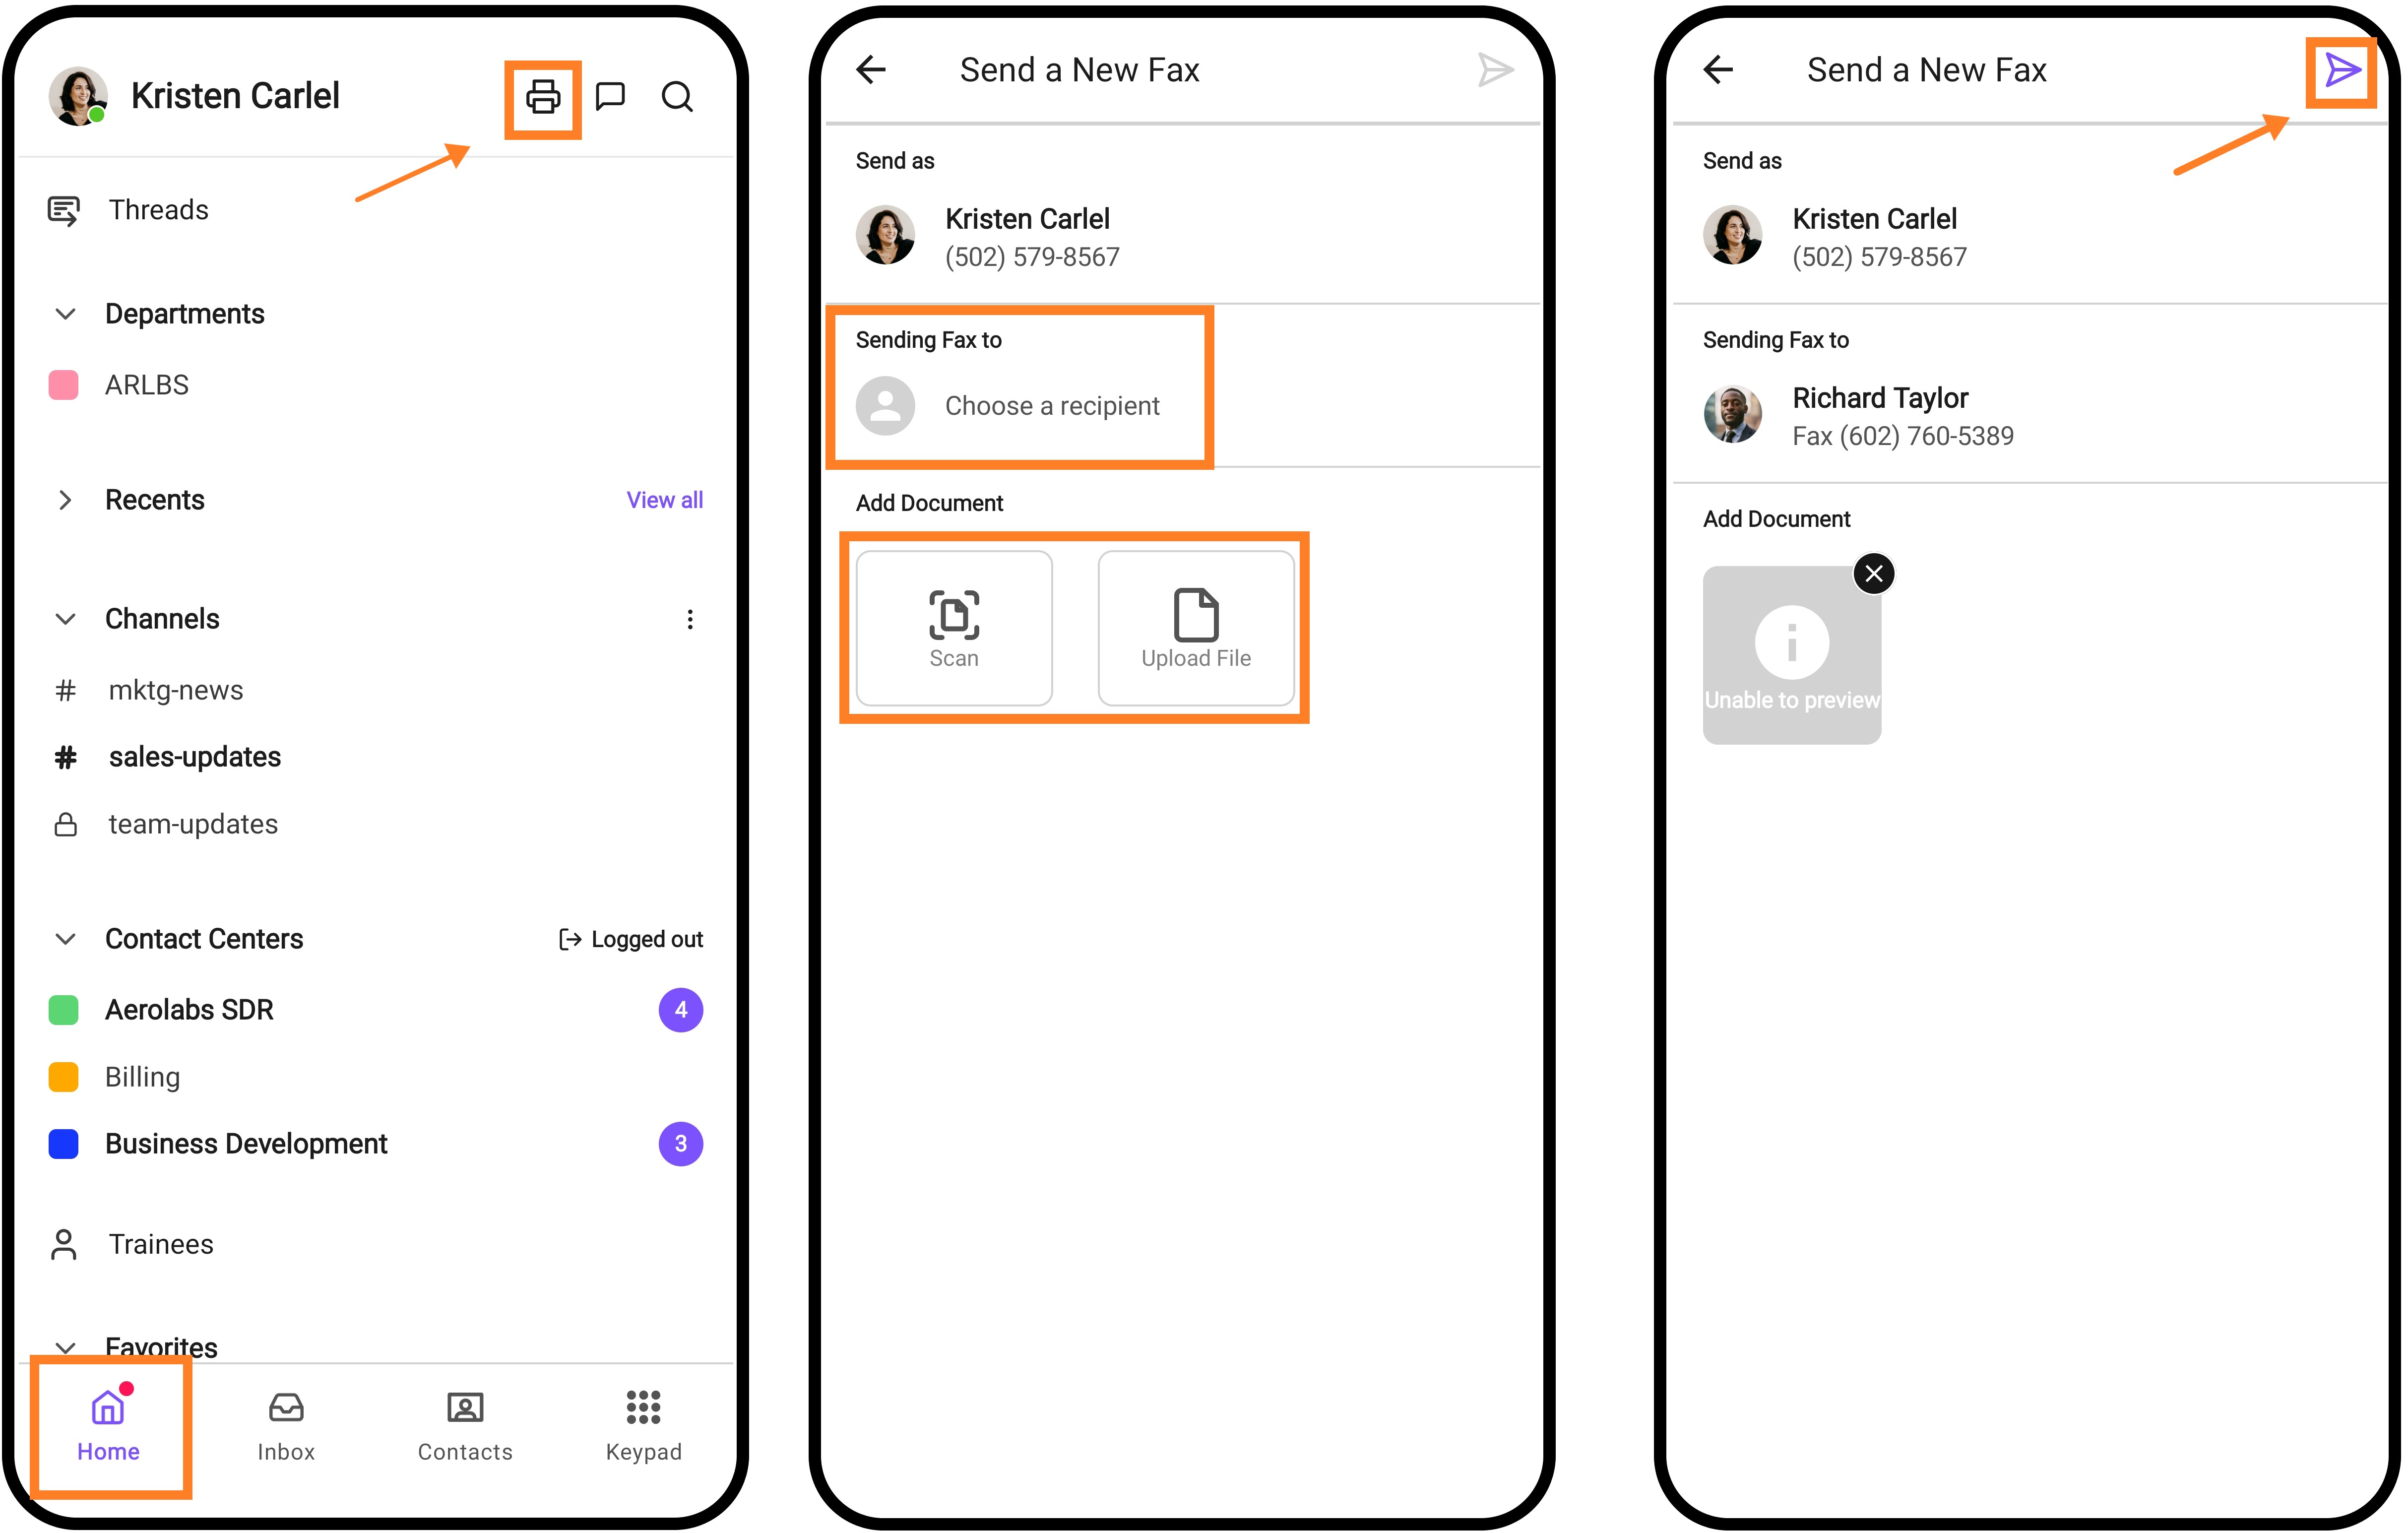
Select Send
Group messages
To send a group message:
Navigate to the Home tab
Tap New Message
Enter all contacts' names or numbers
Write your message in the text box
Tap the purple arrow to send
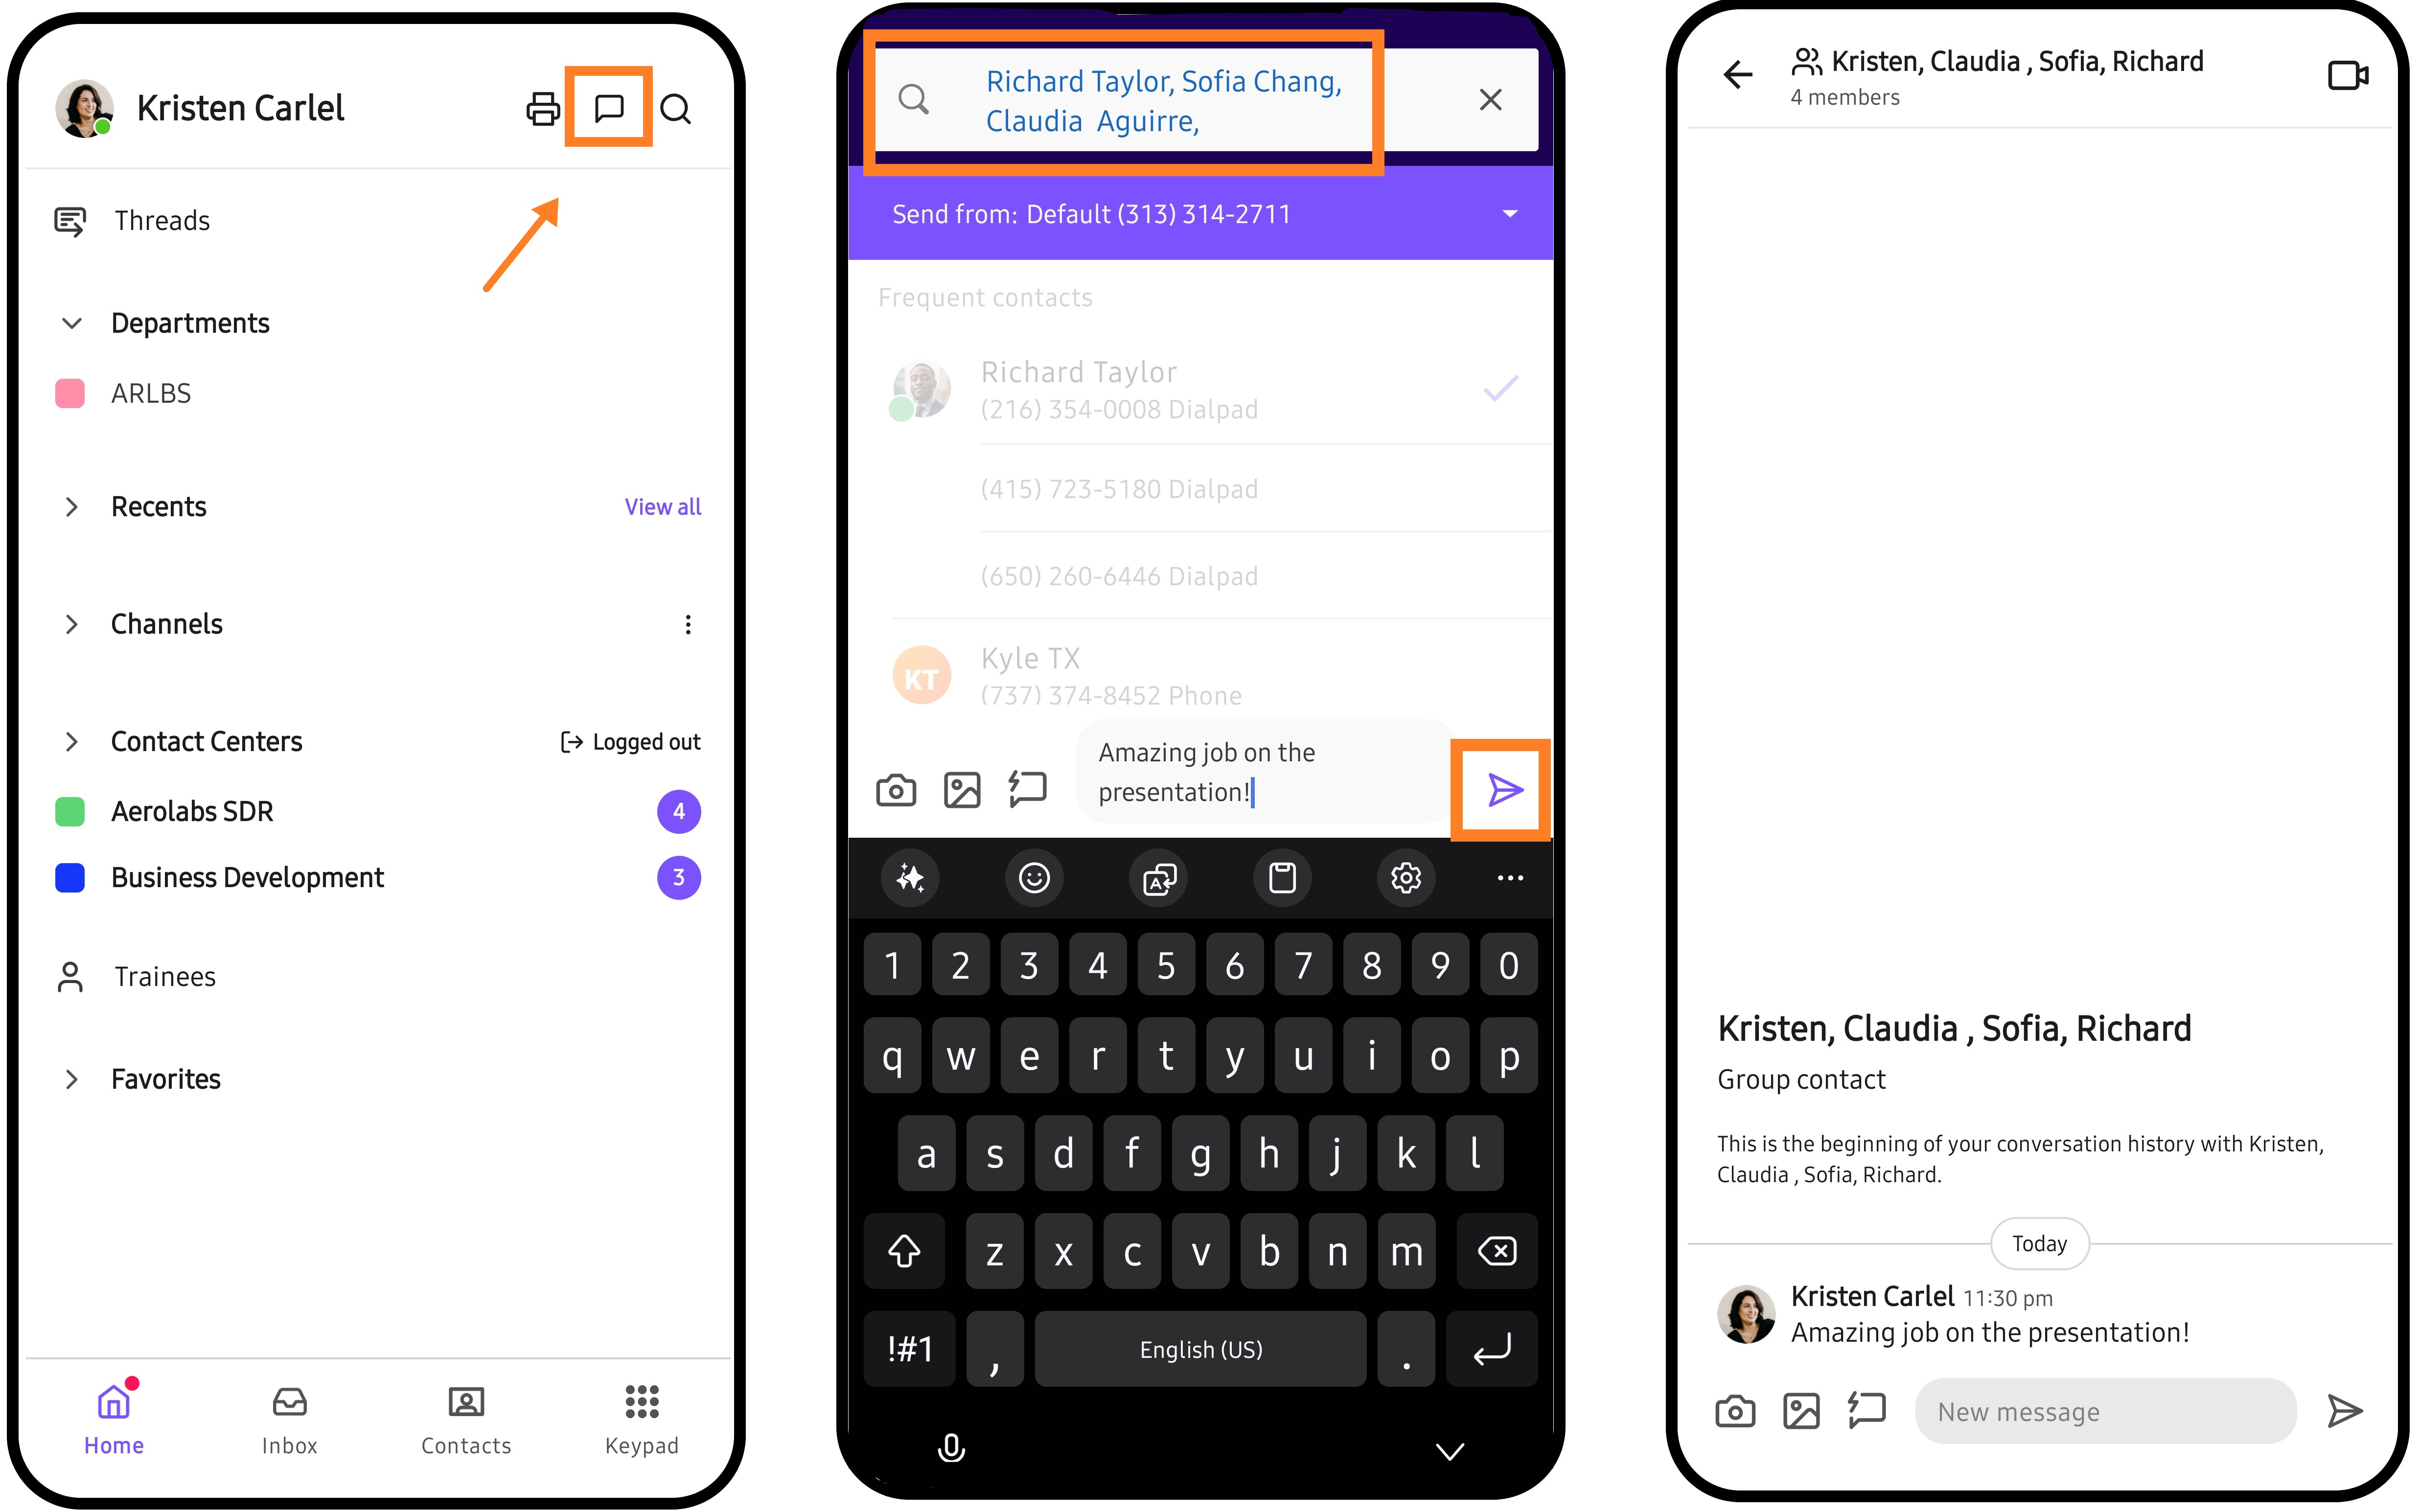
To view group message information, open the conversation thread and tap the names.
Here, you can easily see who is in your group message, and turn message notifications on or off..jpg)
From here you can also:
Tap the star icon to favorite the group chat
Tap the three dots beside someone’s name to view their profile, send them a private message, or call them directly.
Tap the 3 arrows on the top right corner and select Change name to rename the group.
Share from other apps
Want to share a location or a social media post? No problem, Dialpad works seamlessly with your favorite apps, allowing you to share external information via Dialpad.
To share content from an outside app:
Select Share
Select Dialpad
Select the contacts, group chats, or channels within the Dialpad app that you want to share with
Press the purple arrow to send
.png)
Check your inbox
Stay on top of your messages from your inbox. When you have new messages, you'll see the red badge beside the inbox icon.
To check your inbox, simply select Inbox from your bottom bar menu.
.png)
Slide left or right to view each of the different sections of your inbox. You'll see separate tabs for New Notifications, Calls, Missed Calls, Voicemails, Recordings, Messages, Faxes, Starred, and Spam.
Tap Mark all as read if you want to clear all unread messages in a tab.
Manage contacts
Dialpad offers easy contact management in our Android app.
Select Contacts on the bottom bar menu to access your recent, favorite, and shared contacts, as well as easy access to your group chats.
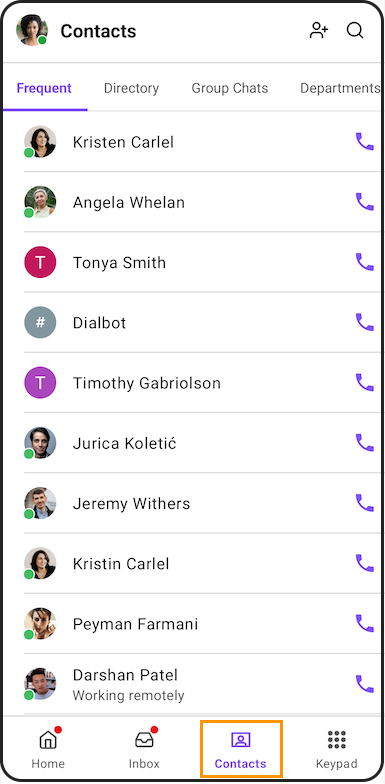
Let's go over some common contact actions.
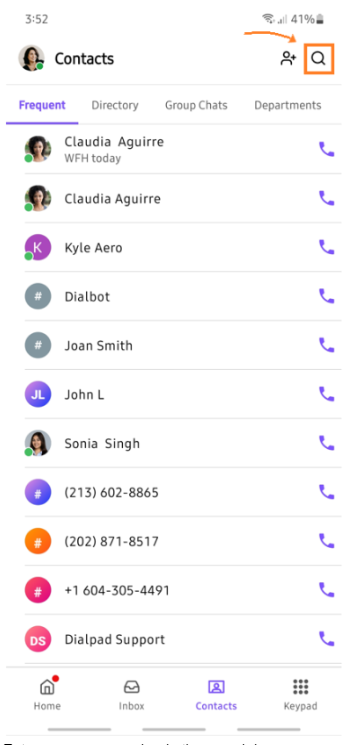
Search for a contact
To search for a contact:
Select the Home or Contacts page of your app
Tap Search (that's the magnifying glass)
Enter a name or number in the search bar
.png)
When you select a contact, the conversation thread will open. You're then able to send a message, call, or view their profile.
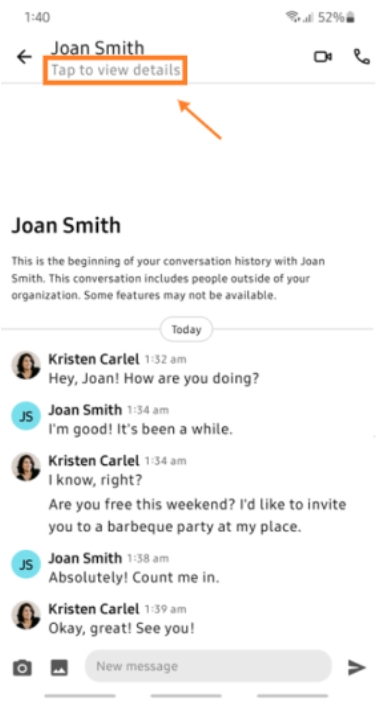
Favorite a contact
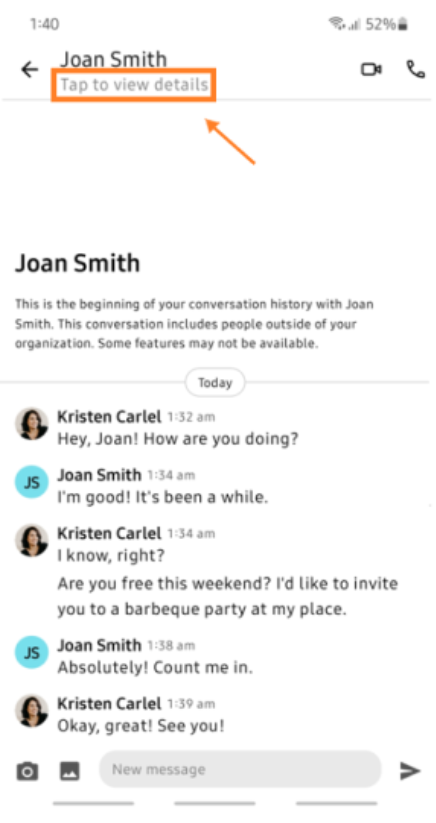
To favorite a contact, open a conversation thread:
Select Tap to view details below the contact's name
Select the star icon

That's it! Your contact will now appear in the Favorites section in the Home tab.
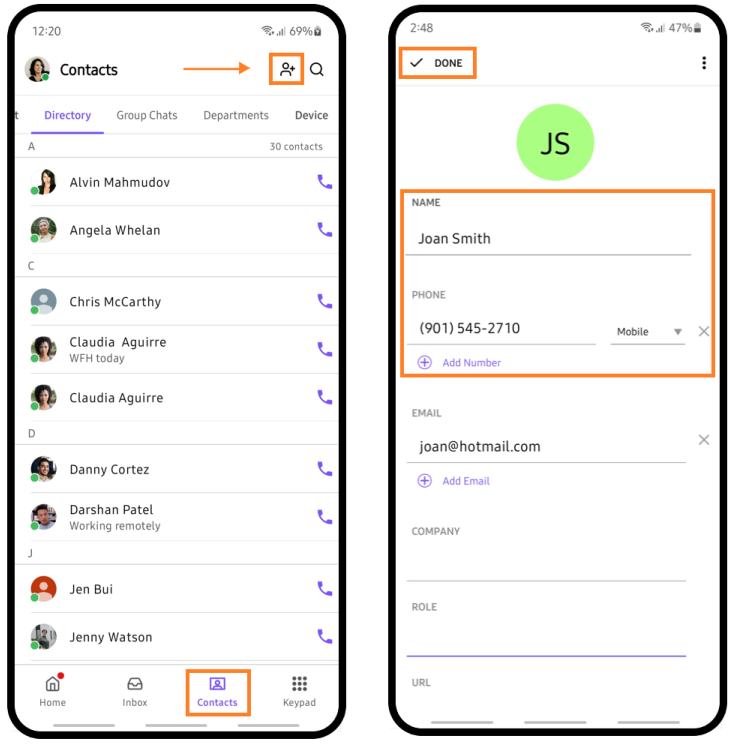
Add new contact
To add a contact:
Tap Contacts
Tap Add Contact
Enter the contact details
Tap Done
You can also add unsaved numbers as new contacts. Open the conversation thread with an unsaved number and select New Contact or Add to Existing.
View a contact profile
To view a contact profile:
Open the conversation
Tap Tap to view details
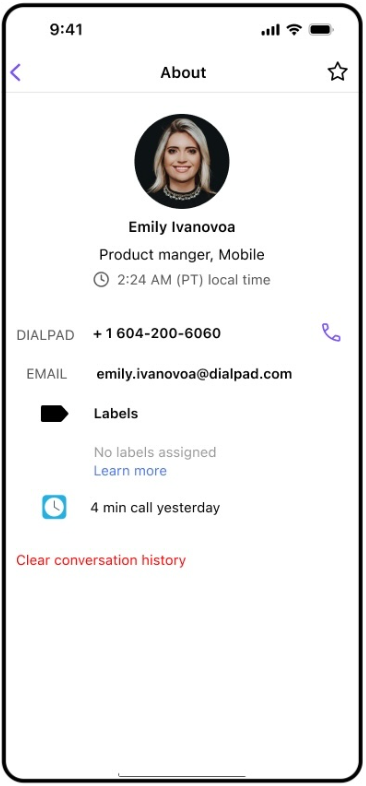
The contact profile page displays the contact details, any associated tags and information from active integrations.
Access device contacts
Easily communicate with people you know by using the contact list on your device.
To access your phone contacts, go to the Dialpad mobile app
Navigate to Contacts
.png)
Select the Device tab
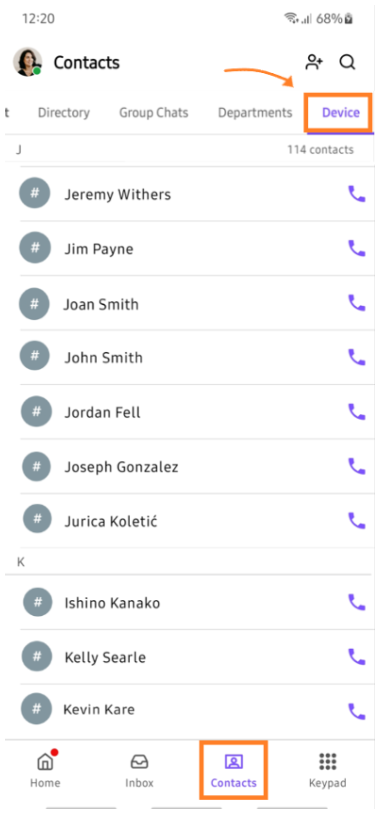
Here, you can view the list of contacts stored on your phone.
Search device contacts
To search a contact from your phone list
Navigate to Contacts
Select Search (that's the magnifying glass)
Enter a name or number in the search bar
Select Looking for something else?
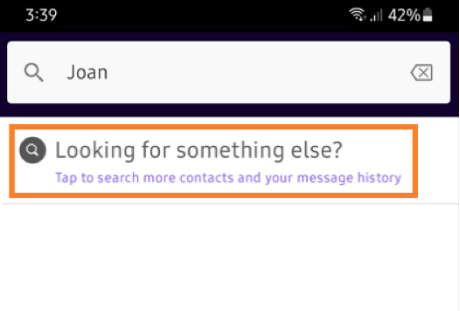
Select Device tab
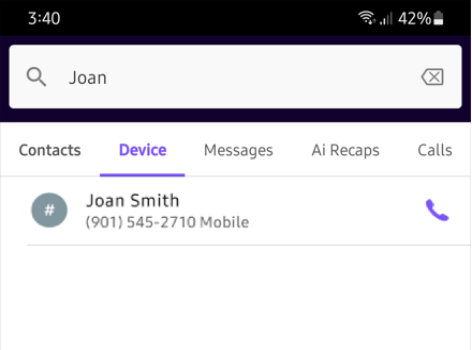
After selecting the contact, the conversation thread will open, allowing you to send a message, make a call, or view their profile.
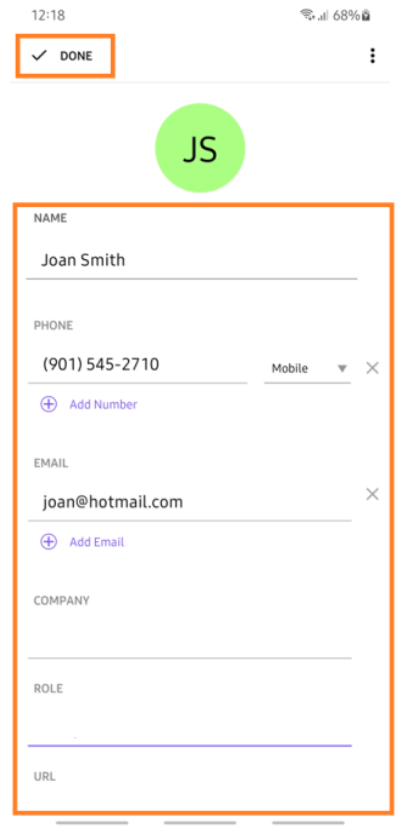
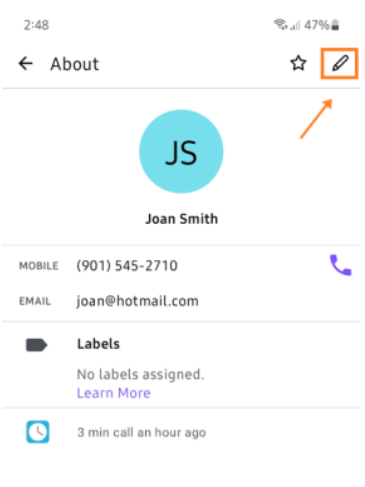
Edit contact details
To update or change your contact’s details, head to Contacts
Navigate to Device tab
Select a contact
Select Tap to view details
Select the pencil icon

Update the contact information
Select Done
Note
Any changes you make to your device's contacts will only reflect in the Dialpad app, not on your device contact list.
It is optional to add your contact's email address, company name, role, and URL.
Delete a contact
To delete a contact from the mobile app
Navigate to Contacts
Select Device tab

Select a contact
Select Tap to view details
Select the pencil icon
Select Options (that’s the 3 vertical dots on the top right)
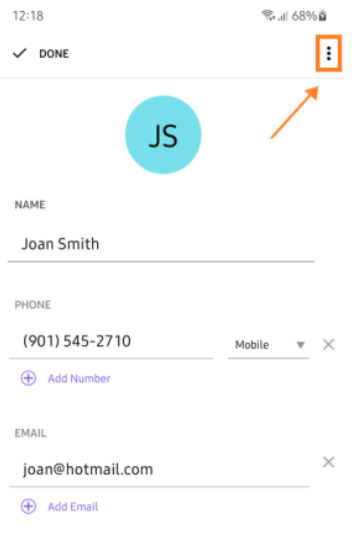
Select Delete contact
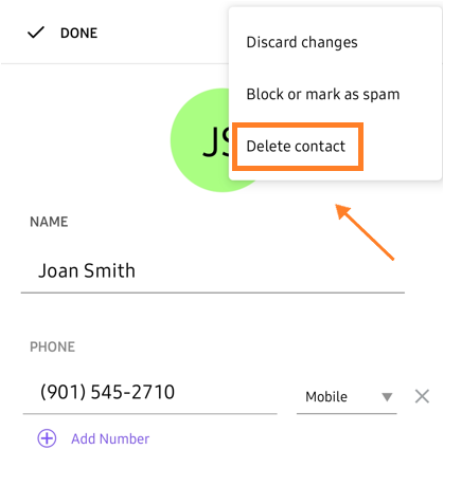
Note
Contacts deleted from the mobile app will only be removed from Dialpad, not from your device.
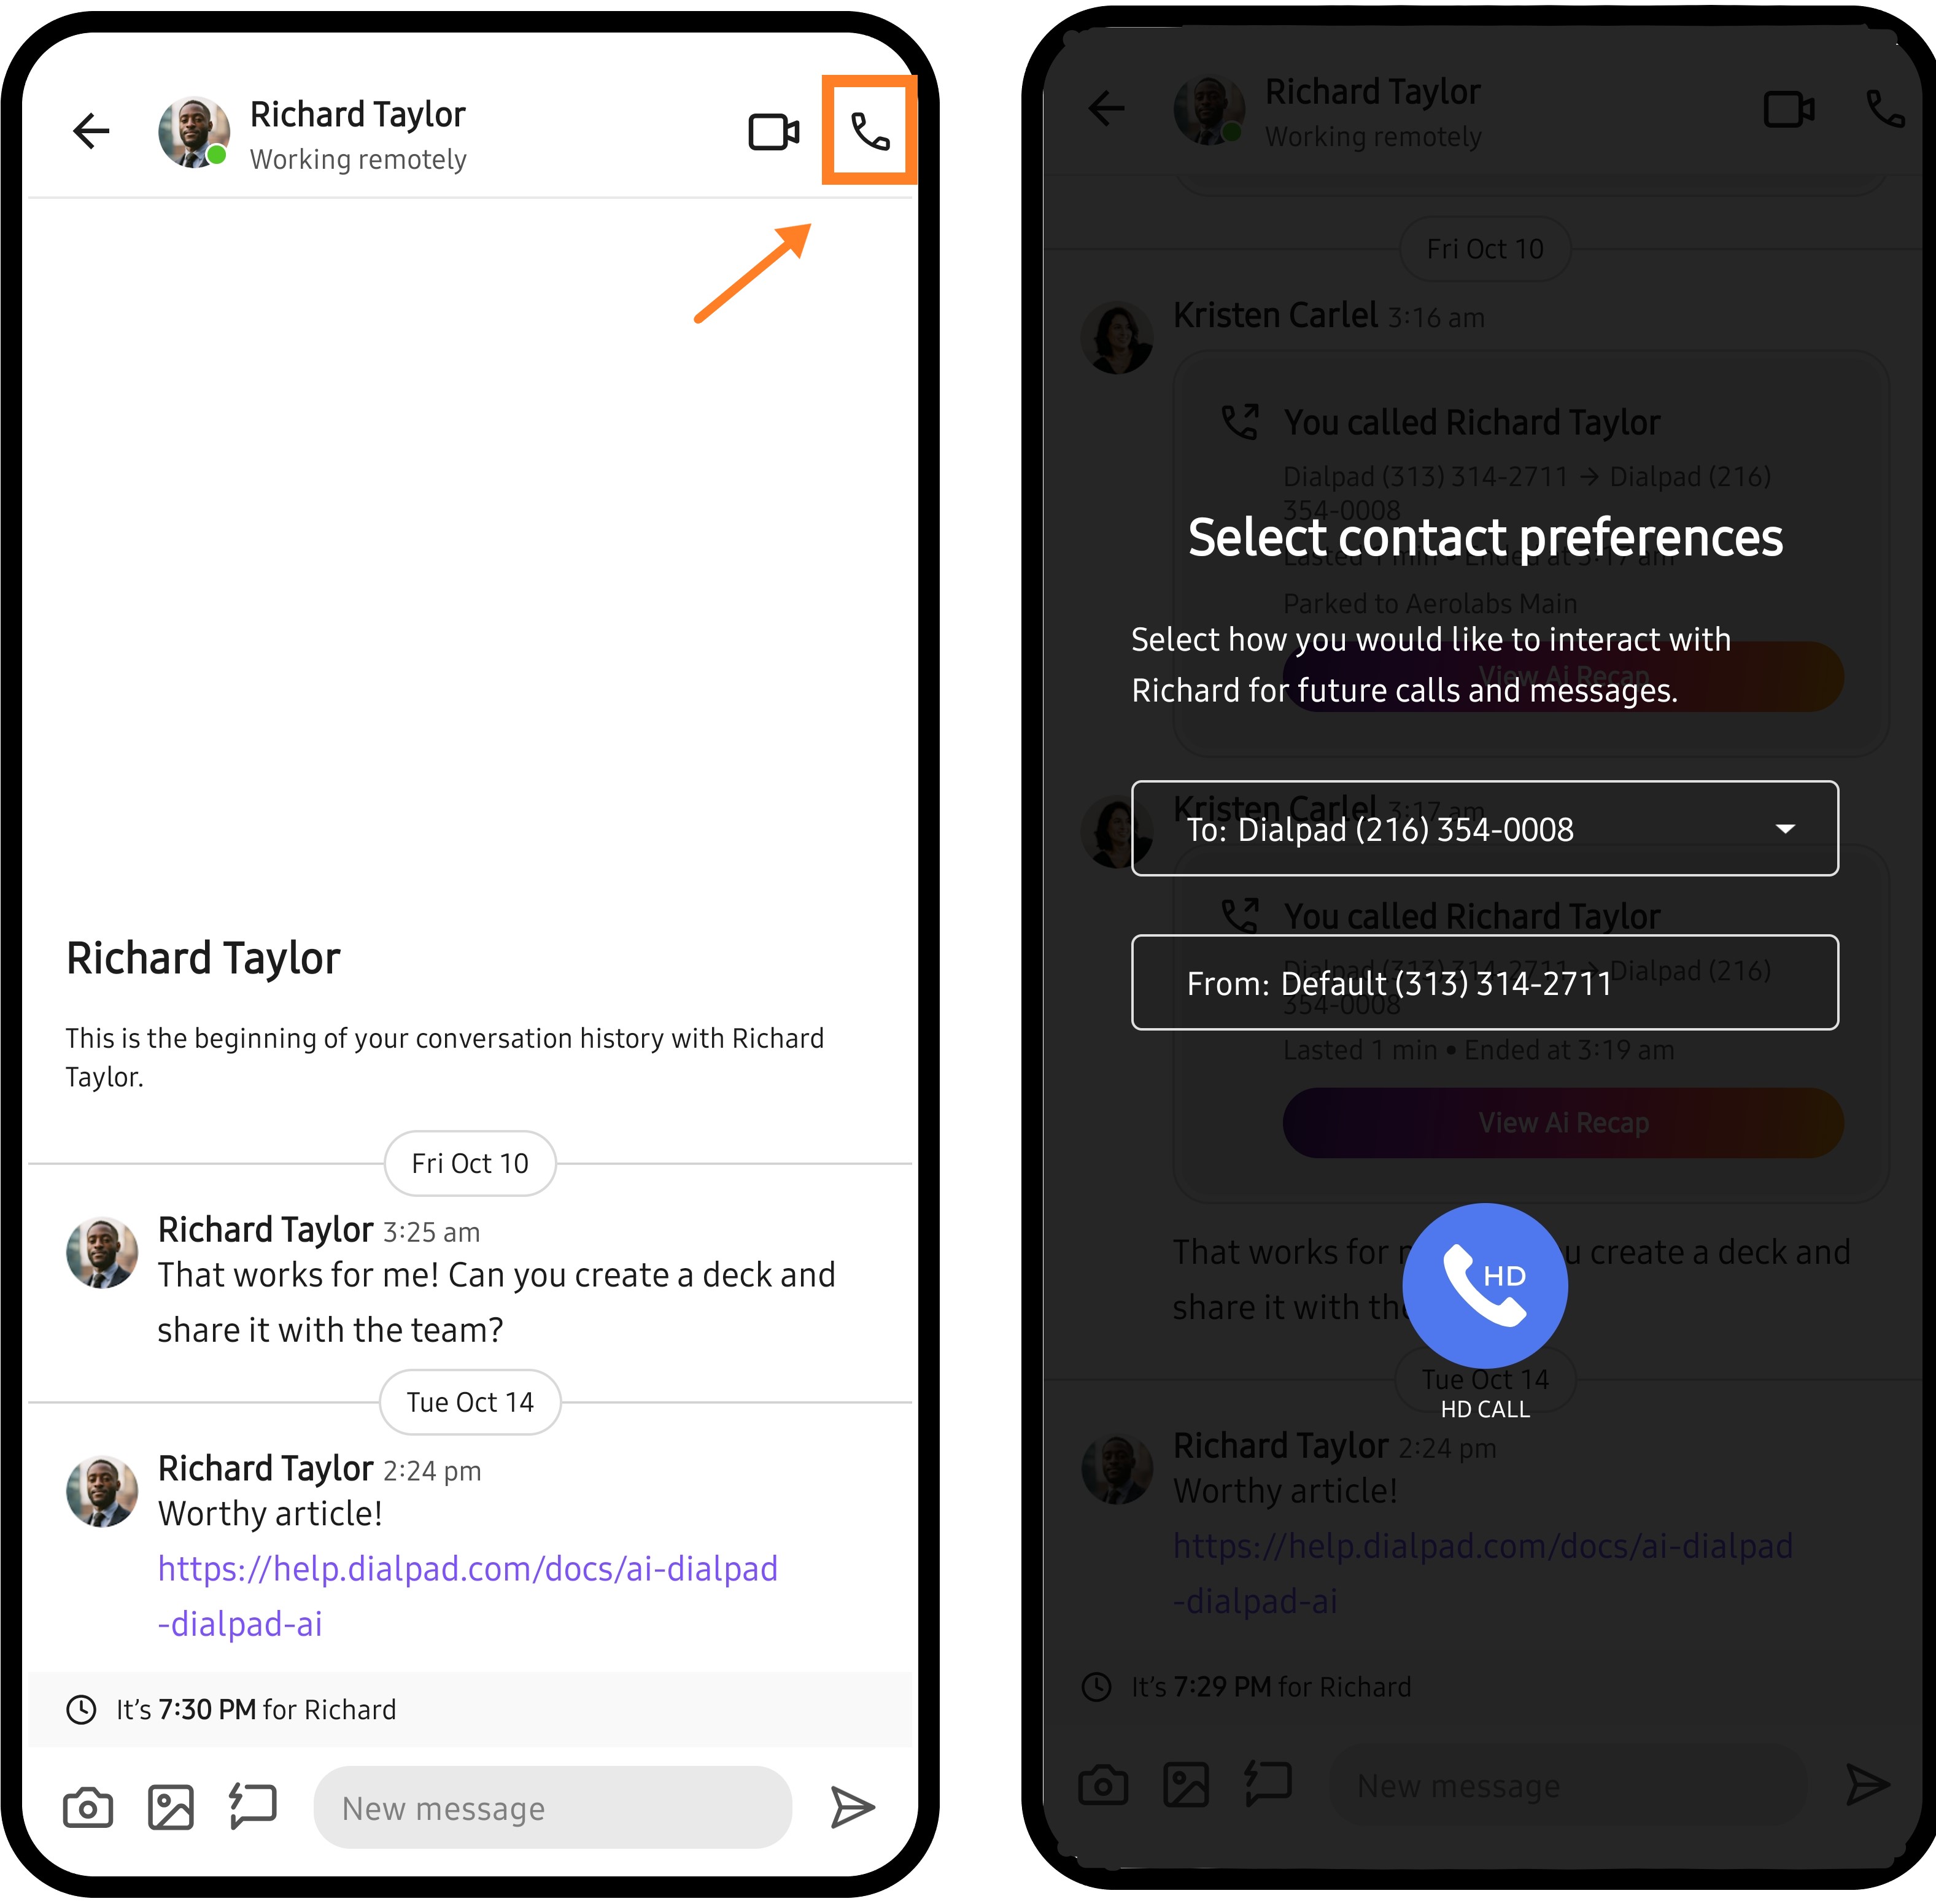
Caller ID
There are 3 ways to adjust your caller ID for individual calls:
Long-press the Call (phone) icon in a conversation thread and choose an available caller ID
Navigate to Calling preferences > Select Caller ID
Choose the desired number
.png)
Go to Keypad
Select Call as drop-down
Go to New call from > Caller Id displays as
Choose the desired number
(1).jpg)
To adjust your caller ID for all calls, you'll need to navigate to your global caller ID settings from the web portal.
Block a number
To block a number:
Navigate to the conversation thread
Select Tap to view underneath the contact's name
Select the Pencil icon to edit the contact
Select Block or mark as spam
Select your desired preference
Block calls and allow voicemails: sends calls straight to voicemail and places conversations to the recents section, and your inbox
Mark as spam: sends calls straight to voicemail and places conversations in your spam folder
Block all communications: Caller cannot connect, your number displays as out of service

Do Not Disturb & custom status
Set your status to Do-Not-Disturb to avoid receiving notifications for calls, or use a custom status to inform colleagues if you're away from your desk or working on a specific project.
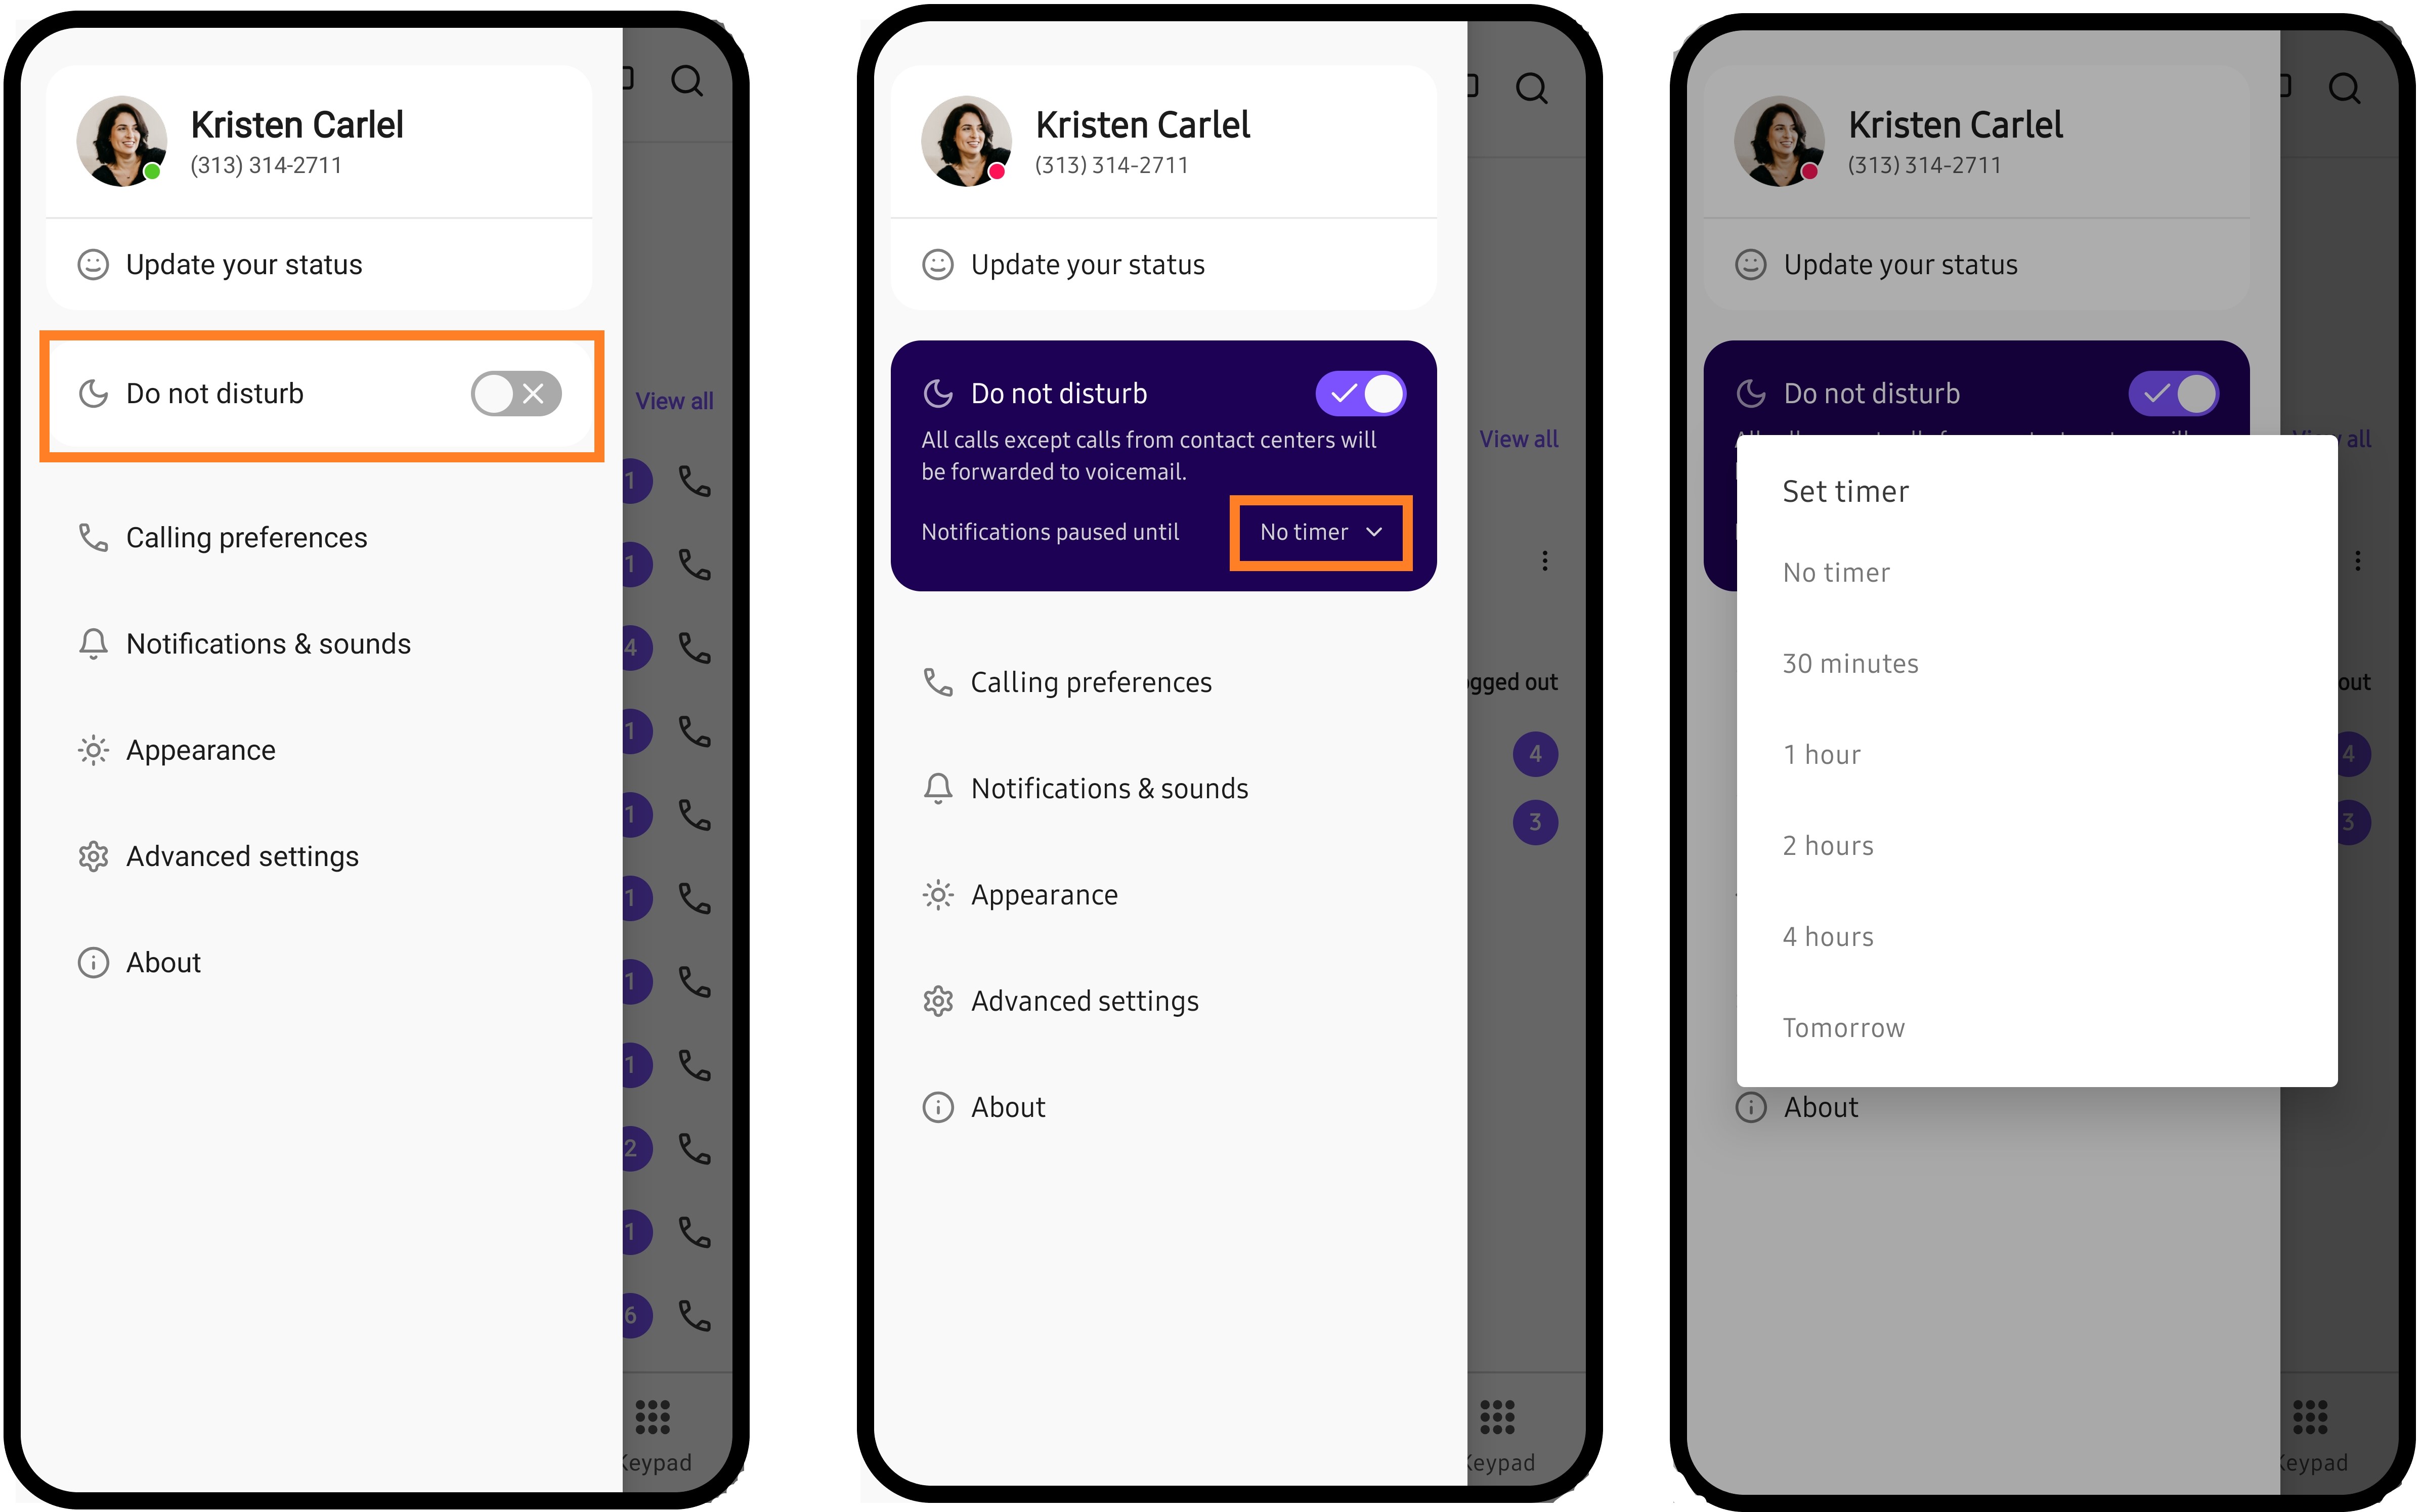
Set Do Not Disturb
To turn on Do Not Disturb mode using the Android app:
Tap your avatar to open your profile
Toggle on the Do Not Disturb
Select Set a Timer if you'd like Do Not Disturb mode to turn off after a specific amount of time
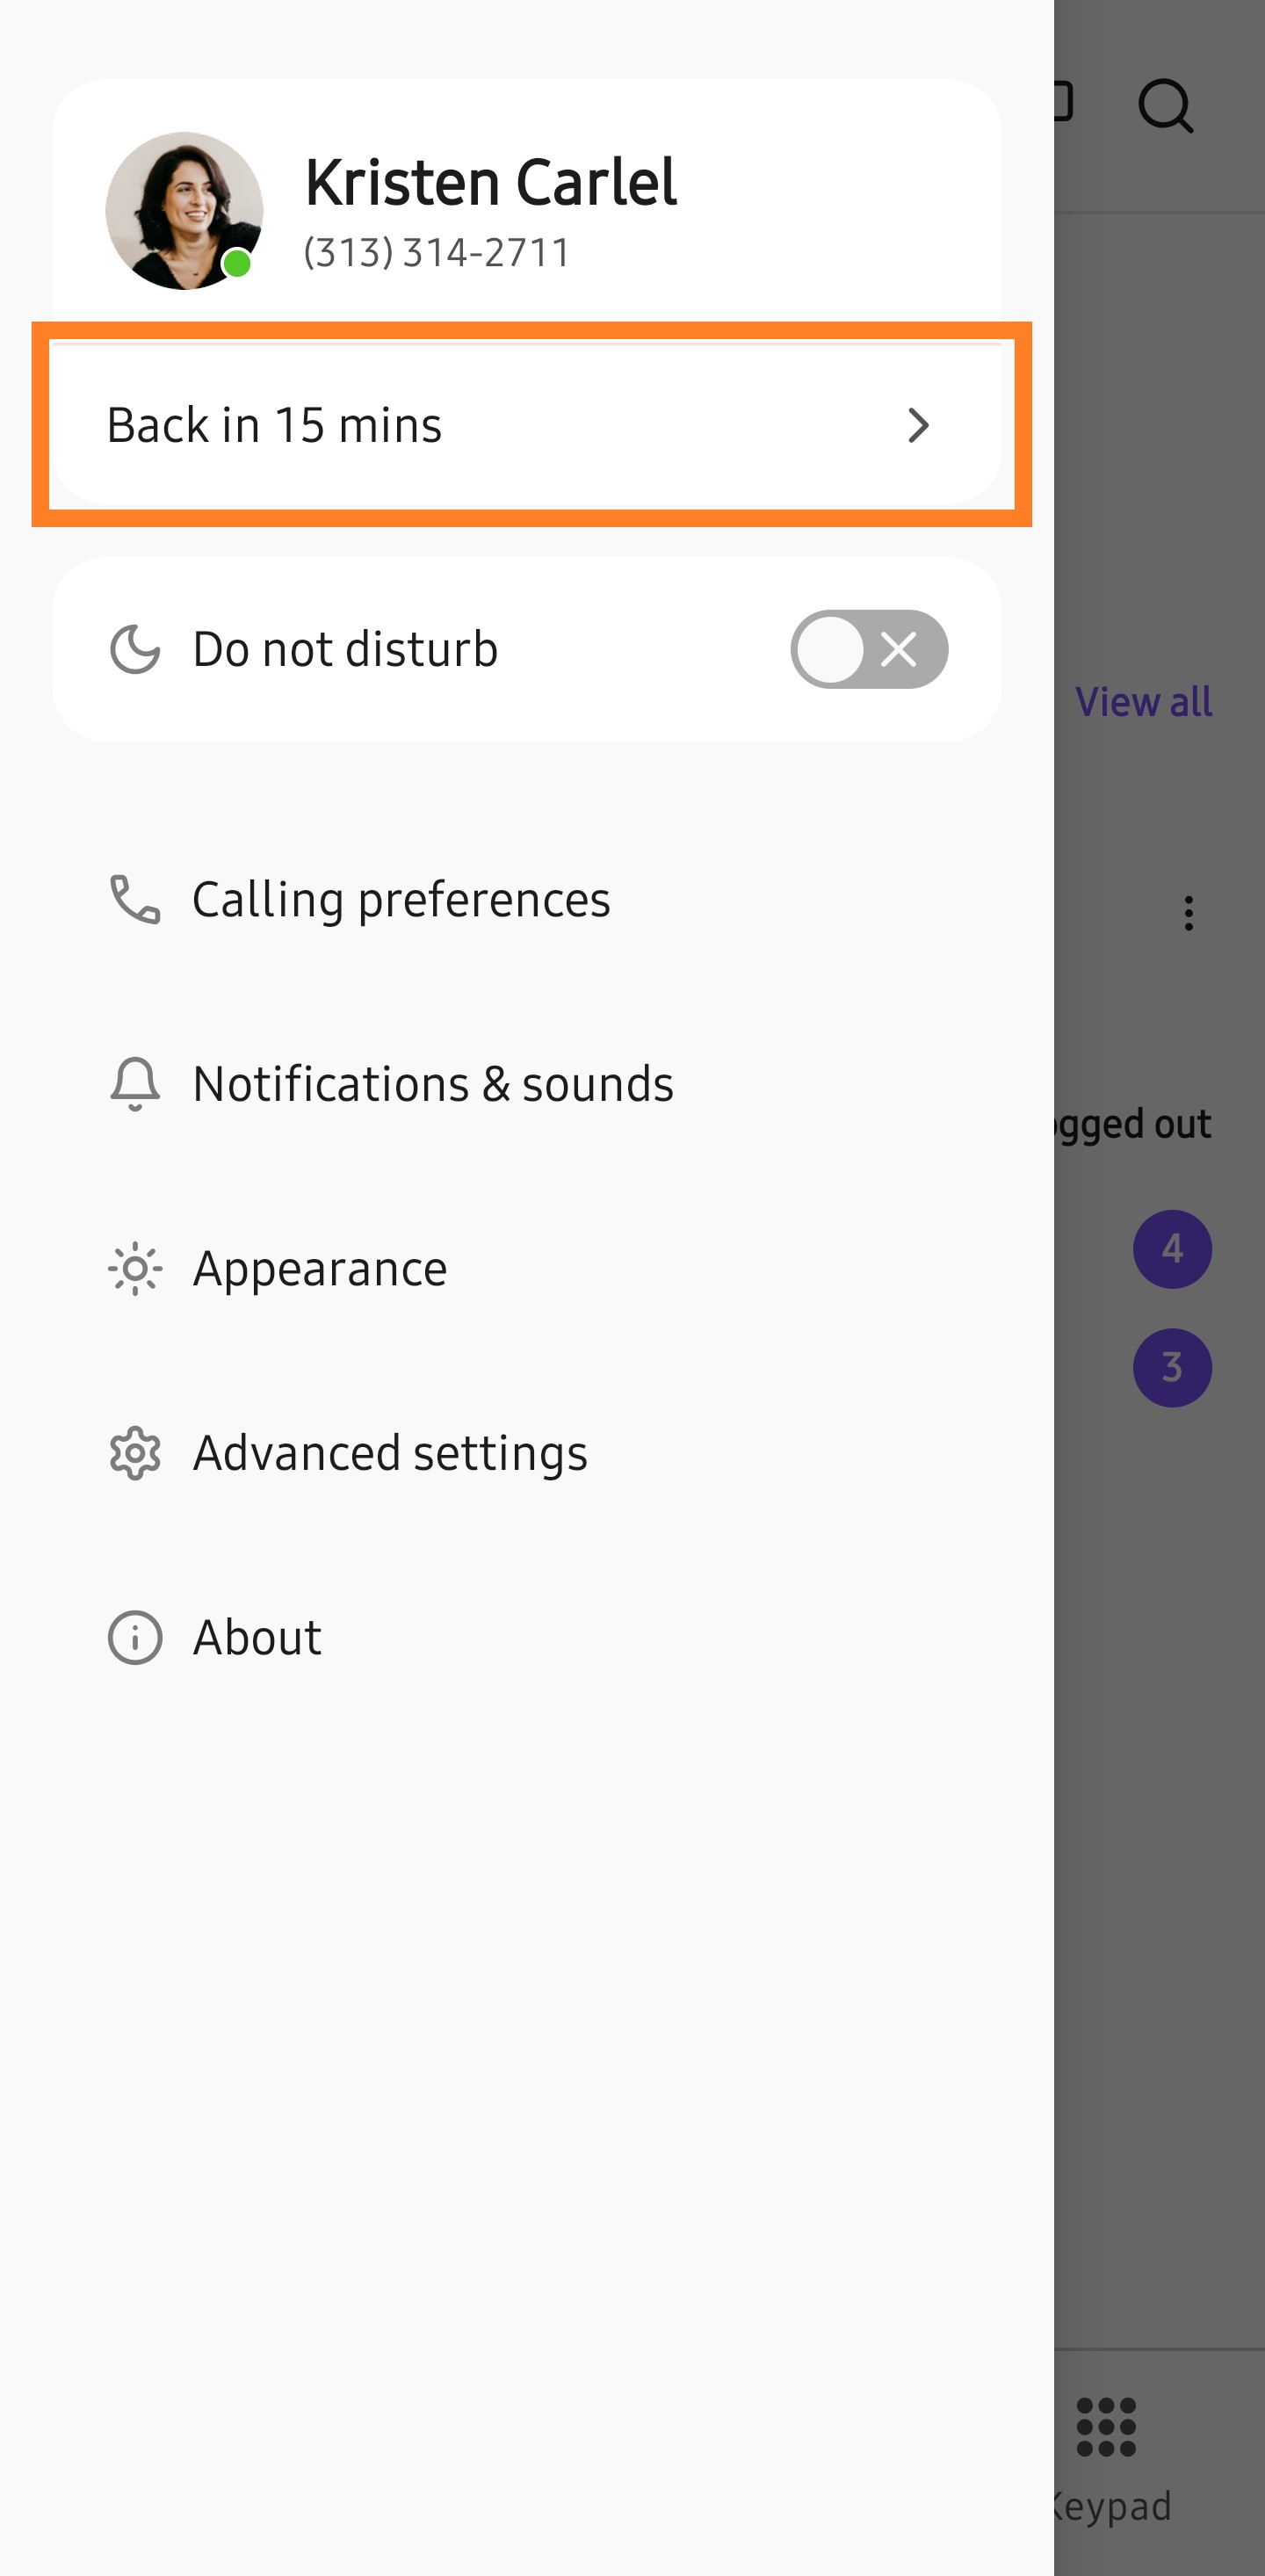
Set custom status
To set a custom status:
Tap your avatar to open your profile
Select Set Your Status, or tap on your existing status
Enter your custom status in the text field, or choose from one of the status templates
There is a 50-character maximum for custom statuses.
To clear your status, select Clear status.
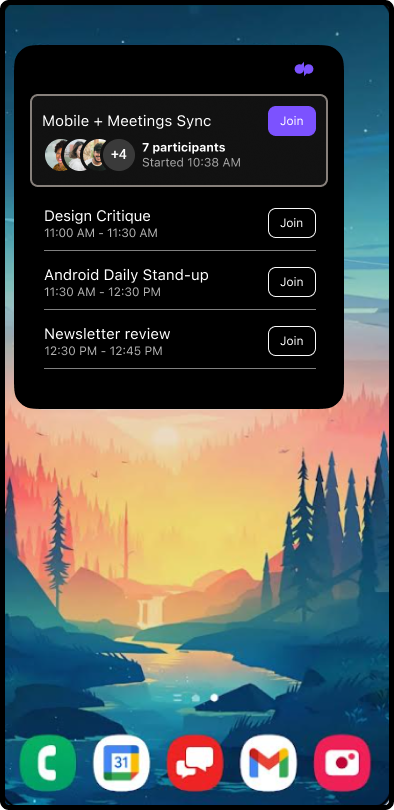
Upcoming Meetings widget
Use Dialpad's Upcoming Meetings widget to easily see the day's current and upcoming meetings, and join them from your home screen.
To join an upcoming meeting, tap Join.
To refresh your meetings, tap anywhere on the widget corners.
Dialpad offers 3 different sizes for your widget:
The small widget shows only the date and time of the next meeting and the join button.
The medium widget shows the date and time of your next meeting, the join button, and the initials of the accepted participants.
The large widget shows the date and time of the next 4 upcoming meetings, the join button, and the initials of the accepted participants.
The Dialpad widget can be added directly from your Dialpad app, or from the home screen.
Add widget from the home screen:
Long tap the home screen
Tap Widgets
Search Dialpad
Tap Add
Add widget from app
Long tap the Dialpad app
Tap widget
Tap Add
Note
The widget's color matches your device's theme. If your device is in Dark Mode, your app will be dark. If your device is in daytime/standard theme, the widget will be white.
App settings
To access your Dialpad Android settings, tap on your avatar on the top-left corner of the Dialpad app, then the app setting are grouped into Calling Preferences, Notifications & Sounds, Appearance, Advanced Settings, and About.
.png)
Calling preferences: Manage your caller ID, enable HD calling for clearer audio, and adjust advanced preferences to customize your calling experience.
Notifications & sounds: Manage your in-app alerts, pick your ringtone, and customize the sounds and notifications you hear while you’re on a call.
Appearance: Manage
Advanced settings:
About:
HD Calling
When HD Calling is enabled, Dialpad will use your internet or mobile data connection for inbound and outbound calls. For the best call quality, you'll need a stable cellular or WiFi network.
To manage HD Calling
Go to Calling preferences
Select Call experience
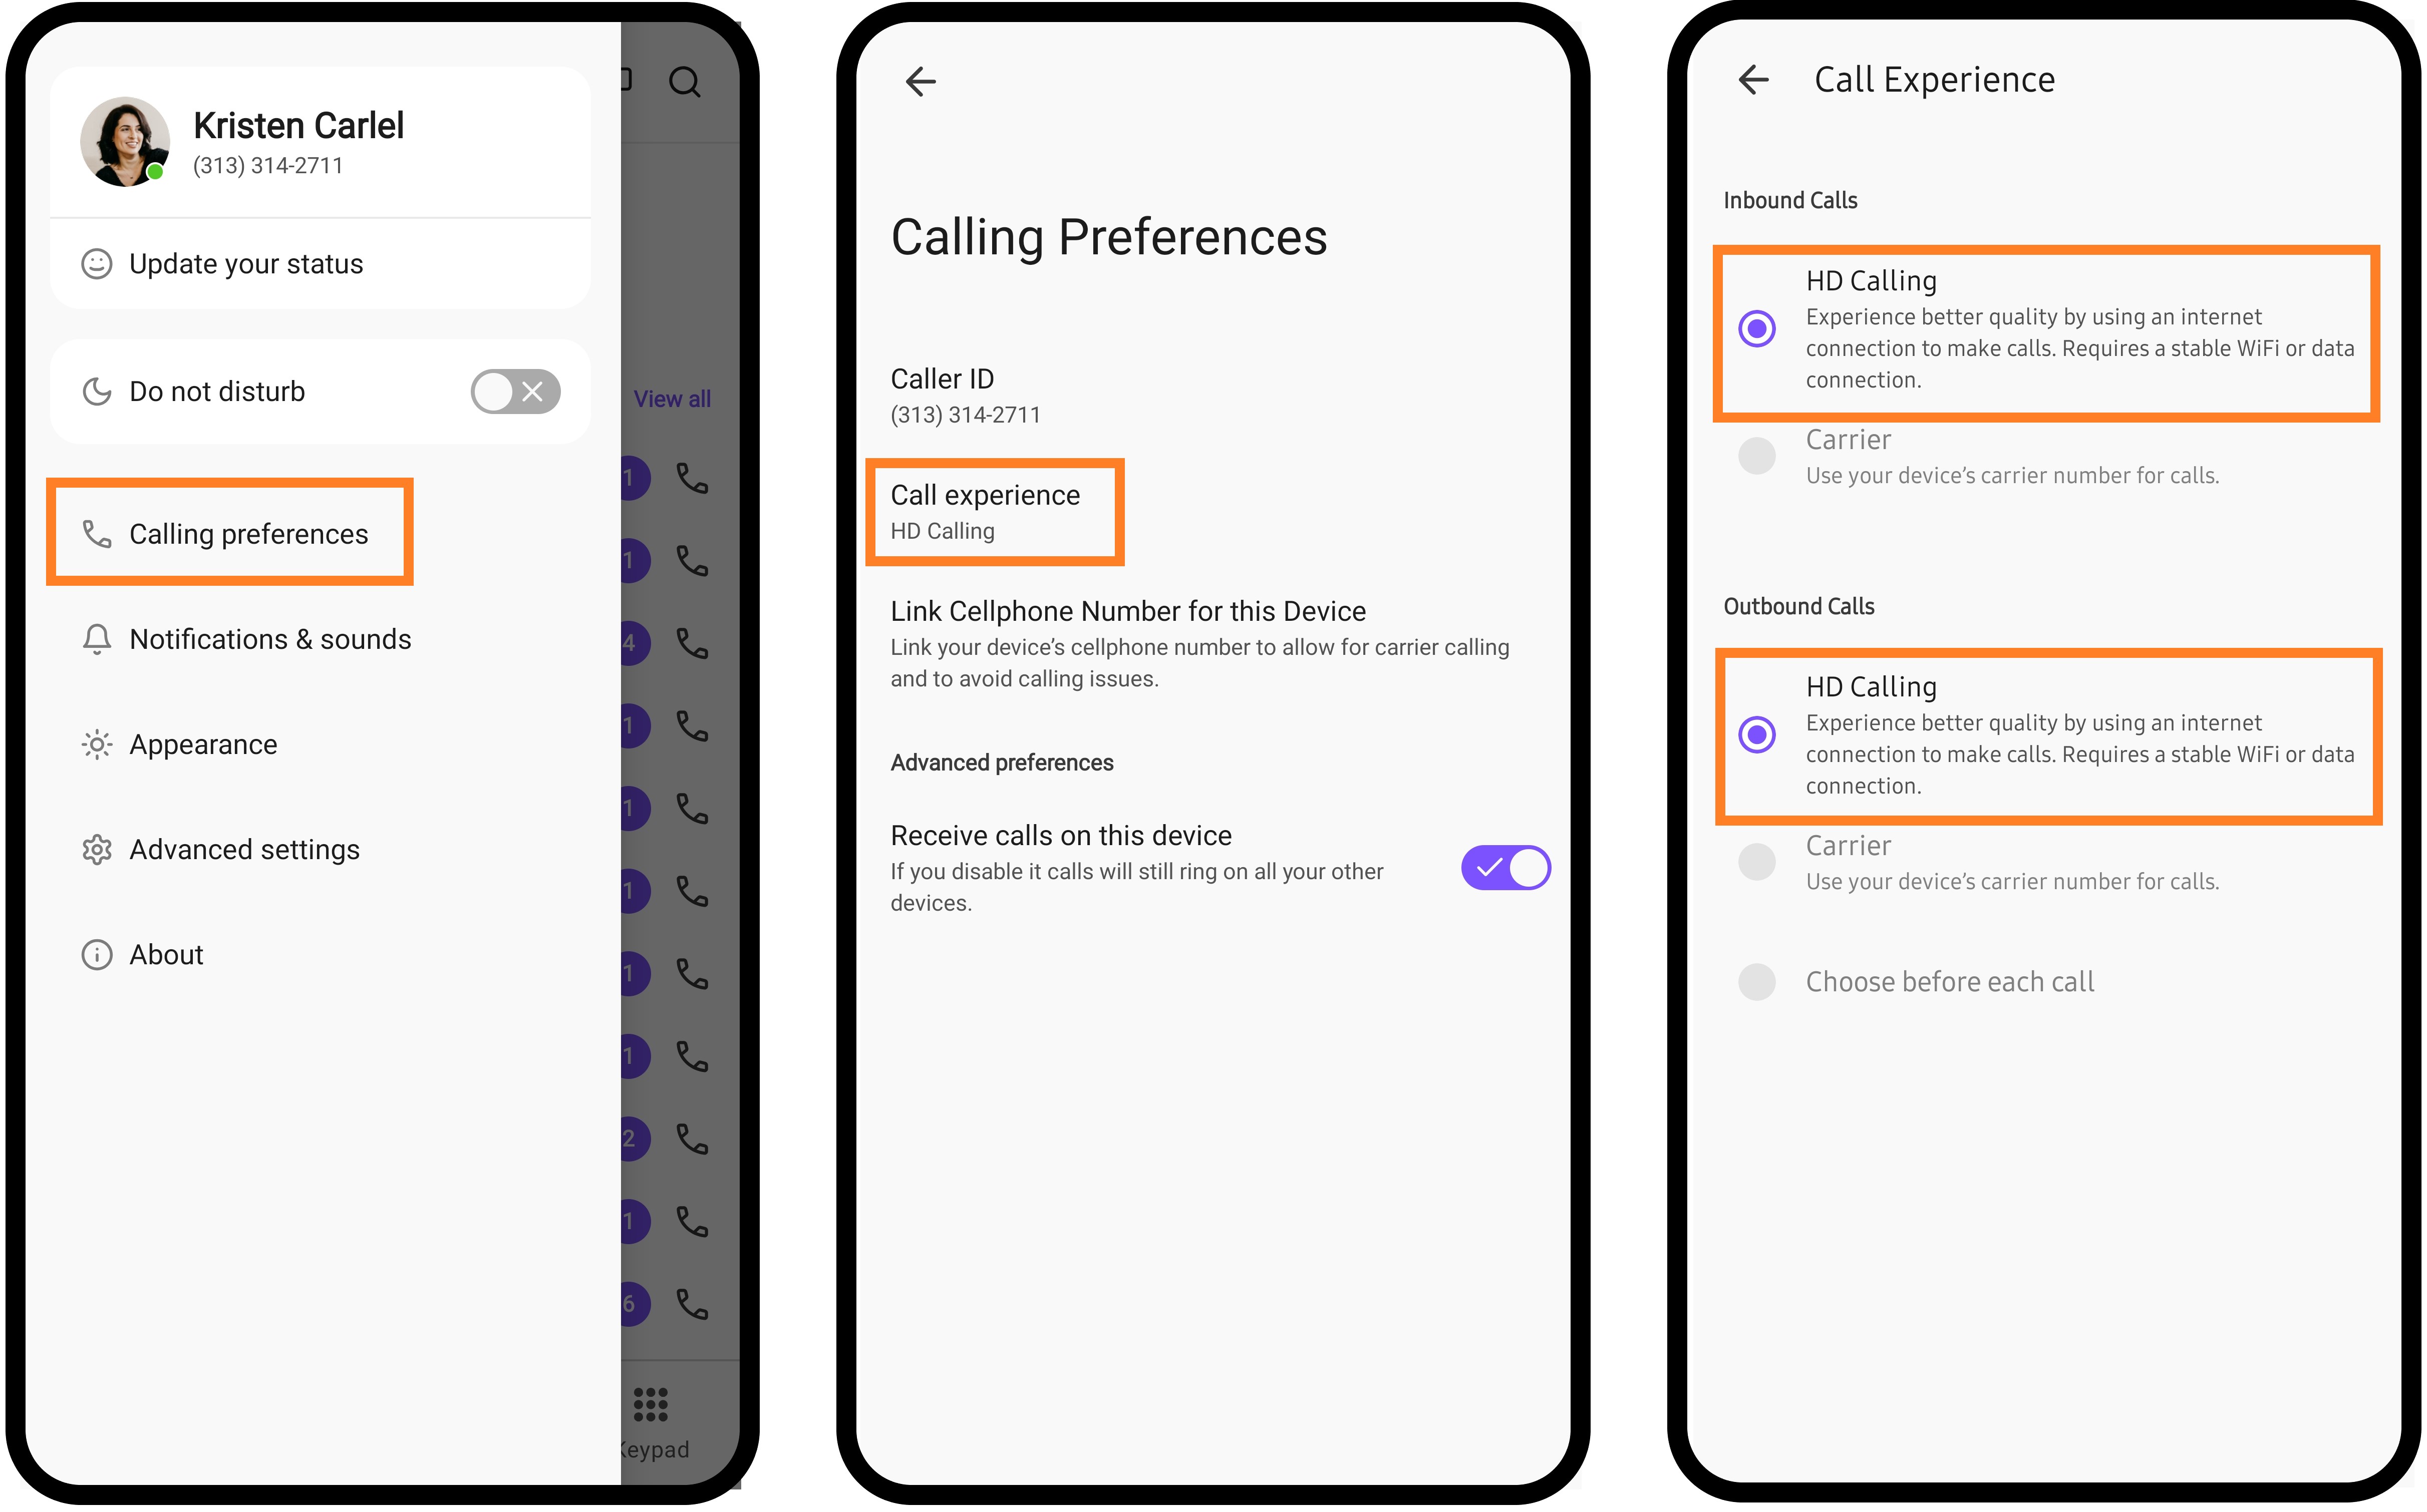
Here, you can choose to use HD Calling for inbound or outbound calls, or even set it to be selected before each call.
Notifications & sounds
Choose to receive notifications for messages, missed calls, and voicemails.
In the Notification & sounds section, choose your ringtone, and the format notifications are delivered to your Android device. You can also enable or disable the ability to silence all other notifications while on a call.
.png)
To customize notifications and how they're delivered, you'll need to select Manage Notifications. 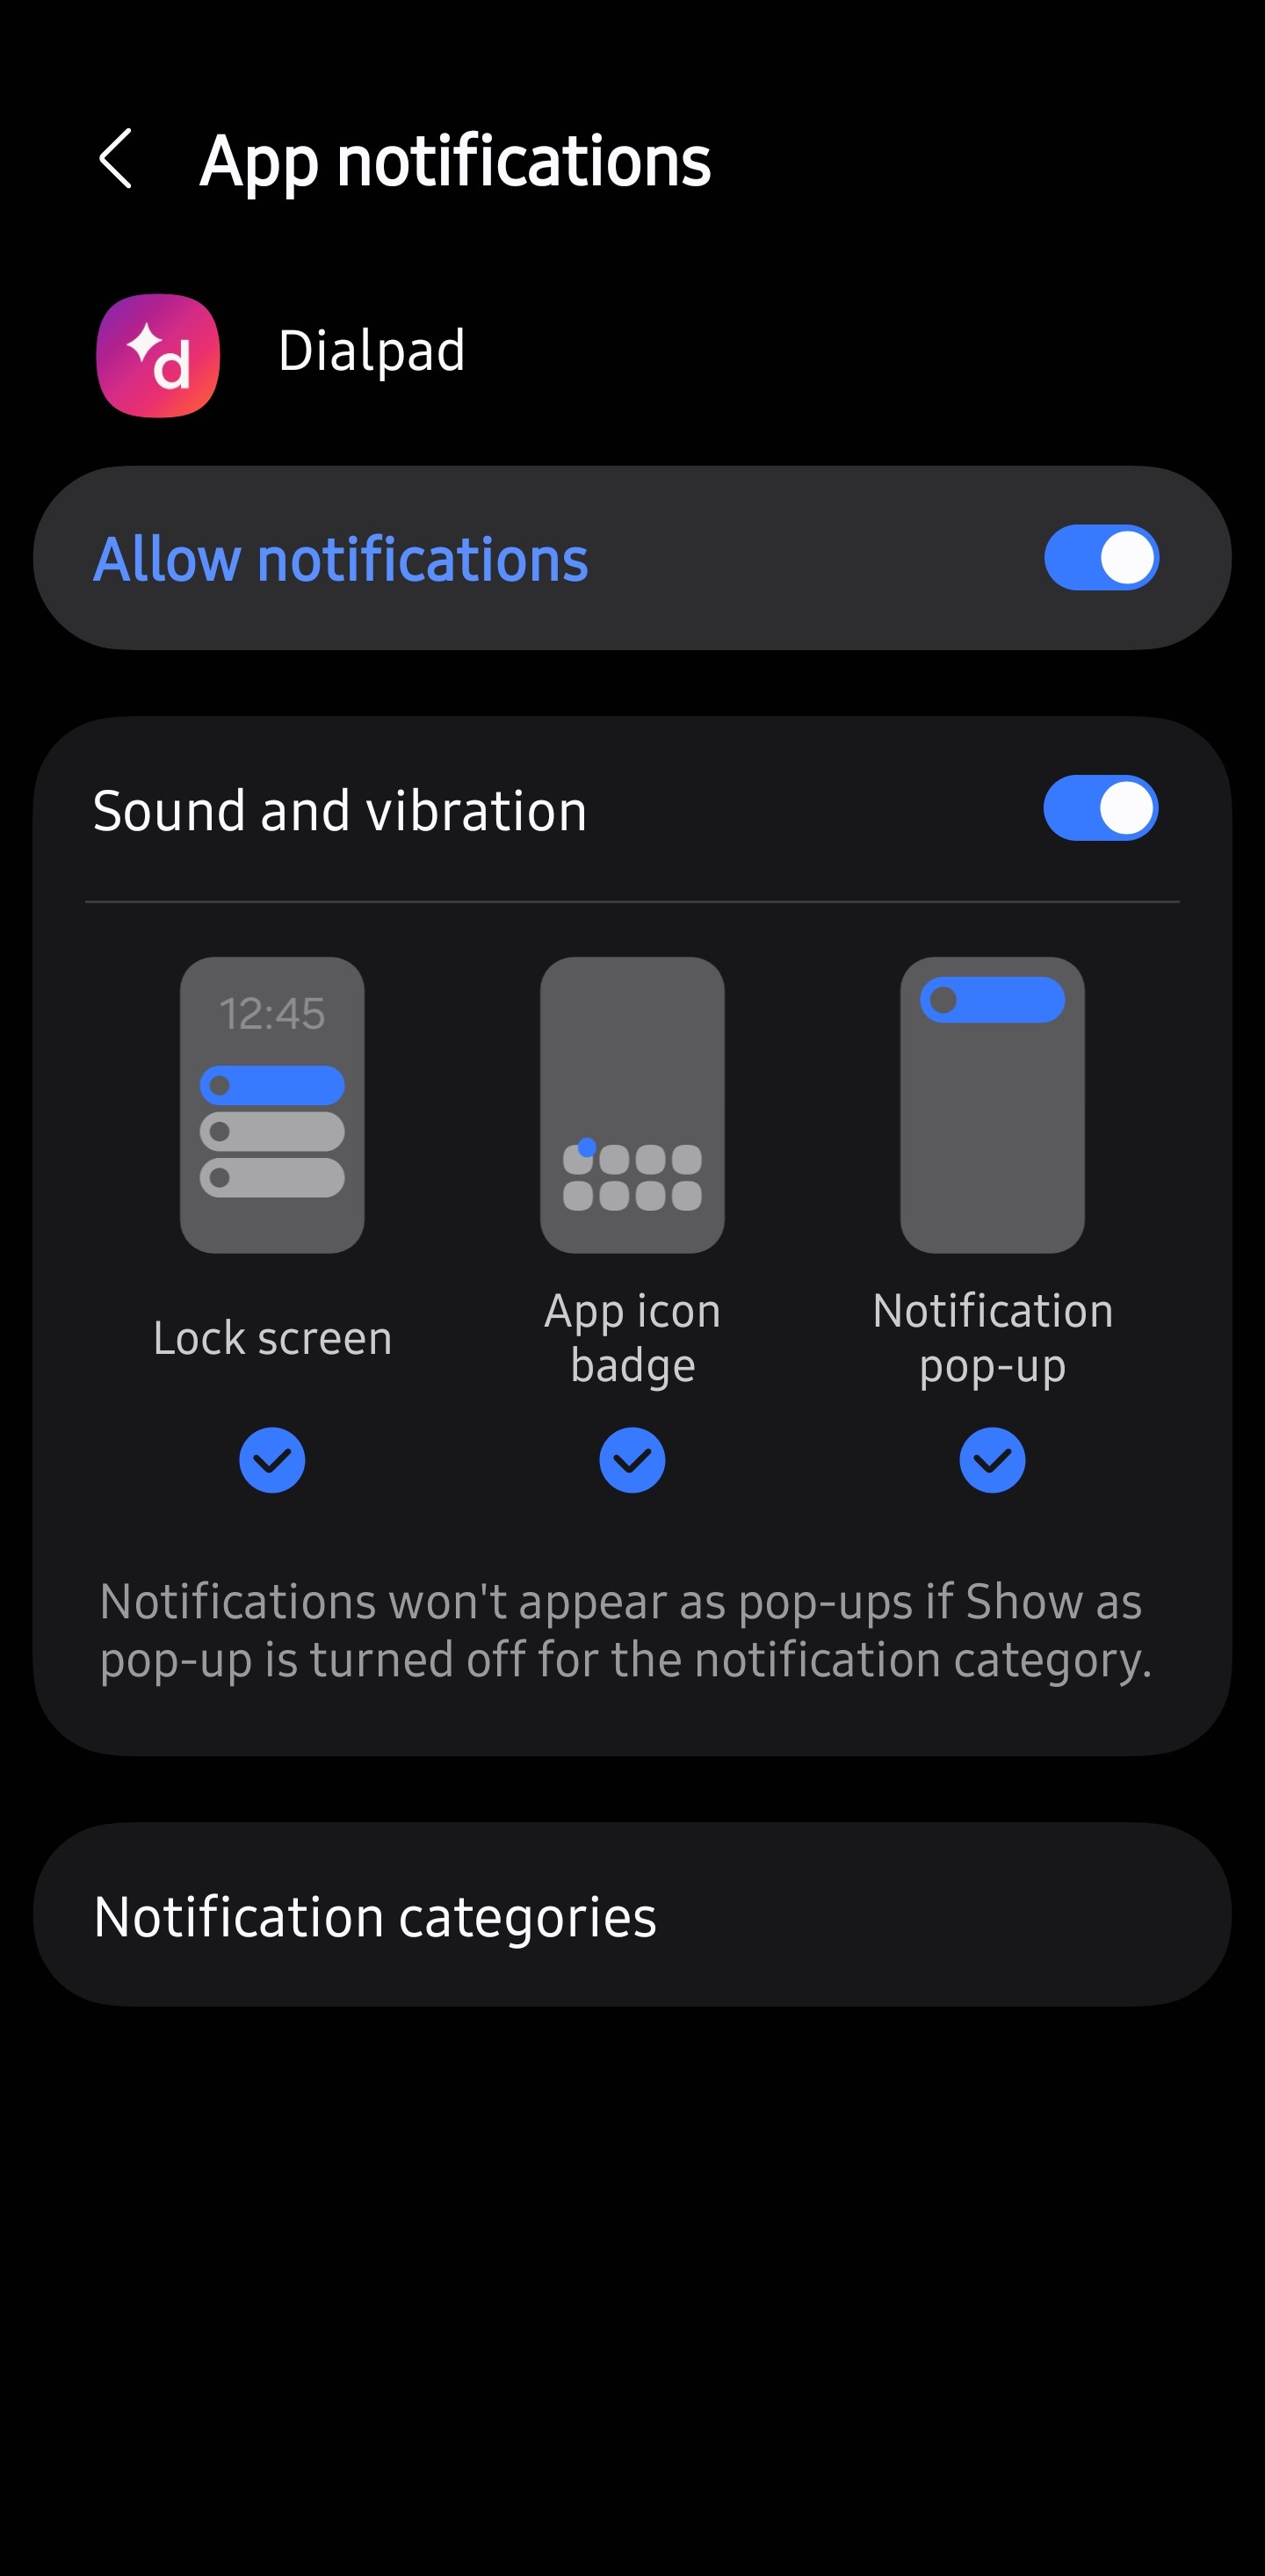
Use this menu to choose how notifications for new messages, missed calls, and voicemails appear.
Tip
If you're on an Android 8.0 or newer, you can turn off push notifications for Shared Lines from your Android settings.
Head to App and Notifications, select Dialpad, and choose your preferences.
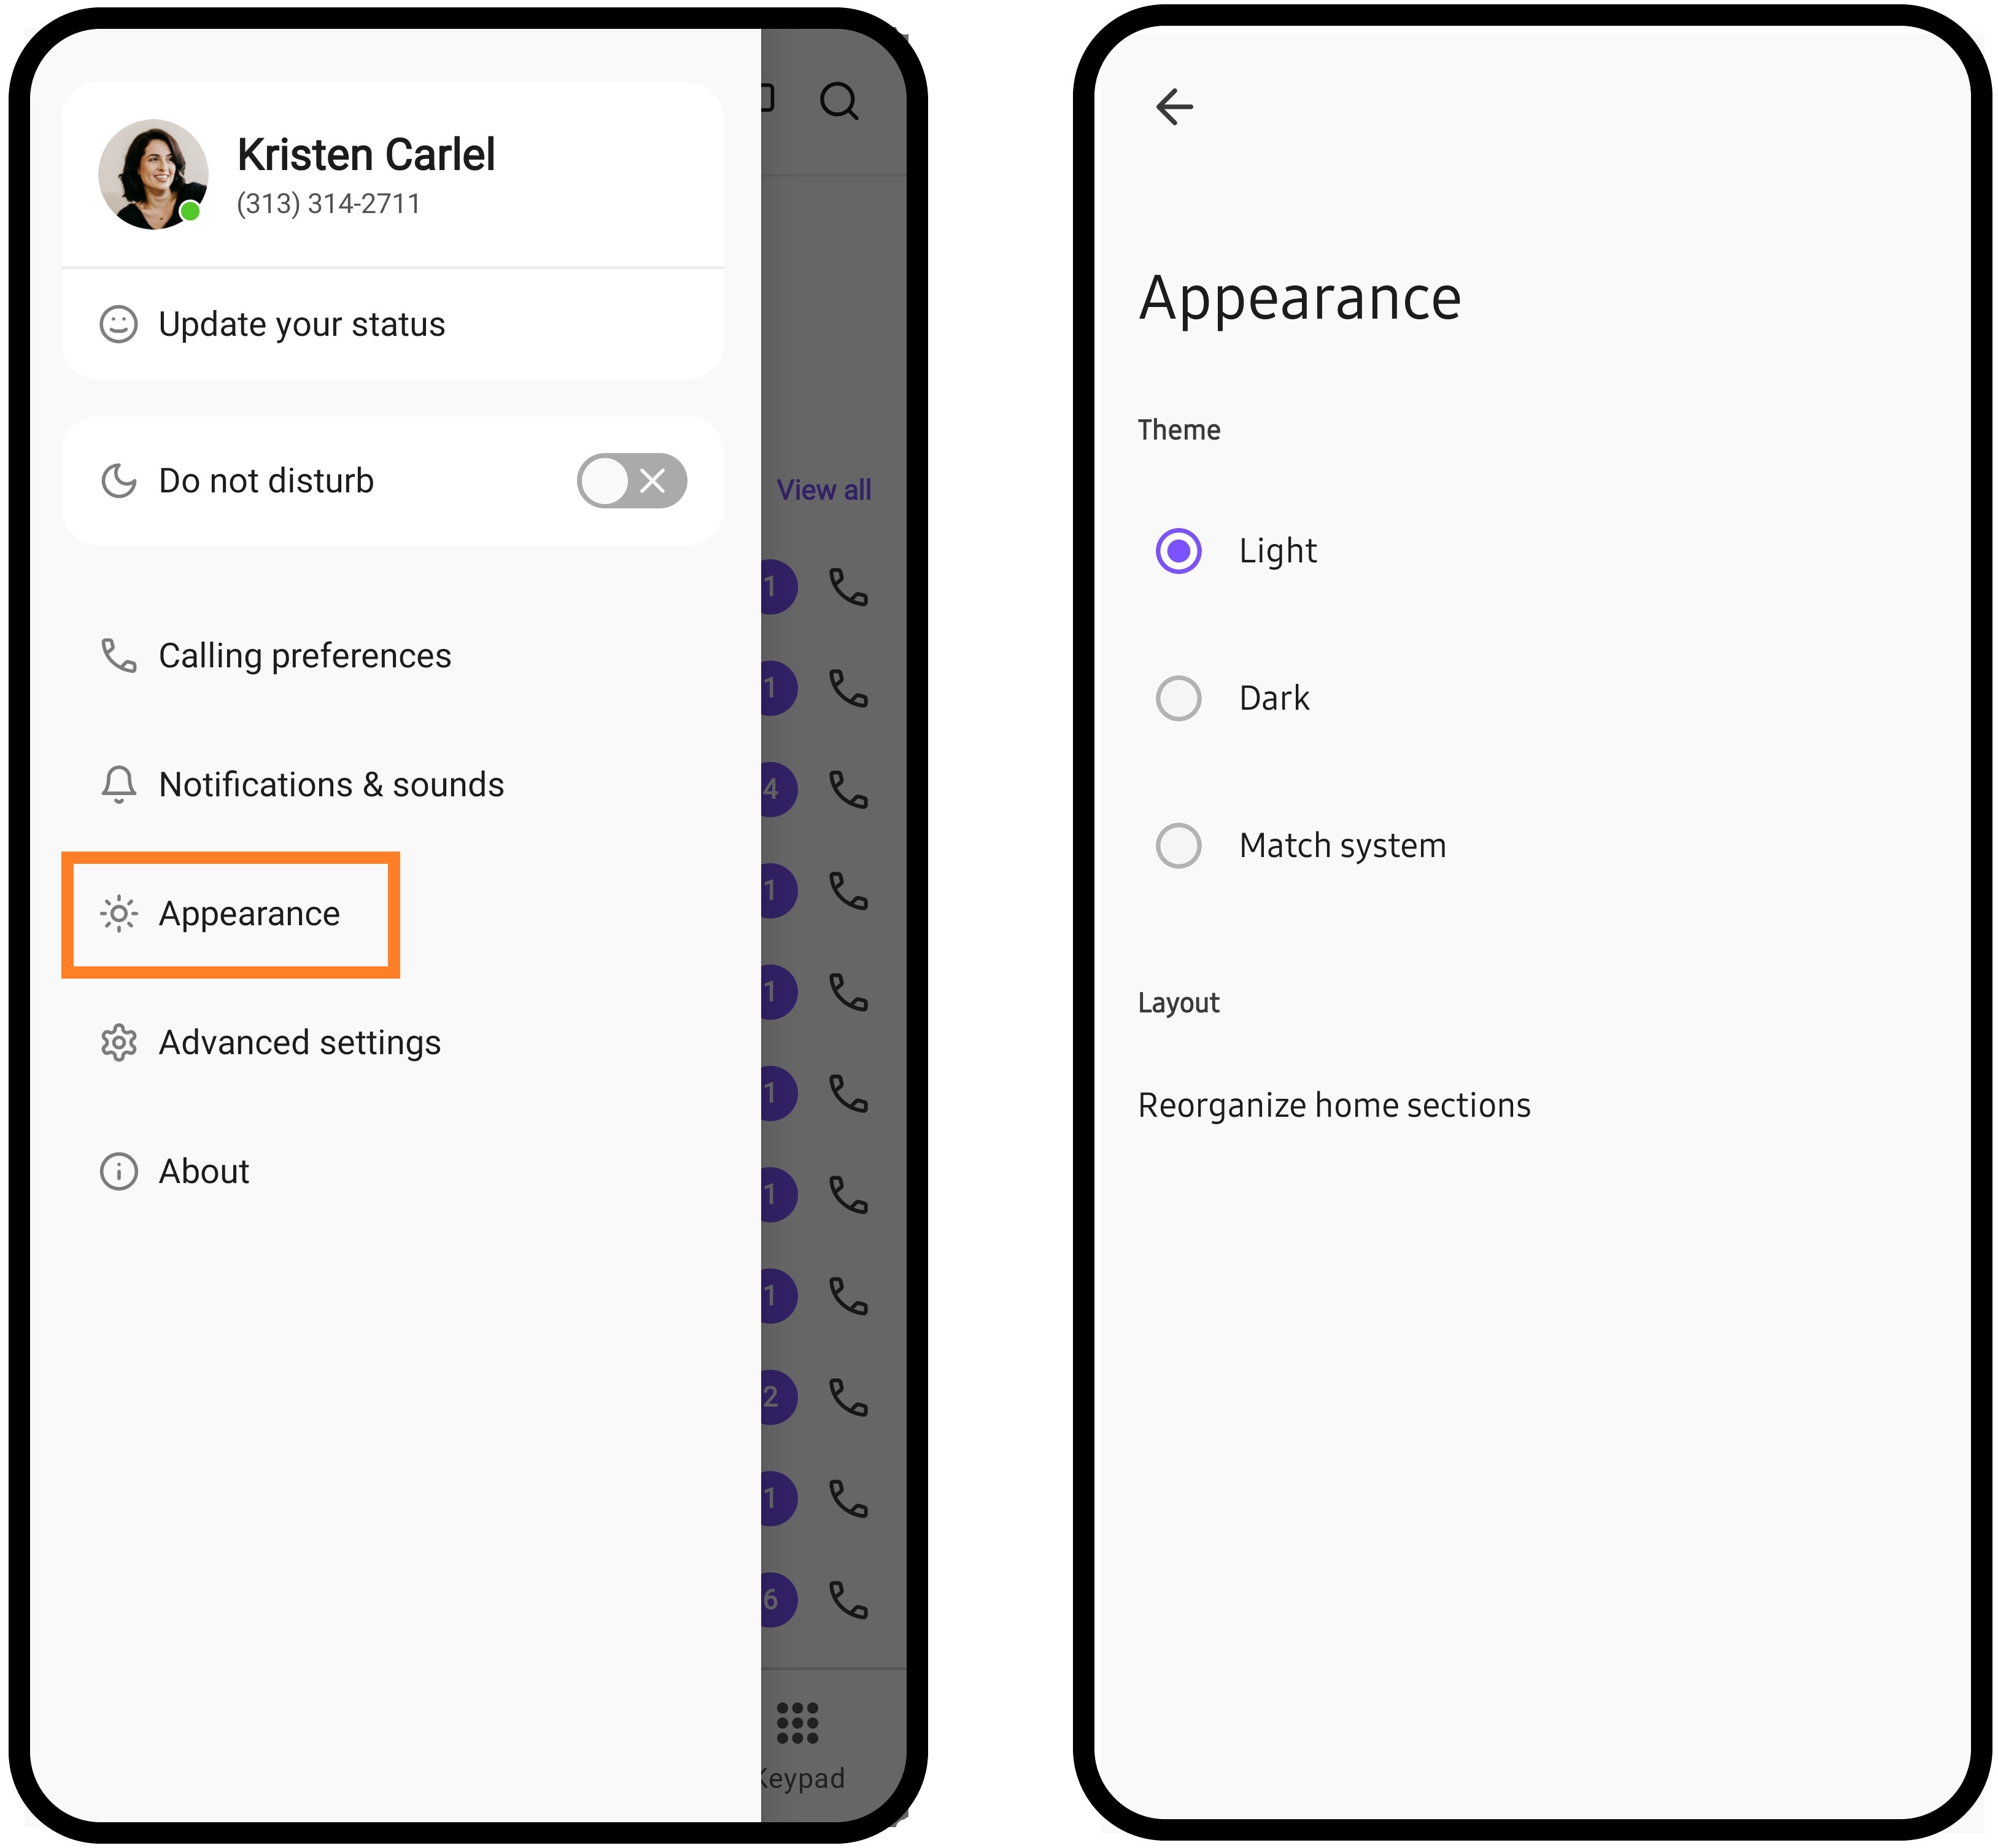
Theme
Select between Light and Dark Mode, or have it automatically adjust based on your system preferences.
Go to Appearance
Select Light, Dark, or Match System
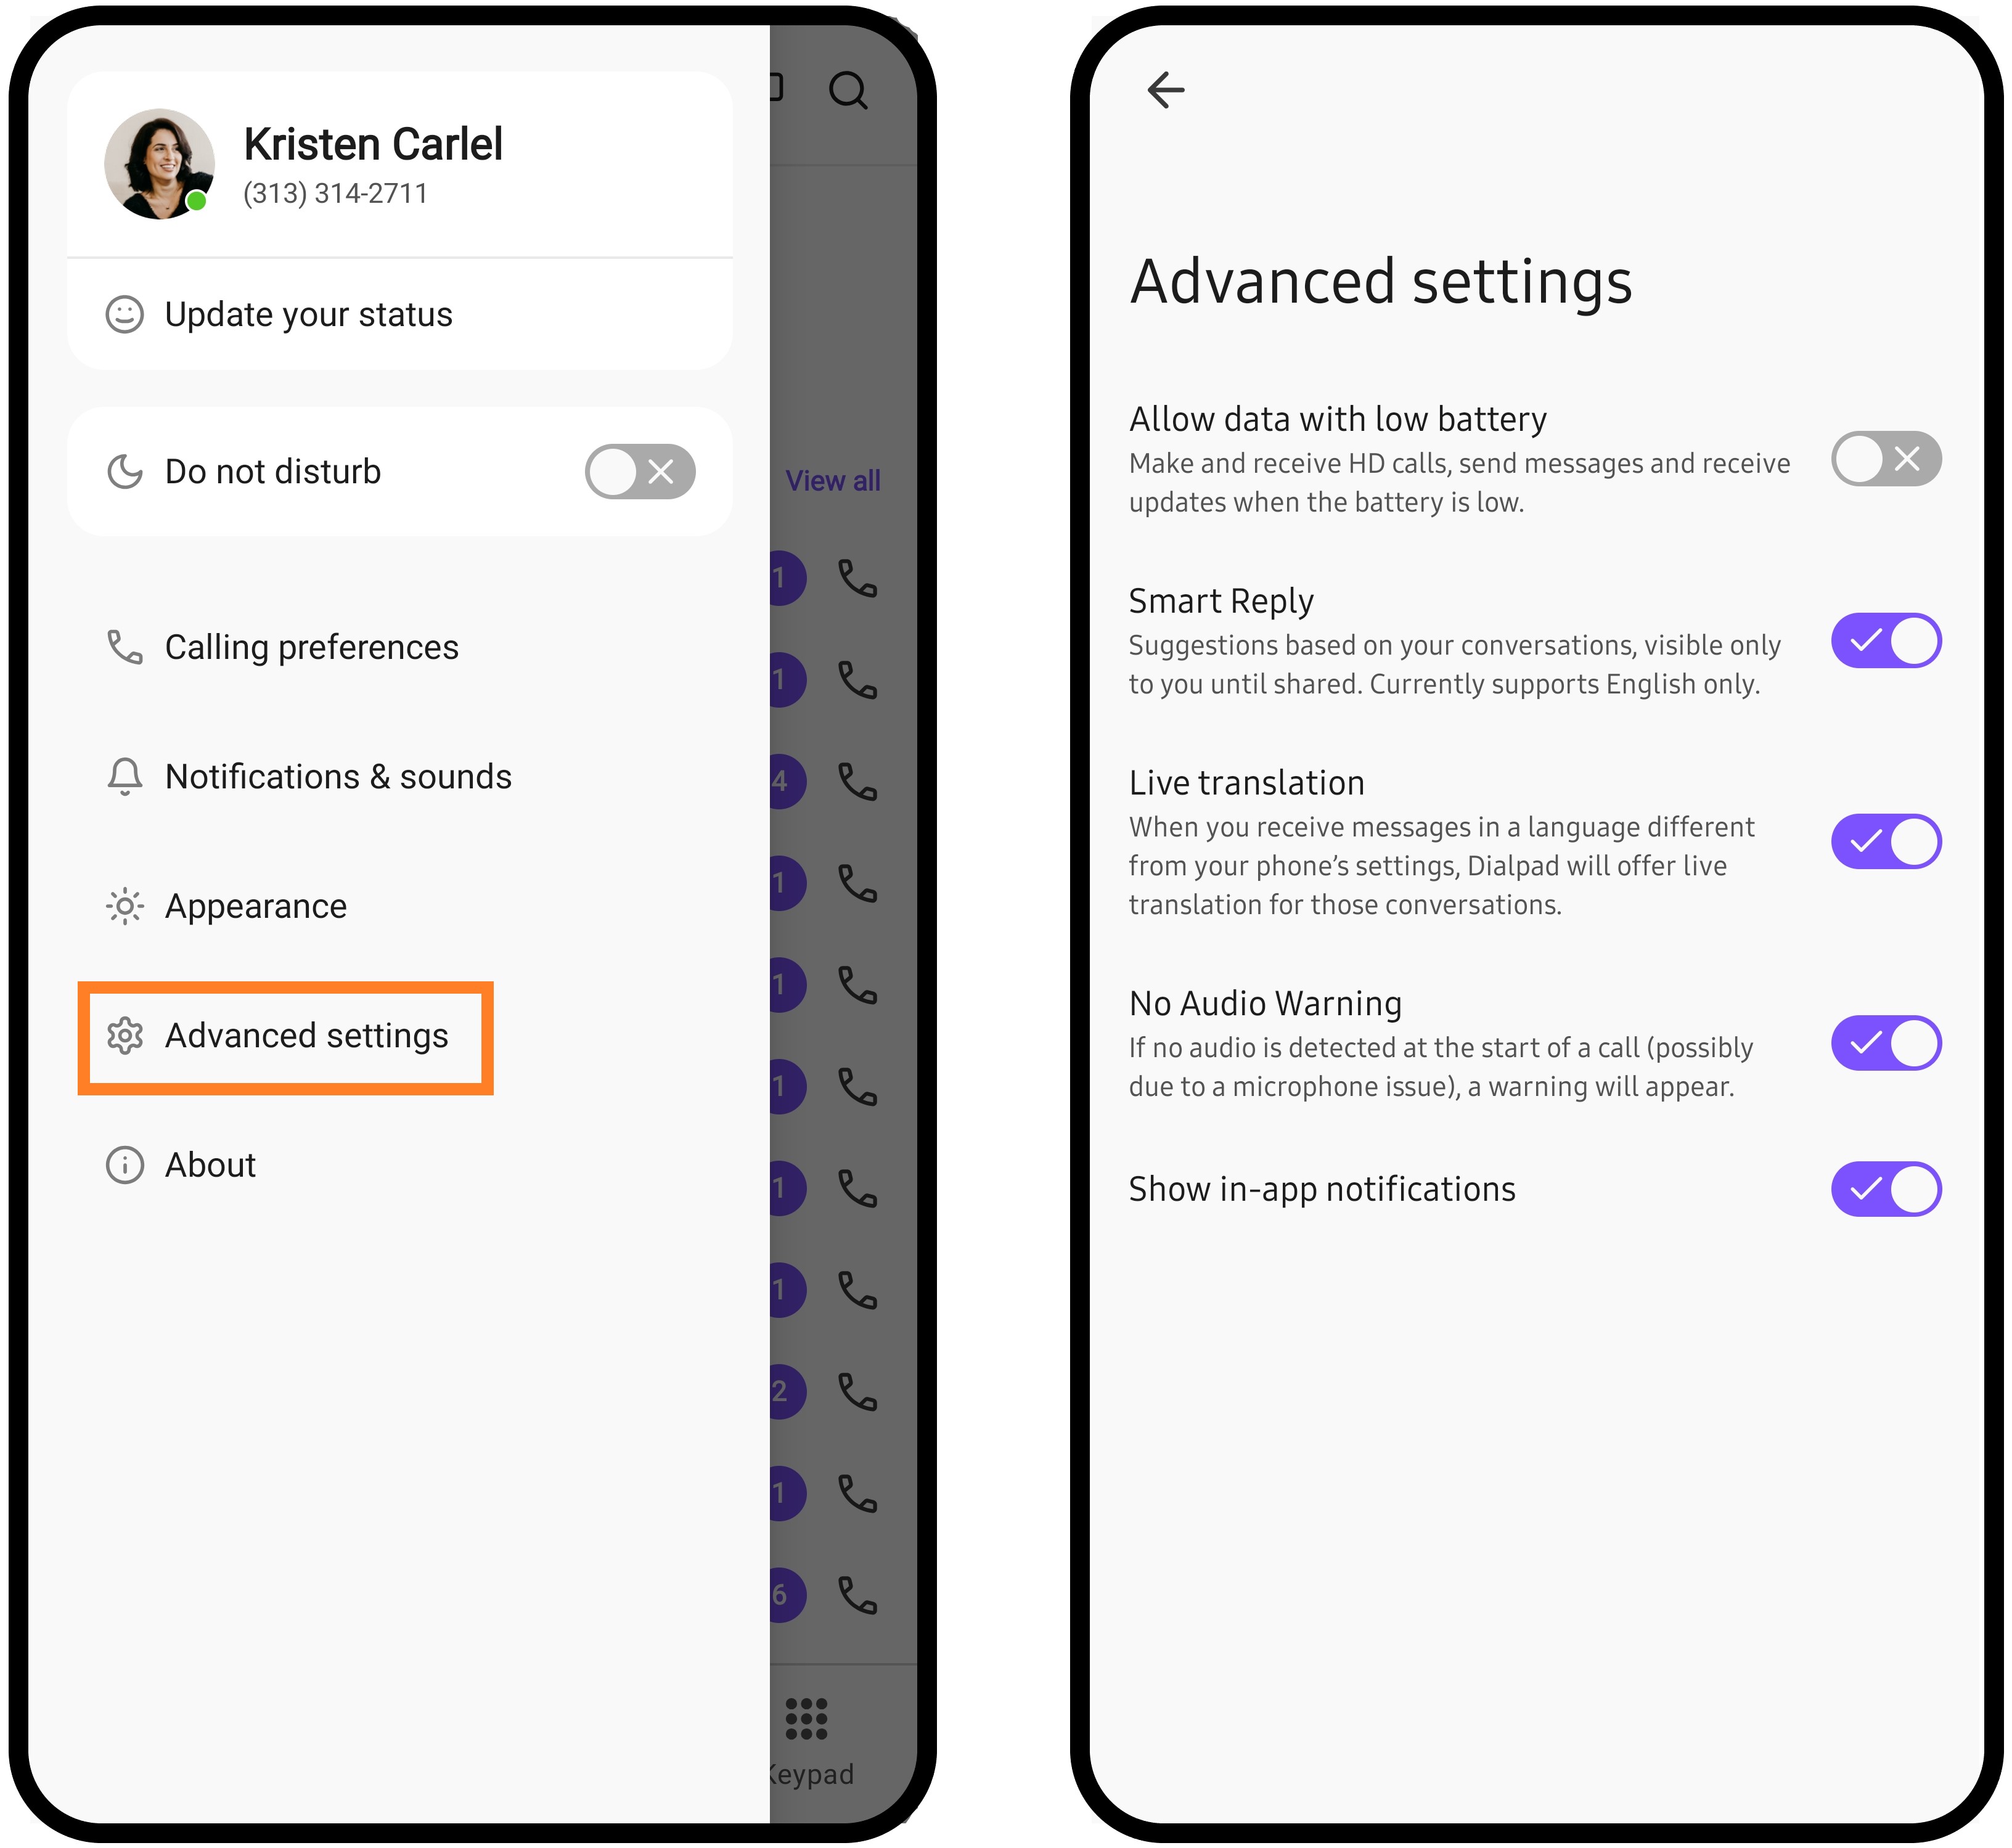
Advanced settings
Use Advanced Settings to further customize your Android Dialpad experience.
Turn the following options on and off based on your preferences:
Allow data with low battery allows Dialpad to operate when your device's battery is low.
Smart Reply suggests replies to new messages that are only visible to you until you tap to share. Dialpad only offers Smart Reply in English.
Live translation receives messages in a language different from your phone’s settings.
No Audio Warning when no audio is detected on your call, a warning will appear to let you know there might be a mic issue.
Show in-app notifications allow Dialpad to alert you of notifications while still in the Dialpad app.
Additional helpful resources are at the very bottom of the Settings menu. To visit our Help Center from the app, select Help. There's also a selection to open our legal and privacy policy and even to submit feedback to our team.
Finally, you can select Log Out to sign out of the Dialpad app on your Android device.