Use a Webchat channel to provide quick and convenient customer support through your website.
Agents will receive live messages in their Digital Contact Center and can respond without leaving the Dialpad app. Emojis, images, and file sharing are all available to help you improve customer engagement and increase conversion rates.
Let’s dive into the details.
Who can use this
Webchat channel creation and deployment is available to Dialpad Connect, Dialpad Support and Dialpad Sell users with a digital plan.
Create a Webchat channel
Create a Webchat channel to start receiving interactions from your website(s).
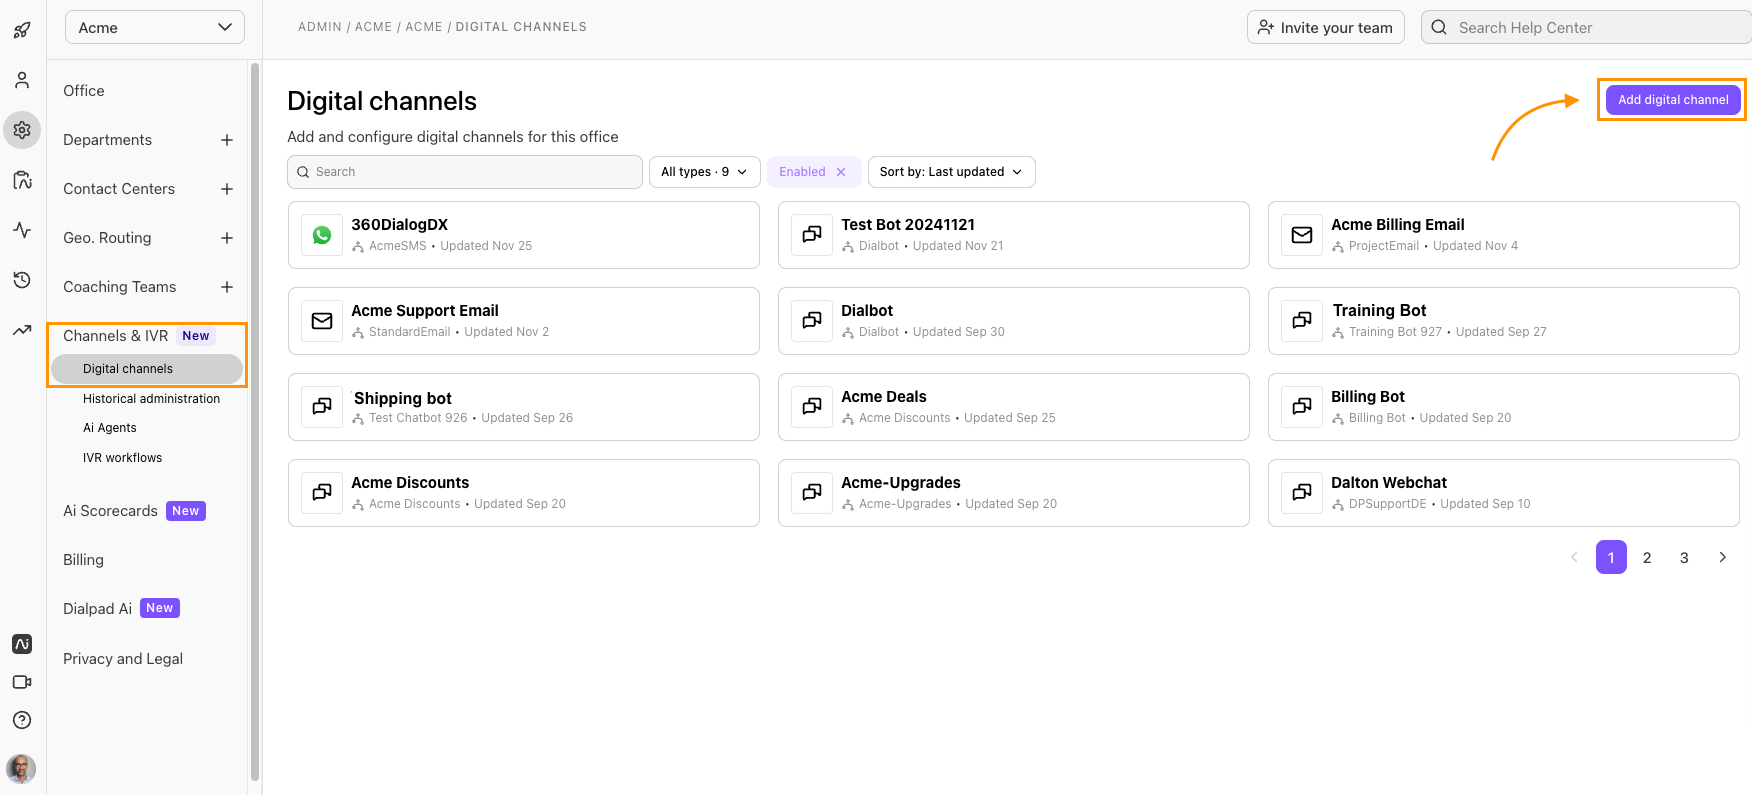
To create a Webchat channel, head to your Dialpad Admin Settings.
Select Channels and Workflows
Select Digital Channels
Select Add Digital Channel
Name your channel
Select Webchat from the Ai Agent drop-down
Select the Digital Contact Center where the channel will be deployed
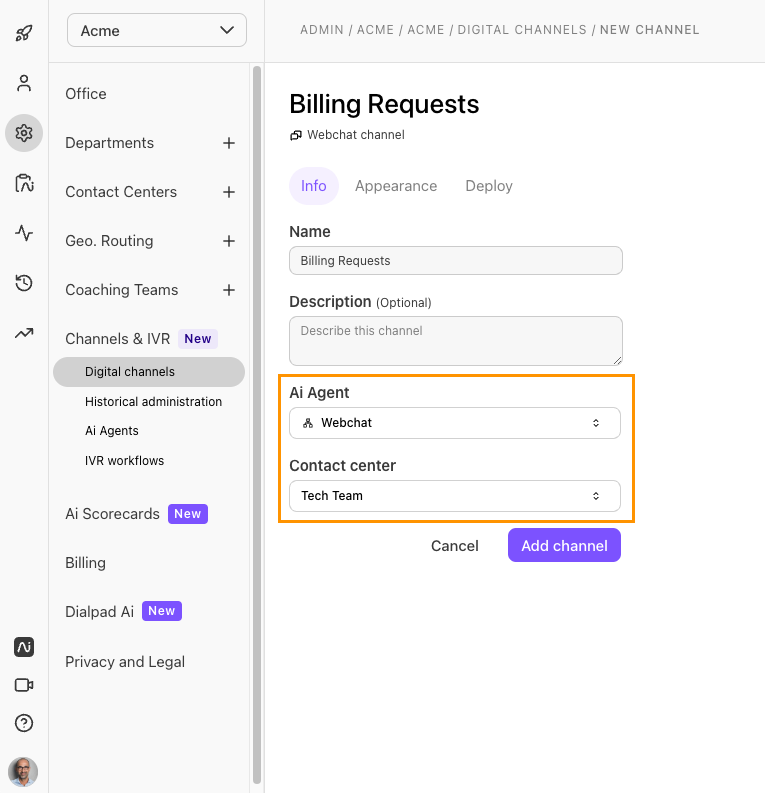
Select Add Channel
Customize a Webchat channel
Once your Webchat channel has been created, it's time to customize it. Dialpad lets you upload your own logos, change the colors and fonts, and more!
To customize the appearance of your channel, head to your Dialpad Admin Settings.
Navigate to Channels & Workflows
Select Digital Channels
Select the desired channel
Select Appearance
.png)
Update your colors, font, and logo
Select Save changes
Deploy a Webchat channel
Now that you’ve customized the appearance of your Webchat experience, it’s time to deploy it.
To deploy a Webchat channel, head to your Dialpad Admin Settings.
Navigate to Channels & Workflows
Select Digital Channels
Select the desired channel
Select Deploy
.png)
From the Deploy Section, you can copy the short link to test your connection (recommended), or select Copy code to copy and paste the code snippet into your website.
Deployment details
The integration script must be included within the the the HTML page, and the clickable element must have the ID dx_chatbot_fab_id
<script async type="module" src="https://dxbeta.dx.dialpad.com/dxclient/dist/dialpad-chatbot.es.js"> </script>
<script> window.dxe = {server: https://dxbeta.dx.dialpad.com }; </script>
The following script must be added to the button element to launch the client.
<img id="dx_chatbot_fab_id"
data-dxchannelid="cfd15683ab42443983a7c4f2ac60c808"
data-dxprovemail="5130893811646464@5130893811646464.sandbox.dialpad.com"/>
The button can be any HTML element as long as the id is set to dx_chatbot_fab_id
The dx_chatbot_fab_id supports the following attributes:
Tip
For a standalone chat experience, have your customers access your chat via the shortlink or QR code.
Here are a few examples of how to deploy your chatbot on popular website hosting platforms and systems.
Wordpress
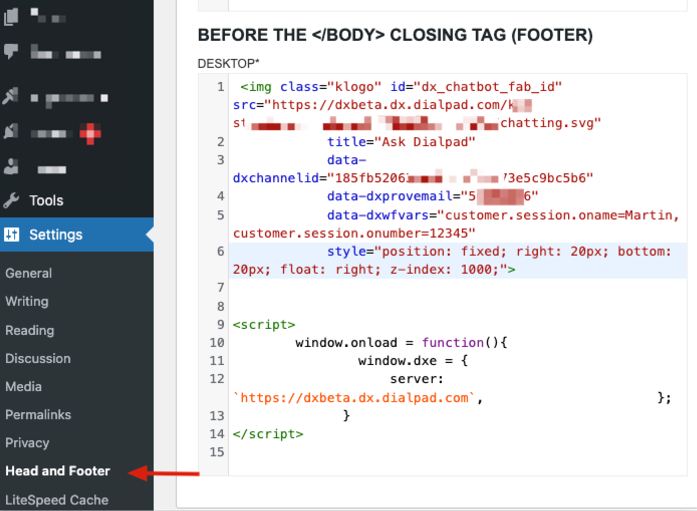
In Wordpress, the Head, Footer and Post Injections plugin is used to inject script in the header and place the floating action button (FAB).
Navigate to Settings
Select Header and Footer
Copy the scripts from the Deploy section
The <Head> page section of each page must include the chat script for persistent or sticky sessions.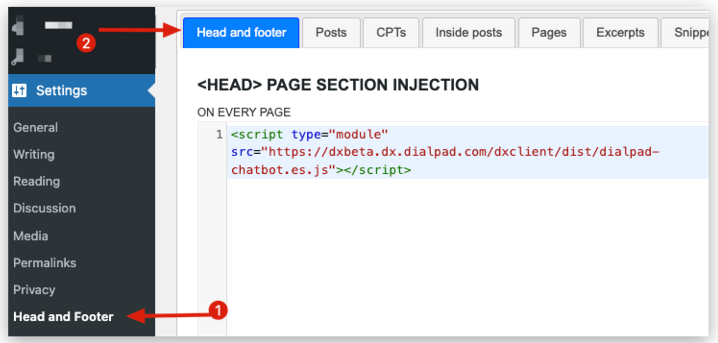
Add the FAB and the initialization before the </body>
Squarespace
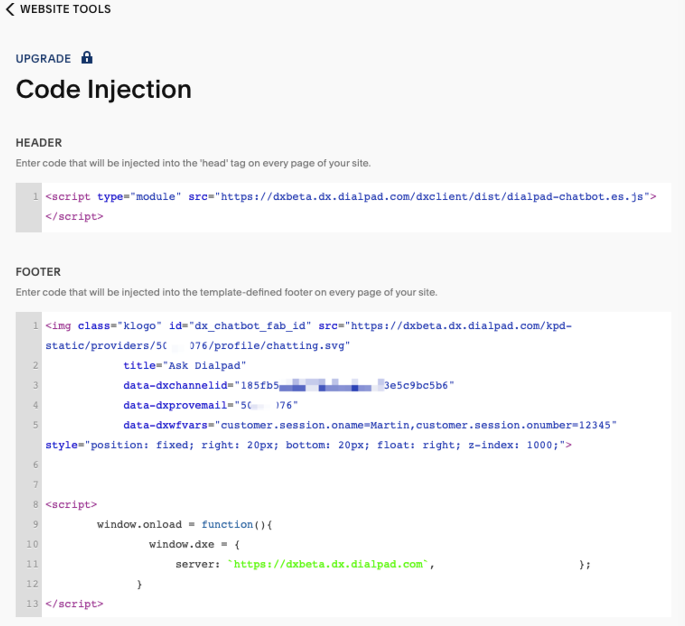
The Squarespace website builder supports code injection from the Website Tools.
Select Utilities
Select Website Tools
Select Code injection
Copy the script found in the Deploy section
Ruby on Rails apps
Dialpad’s Ai Chatbot client can be integrated with Ruby on Rails apps. Refer to the sample code and instructions below to learn how to integrate our Ai Chatbot with a RoR app
Step 1: Create a partial
Locate the app/view/shareddirectory for your app and create a new view file named _dialbot.html.erb
Copy and paste the following code into your partial.
<div
  id="dx_chatbot_fab_wrapper_id"
  style="background-color:#7C52FF;border-radius:50%;box-sizing:border-box;display:flex;height:56px;overflow:hidden;padding:12px;width:56px;position:absolute;bottom:16px;right:16px;z-index:123;">
  <img
    data-dxchannelid=<%= channel_id %>
    data-dxprovemail=<%= provider_id %>
    id="dx_chatbot_fab_id"
    src="<%= server %>/kpd-static/providers/0/webchat/default/images/fab-icon.png"
    style="clip-path:circle(50%);object-fit:contain;height:auto;width:100%;"
  />
</div>

<script>window.dxe = { "server": "<%= server %>" };</script>
<script async type="module" src="<%= server %>/dxclient/dist/dialpad-chatbot.es.js"></script>
Step 2: Use the partial in other views
Use the partial in other views, for example:
<%= render partial: "shared/dialbot", locals: { channel_id: '45194947cdd740129c48fb3c10706a3d', provider_id: '5646620347596800@dialpad.com', server: 'https://lighthouse.dx.dialpad.com' } %>Parameters
channel_id The unique ID of the WebChat channel.
provider_id The provider ID or email.
server The server URL with zone.
Android apps
Dialpad Ai Chatbot client can be integrated with native Android apps. You can use our Android SDK and Swift package to enable this integration.
This article provides references and links to our public GitHub repositories that host the Android SDK and Swift package for native Android apps.
The repository contains usage and installation guide, sample app and SDK source.
The key features of these native bindings are:
Bi-directional Communication:
Your Android app can send commands to the chatbot using
DialpadChatbotCommandandNotificationCenterThe chatbot can send events to your Android app using
DialpadChatbotEventandNotificationCenter
WKWebView-based Implementation: Leverages
WKWebViewfor rendering the chatbot interface.Compose Support: The package includes a
DialpadChatbotViewfor easy integration with Jetpack Compose andSwiftUI
iOS apps
Dialpad Ai Chatbot client can be integrated with native Android apps. You can use our iOS SDK and Swift package to enable this integration.
This article provides references and links to our public GitHub repositories that host the iOS SDK and Swift package for native iOS apps.
The repository contains usage and installation guide, sample app and SDK source.
The key features of these native bindings are:
Bi-directional Communication:
Your iOS app can send commands to the chatbot using
DialpadChatbotCommandandNotificationCenterThe chatbot can send events to your iOS app using
DialpadChatbotEventandNotificationCenter
WKWebView-based Implementation: Leverages
WKWebViewfor rendering the chatbot interface.Compose Support: The package includes a
DialpadChatbotViewfor easy integration with Jetpack Compose andSwiftUI
More information
Questions on how to manage your Digital Contact Center? Be sure to read this Help Center article for more information.
Frequently asked questions
What types of images can I share?
Users can upload the following file types:
gif
png
jpg
aac
mp4
amr
mp3
ogg
3gp
pdf
doc
xls
ppt
docx
xlsx
pptx
Can I share multiple attachments at once?
No, only one file can be uploaded at a time.
Are web chats secure?
Yes! We encrypt all API calls and web socket data.
Where can I find analytics for my Webchat channel?
To monitor your Webchat channel metrics, check out the All digital view in your Dialpad Analytics.
Are eParams supported?
No eParams is not supported.