Tap into the power of Dialpad’s Agentic AI Chatbot, available 24/7, not only to answer questions but to take action. Agentic chatbots can book appointments, check order status, update records, create tickets, and more, seamlessly connecting to your systems like Bullhorn, Salesforce, ServiceNow, Zendesk, HubSpot, Google Calendar/Workspace, Outlook, AthenaHealth, Calendly, and Zoho CRM.
Let’s dive into the details.
Who can use this
AI Agents are available to Dialpad Support users on an Advanced or Premium plan.
To connect an agentic AI agent to your Contact Center, you must have a Digital Contact Center.
Types of AI Agents
Dialpad offers two types of AI Agents:
Agentic Agents: Capable of performing tasks, executing workflows, and generating natural answers.
Generative (Classic) Agents: Designed specifically to generate natural answers from your knowledge base.
This article covers how to create an Agentic AI Agent.
Read this article to learn how to create a Generative (classic) AI Agent.
Create an Agentic AI Agent
To create an Agentic AI Agent, go to your Dialpad Admin Settings.
Note
You must be a Company or Office Admin to create an Agentic AI Agent.
Select AI Agents
Select Create AI Agent
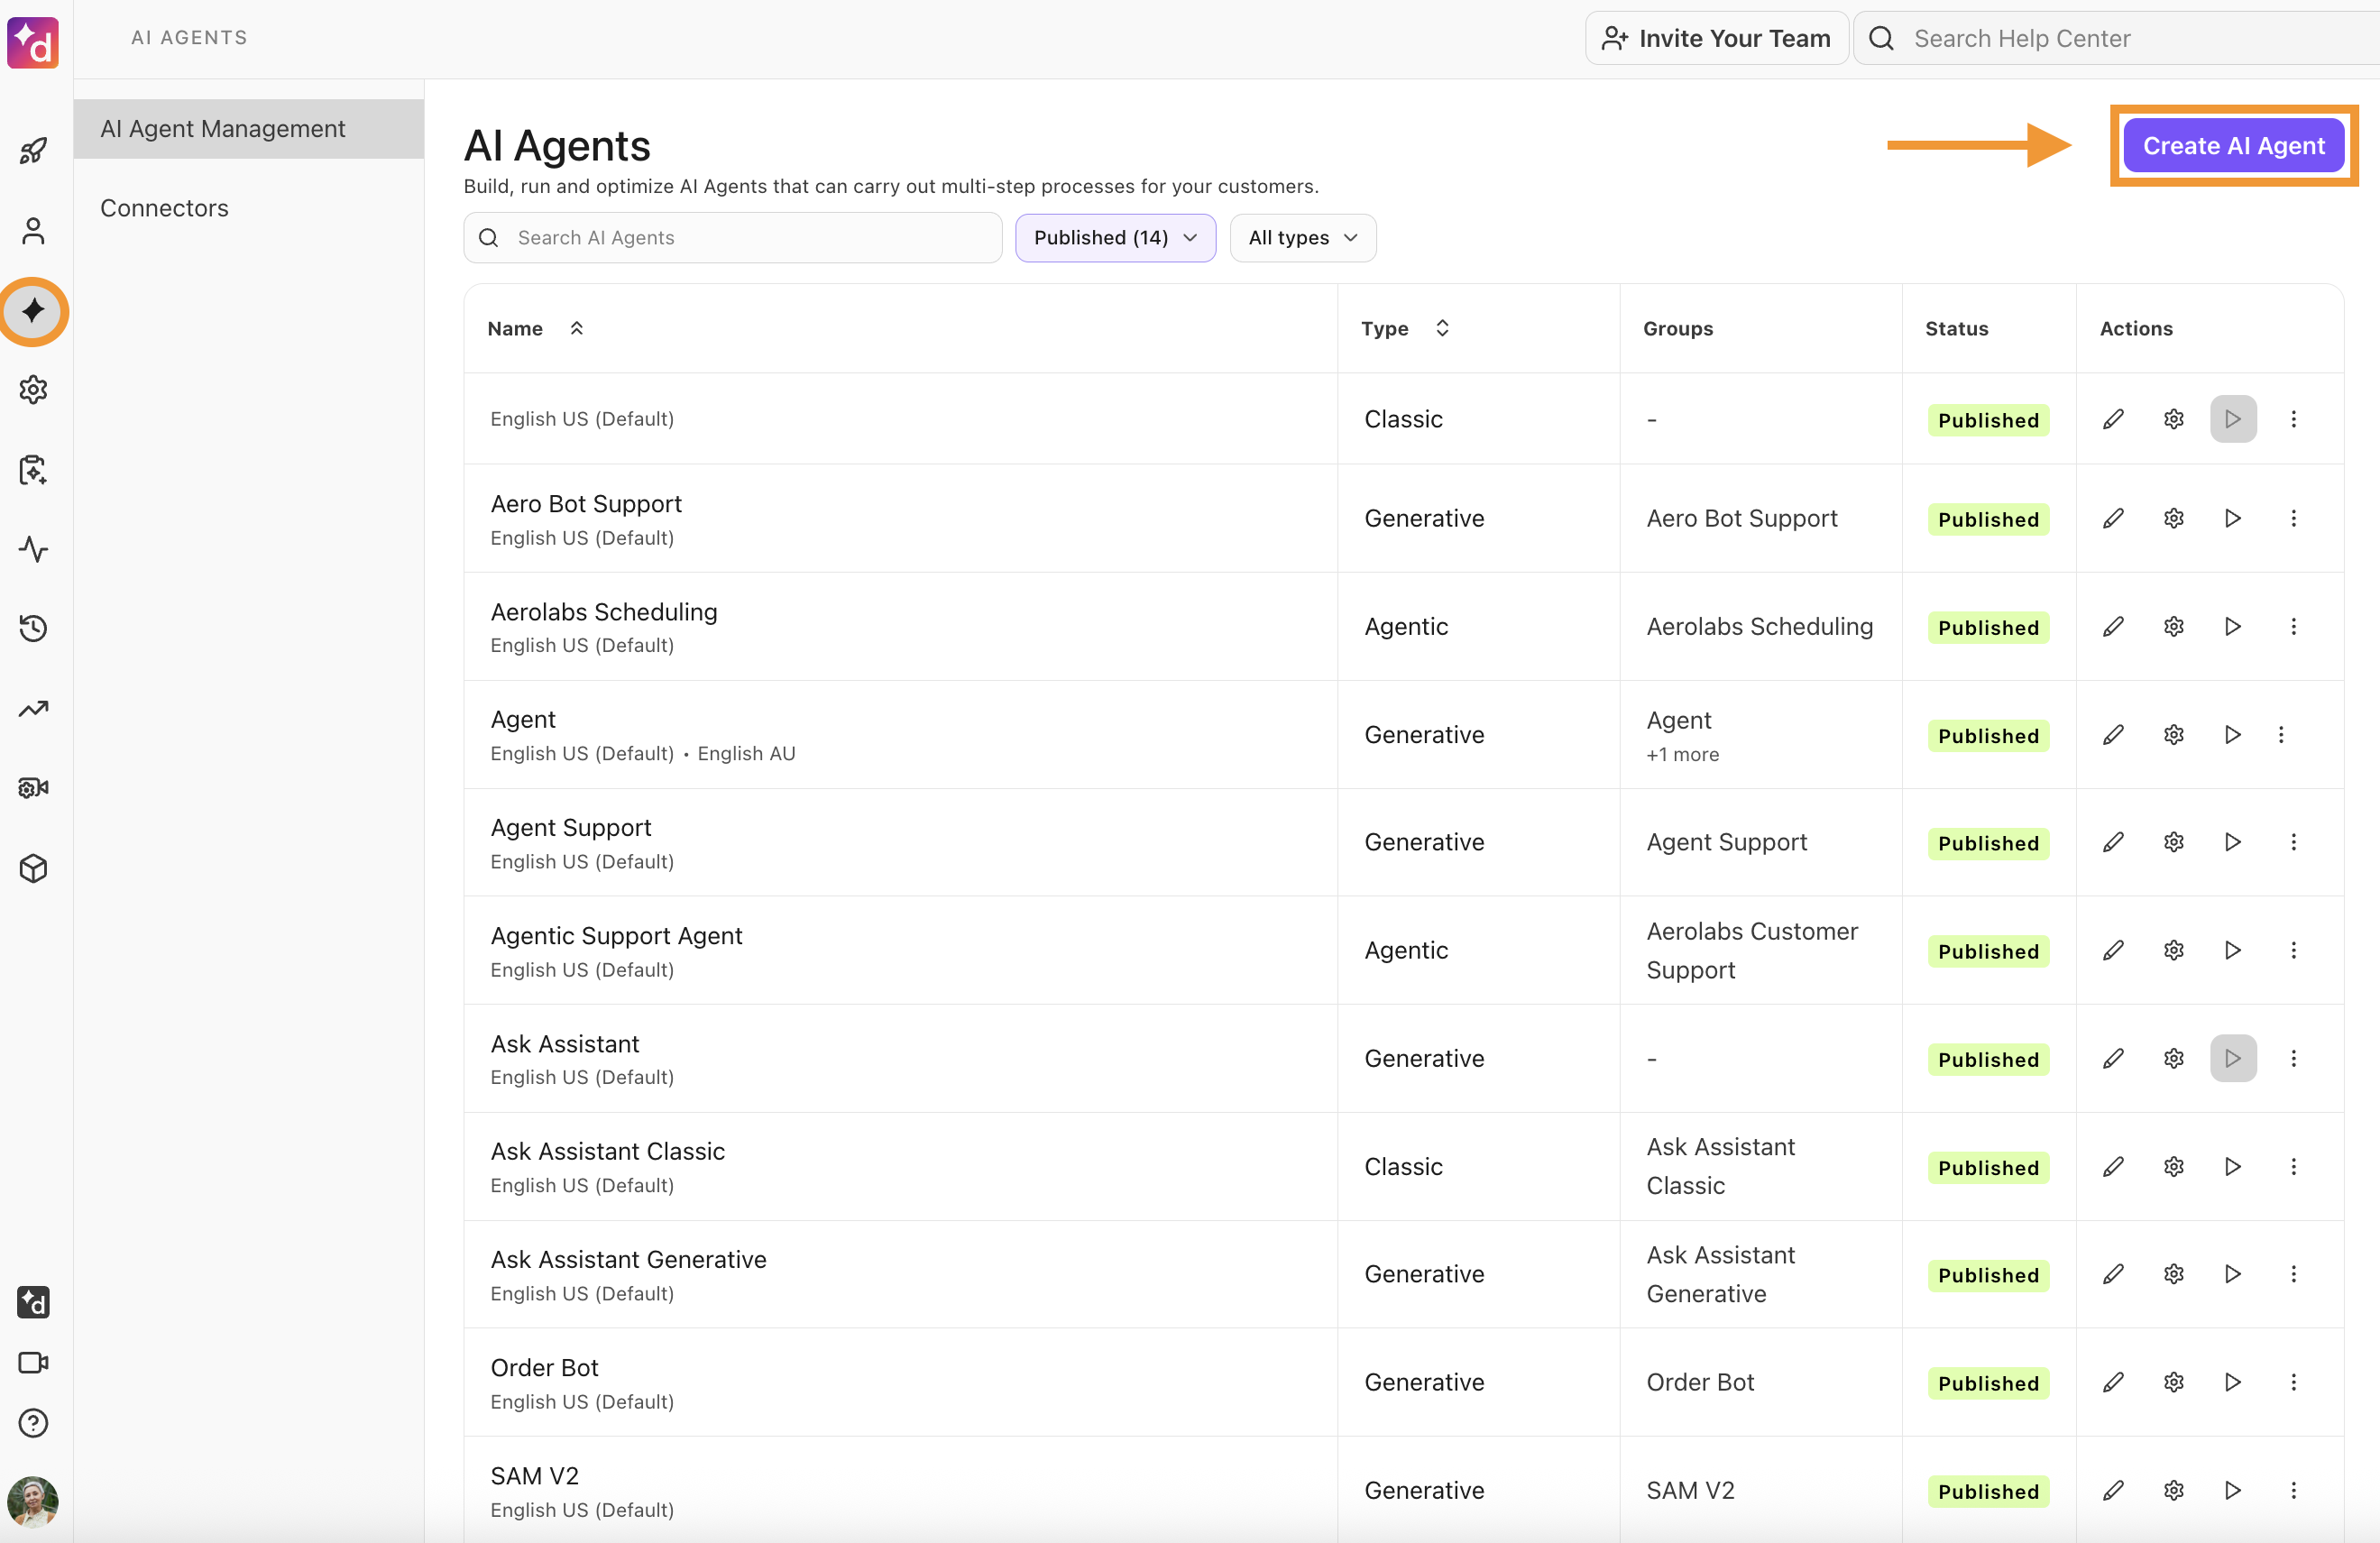
Select Agentic
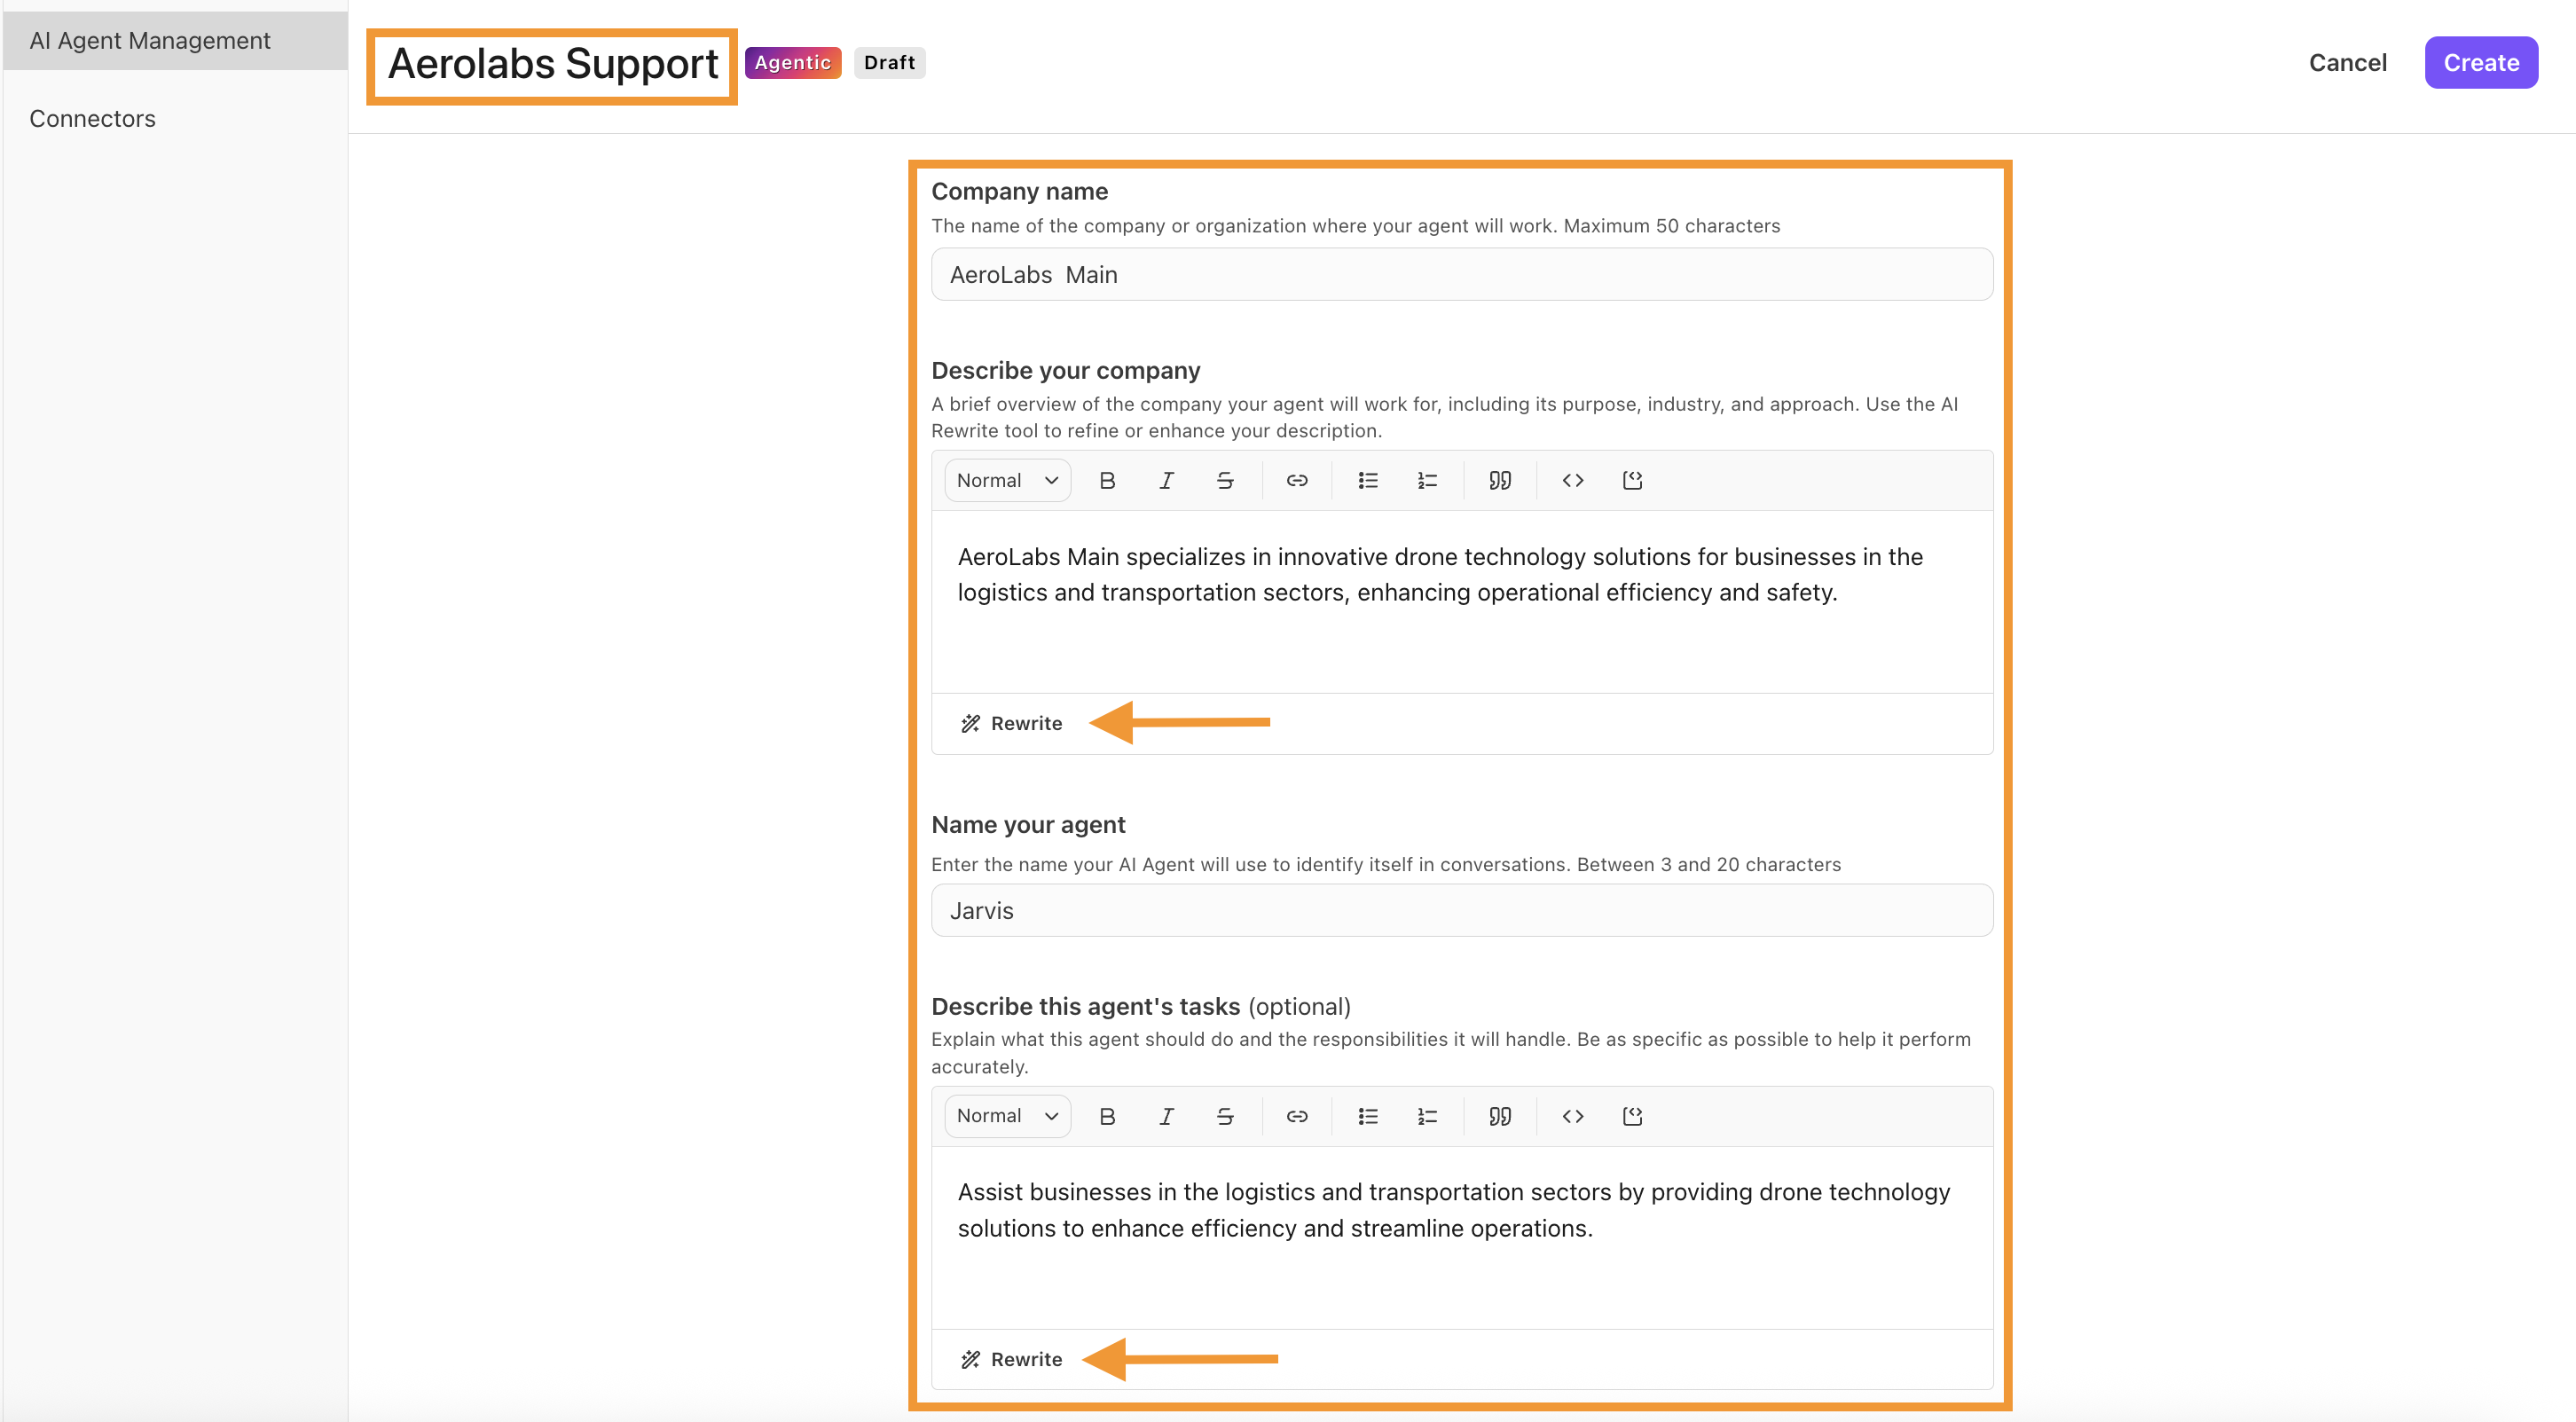
Name the AI Agent
Note
Your AI Agent’s name is for internal purposes only; customers will not see this name.
Enter your Company name
Describe your company
Tip
The more context you provide, the better.
Select Improve to use our AI writing assistant tool to help with style and check for errors.
Describe the tasks your agent will perform
Note
This is where you can expand on what you want the agent to do. It can include: how data is displayed, confirmations to ask before proceeding, etc.
Do not include specific steps for skills. Only include high-level descriptions of the skills you want the agent to perform.
Select Improve to help craft your prompt.
Use your discretion when filling this out. The above-listed items are just examples of what you can include in the description for agent behaviour.
Define the voice and tone of the agent
Note
This is where you can describe the tone it will use, such as a professional tone. You can also define the type of voice to use, such as active or passive.
Enter the agent’s display name
This is the name that will appear to your customers.
Describe how the agent will greet your customers.
Use your discretion when filling out how you want the agent to greet users.
Choose the AI Agent’s knowledge base language
Select Create
That’s it! Your new Agentic AI Agent is ready for deployment.
Tip
You can update these settings at any time from the Settings section of your AI Agent.
Add knowledge to an Agentic AI Agent
Now that your Agentic AI Agent has been created, it's time to give it knowledge by connecting sources. This could be an internal knowledge base, a public-facing Help Center, or any external website.
Note
Agents have access to the knowledge base throughout all customer interactions and don’t need a specific skill set to use it.
Dialpad’s AI Agents can sync with the following popular content management platforms:
Zendesk
Document360
Box
Guru
Google Drive
Note
You must select a specific folder, not the entire drive.
Google Docs, PDF, HTML, TXT, and MD files are supported.
These knowledge connectors sync every 24 hours, ensuring updates to your Help Center articles are automatically reflected in the chatbot’s connected knowledge.
You can also use our custom web crawler to add content from any website.
Webcrawler configuration
When using a custom webcrawler, you can choose to crawl selected pages or the entire website.
If crawling only specific pages, you’ll need to configure the following details.
Base URL: The root of the website that will be crawled (this will act as the reference point for the entire domain).
Starting Pages: The specific entry points for the crawling process. They are the actual URLs where the crawling starts but not necessarily the root of the website.
These URLs can be deep links that point to specific pages within the domain.
Labels: Specify a label to be applied to each imported document. This can be useful for distinguishing documents from other sources (e.g. uploads).
You can also customize your webcrawler using the following advanced settings:
Ignore meta directives: Instruct the crawler to disregard <meta> tag directives such as robots="noindex, nofollow" that are normally used to control how search engines index and link to a page.
Force crawl: Instead of relying on the sitemap to discover which pages to crawl, force crawl dynamically discovers the pages by fetching and processing every discoverable link, beginning with the starting pages.
Use custom agent: Specifies a custom user agent string.
Ignore page locale: When set, the crawler ignores any locale specified by the page (via HTML lang attributes, HTTP headers, or meta tags) and instead treats the content as if it fits the desired locale.
CSS selector: Use a custom CSS selector to specify what content to scrape from each page.
Minimum wait duration: Customize the delay between crawling each page.
*If you’re using the custom webcrawler, you must have legal rights to use the crawled and imported content from all linked websites.
Not limited to websites, you can also upload helpful documents! Note that documents do not sync with Dialpad, meaning if you update your file, you must remove it and upload the newest version.
To add knowledge to your chatbot, go to your Dialpad Admin Settings.
Select AI Agents
Select the AI Agent
Go to Documents
Select Configure sources
.png)
Connect to a content source, or upload documents
Note
If you’re connecting to a content management system, you’ll need to provide additional details such as your domain, API key, or locale.
Follow the prompts, then select Save
Tip
If you want to upload individual documents, select Add document to add unique files.
*Individual documents cannot be larger than 5 MB.
.png)
Agentic Skills
Skills define what an Agentic AI Agent is allowed to do. A Skill grants the agent access to specific actions, for example, adding a caller’s information into your CRM when the caller is a new lead.
These actions are executed through Connectors.
Each API endpoint inside a connector is called a Data Operation. A Data Operation represents a specific “unit of work” the agent can perform, such as Create Contact, Update Lead, or Log Call Note.
Once a connector is published, you can select which Data Operations (actions) and flows you want to make available to your agent by attaching them to a Skill. This allows you to control exactly what the agent can do with that integration.
Skill Prompts and Guardrails
Each Skill includes its own configuration prompts. One of the most important parts of Skill configuration is defining Guardrails.
Guardrails describe the limits of what the Agentic AI Agent can do. They help prevent undesired actions by explicitly defining boundaries—for example:
What the agent should never do.
What data the agent should not access or modify.
When the agent must ask for confirmation before acting.
When the agent should escalate to a human.
Clear guardrails are essential for safe and reliable agent behavior. While some guardrail enforcement is handled automatically by the platform, specifying them clearly helps ensure the agent behaves as intended.
Create Agentic Skills
To create Agentic Skills for your Agentic Agent, go to your Dialpad Admin Portal.
Select AI Agents
Navigate to the desired chatbot, then select Manage your agent
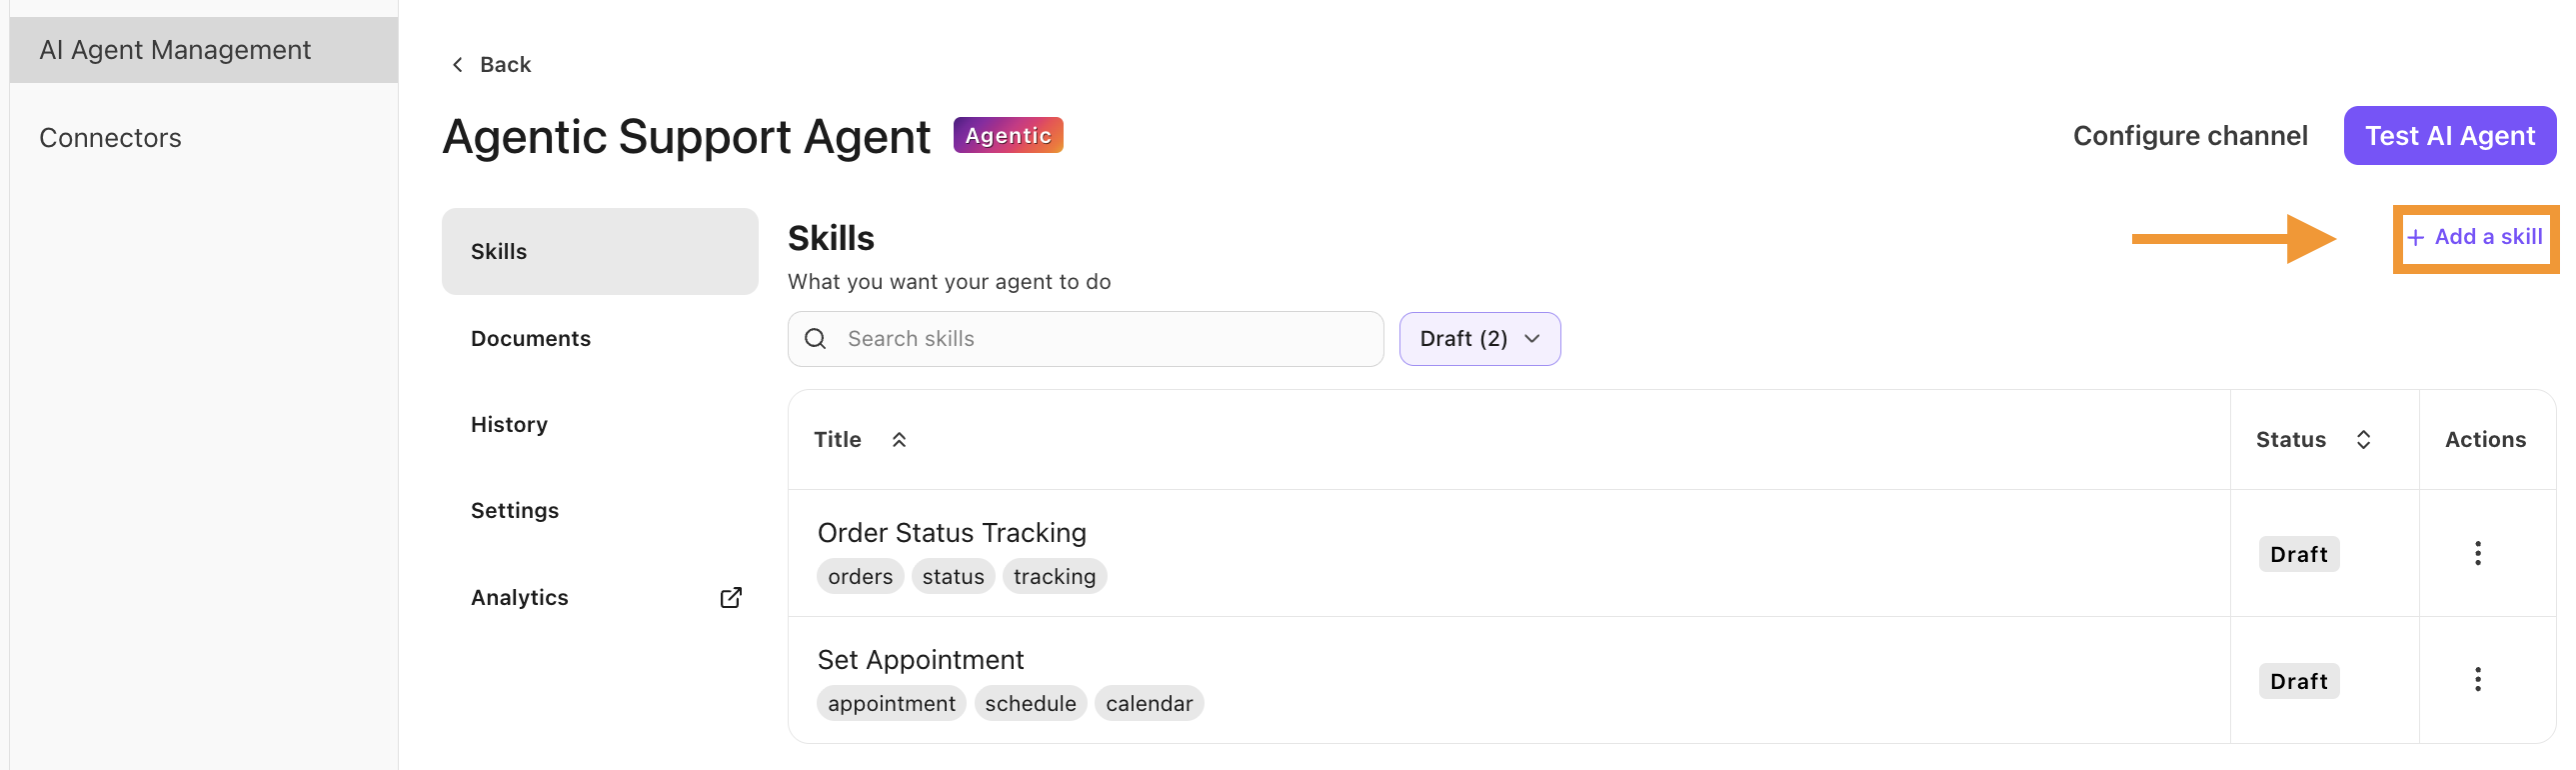
Select Skills
Select Add a skill
Choose to create a skill from scratch or use one of the pre-defined templates
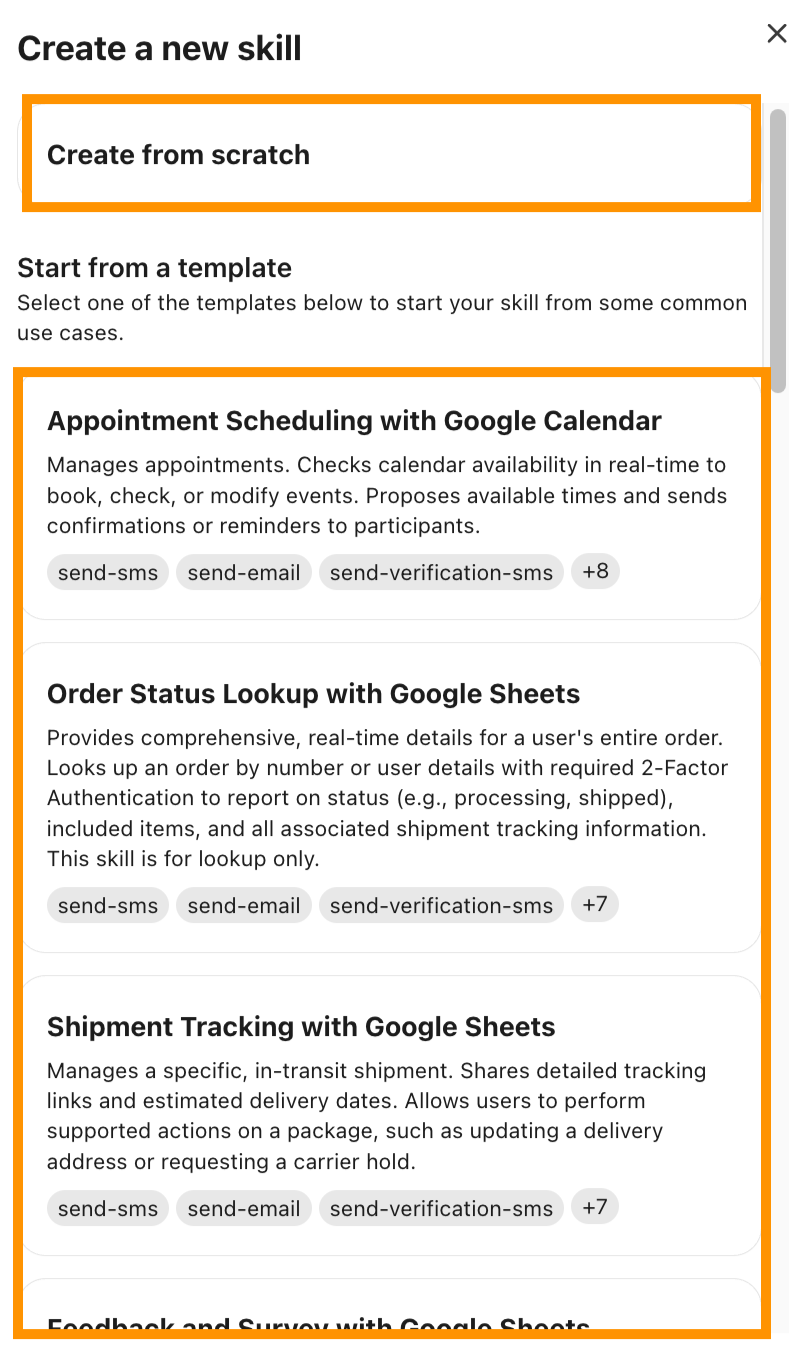
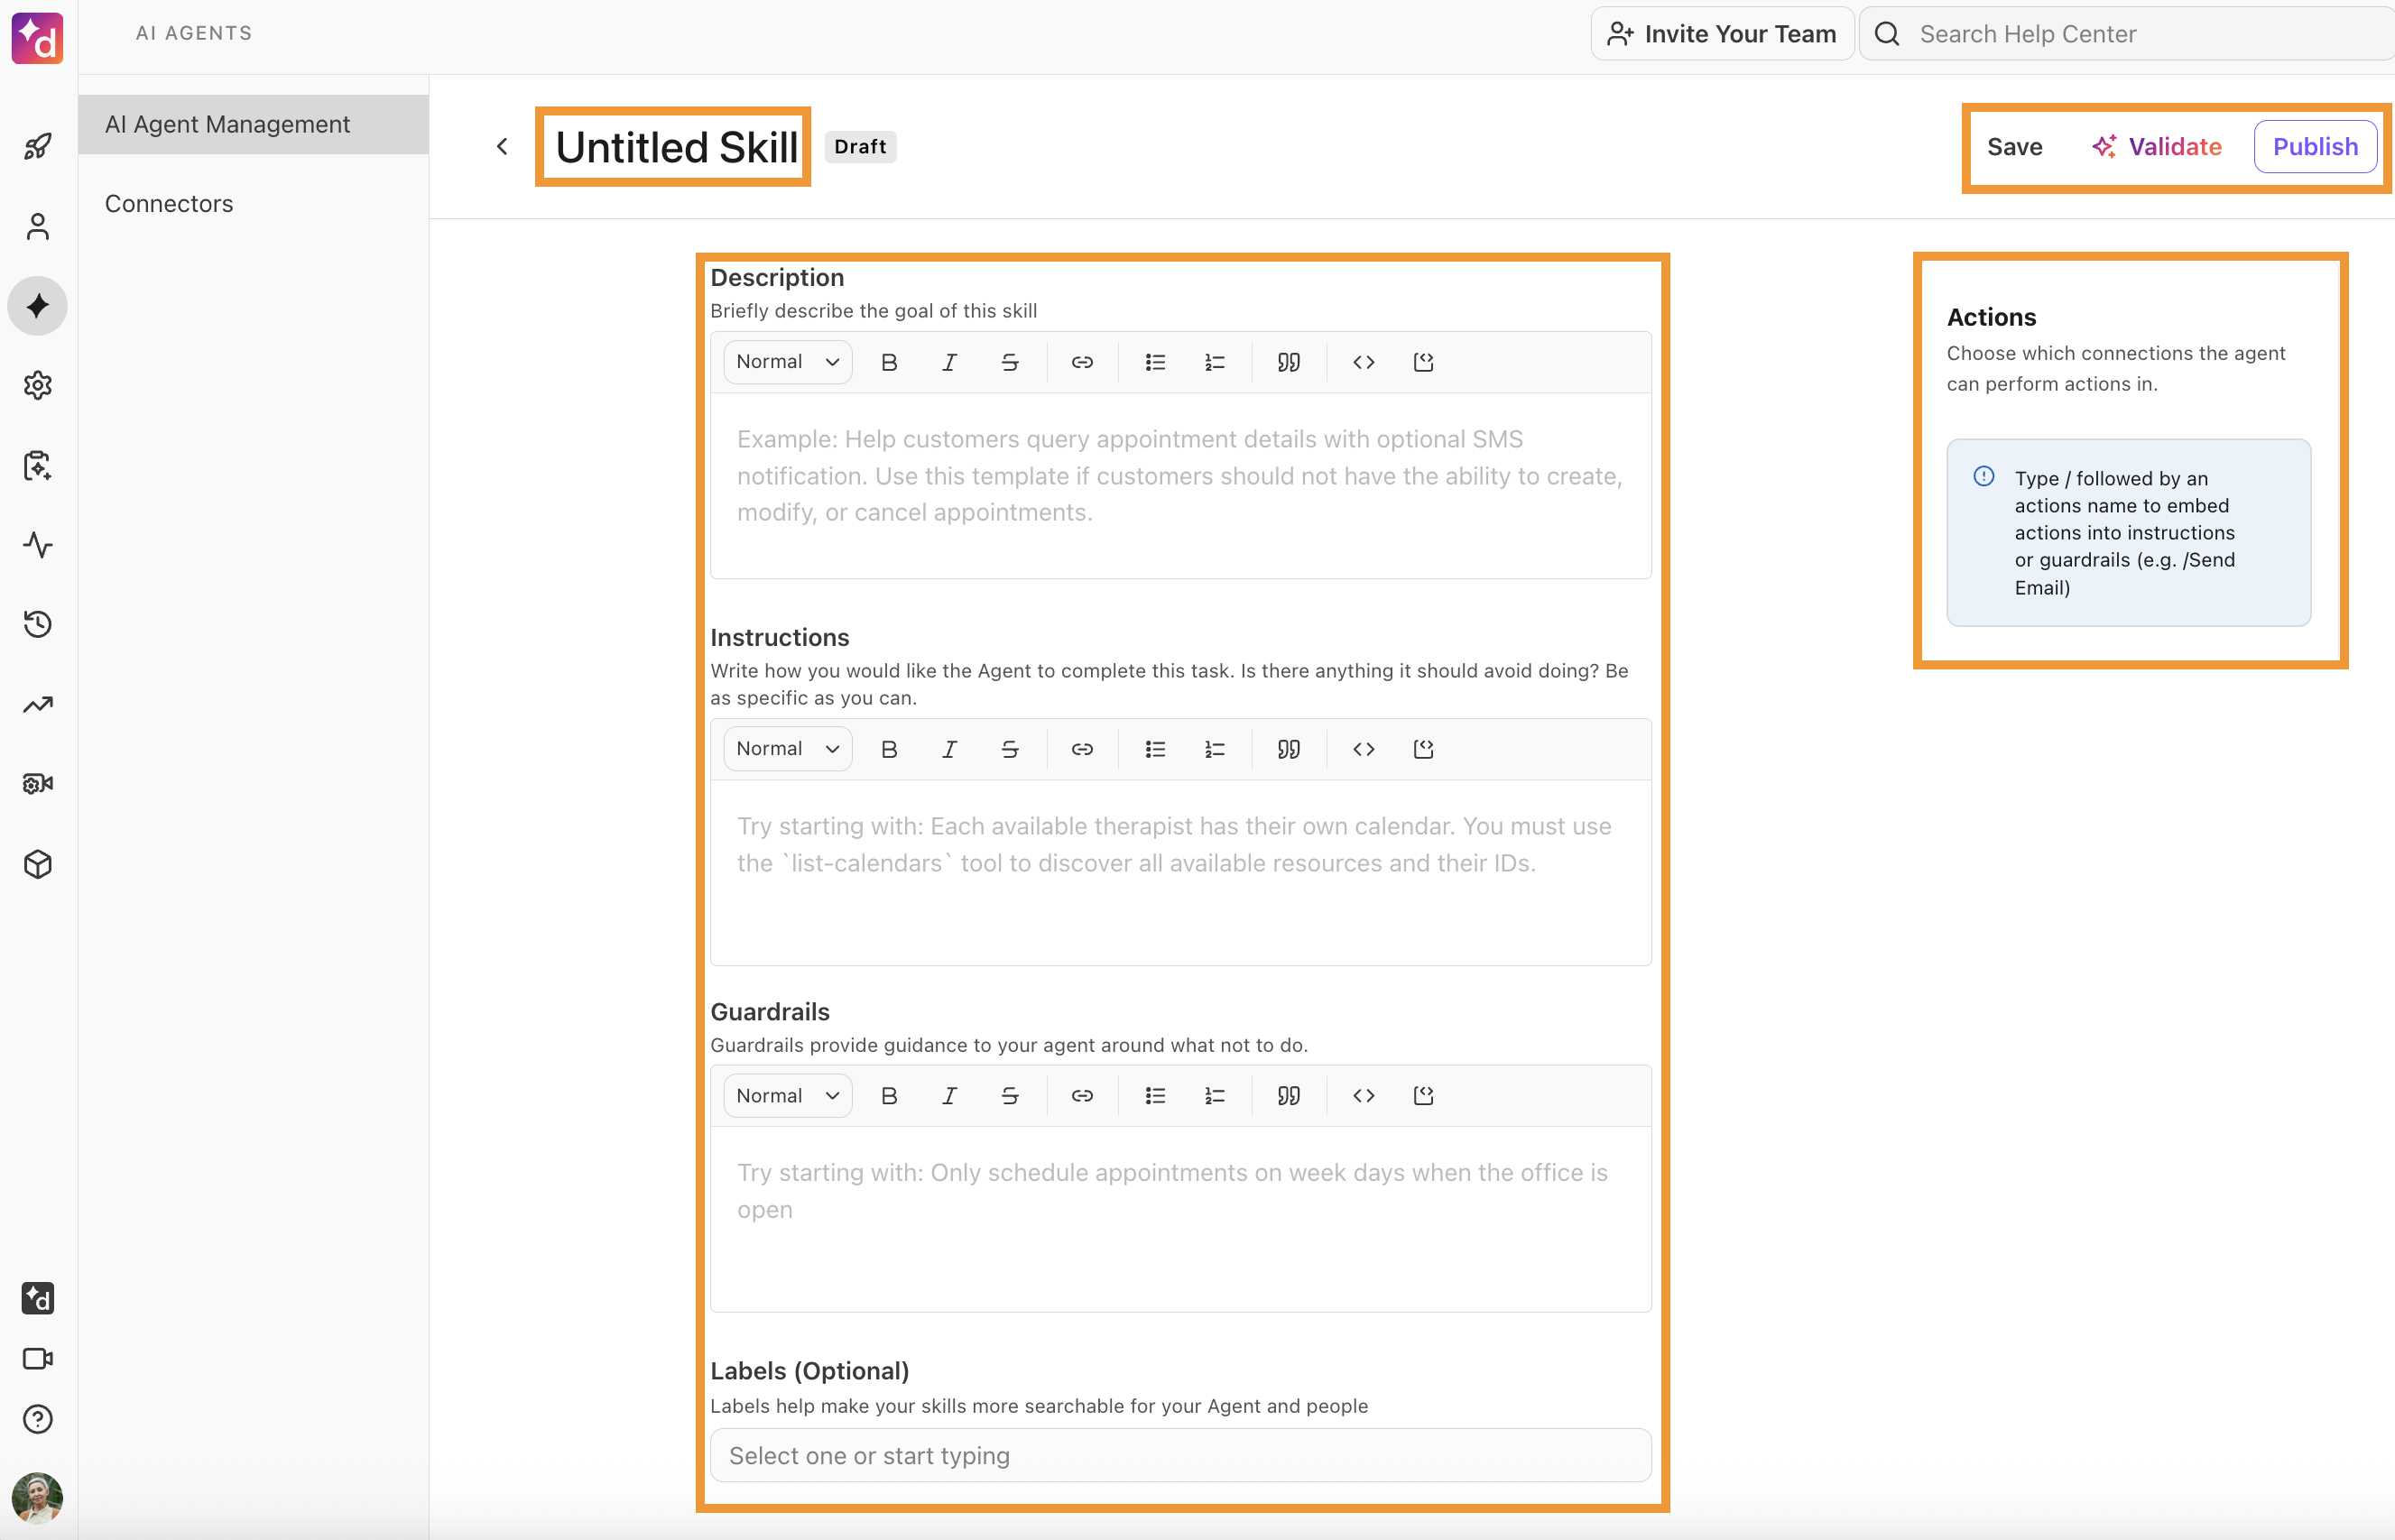
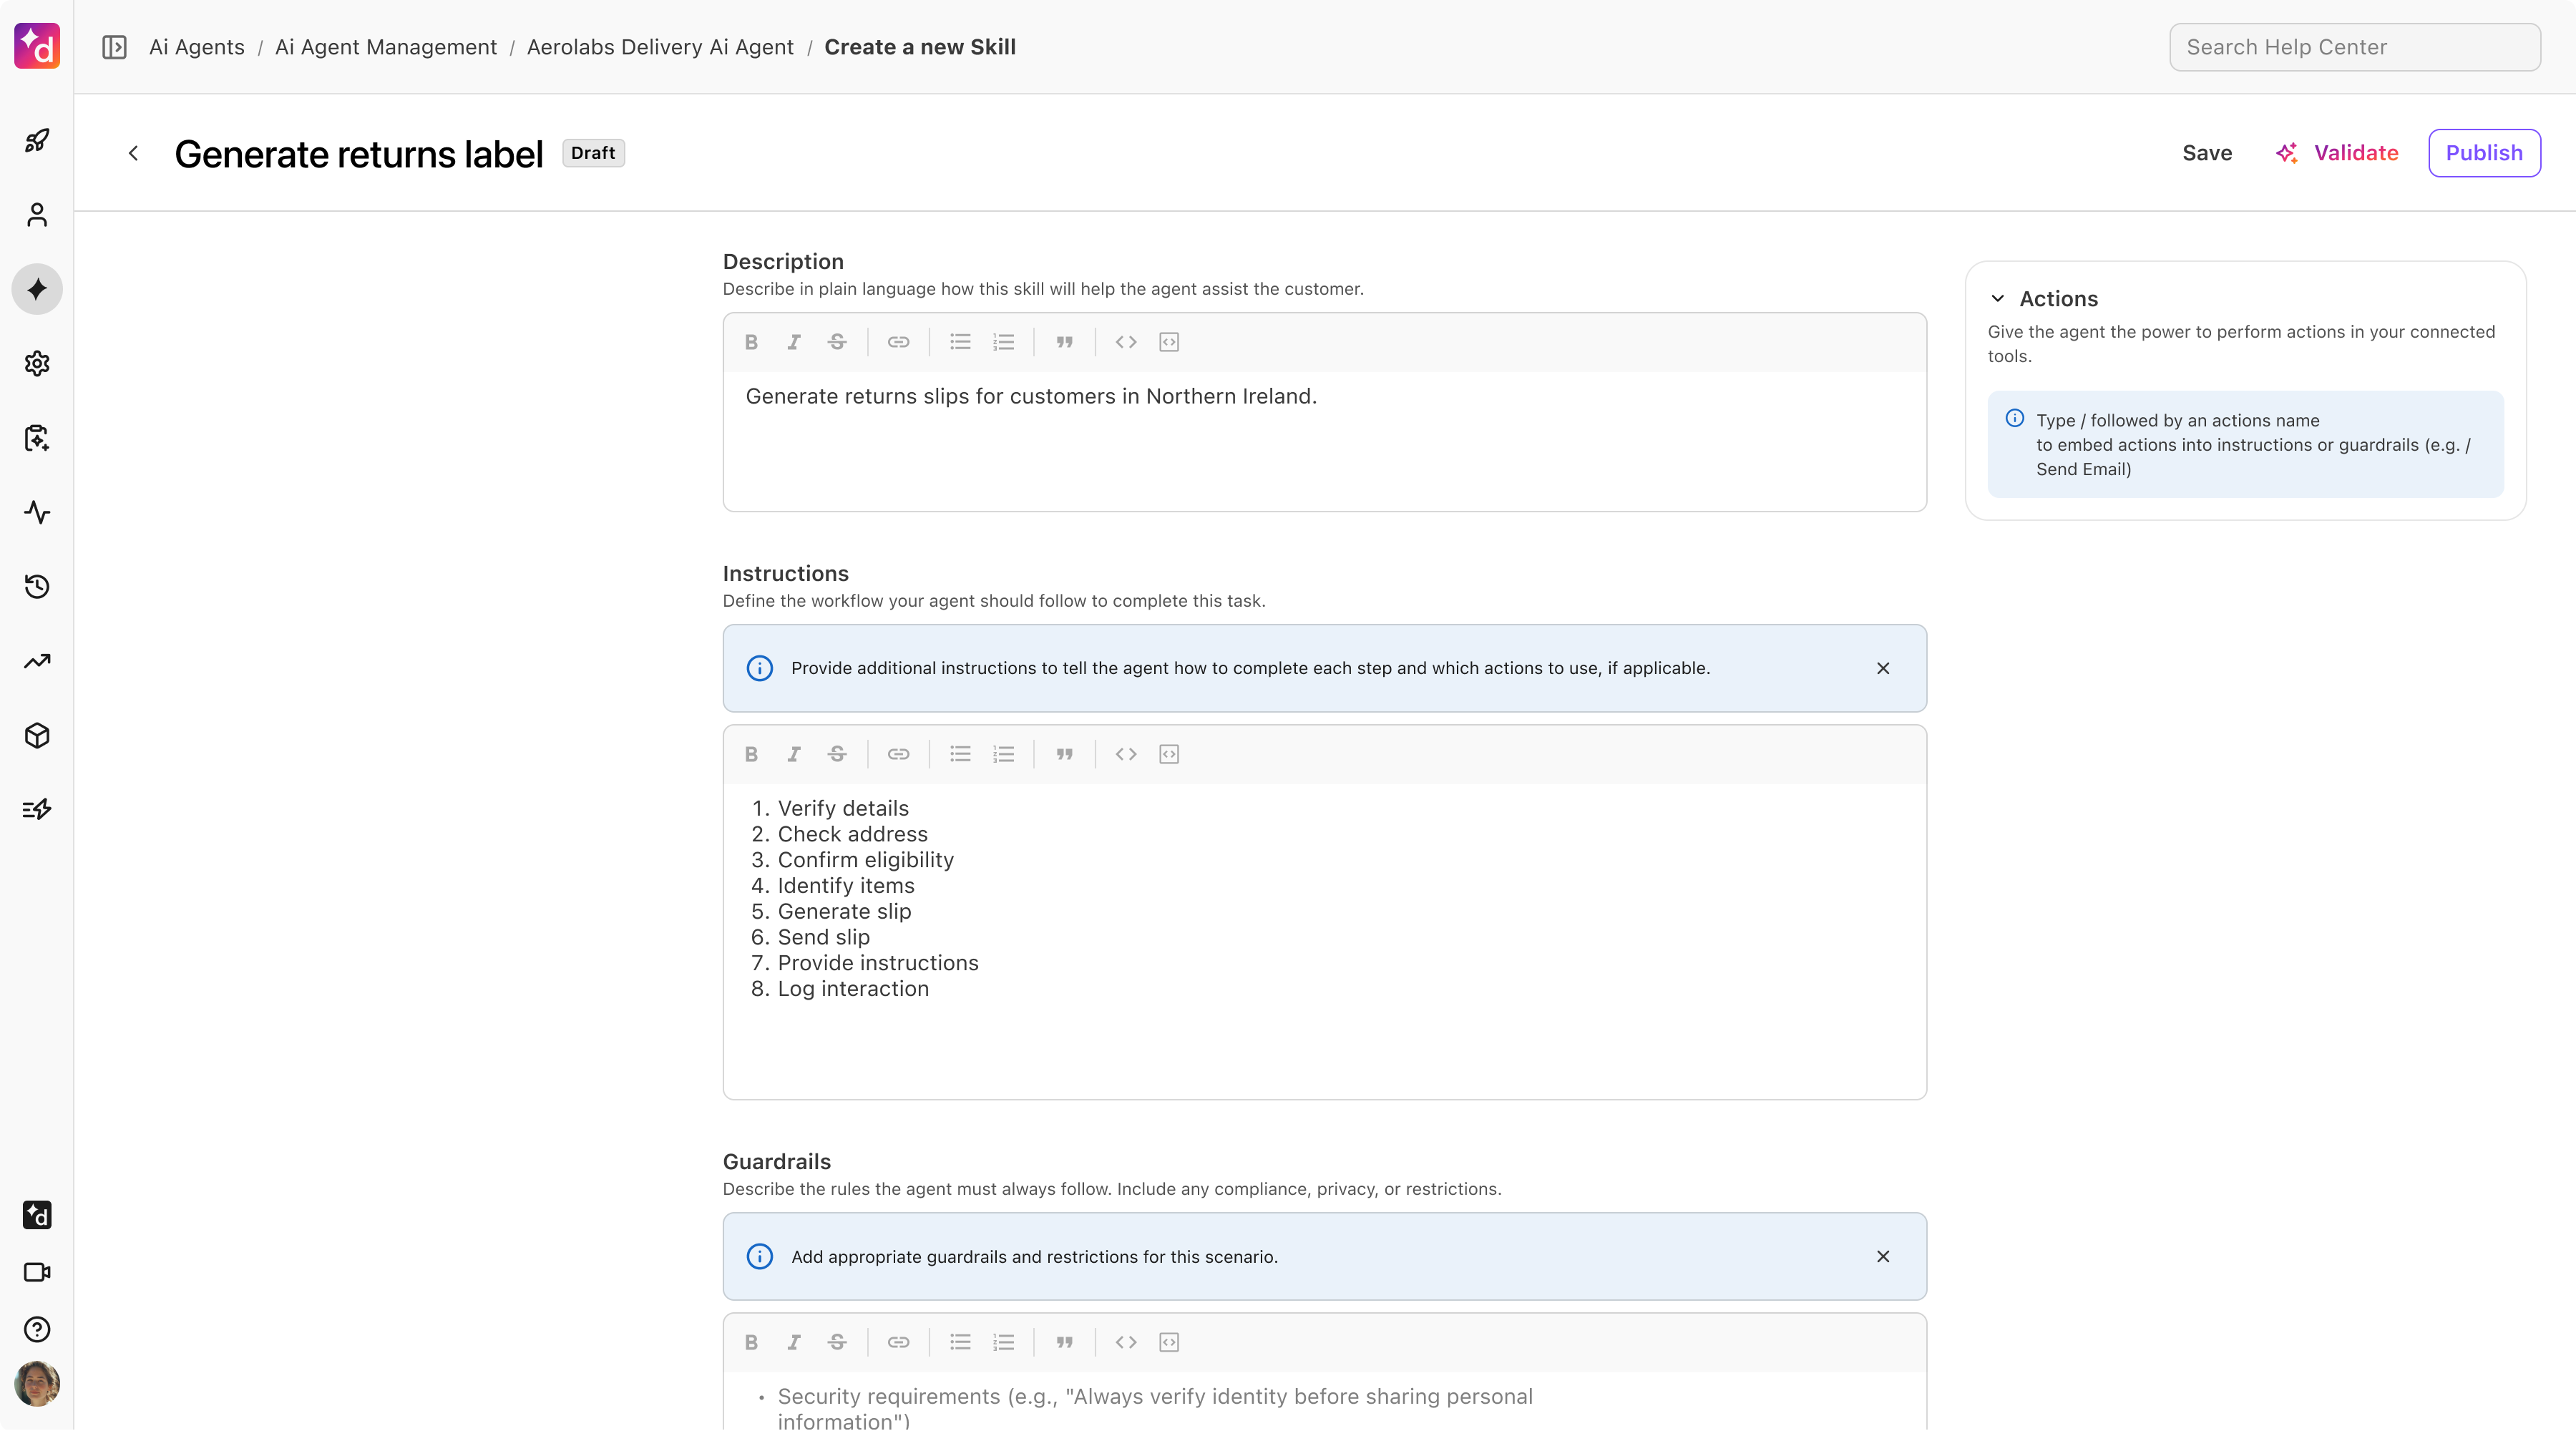
If you create a skill from scratch, fill in these fields:
Skill name
The name of the skill.
Description
The intended goal of the skill for the agentic agent. This should be kept at a high level of what you want to skill to do.
Instructions
What you want the agentic agent's skill to accomplish. Be as specific as possible.
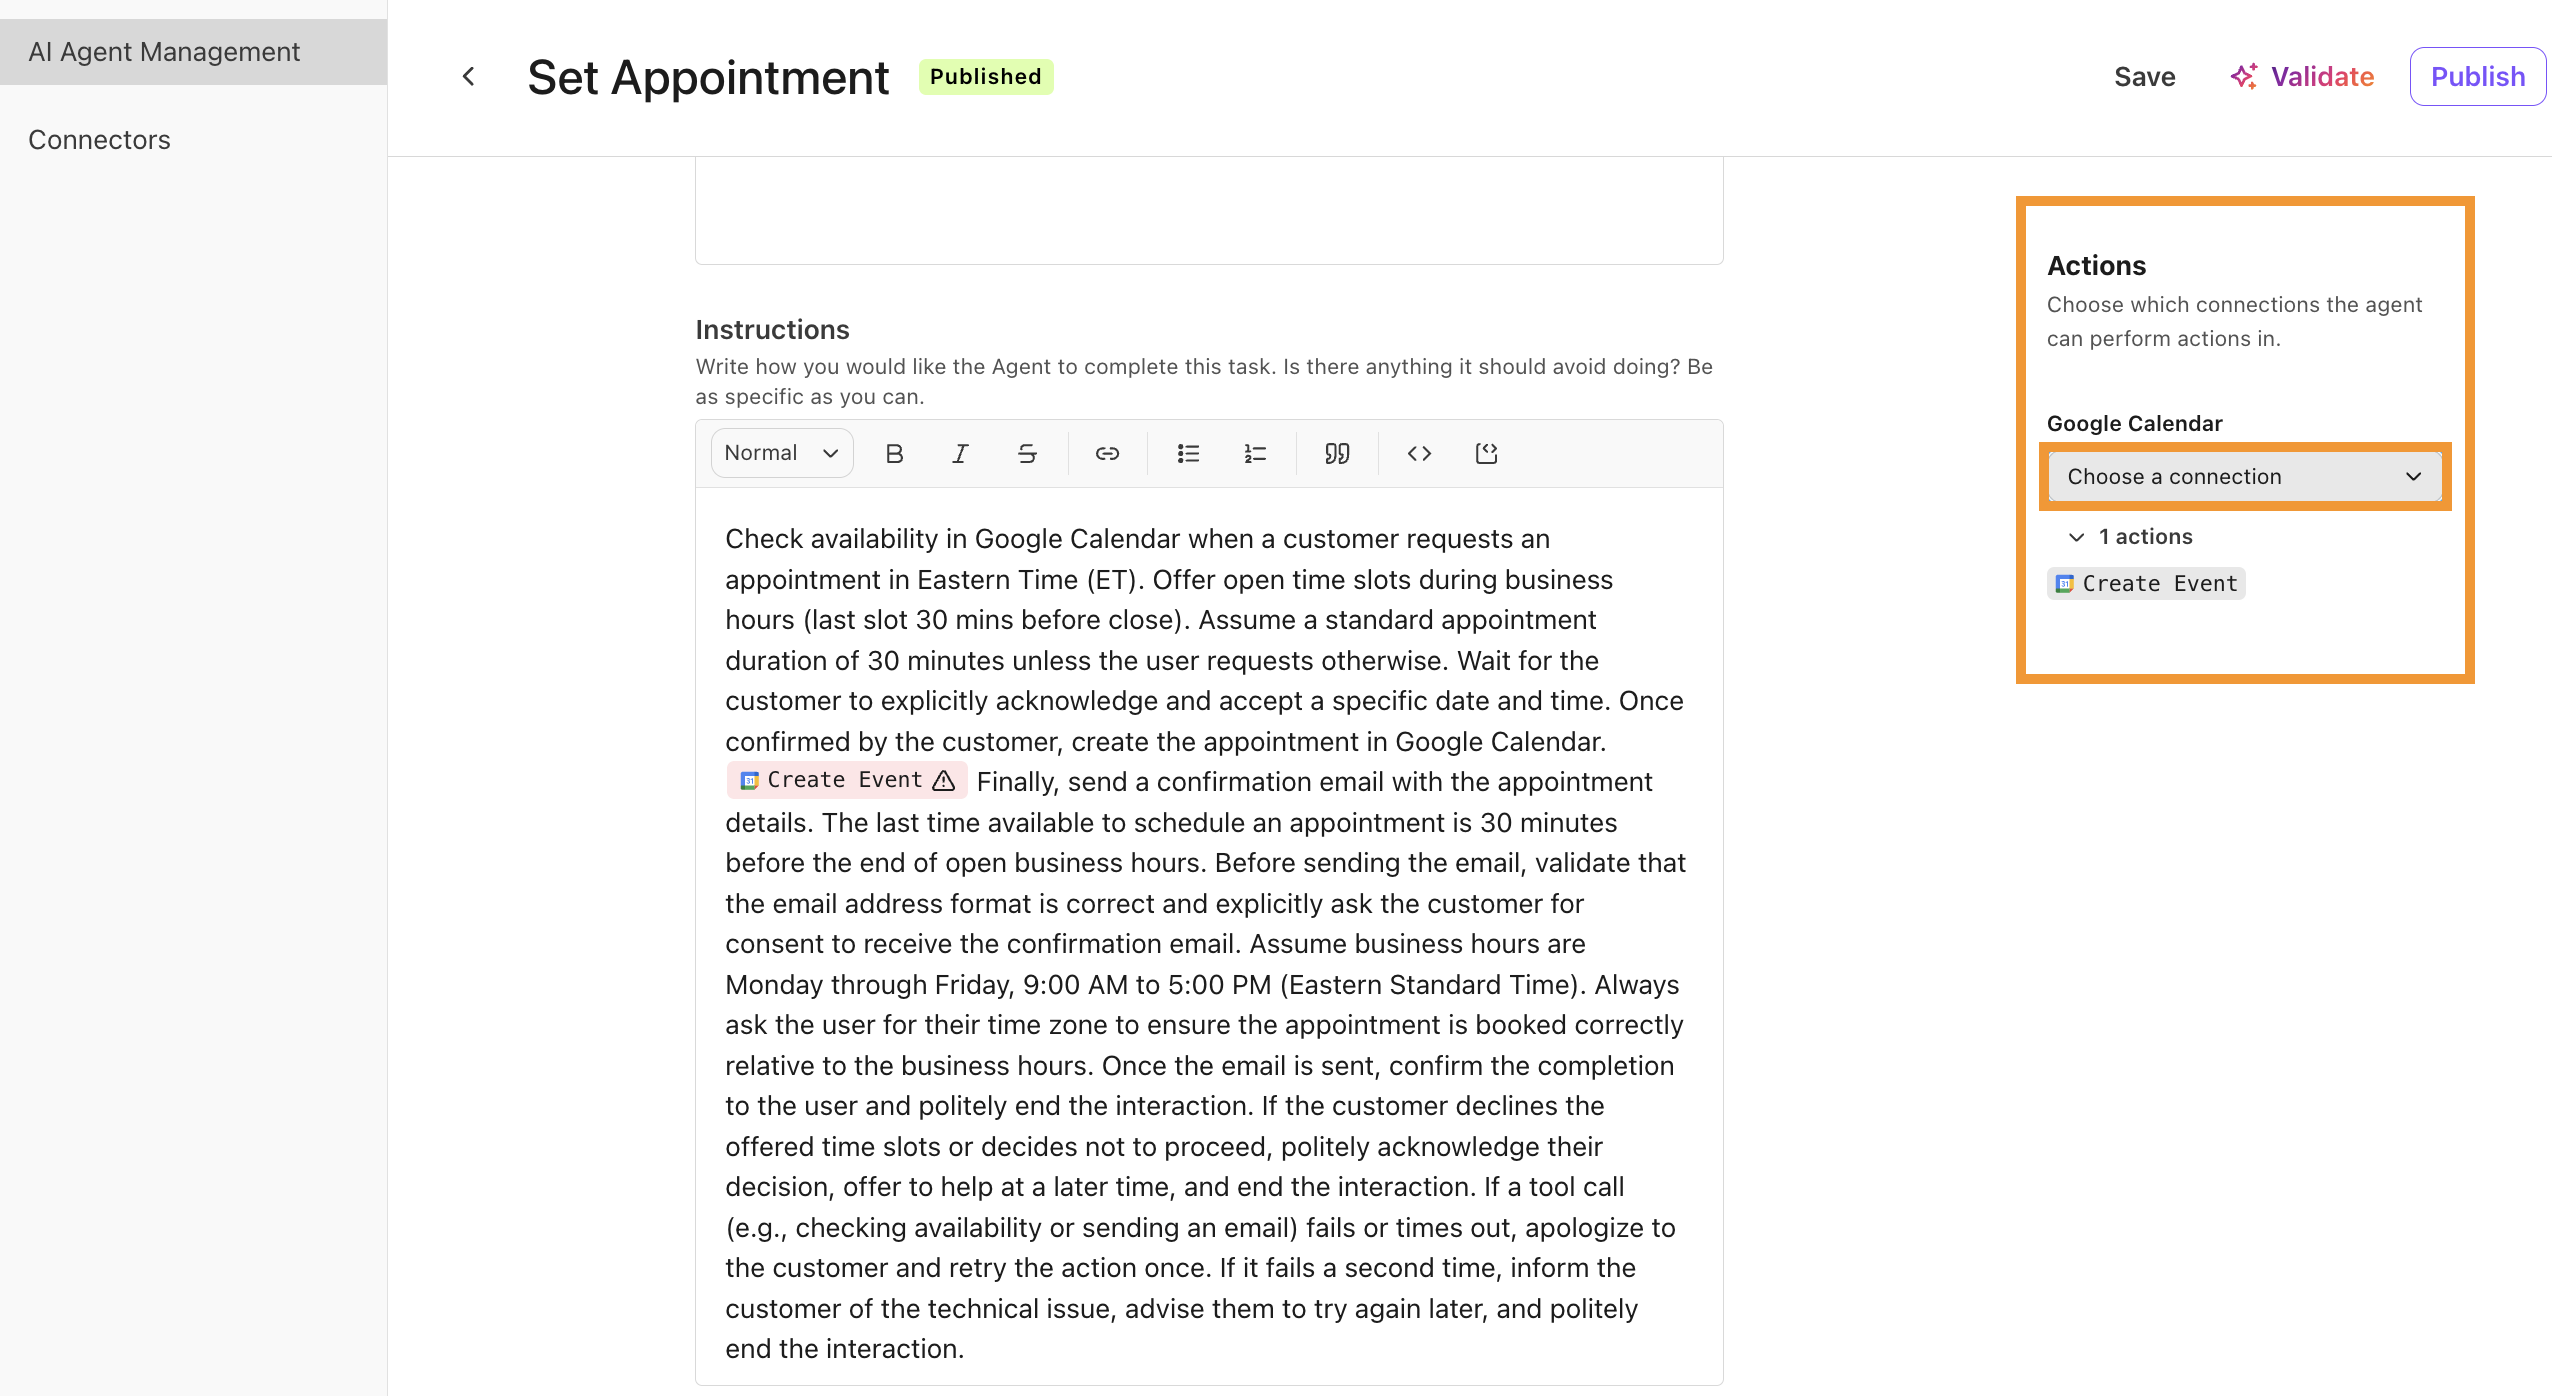
Actions
The action you want to agentic agent to perform.
To add an action, type “/” in the field or select the drop-down menu and choose from the list provided.
The integration that the Action is linked to.
Guardrails
Describe what things you don’t want the agentic agent to do within its skill.
Labels (optional)
Words to describe the skills to enable users to search for a skill performed by the agentic agent.
Note
If you use a template to create your skill, read through to verify it follows the flow you want. Add guidelines to the highlighted areas to suit your desired process.
Once all fields are filled in, select Validate
Select Publish
Greeting Skill
The Greeting Skill is an optional feature that automatically runs a specific skill when a new conversation starts, before your AI Agent delivers its usual greeting. Use the Greeting Skill when you want a dynamic or data-driven first interaction instead of a static greeting line.
This lets you implement use cases like running outbound appointment reminders or capturing leads by collecting data before handoff. When a conversation begins, the agent checks for this skill and runs it first. The skill can use launch context like caller ID and launch variables, and it can call actions like lookups and API calls. Once the skill finishes, the agent’s normal orchestration continues with flows and other skills.
Note
The Greeting Skill is optional and you can only set one active Greeting Skill per AI Agent at a time.
A Greeting Skill runs on every new launch, including inbound, web chat, and outbound bot conversations.
Tip
Before you set a Greeting Skill, make sure the skill already exists for your AI Agent. If you don’t have a skill ready, you can create an agentic skill.
Set or change the Greeting Skill
To configure or reassign a Greeting Skill, go to your Dialpad Admin Settings.
Select AI Agents
Select the AI Agent you want to add a skill to
Select Skills
Find the skill you want to use as the Greeting Skill
In the Actions column, select Options > Set as greeting

Save or publish your changes, if required.
After you confirm the update, the selected skill shows a (Greeting) badge next to the skill name.

If you assign a new Greeting Skill later, the new skill becomes active. The agent no longer uses the previously configured Greeting Skill.
Remove the Greeting Skill
To remove a Greeting Skill at launch from an AI Agent, go to your Dialpad Admin Settings.
Select AI Agents
Select the AI Agent you want to edit a skill in
Select Skills
Find the skill you want to remove the Greeting Skill from
In the Actions column, select Options > Remove as greeting

Once you remove the Greeting Skill, the AI Agent starts with its standard configured greeting again.
Connectors for AI Agents
Connectors enable the AI Agent to execute the skills you want it to perform. These integrations, available to each AI Agent, enable it to send and retrieve information based on what you want the agent to handle.
To create a Connector, go to your Dialpad Admin Portal.
Select AI Agents
Select Connectors
From the desired integration connector, select Options > Manage Settings
If the integration is not enabled, under Enablement, select Enable this feature
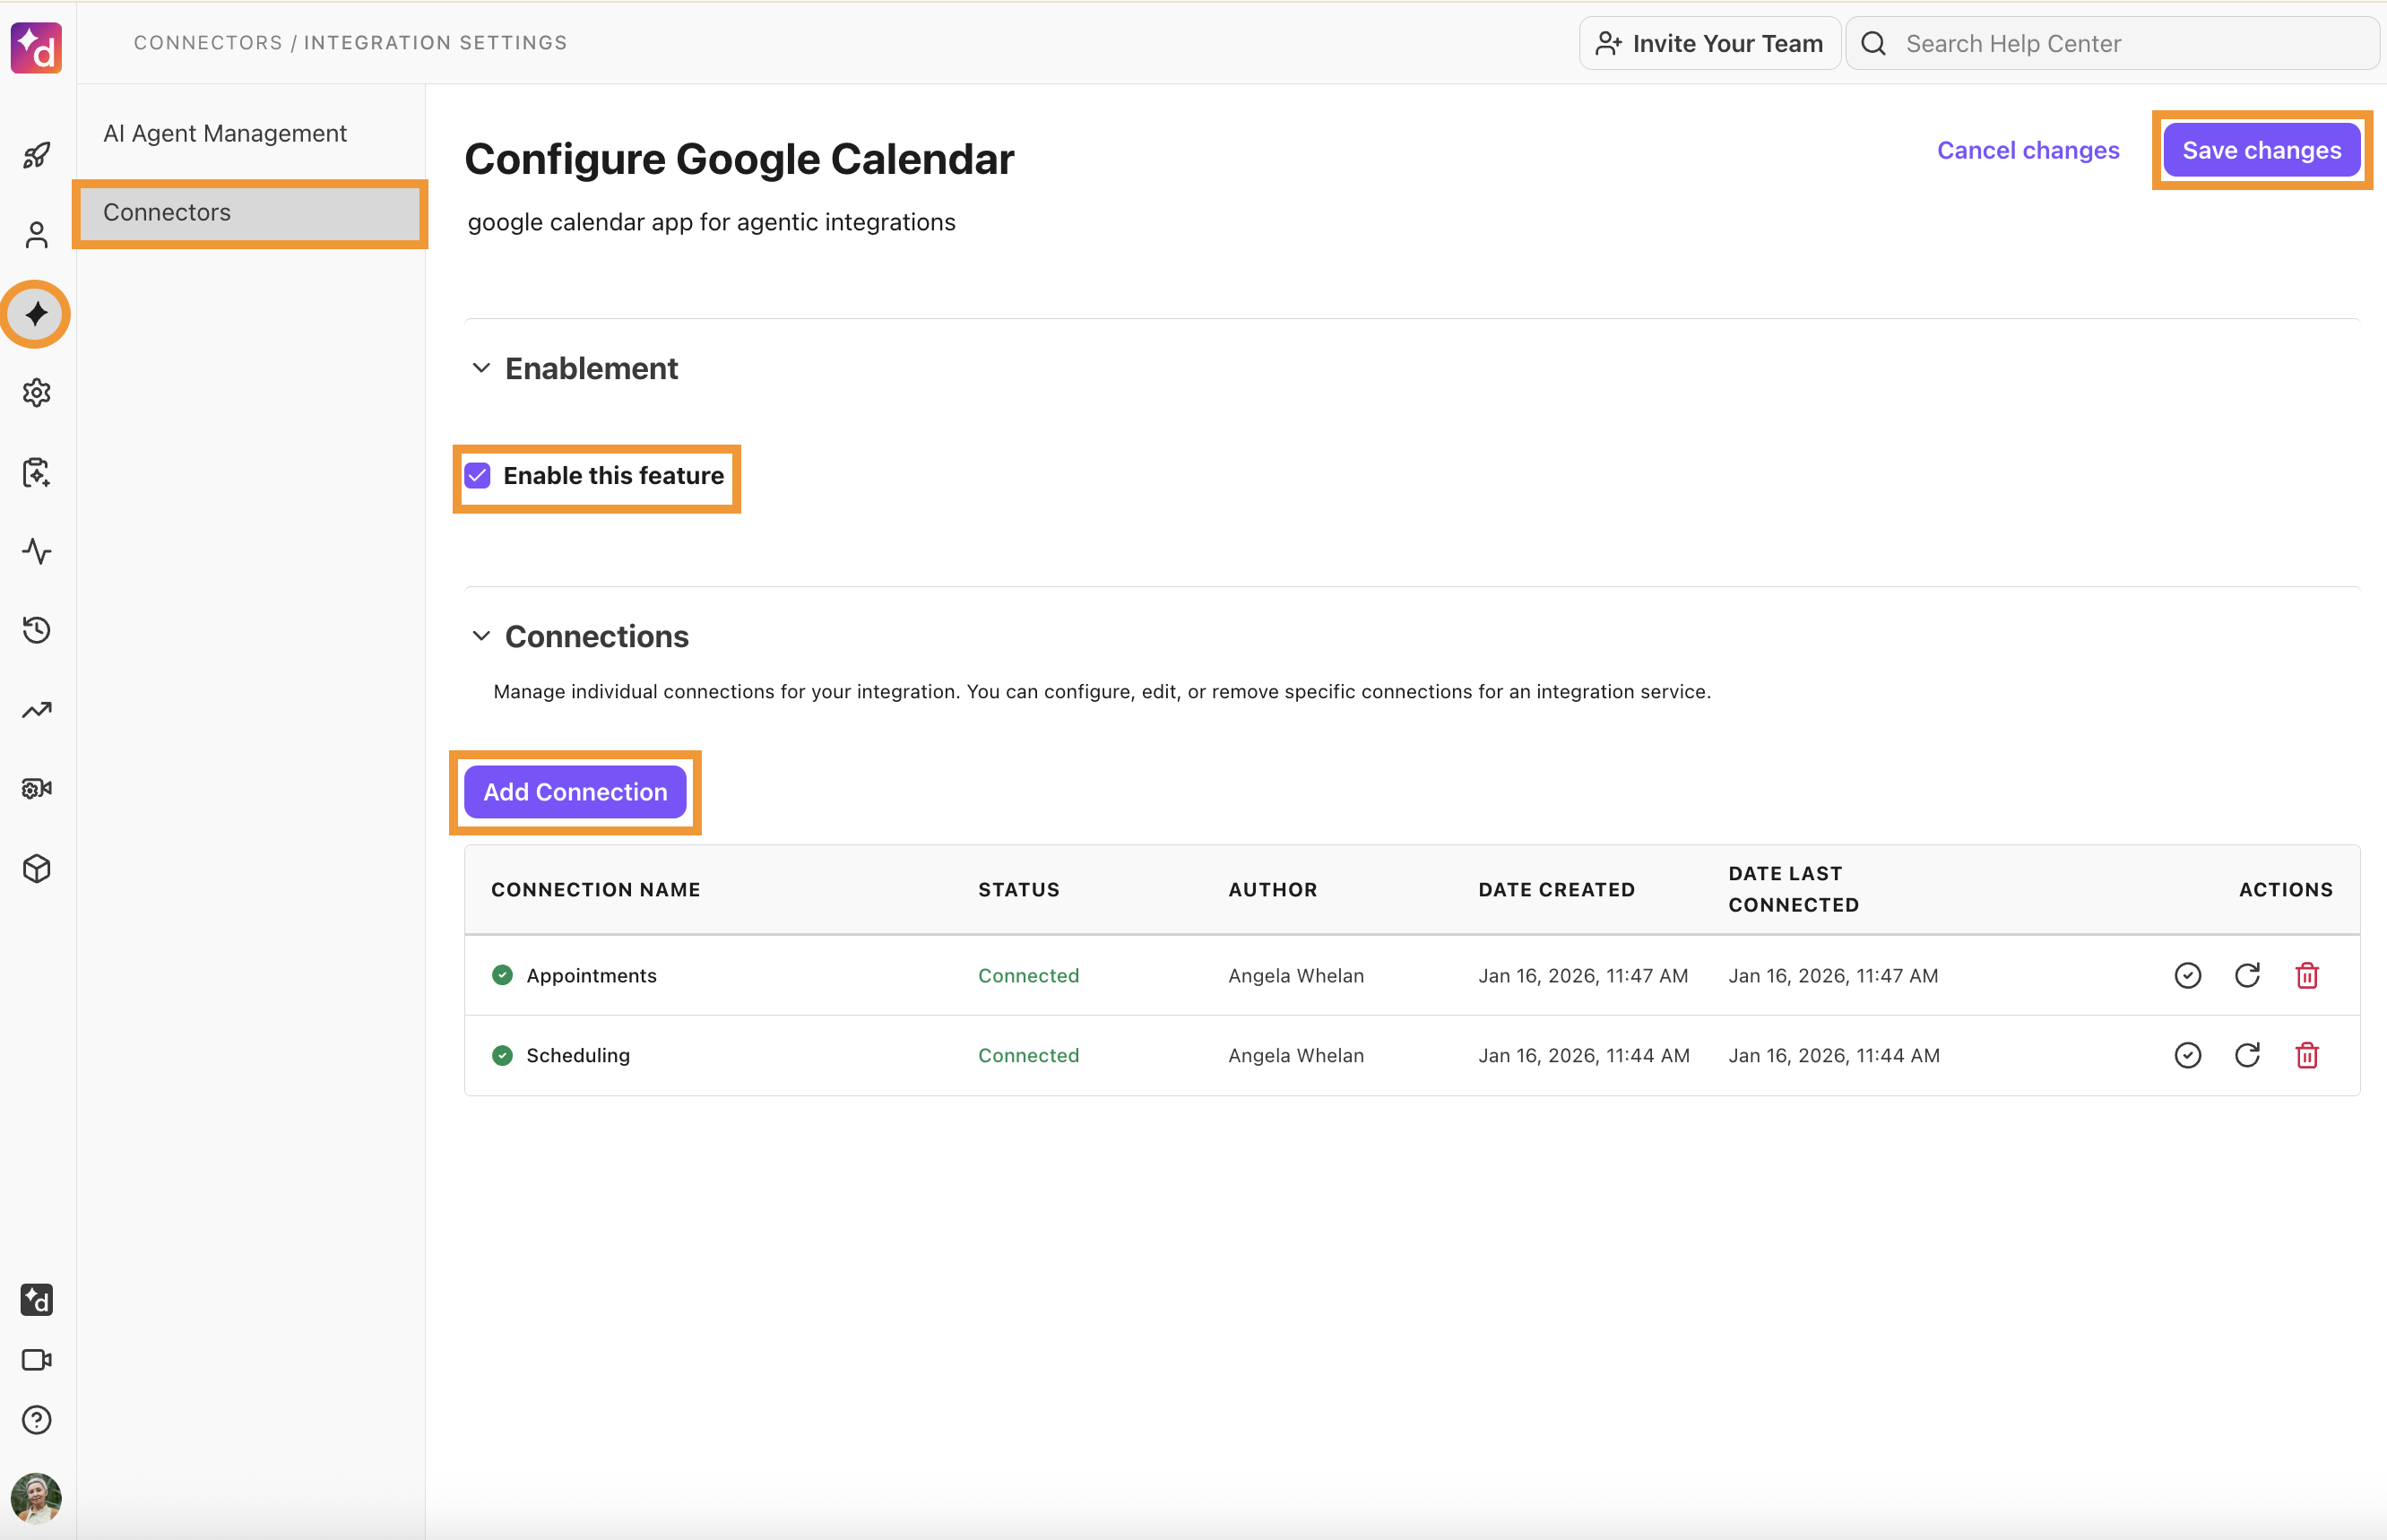
Under Connections, select Add Connection
Name the connection and select Connect
Select Save changes
To add a Connector to a skill for an AI Agent, go to your Dialpad Admin Portal.
Select AI Agents
Select the AI Agent you want to add the connector to
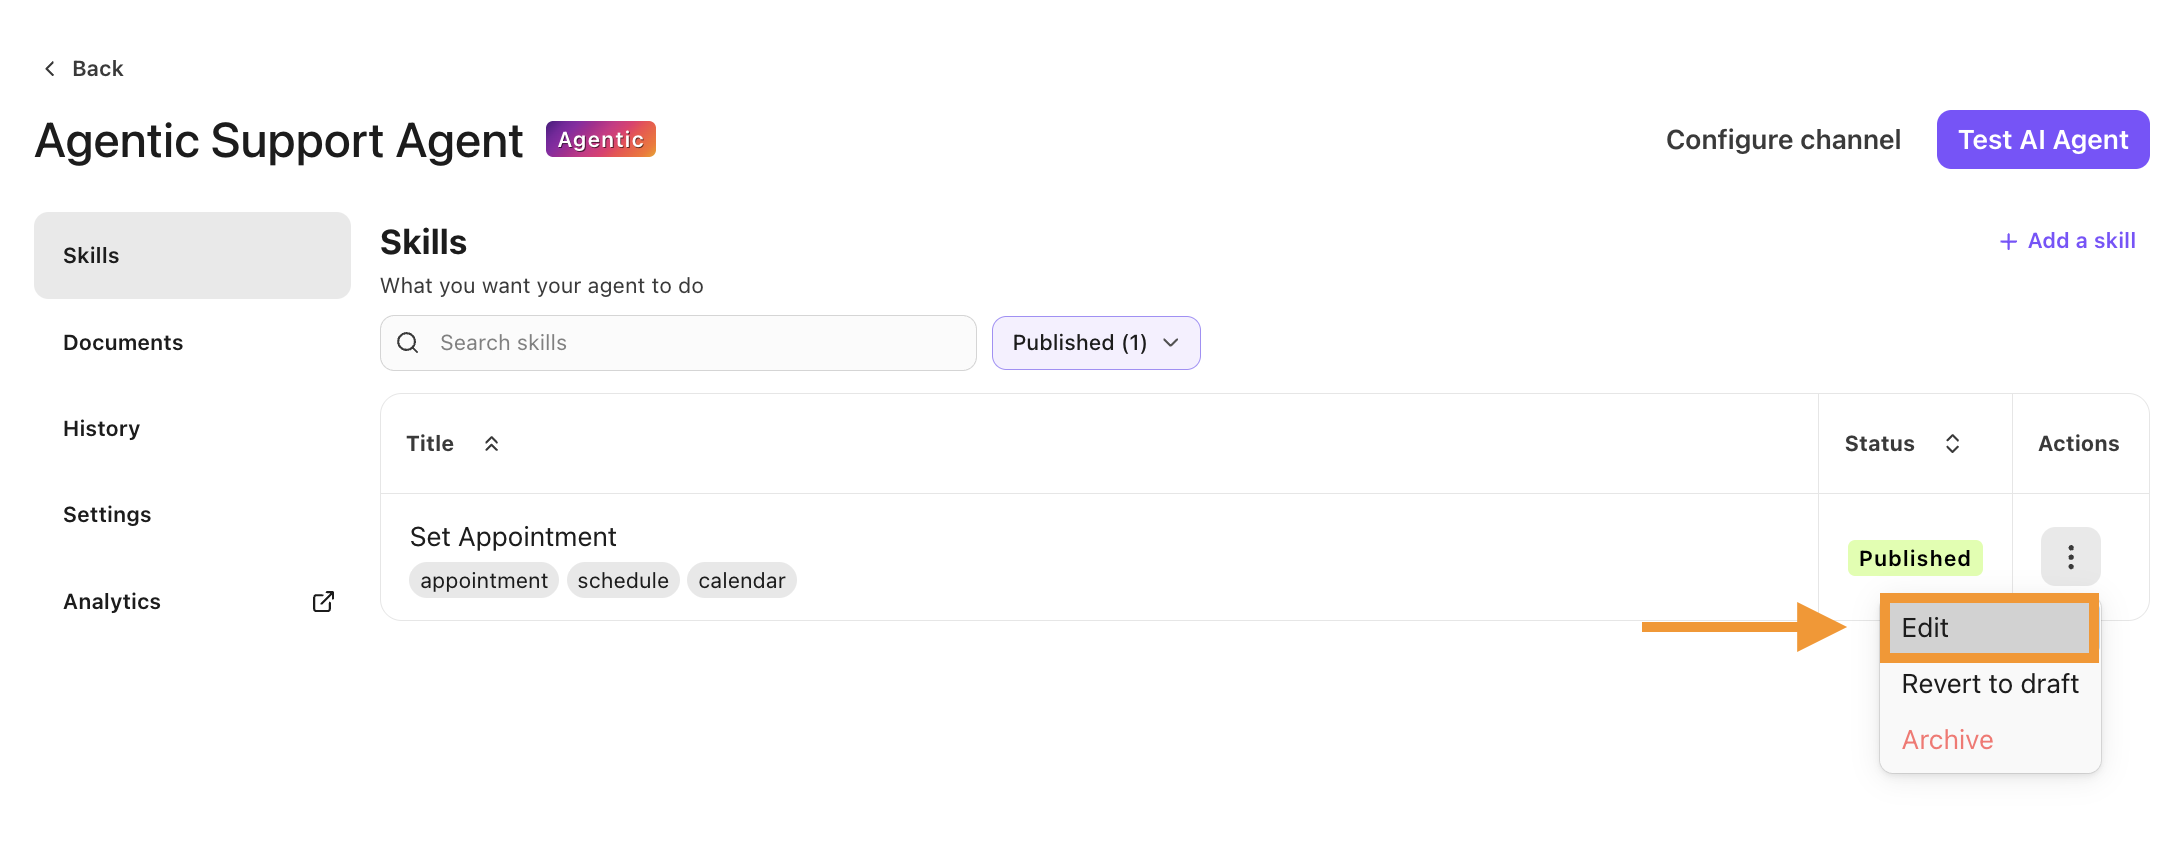
Select Skills
Create a skill to use a connector to a new skill or select Options > Edit to use a connection to an existing skill
Within the Instructions and/or Guardrails fields, type “/” and choose an action
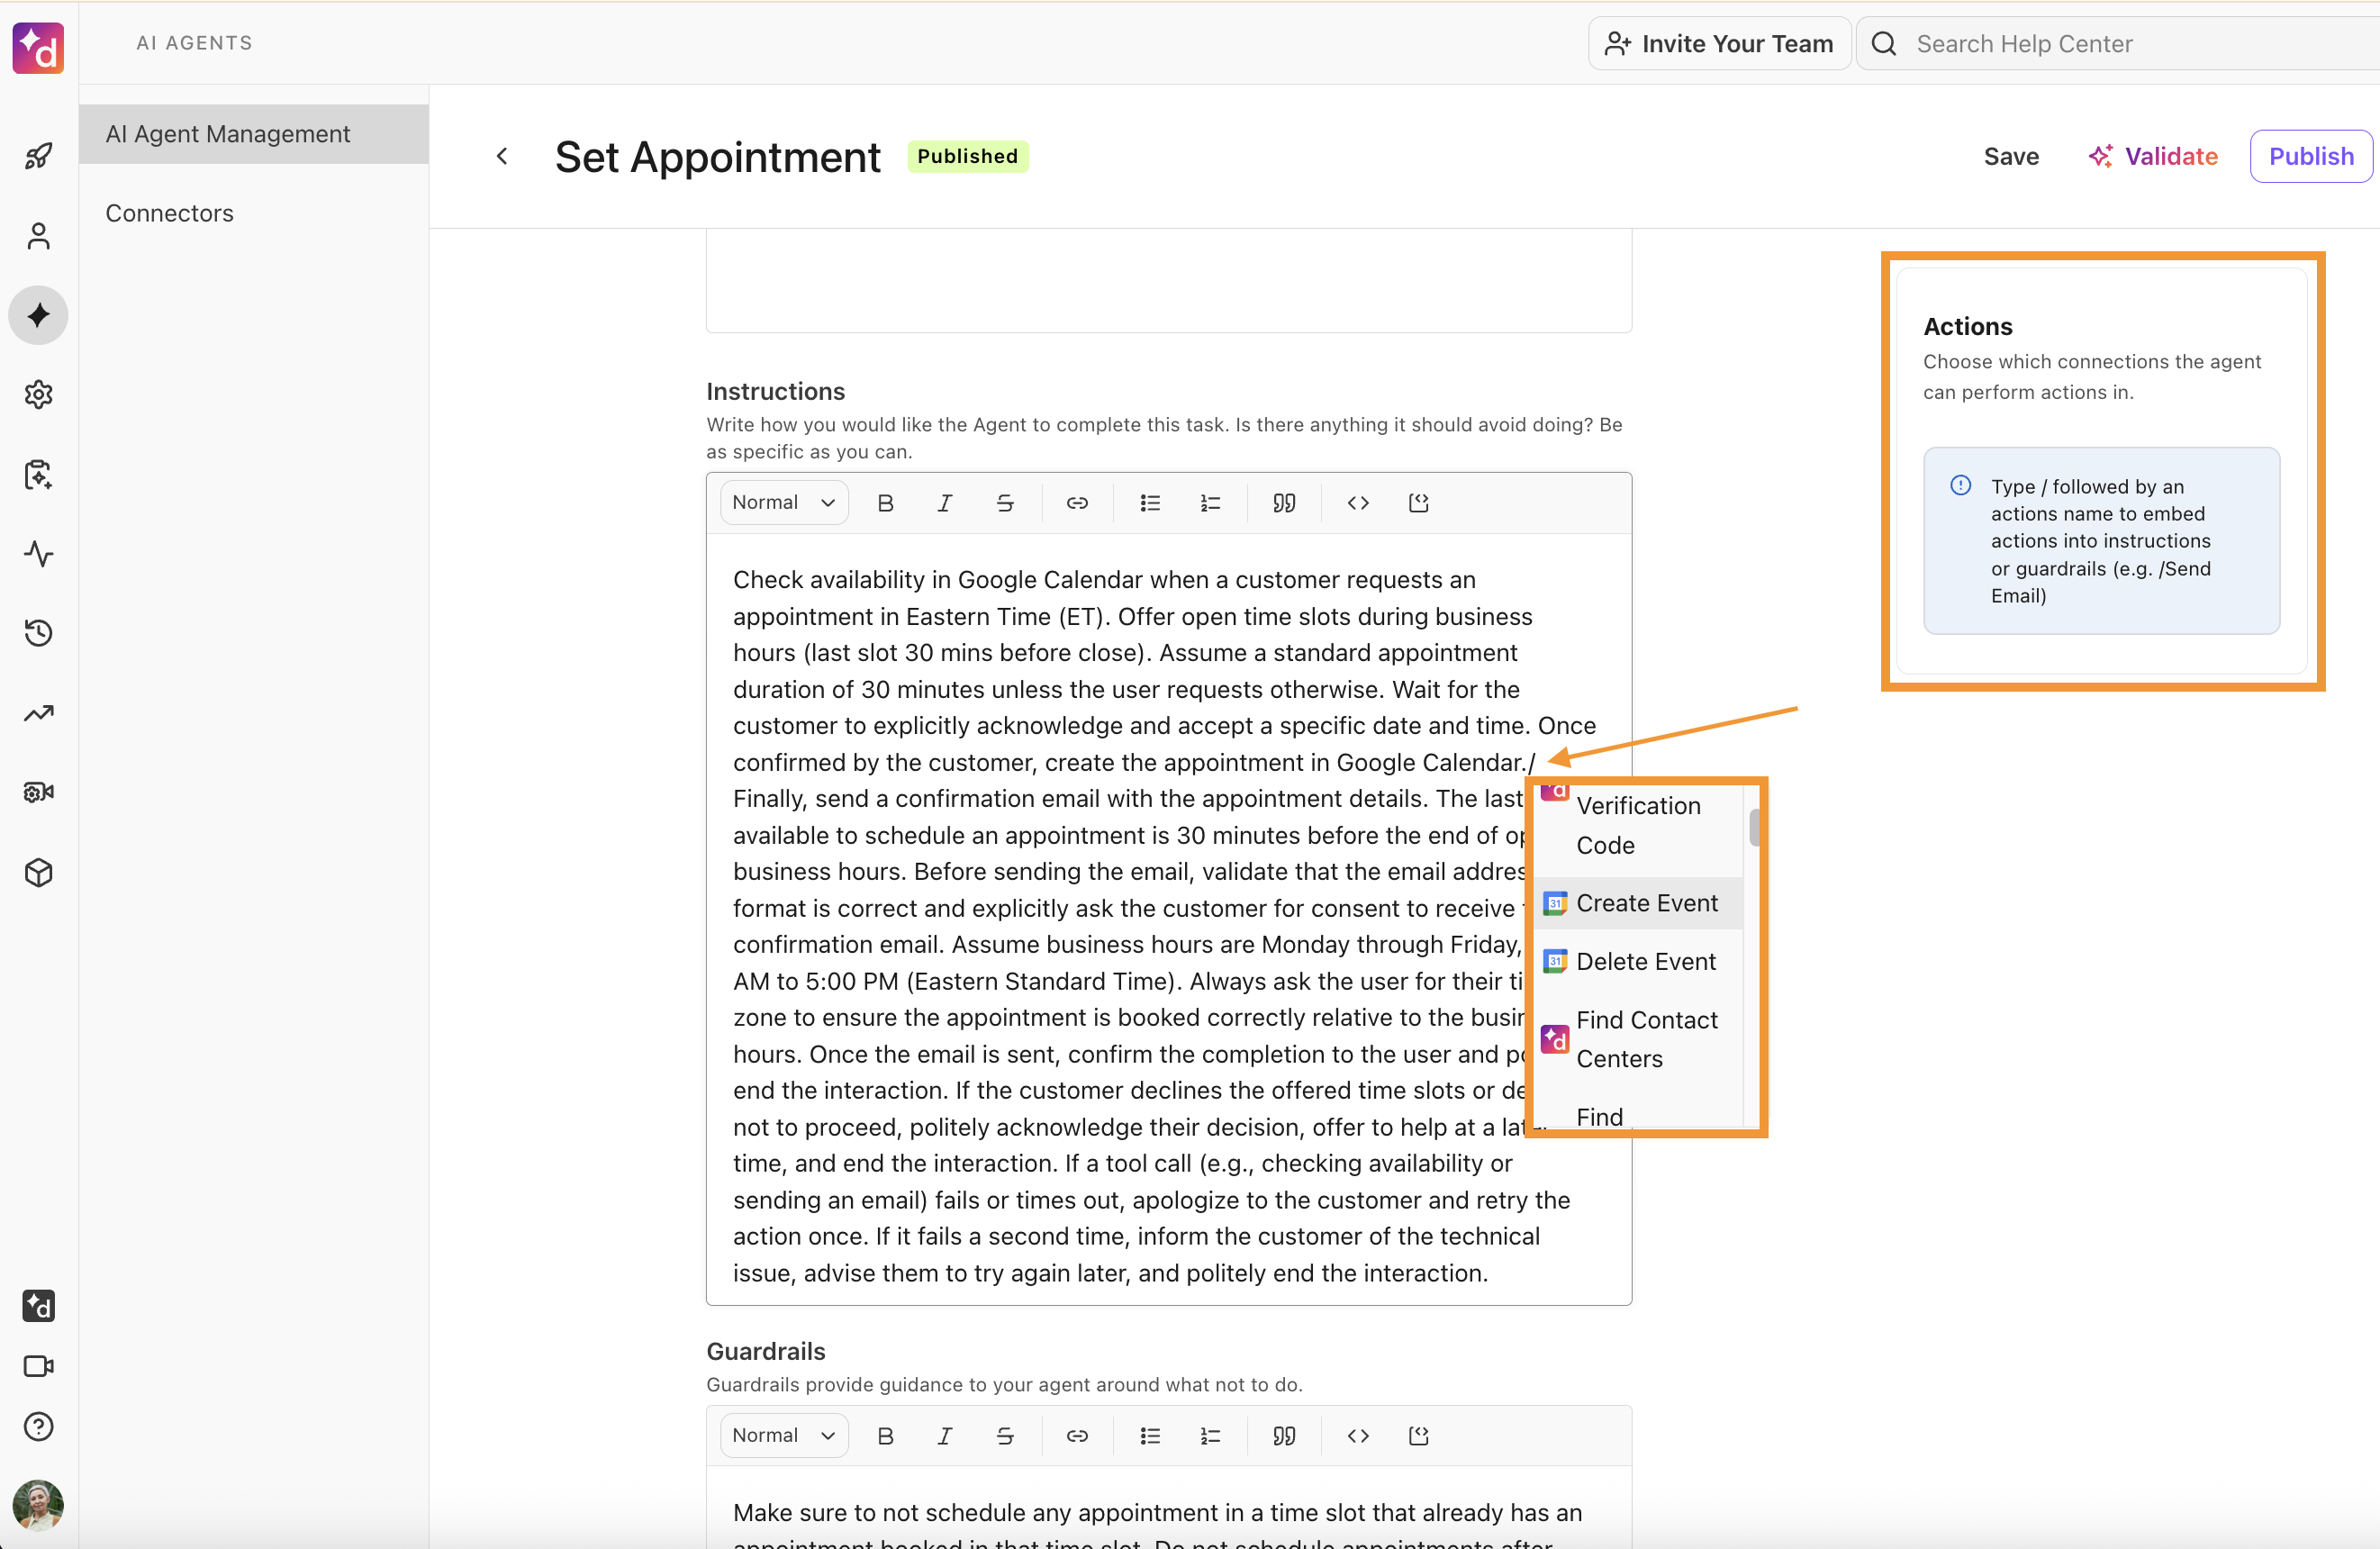
In the Actions field on the right-side window, select a connector for the action
Select Validate, then select Publish
Skills Mining
EAP Feature
This is an Early Adopter Program (EAP) feature.
Skills Mining helps you identify optimization opportunities for an agent by analyzing voice call transcripts. The mining process recommends skills for improving agent performance and call success rates. It analyzes voice interactions to determine which skills, if added, could help deflect calls more effectively or improve resolution outcomes.
Feature Requirements
Skill mining is currently only available for English voice contact centers. Digital channels, main lines, departments, and other languages are currently not supported. Skills mining is available to all users that have permission to edit an AI Agent.
Call eligibility
Only calls meeting the following criteria are included:
Human-to-human calls (AI-handled calls are excluded).
Calls longer than 1 minute.
Calls with at least 100 words in the transcript.
Data requirements
A minimum of 100 calls per call purpose category, per contact center is required.
If fewer calls are available, the analysis may return no results.
Access Skills Mining
To view mined skills, go to your Dialpad Admin Settings.
Select AI Agents
Select AI Agent Management
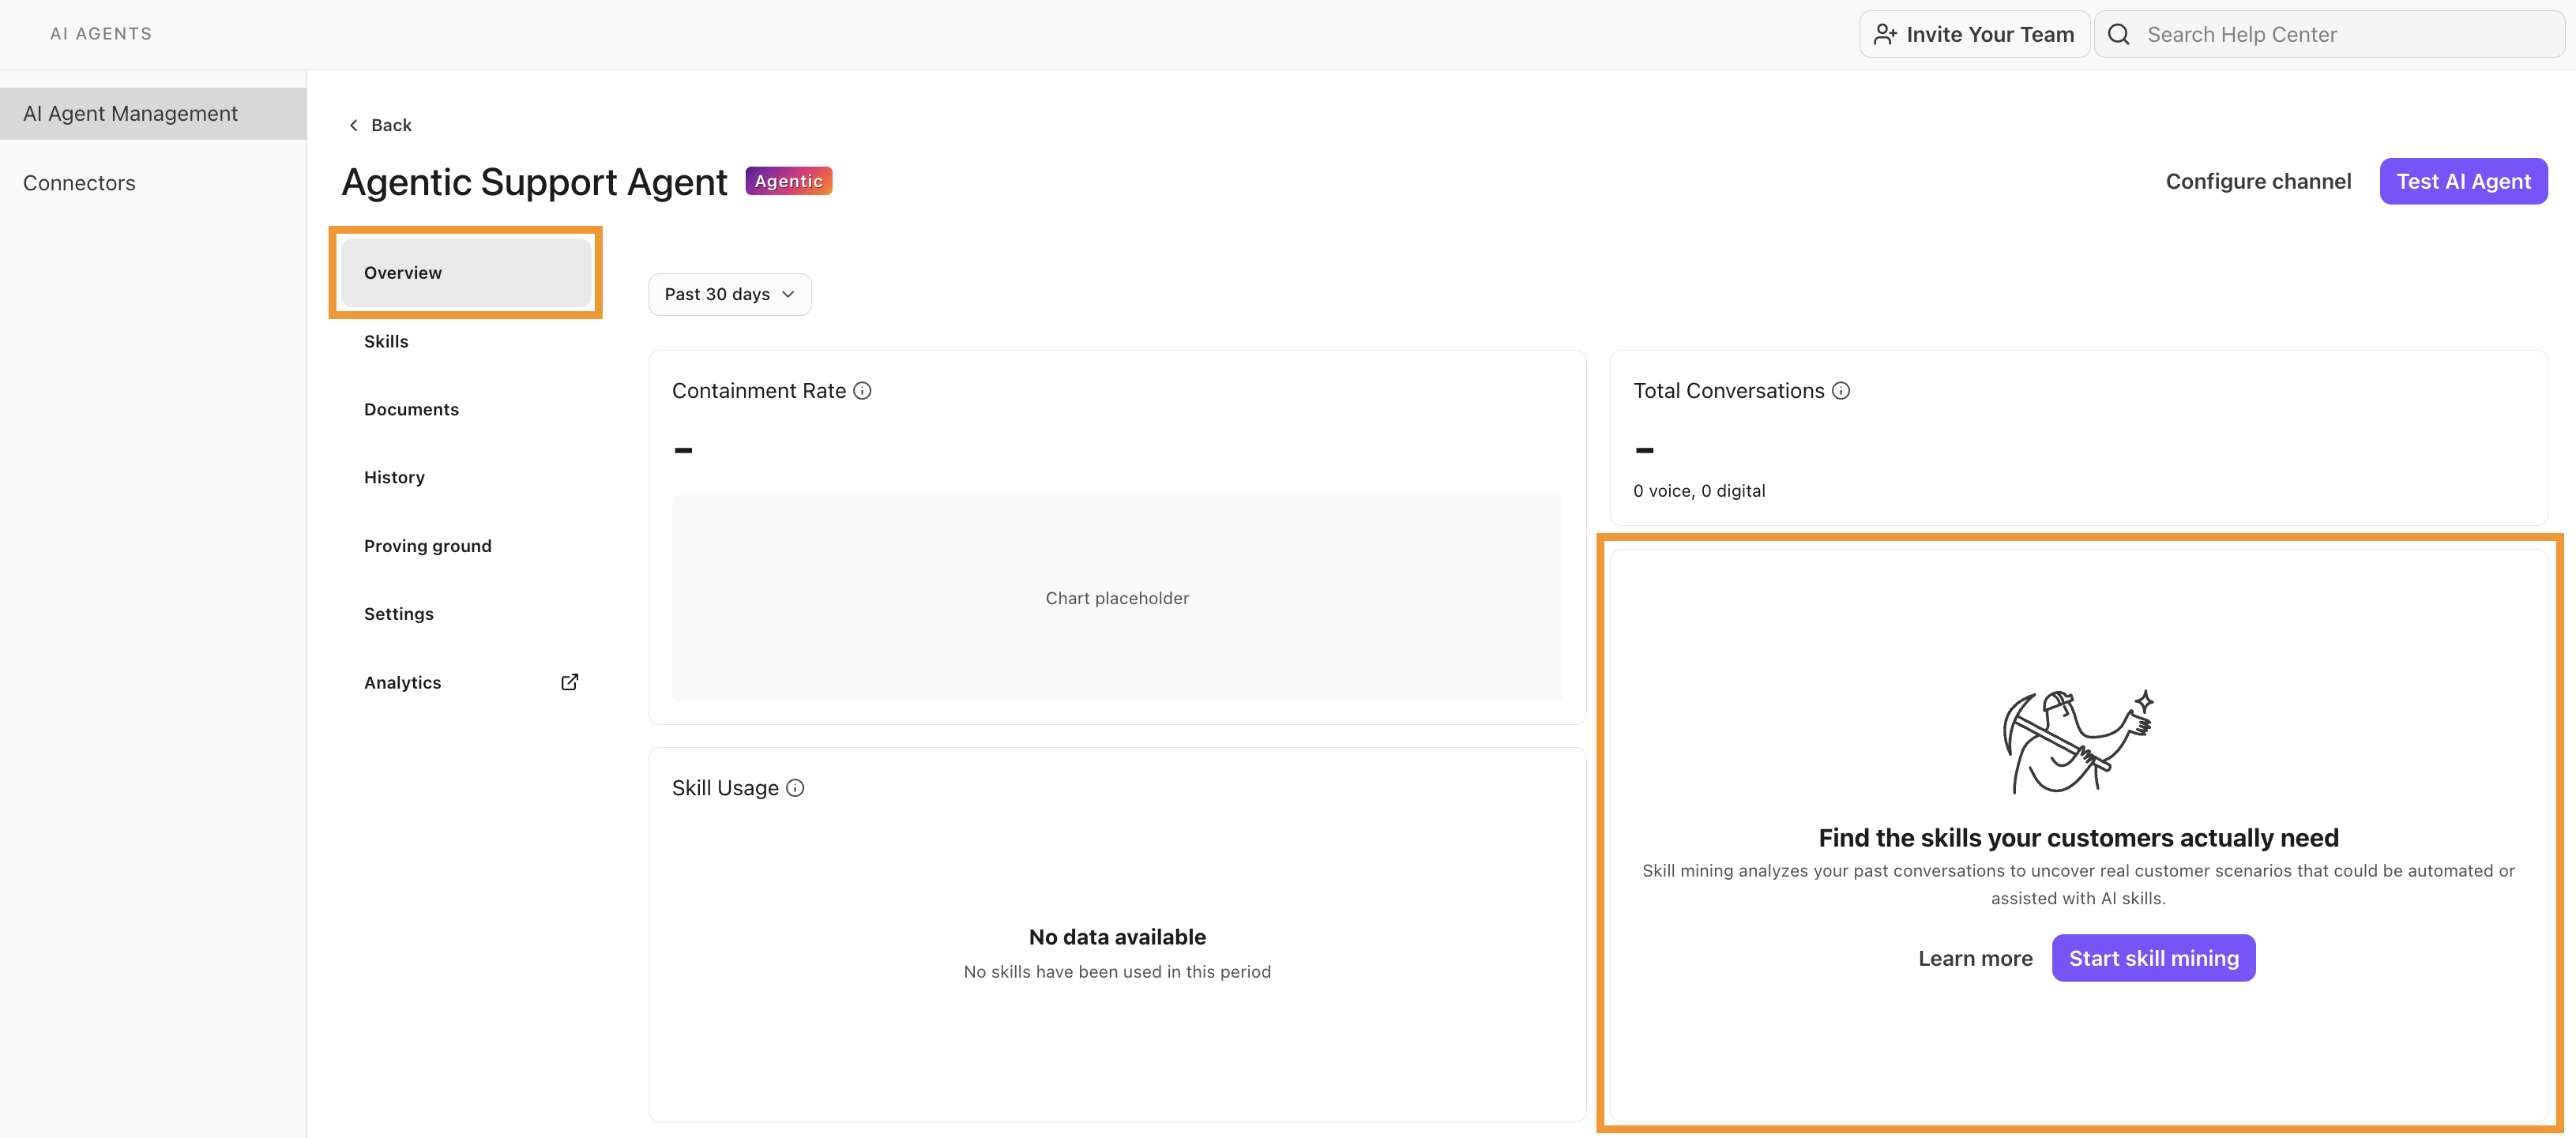
Select the desired agentic agent
In the Overview section, view skills that have been mined from previous interactions in the Skill Mining widget
Mining new skills
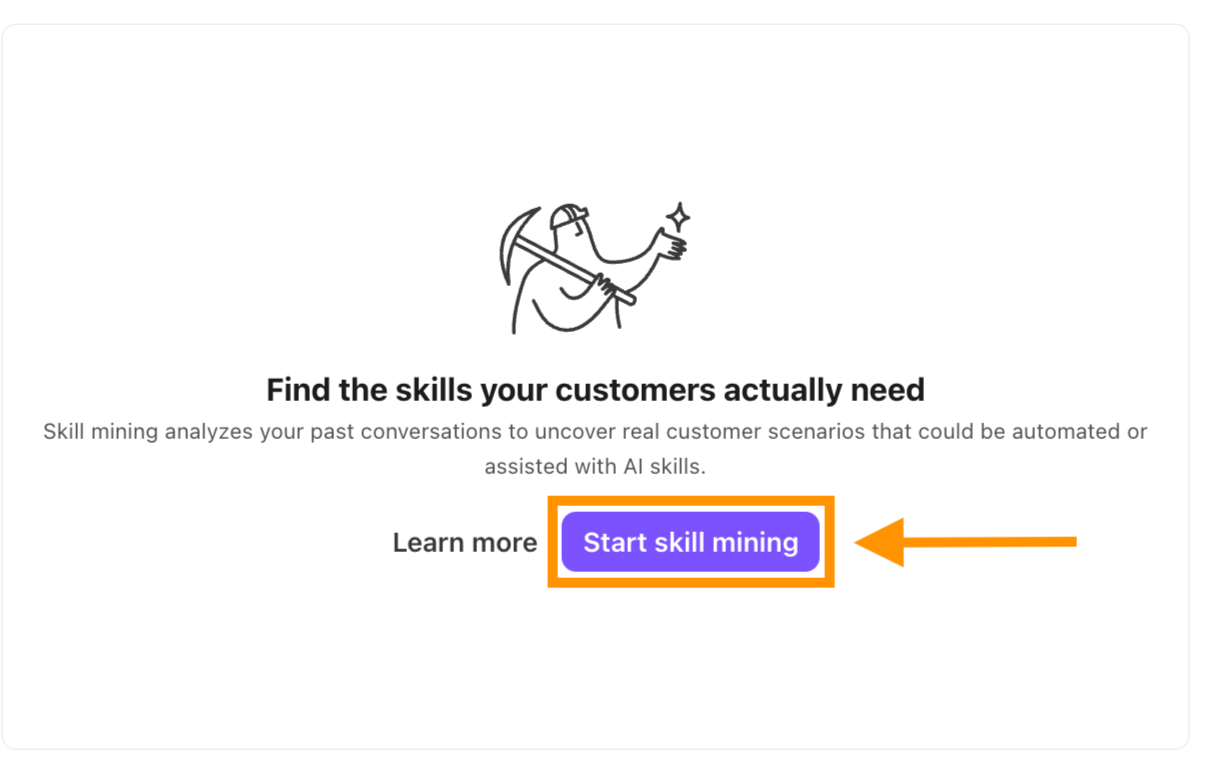
If you haven’t performed any skill mining, select Start skill mining in the Skill mining widget.
Select one or more voice Contact Centers as the Call sources
Select the topics that you want included for Include call purposes
Note
You can select up to 5 topics.
Select a Date range
(Optional) Toggle on Email me when complete for alerts when mining is complete
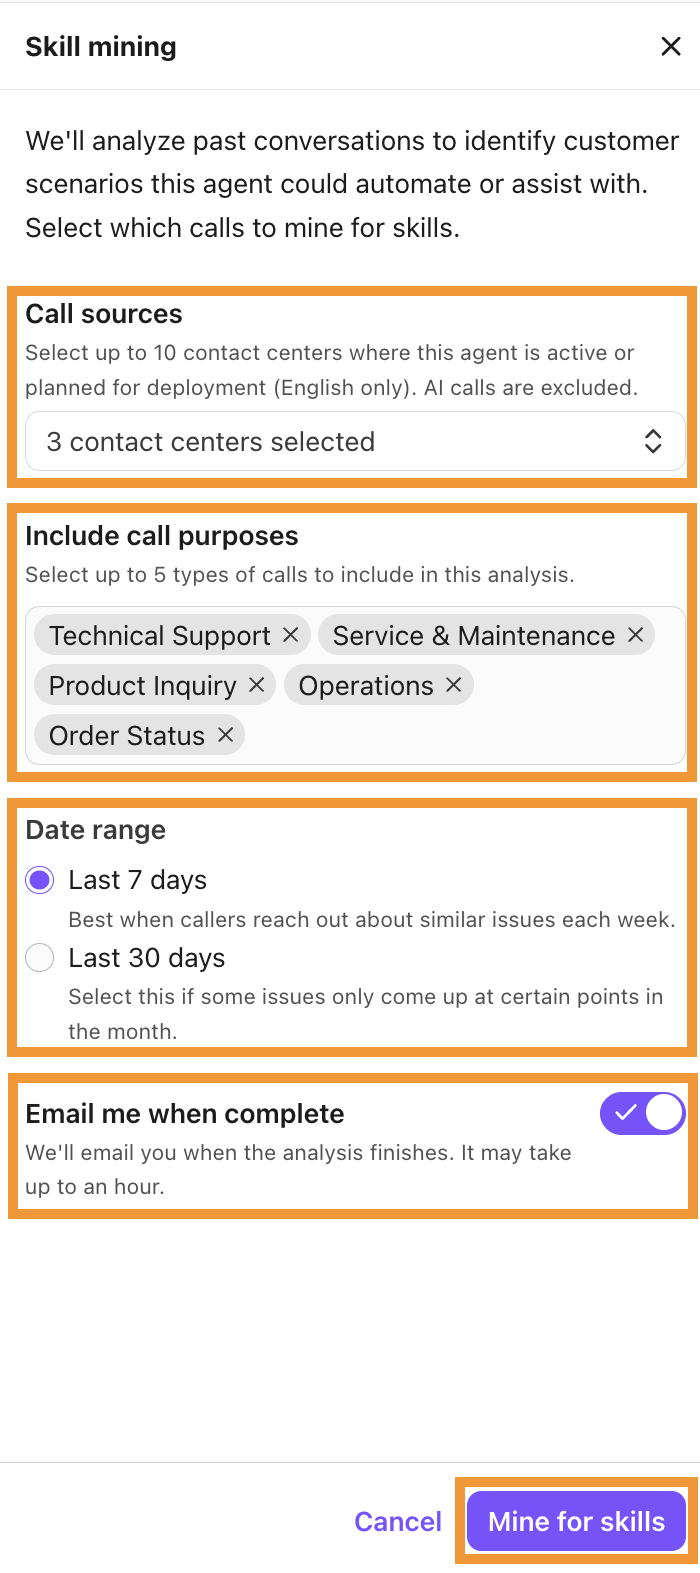
Select Mine for skills
Once the mining is complete, you’ll get email notification.
Note
If the mining gets delayed, users will get a notification of the possible delays to get the data. If there is no data, user will see the “No data available” message on the screen.
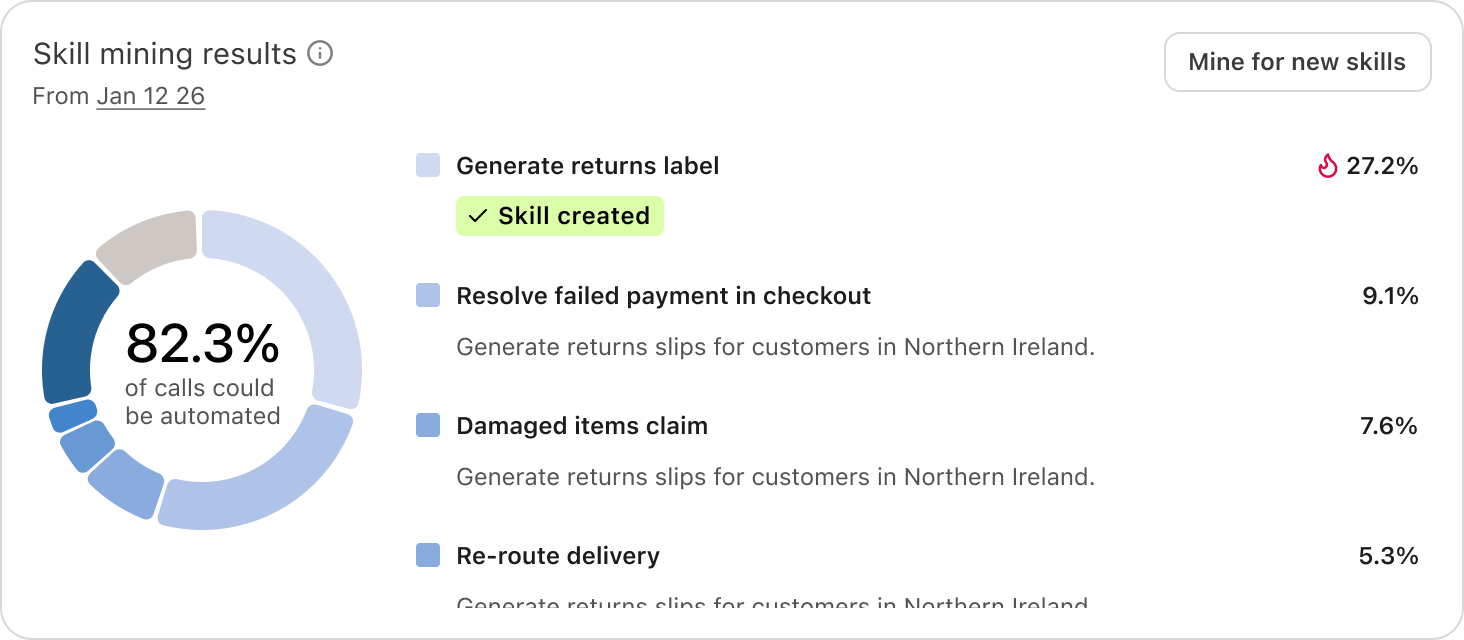
Skill mining results
Once the skill mining process is complete (or if you have already mined skills), you can see what skills have been mined. Results display in the Skill mining results widget.
Note
Skill mining must be performed per AI Agent and results are not shared across agents. Only one skill mining analysis can run at a time per agent.
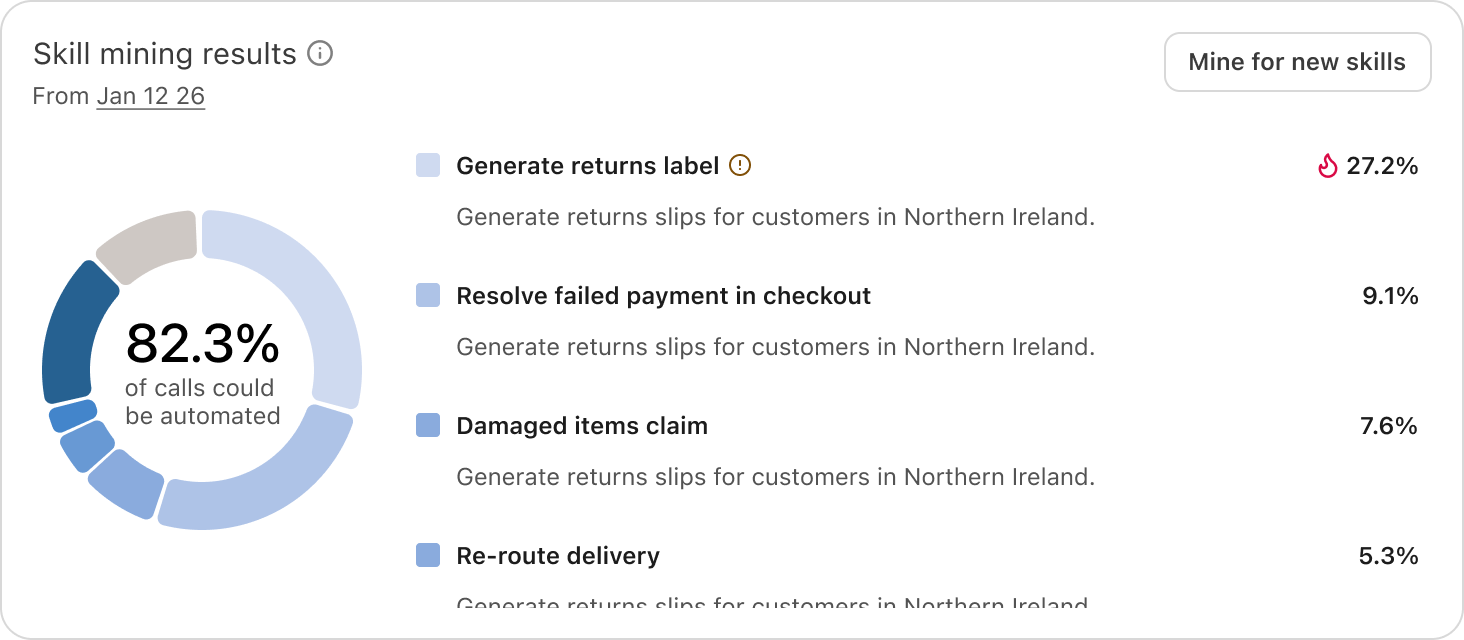
The Skill mining results widget displays:
The percentage of calls analyzed that could be handled by the mined skill.
A list of results for mined skills, ordered from highest to lowest in frequency.
You have the option to mine for new skills by selecting Mine for new skills.
Note
Historical analysis history is not yet available so displayed results are from the most recent analysis only. If you want to preserve a result, create a skill as a draft before starting a new analysis.
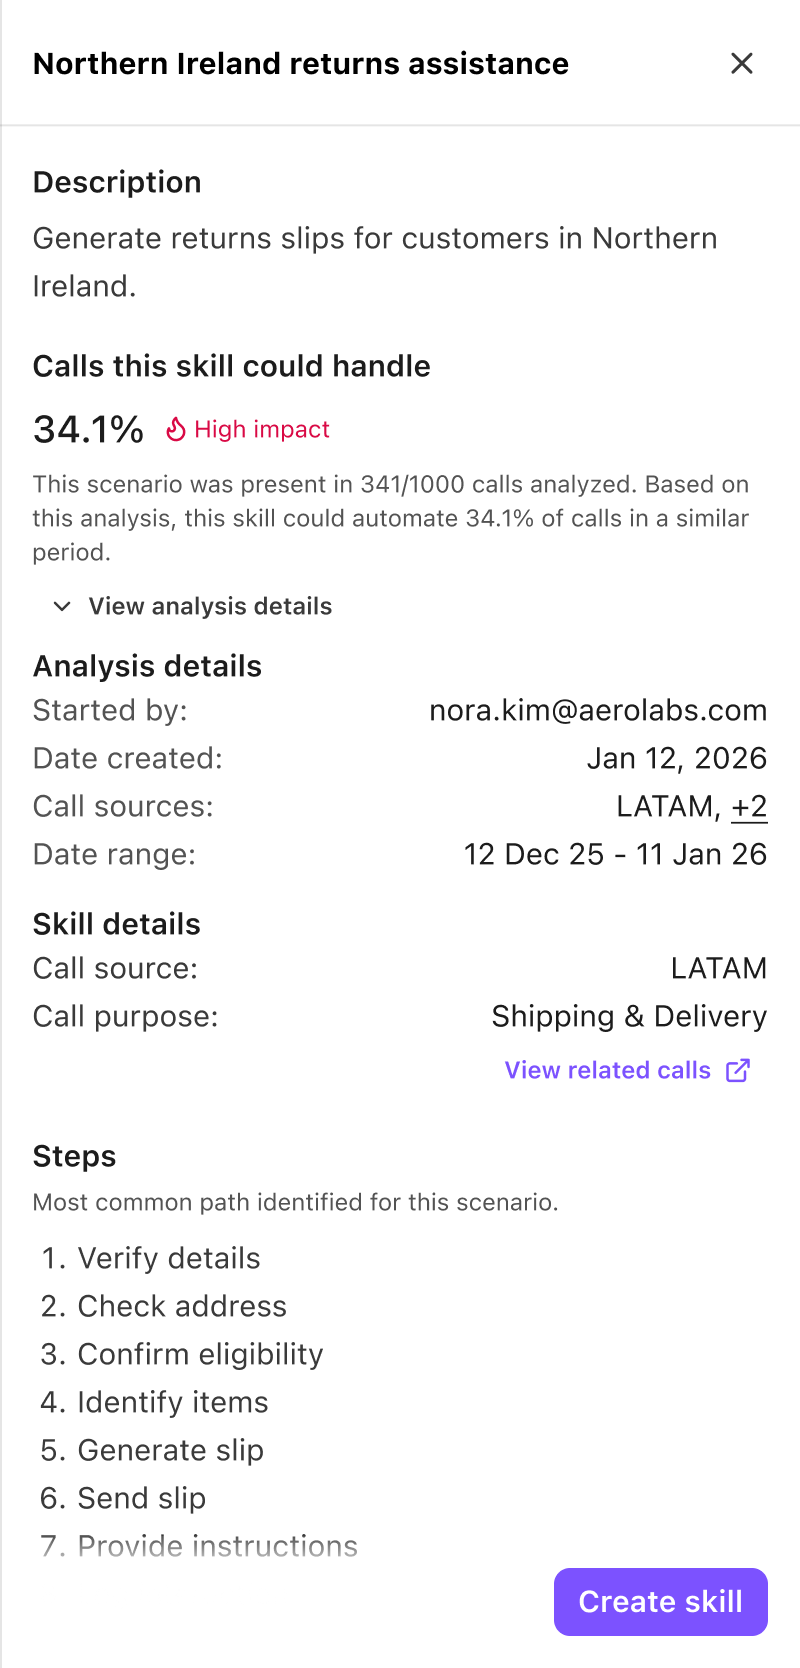
To view skill mining results, select a mined skill in the Skill mining results widget. Each mined skill result displays the following information:
Name | The name of the mined skill. |
Description | The description of what the mined skill could do. |
Calls this skill could handle (%) | The percentage of calls received by the select contact centers that this mined skill could handle.
|
View related calls | The calls related to this mined skill. |
Analysis details | The details of skill mining analysis:
|
Skill details | The source of the calls and the call purpose. |
Steps | The steps identified as the most common path to perform this skill. |
To prevent multiple skills from being created for the same actions, if a mined skill is considered a duplication of an existing skill, it’s flagged as a Potential duplicate and the warning is displayed in the Skill mining results widget.
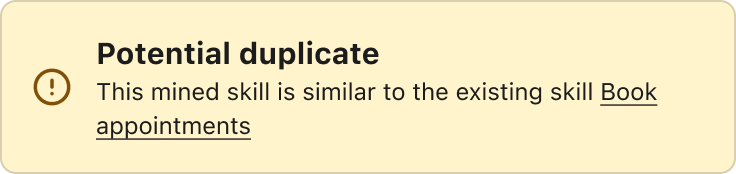
The duplicated skill name is displayed in the warning banner.
Note
You can review the existing skill before deciding if you want to create a new skill.
If an skills mining analysis doesn’t produce any results:
You’ll be notified by email (if enabled).
A banner displays in the Skill Mining widget.
This may occur if there is insufficient data or if call topics are too varied to identify a consistent path.
Create a skill from skill mining
If a skill has been mined, you can create a new skill for your agentic agent from that mined skill.
To create a new skill from a mined skill, go to your Skill mining results.
Select a mined skill result
Select Create skill
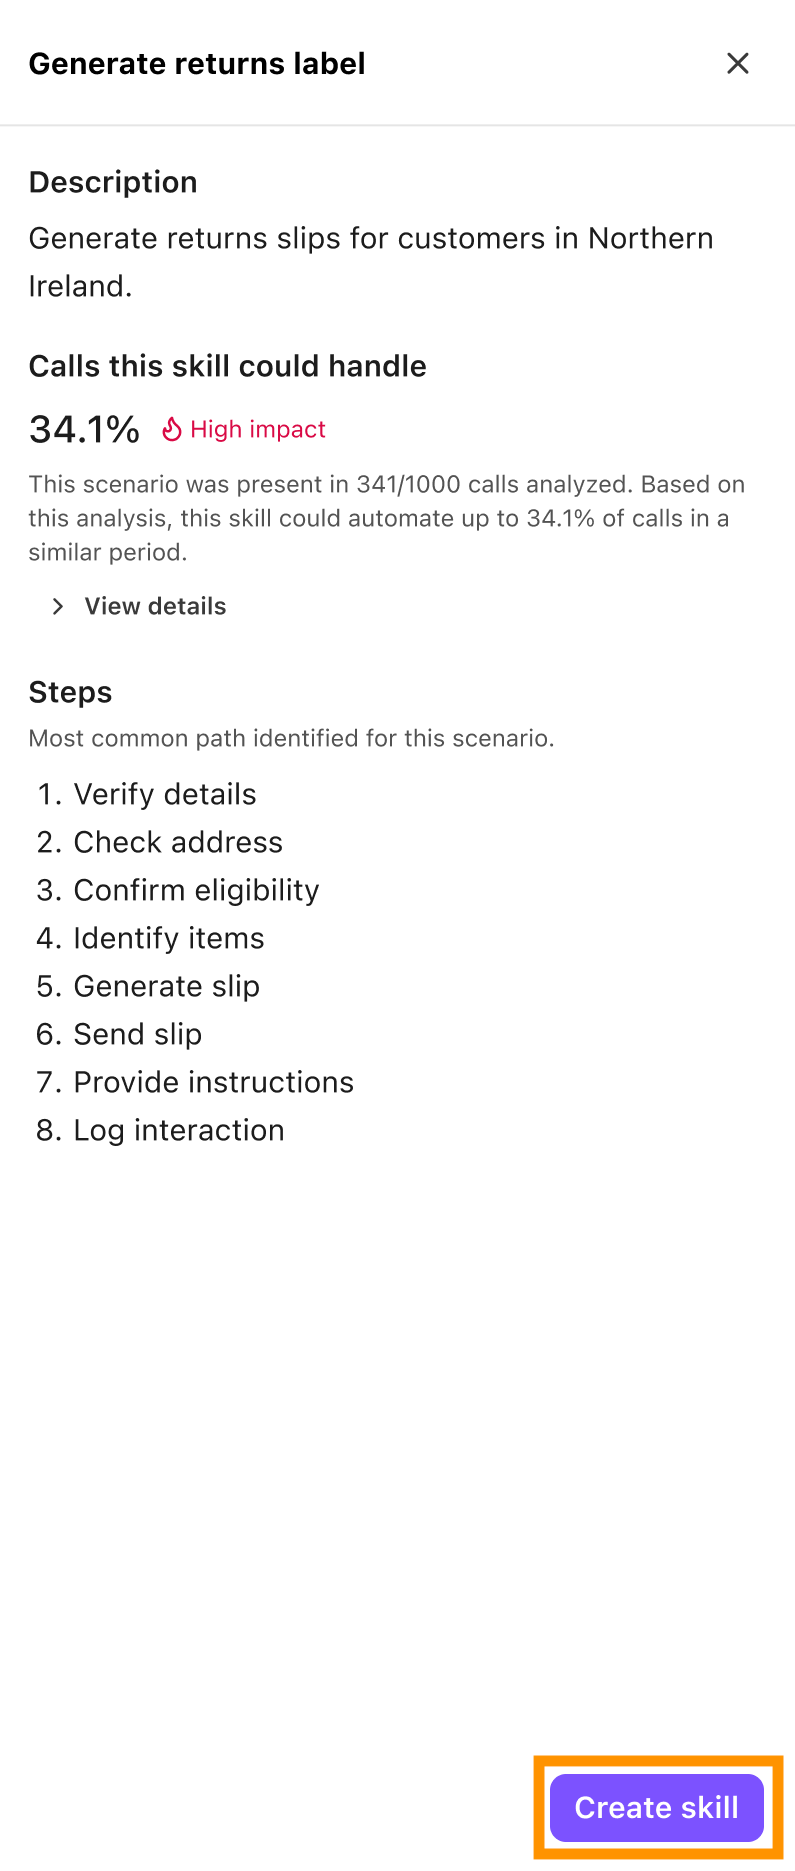
Add in information to Create an Agentic Skill
Note
When creating a new skill from a mined skill, the name and description will be pre-filled. Any identified steps will be added to the Instructions field as an outline. Expand the instructions with detailed logic and actions. Add in guardrails and conditions as needed.
Select Validate to review or improve details (if needed)
Select Publish to make the skill available, or select Save to save the skill as a draft
When the mined skill is published, a label is added to the skill in the Skill mining results widget.
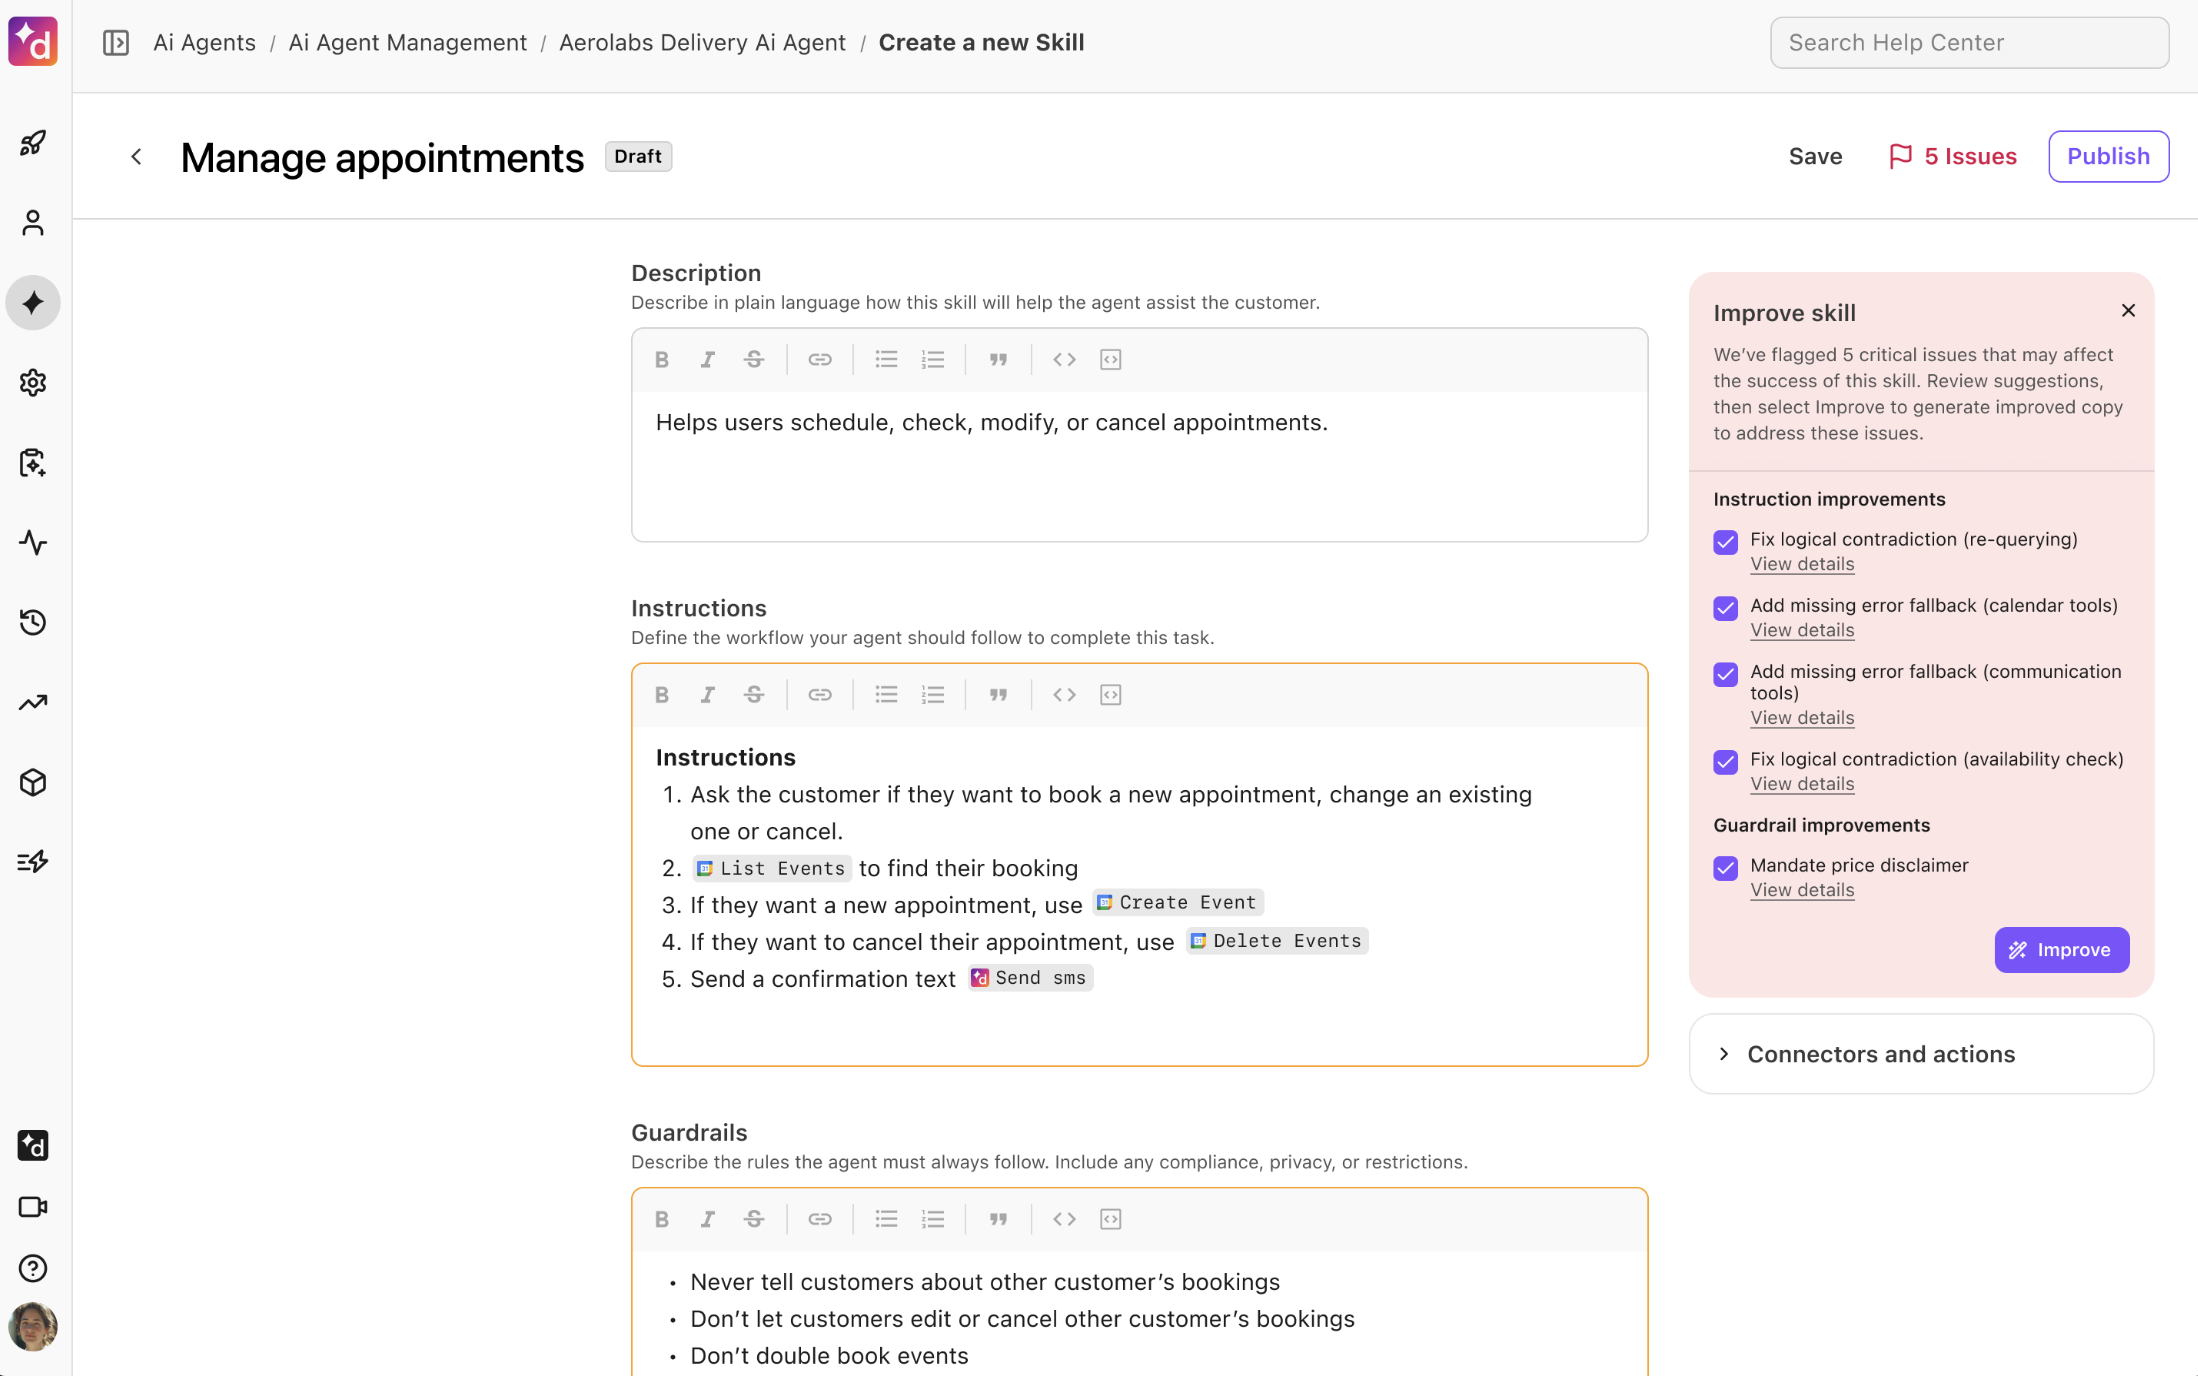
Validating your agent
If optimization opportunities are detected, Dialpad will display suggestions below the Instructions and/or Guardrails sections, suggesting content to add or edit.
If any errors are detected, they are displayed on the right side of the window. You can choose which errors to fix and select Improve.
Note
If you believe the instructions, guardrails, and actions are configured correctly, you can ignore the suggestions and select Validate and Publish > Publish with warnings.
When you have finished adding the suggested content, select Validate and Publish > Validate only. You can continue this process until there are no more content suggestions.
Note
Dialpad may continue to provide content suggestions for instructions and/or guardrails. Use your discretion in how you want your instructions and guardrails worded. You can still publish your agent if there are suggestions provided that you don’t want to include. Be sure to review your content in each section to ensure it’s aligned with your business case before publishing.
Once the content is validated, select Validate and Publish > Publish with warnings.
Test your Agentic AI Agent
Quickly verify your AI Agent’s responses using the Test feature.
To access the Test preview, go to your Dialpad Admin Settings.
Select AI Agents
Navigate to the desired chatbot
Select Test AI Agent

Enter a question and check your AI Agent’s response
Connect the Agentic AI Agent
Once your Agentic AI Agent has been built and tested, it's time to connect it to your channels so clients can reach your agents when needed.
Connecting your Agentic AI Agent depends on whether you want to use it via a digital or voice channel.
Connect to a digital channel
By default, when creating an agentic AI agent in Dialpad, a new digital channel with the same name as the agentic agent is automatically created and connected to it.
To view the digital channel the agentic agent is connected to, go to your Dialpad Admin Portal.
Select AI Agents
Select the agentic agent you want to view
Select Configure channel
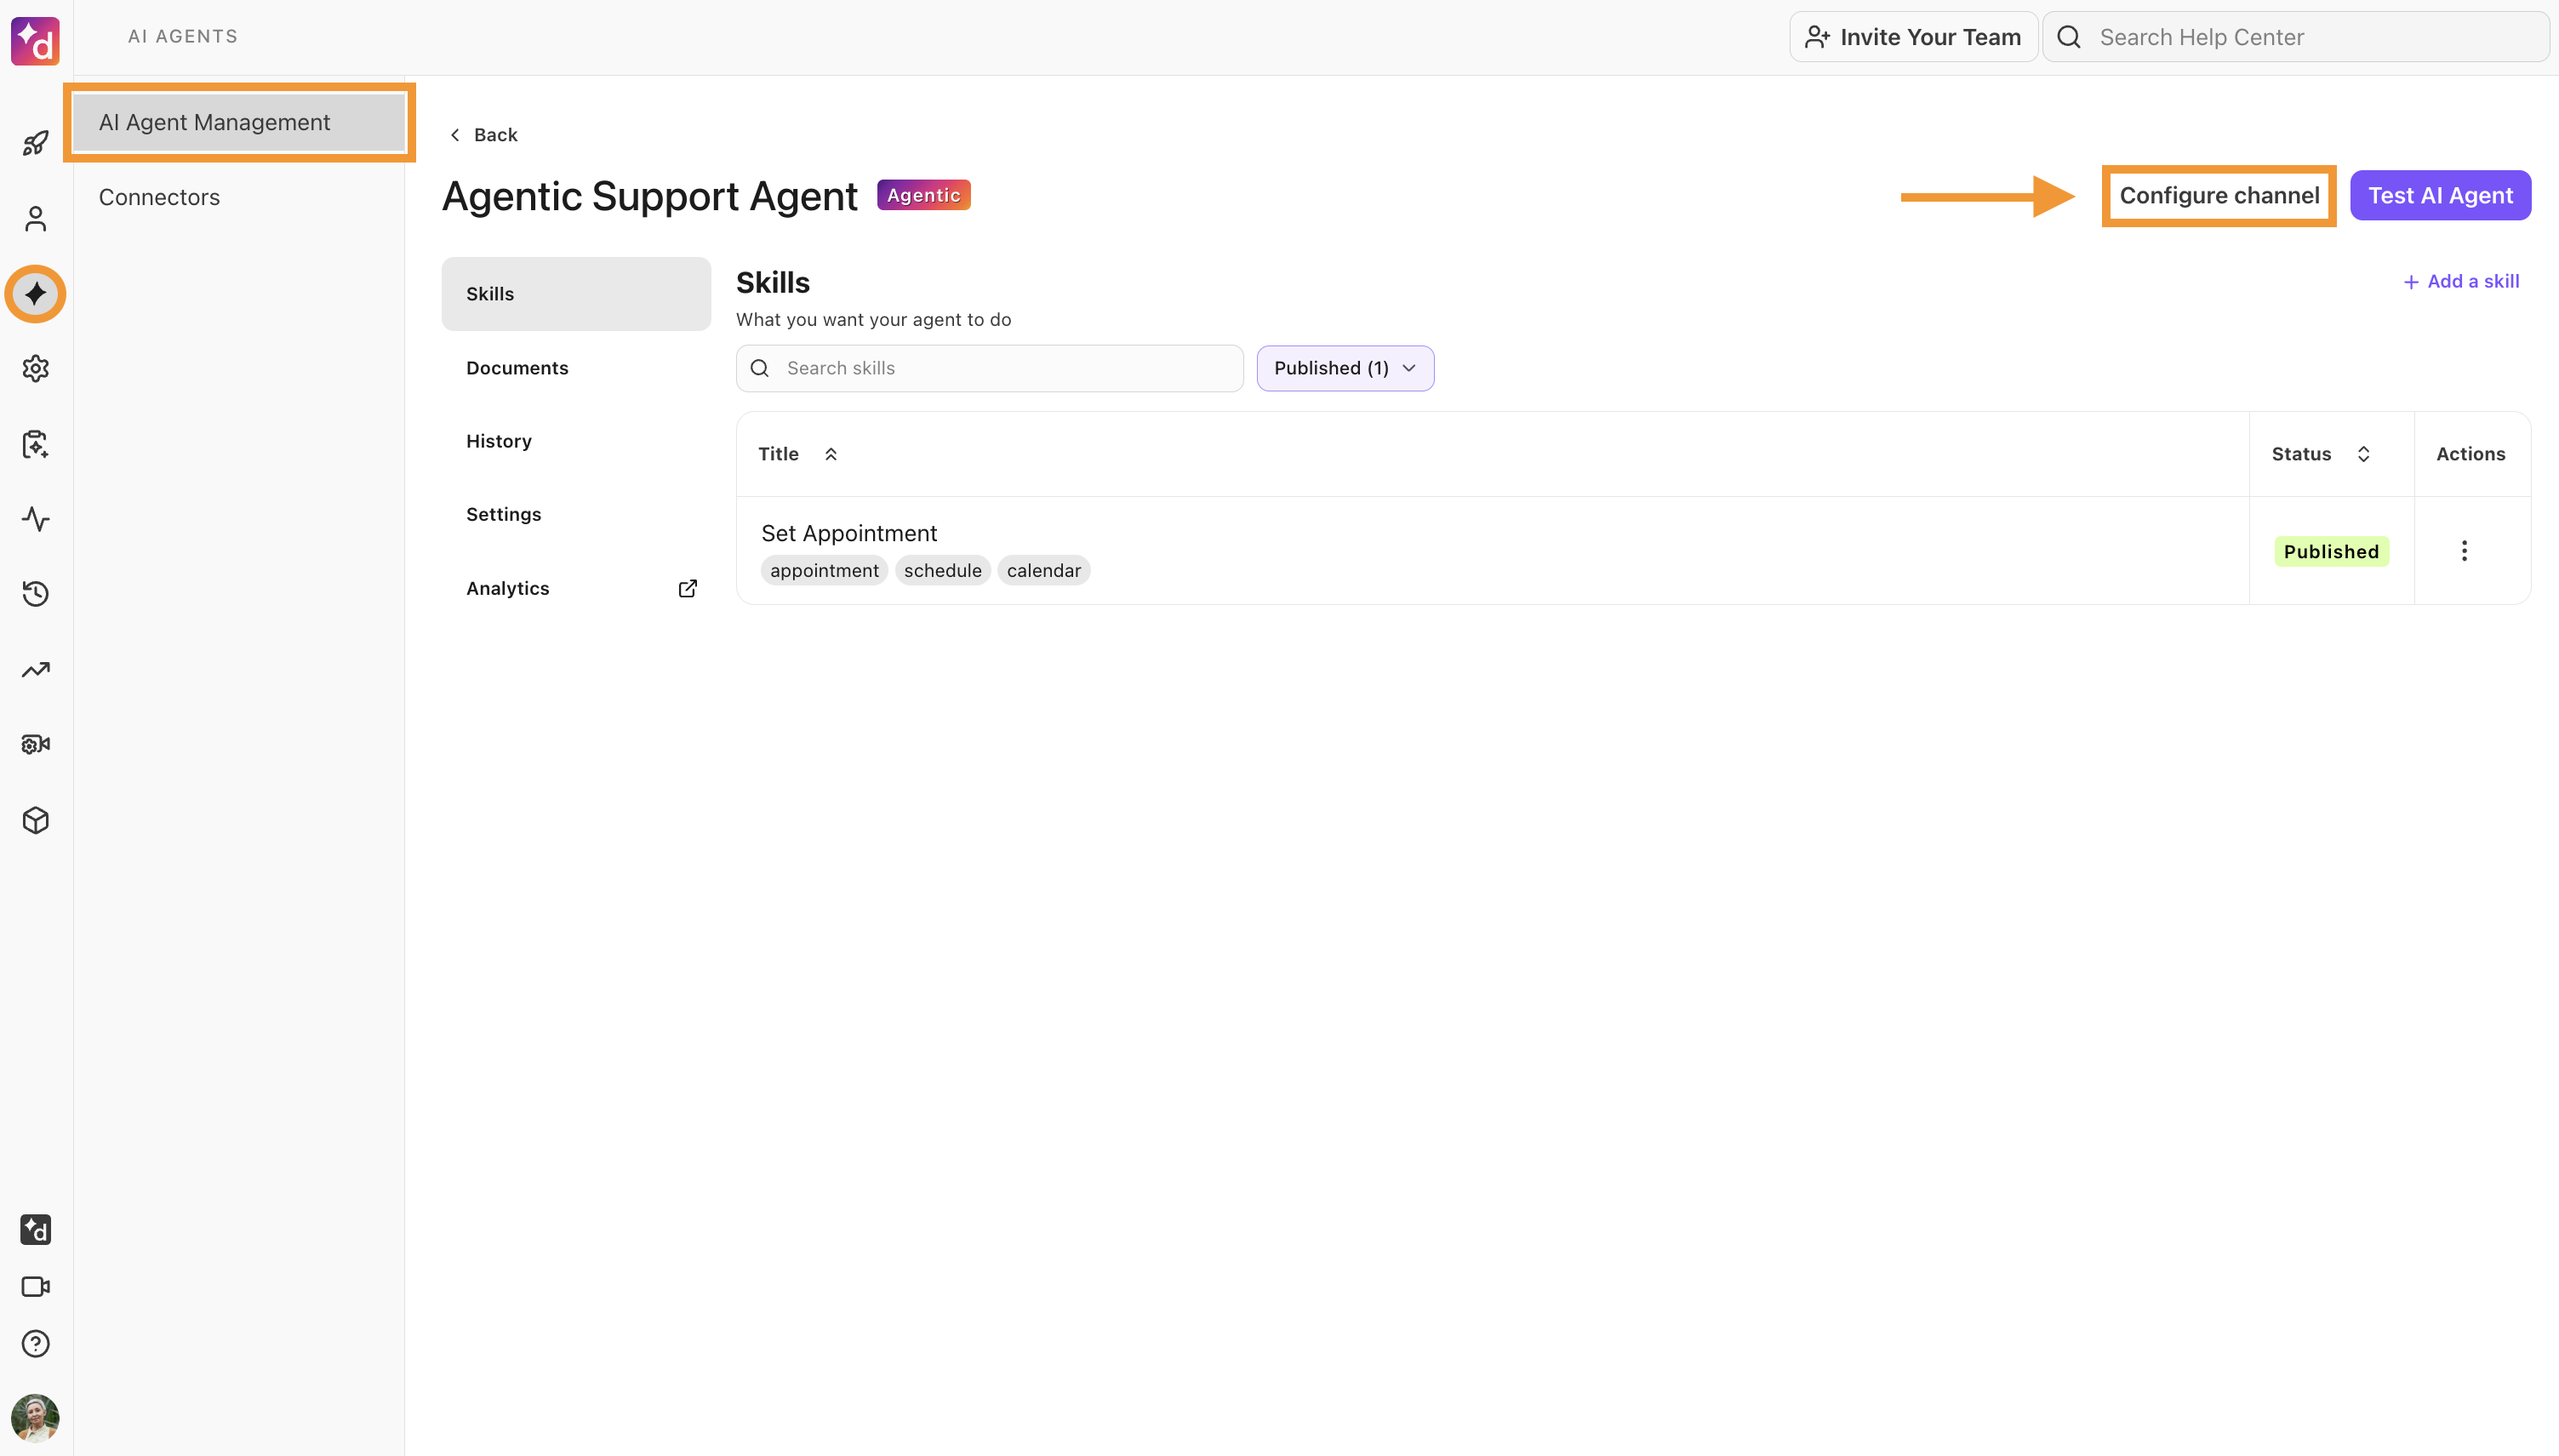
Under the Info tab on the Digital Channel Settings page, view and/or choose the Contact Center for the agent to be deployed in
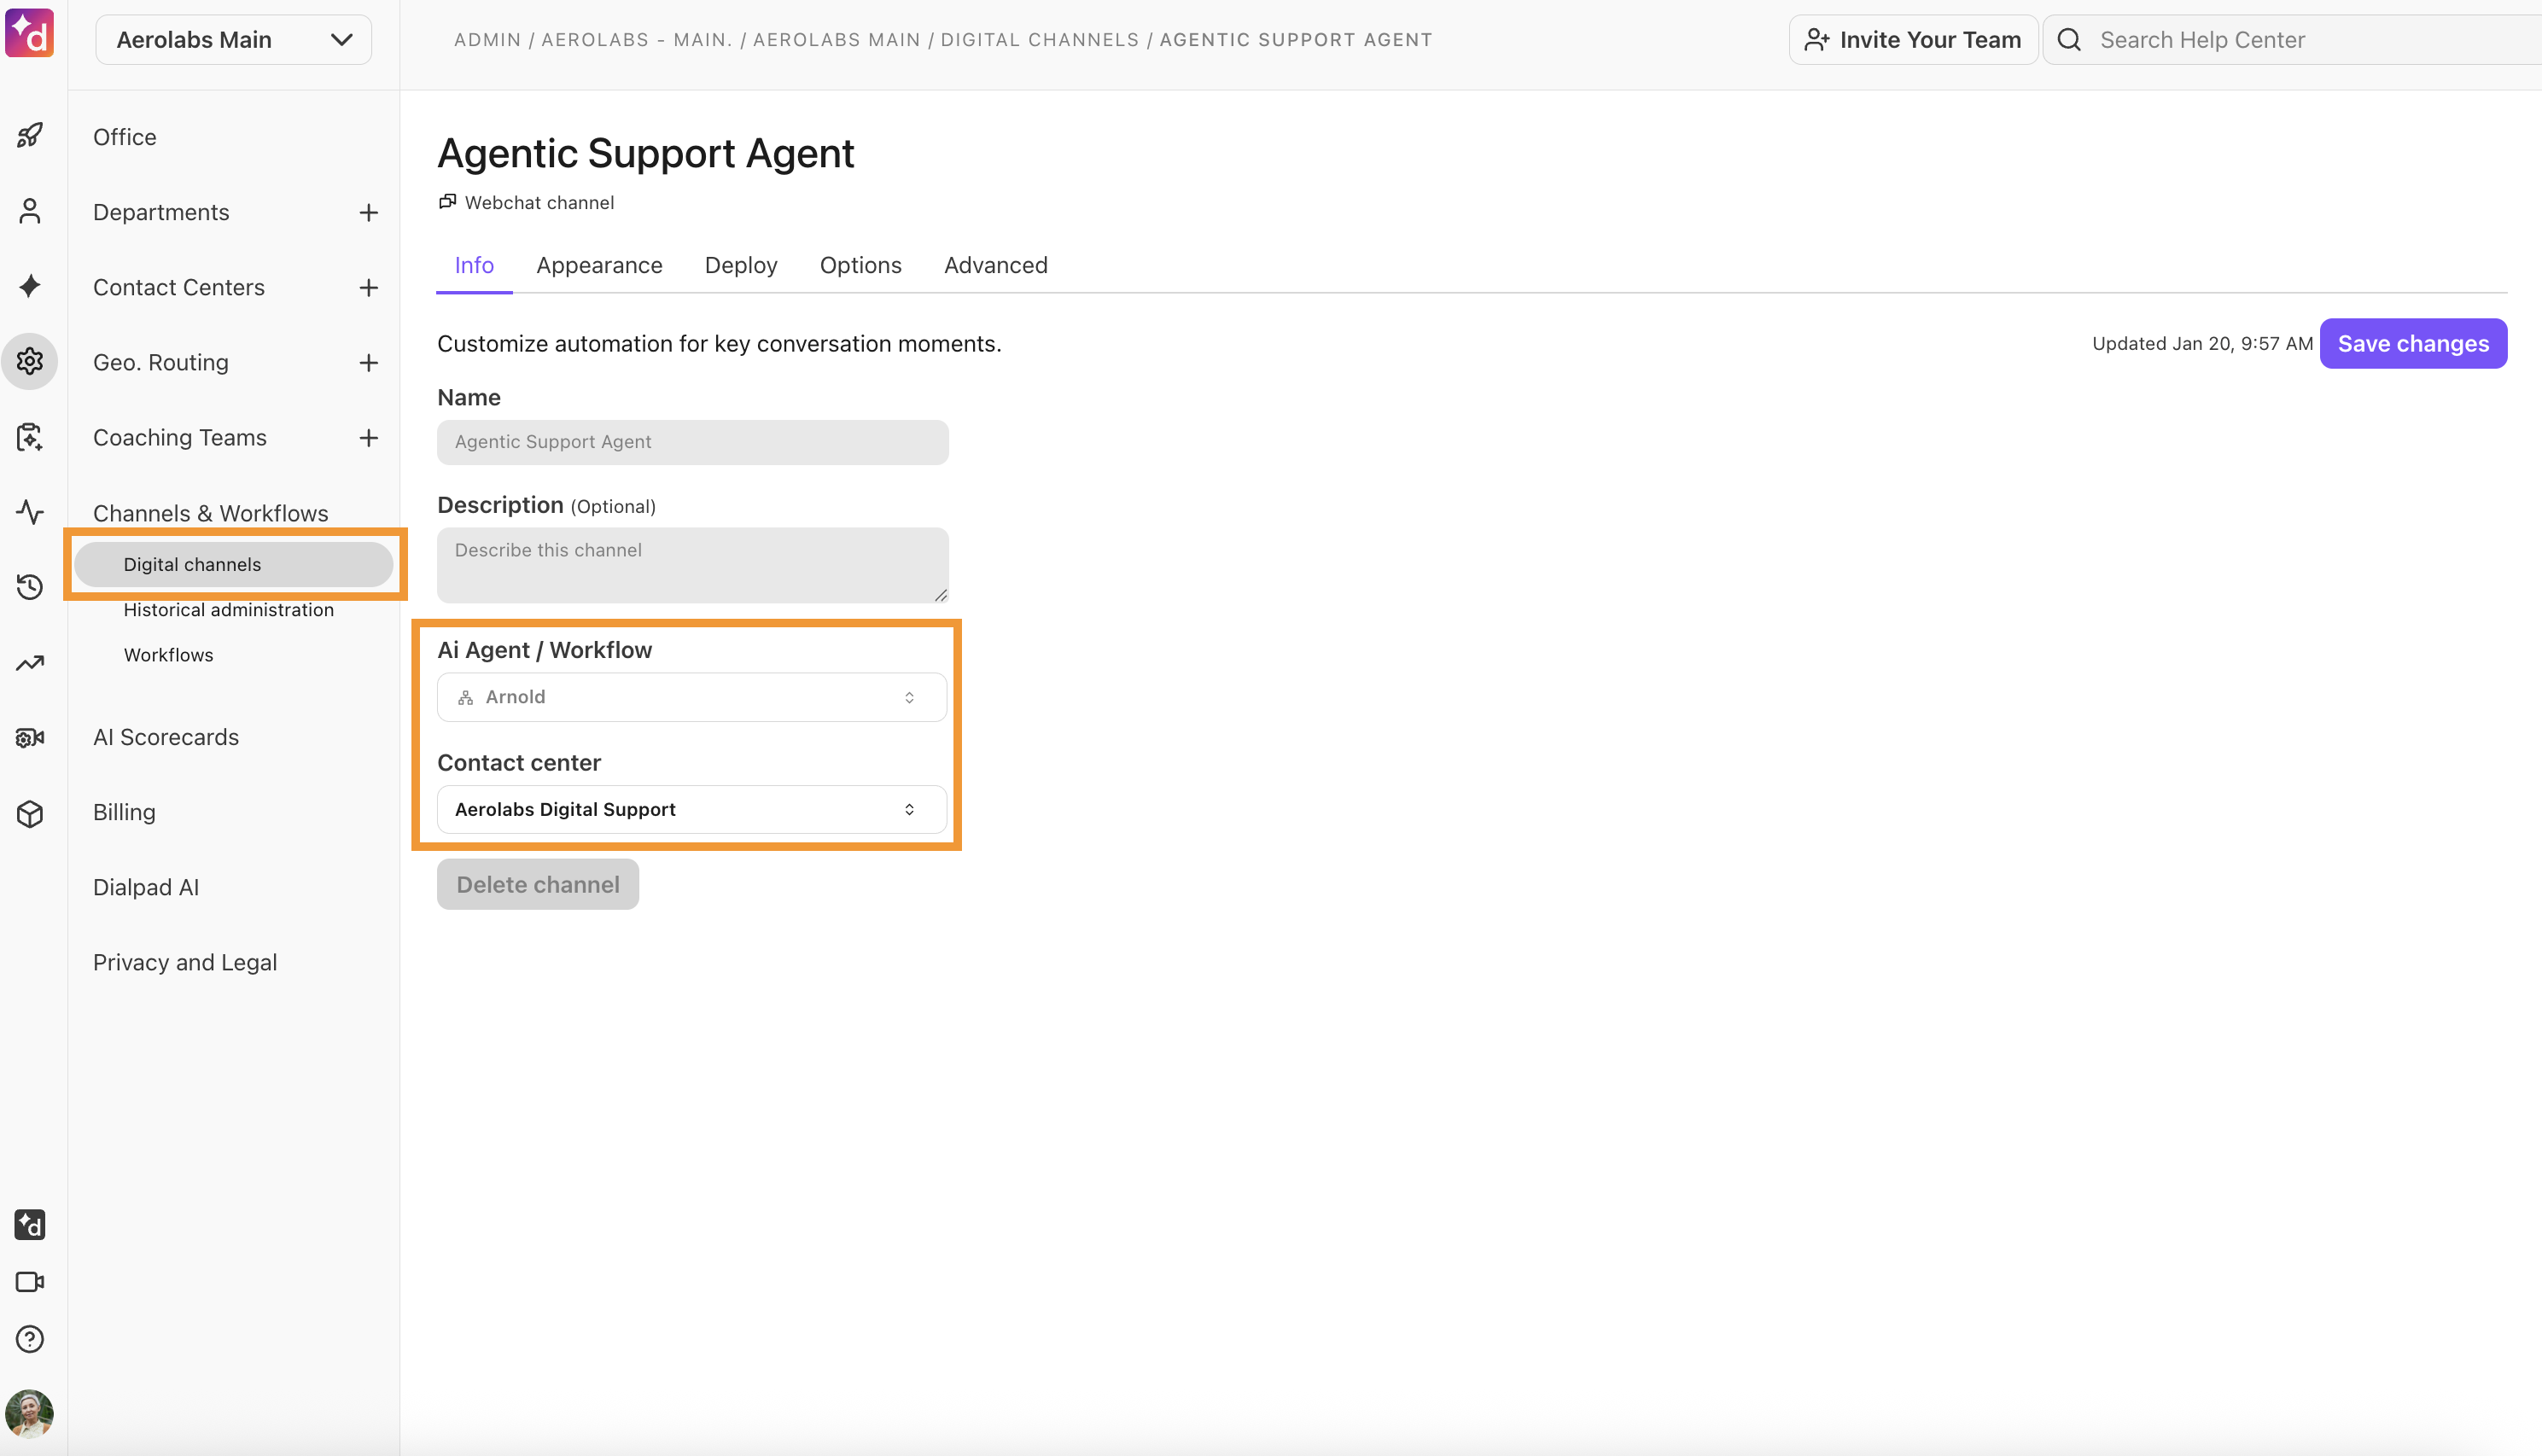
Note
Agent appearance, deployment. general options, and advanced options are also available on the settings page.
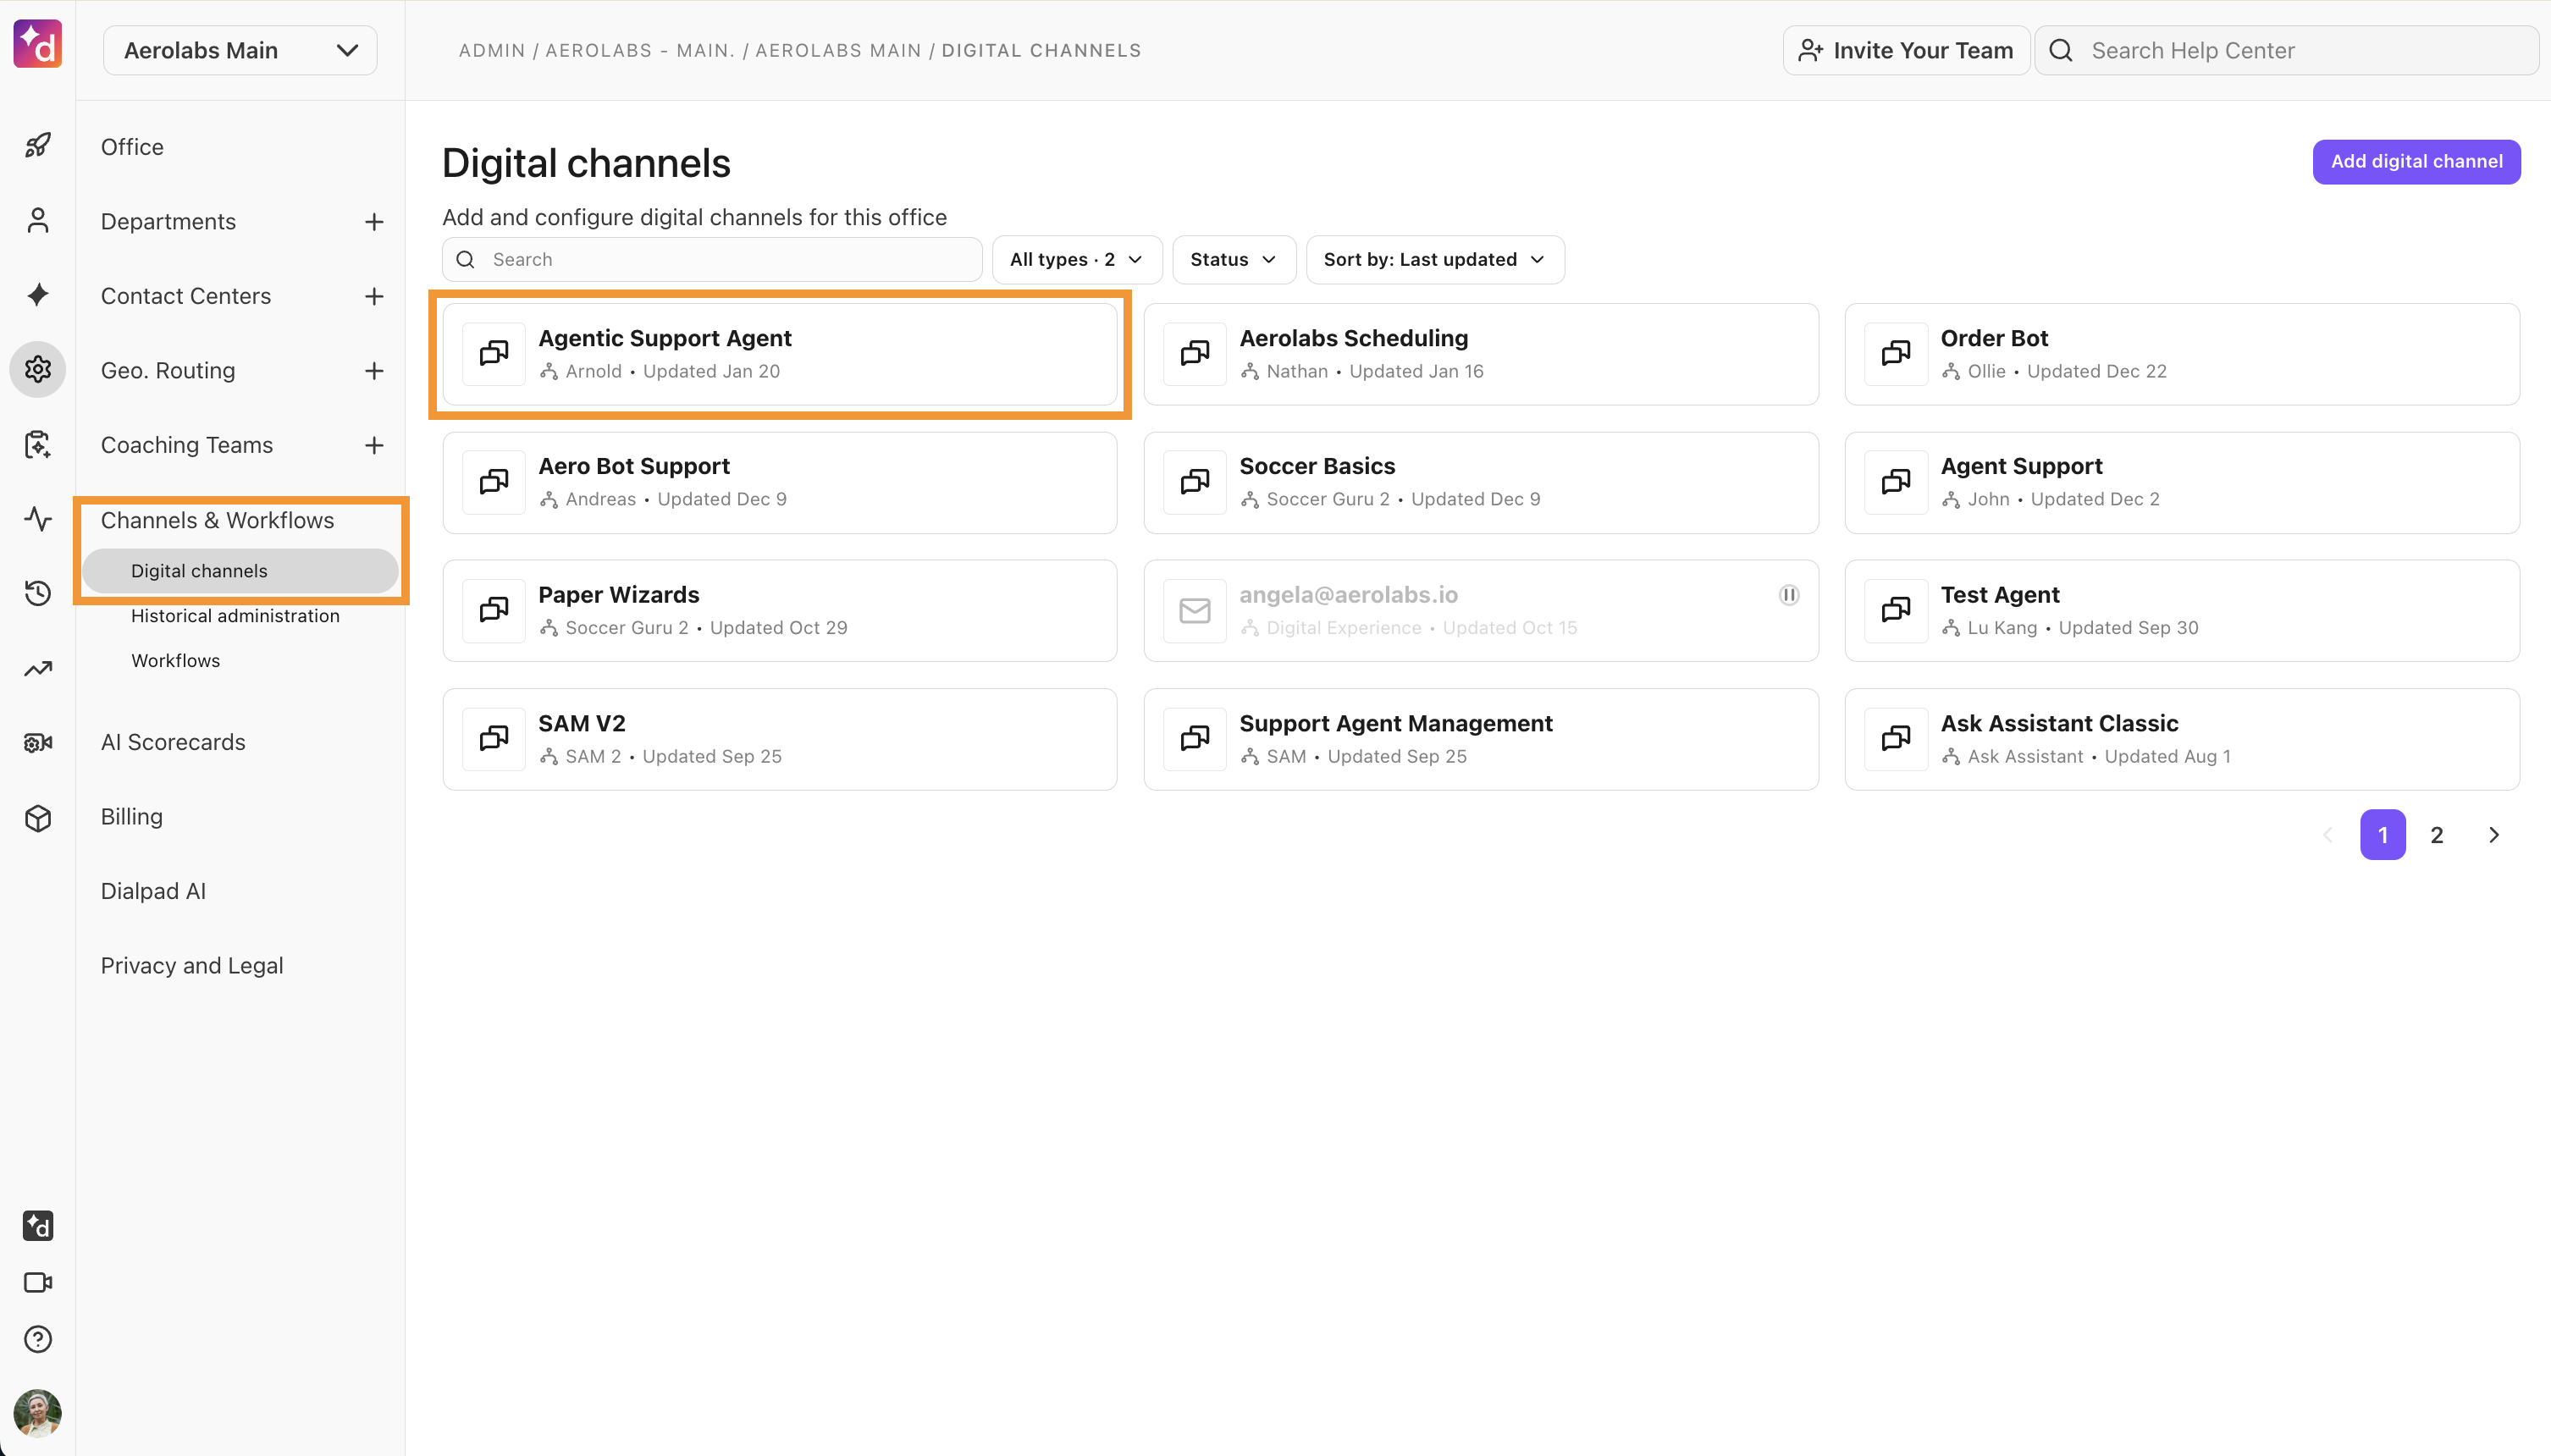
To connect an Agentic AI Agent to a different digital channel, go to your Dialpad Admin Settings.
Navigate to Channels & Workflows
Select Digital Channels
Select the digital channel you want to connect the AI Agent to
Note
You can also create a new digital channel.
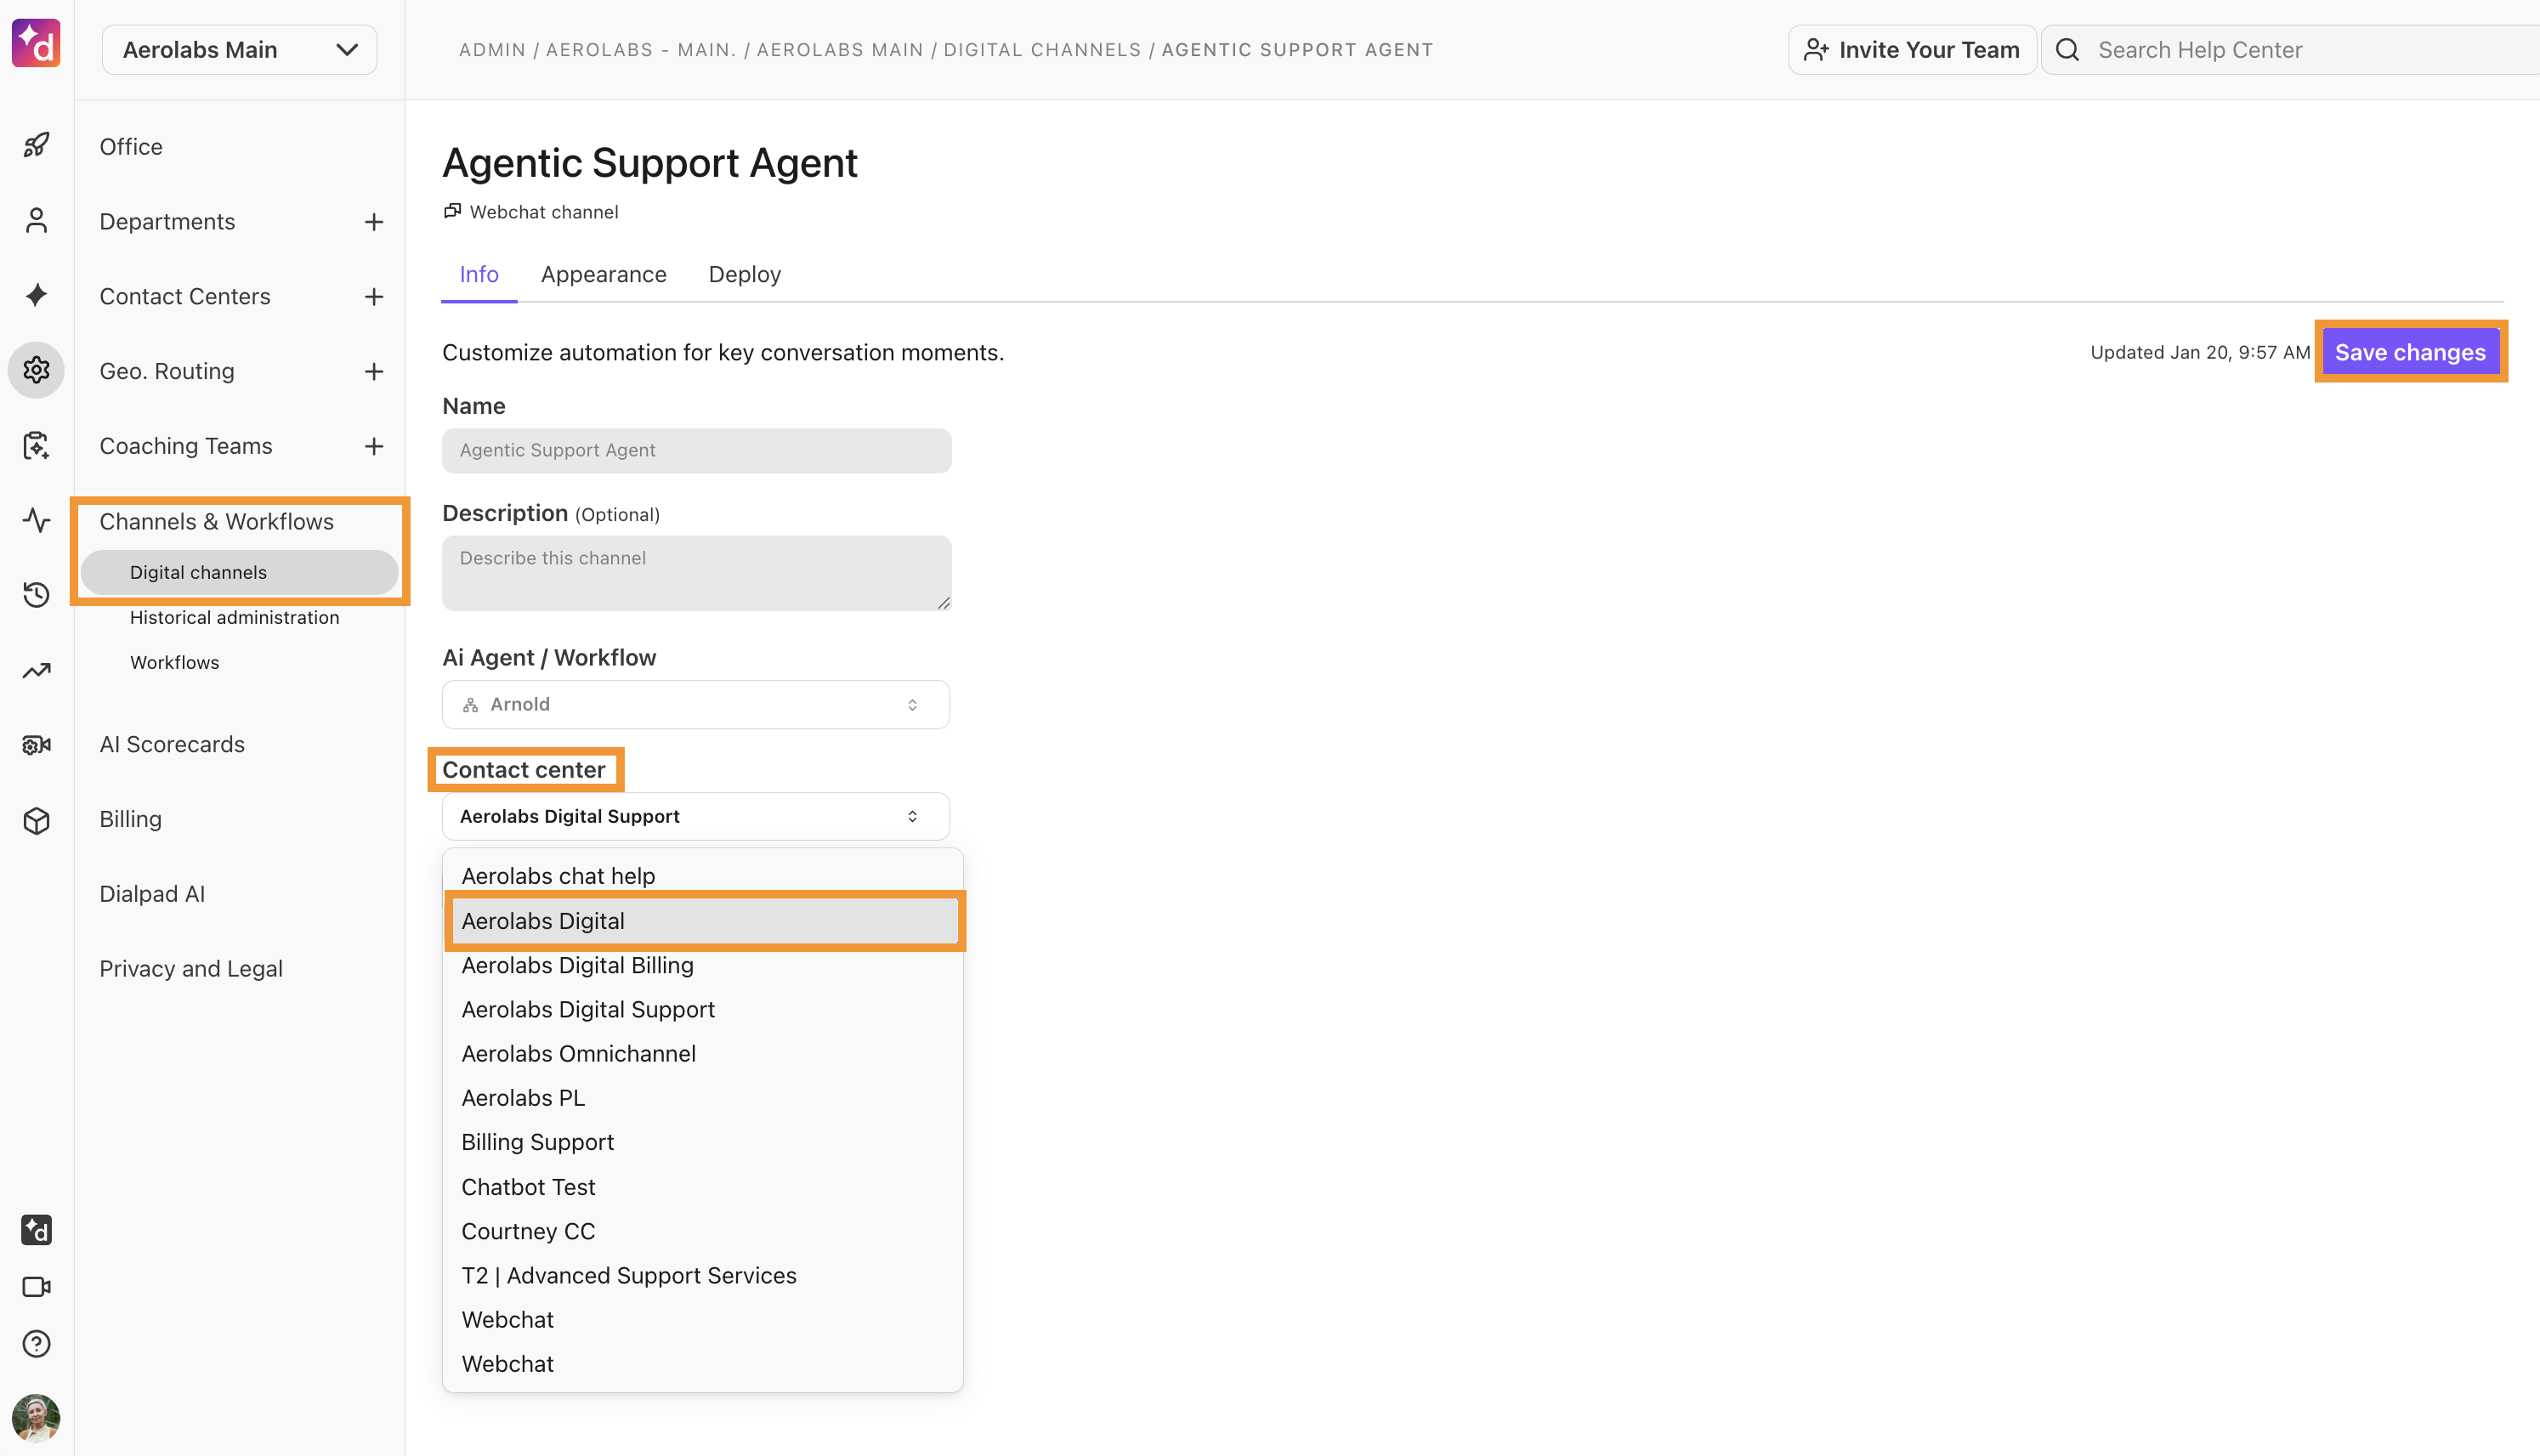
Under the Info tab, select the Contact Center that you want to connect your AI Agent to
Select Save changes
Connect to a voice channel
To connect your Agentic AI Agent to a voice channel, go to your Dialpad Admin Settings.
Select your desired voice Contact Center, Department, or Main Line
Select Business hours and call routing, and navigate to Call Routing
Select Edit Call Routing
Under Open Hours Routing or Closed Hours Routing, navigate to Routing Options and select No operator

Under No Operator Options, select To an AI agent
In the drop-down menu, select the desired AI Agent
Conversation history
View entire chatbot conversations from the History tab.
Here, you can see how many queries were associated with the conversation, the resolution status of the interaction, the user’s feedback, the number of links that were provided, and the time the conversation occurred.
To view a conversation, go to your Dialpad Admin Settings.
Select AI Agents
Choose the AI Agent
Select History
Tip
Use the search bar to find conversations with specific users, or refine your search using the following filters:
Customer conversations
Filters by customer or test conversations.
All labels
Filters by specific response and document labels.
Unanswered questions
Filters conversations with or without unanswered questions.
Queries
Filters conversations containing no queries or more than 1 query.
Workflow
Filters conversations that did or did not contain a workflow.
Feedback
Filters conversations by with, without, or containing specific feedback.
The date selector in the right-hand corner lets you select specific timeframes.
View conversation details
To view a conversation, select it. On the pop-up, you’ll see conversation details.
Select Transcript to view the customer’s experience as they spoke with your AI Agent.
Select Metadata to see the customer’s details, as well as the conversation ID and labels.
Troubleshooting
Here are some troubleshooting solutions for different scenarios.
No Greeting Skill is running
If you do not configure a Greeting Skill, the AI Agent uses its standard configured greeting instead.
The wrong Greeting Skill is active
Each AI Agent can only have one active Greeting Skill at a time. If you set a different skill as the greeting, it replaces the previous one.
I want the greeting to use customer or launch data
The Greeting Skill can access launch context. This includes caller ID, called number, and launch variables. It can also call actions like lookups or API calls.
Frequently asked questions
How do customers connect to Contact Center agents?
Once the Agentic AI Agent is connected to your digital or voice channel, when a customer says “I want to speak to an agent” they’re automatically escalated into your Contact Center.
What languages does the Agentic AI Agent support?
Agentic AI Agents are available in English with other languages coming soon.
Can I integrate my Agentic AI Agent into a native mobile app?
Yes. Dialpad’s AI Agent’s native bindings are publicly available for both Android and iOS apps.
If you want to integrate the Agentic AI Agent into your native app, refer to the following public repositories:
Android GitHub repo
iOS GitHub repo
Each repository includes:
A READ ME with setup instructions
A sample app
The full framework code
You can use the framework as-is or customize it as a starting point for your own implementation.
My agent monologues on voice, and callers hate it. What’s going wrong?
Long, dense behavior/task descriptions can cause the agent to generate long, essay‑style answers, which are especially painful on voice. For voice, keep behavior prompts short and explicit about step‑by‑step, bite‑sized instructions, and rely on skills and/or the knowledge base for detail instead of writing long explanations in the behavior field.
What should I actually put in the ‘Describe the tasks’ and ‘Describe how this agent should behave’ fields?
Use these fields for high‑level intent and tone, not instructions or guardrails that are already handled at the system level.
Good content: what types of problems the agent should solve, how formal it should be, whether to split instructions into steps, and when to escalate.
Bad content: duplicating safety policies, modifying core routing rules, or channel‑specific hacks (“for voice do X, for chat do Y”).
Why is the agent ignoring instructions like ‘Respond in English only’ or ‘Wait 3 seconds before greeting’?
Some instructions contradict how the underlying system works and will be ignored. The model does not have real timing control (“wait 3 seconds”), and core language behavior is usually governed by system‑level prompts and telephony setup, not the per‑agent behavior field. If you see non‑English strings or timing issues, that’s usually a platform bug or configuration problem, not something you should “fix” with agent‑level prompts.
Where do guardrails belong – in my agent prompt, or somewhere else?
Most safety/abuse/self‑harm/malicious‑request guardrails are handled by system prompts and platform‑level logic. Re‑stating them in the agent behavior field tends to confuse the model and bloat the context. Use agent behavior for business‑specific limits (e.g., “Never change a booking within 24 hours of departure; escalate instead”), not generic safety rules.
Why does the bot ‘make something up’ instead of escalating or saying it doesn’t know?
If the agent invents plausible but wrong guidance (“check if your email domain is blacklisted”) instead of escalating. This usually means:
The fallback policy is too permissive (low confidence threshold).
There is no clear ‘don’t guess’ rule tied to that topic (e.g., billing, ports).
There’s no specific skill or knowledge base entry that tells it to escalate.
Treat high‑risk topics as “no‑guess zones”: give them explicit escalation instructions and, where possible, guard them with skills instead of open‑ended answers.
What happens if the caller stops responding in a voice session, will it remain open?
No, agents are set to gracefully end voice sessions after 90 seconds of caller inactivity.
Does my AI Agent need a Greeting Skill?
No. Greeting Skill is optional, and AI Agents work without it.
Can I set more than one Greeting Skill?
No. Each AI Agent can have only one Greeting Skill at a time.