Designed to provide deeper diagnostics into call quality, user devices, and SIP provisioning, our Enterprise Support Portal (termed /es portal) is a powerful tool in a Dialpad admin’s arsenal.
While many call analytics are available within the Dialpad Admin portal, this tool is useful for viewing advanced analytics and conducting initial troubleshooting for jitter, latency, network issues, and device connectivity.
Who can use this
Dialpad’s Enterprise Support Portal is available to Dialpad Support and Dialpad Sell users on an Advanced or Premium plan, as well as our legacy Enterprise plan.
Contact Customer Care to enable the Enterprise Support Portal.
Access the Enterprise Support Portal
To access the Enterprise Support Portal, go to dialpad.com/es and select your Company link.
Here, you’ll see quick access links help manage your users, offices, shared lines, and more.
Plus you’ll see a list of all the feature flags that have been added to your account.
Dialpad Glossary | Feature flags
Feature flags are features that have the flexibility of being turned on or off at different levels, i.e. Company level (meaning everyone has access) vs user level.
To turn off an feature flag, simply select Remove. You can always check in with your Customer Success Manager or our support team if you’re unsure about a specific feature flag.
View users
Let's start with the basics — looking up a list of all your users.
To view a list of your company's users, select Users from your company page.
.png)
Here, you'll see an overview of each of your Dialpad users, including key information such as:
Company Admin
Dialpad #
Account state (Active, Pending, Invited, Deleted)
The Pending status only applies to the user who created the account, or to the first Dialpad user. All other new team member's account state will show as Invited until they become active.
License type
Contact Center status
.png)
View number assignments
Need to look up a list of all assigned numbers? Select Dialpad #s from your company page to see an overview of all your Dialpad numbers.
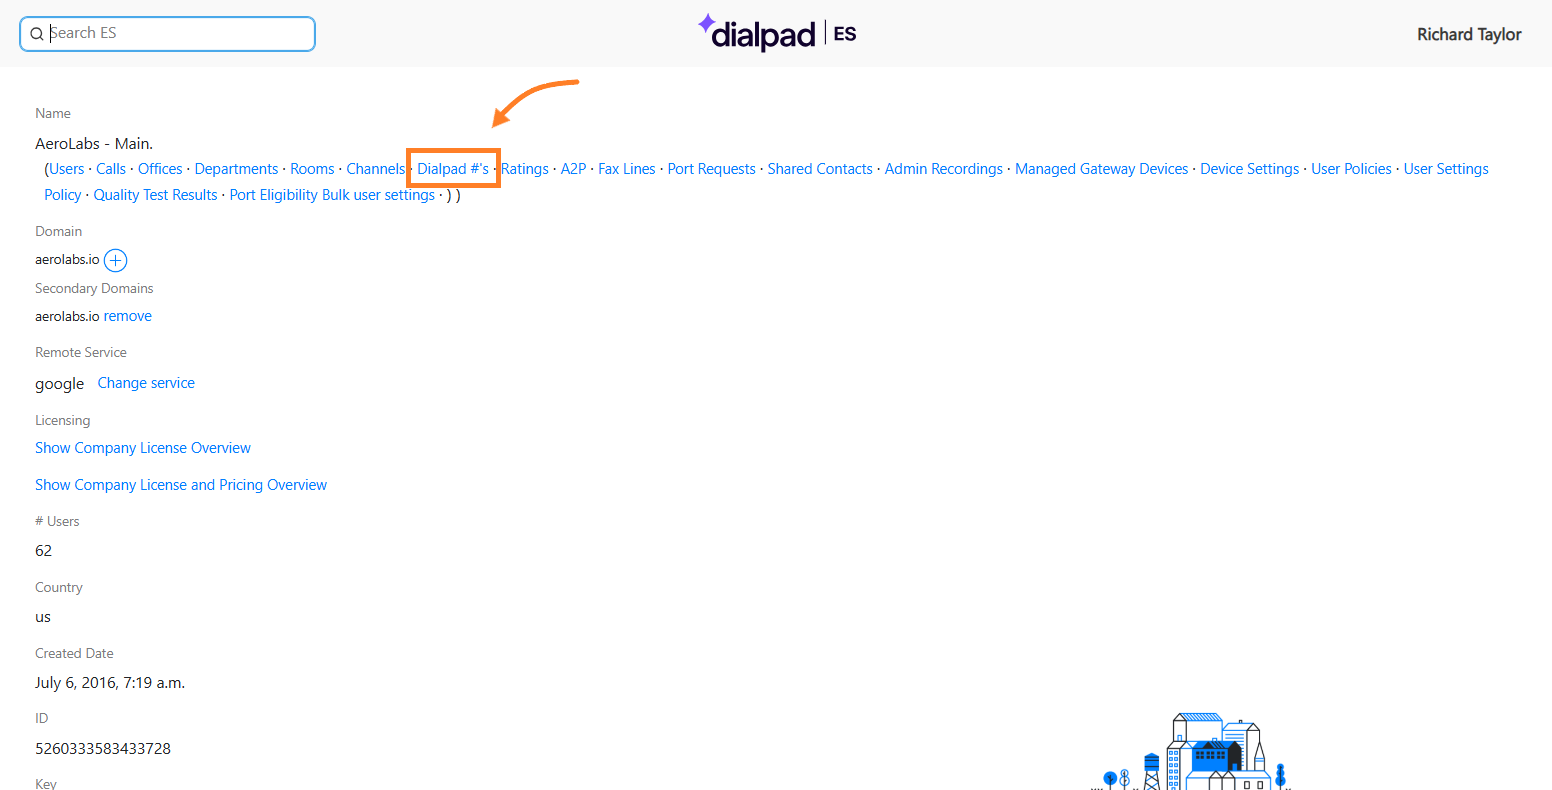
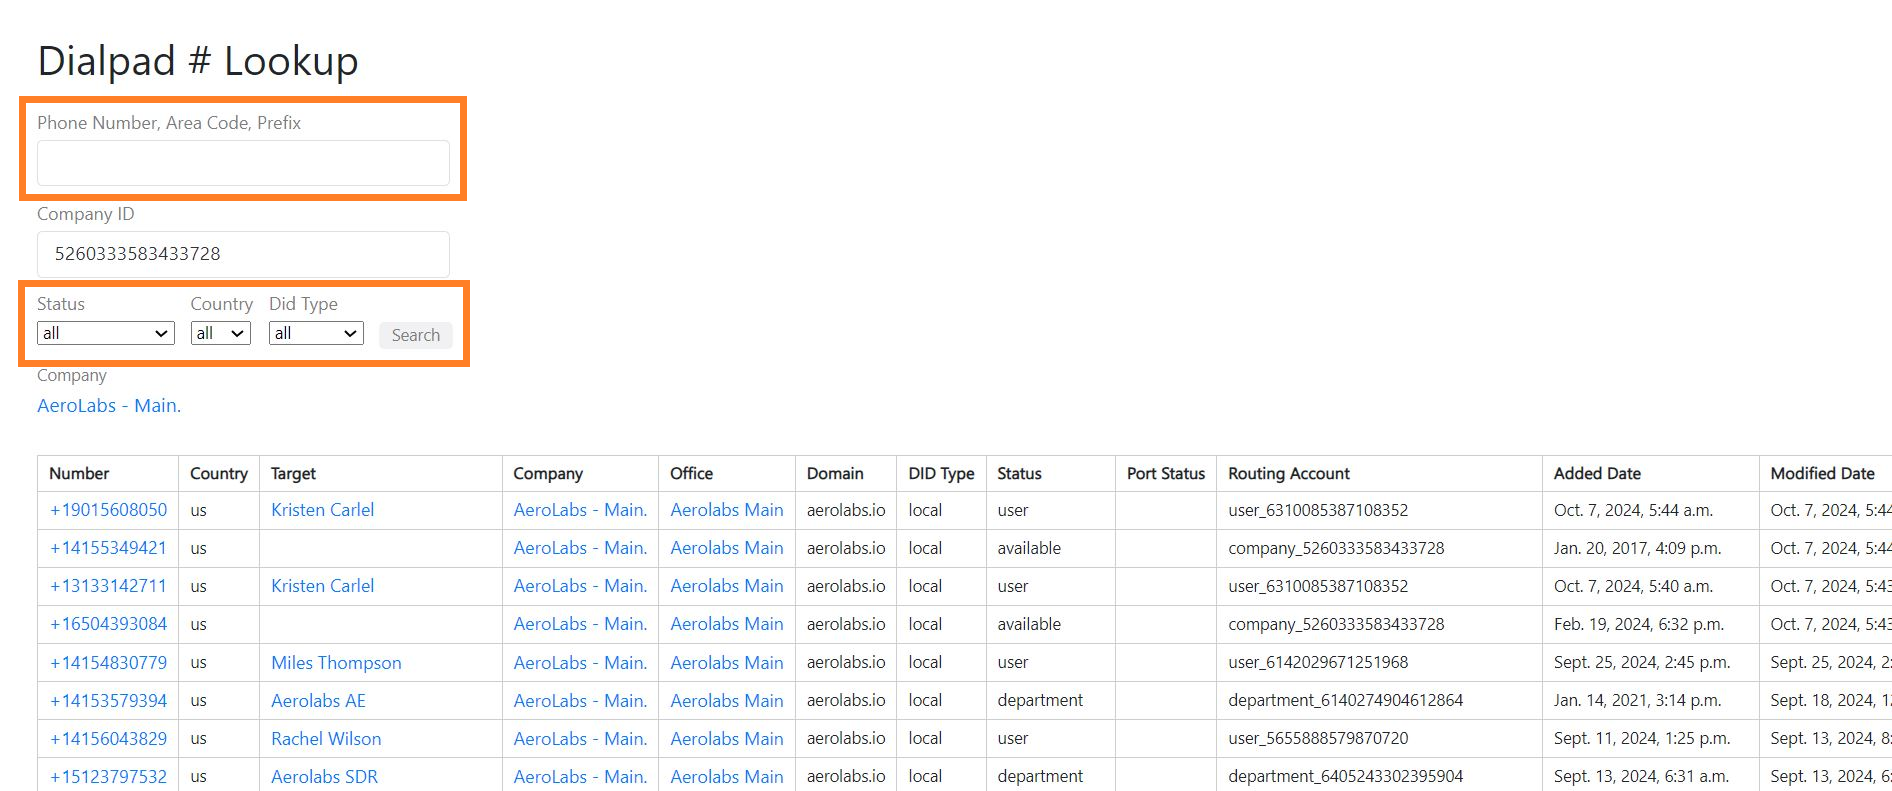
Search for a number
On your the Dialpad #'s page, you can search for a specific number assigned to your Company.
Navigate to Dialpad # Lookup
Enter the phone number in the search field (or filter by status, country or number type)
View devices & app versions
Whether you want to check user devices, verify app updates, or review SIP registrations, you can find all that and more through our the User Search.
Select Users from your Company page
Navigate to User Search
From the overview tab, view the user's app version
Select an individual user to view their assigned devices and full user details
Dialpad Glossary | App Version
native = mac or windows desktop app
packaged_app = chrome app
web or harness = logging into dialpad.com or dialpad.com/appYou can see other info such as Platform (what machine they’re using), Version, Updated, and Registered.
If you ever need to confirm the latest version of the Dialpad apps, be sure to check our What's New section.
View SIP Registrations
Once you’ve navigated to an individual user’s devices, you can check to make sure that each device is registered with our servers. This is particularly important for cases where users are reporting issues making or receiving calls.
Navigate to User Devices section and look up the app in question.
Here's a quick cheat sheet to force re-registration on the other apps:
App | How to Push Registration |
|---|---|
Obihai/Polycom/SIP | 1. Select Delete next to User Device |
Desktop Apps (Mac/Windows/Chrome) | 1. Select Delete next to User Device |
Note
iOS, iPad, and Android devices don't show a registration timestamp in the ES Portal.
View SMS Registration data
Access and view your SMS Campaign registration by going to A2P option on your ES Portal.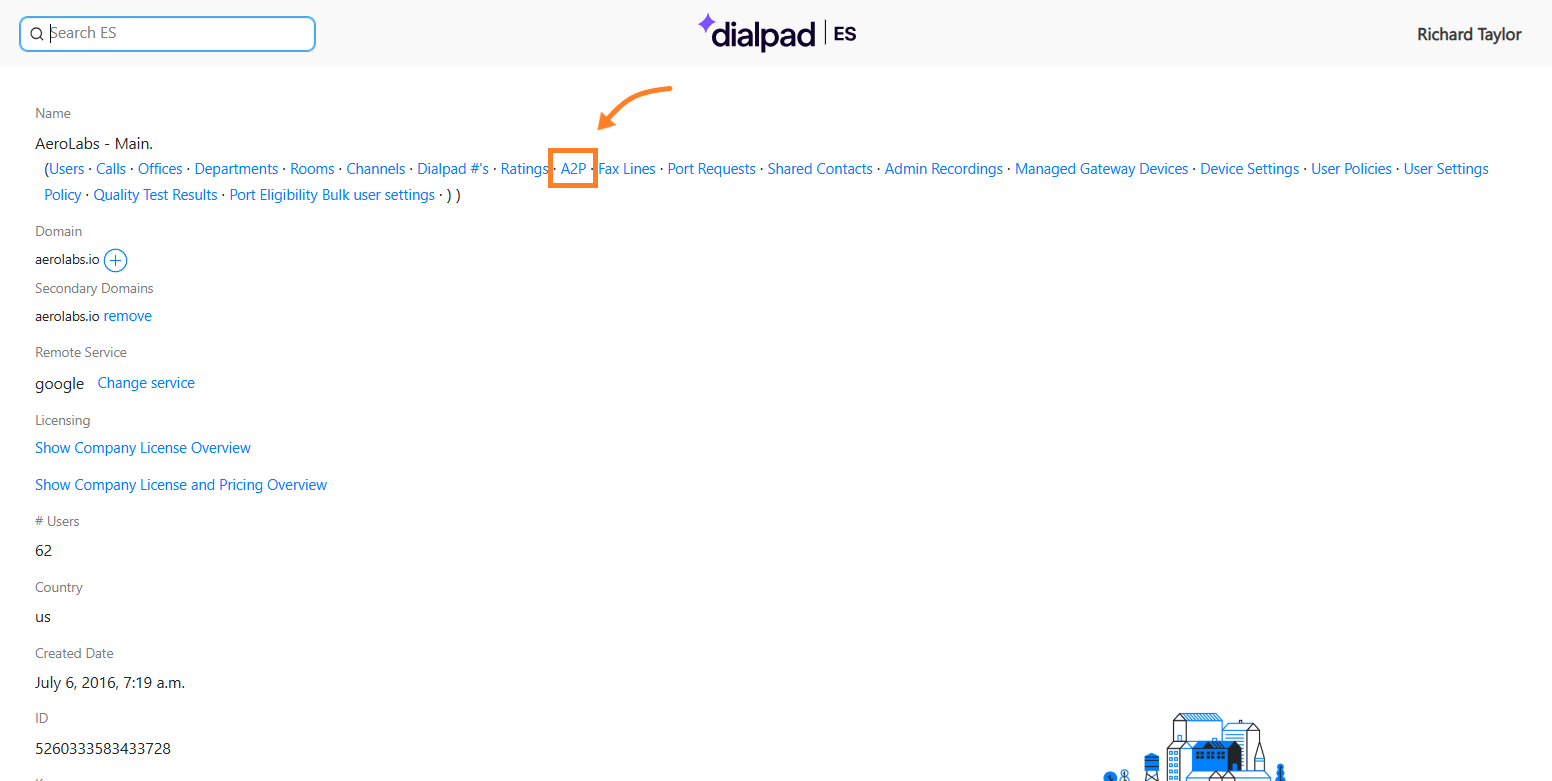
On the A2P page, you can find details about your SMS Registration status, including your Brand and Campaign ID, registered numbers, message use cases and any reasons for rejection.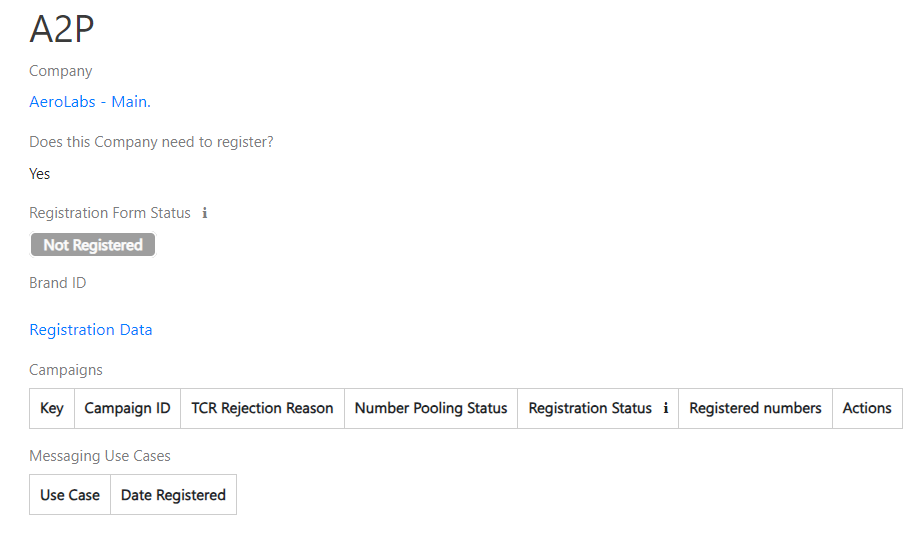
Check port status
You can view a list of all submitted port requests for your Company on the ES Portal by going to Port Requests.

Check your porting status by batch ID, company, office, LNP ID, # of DIDs, port type, date modified, and date requested.
.png)
Porting eligibility
When entering numbers to port, you can check whether they are eligible for porting.
Note
This is only available for phone numbers in Canada and the US.
To check a number’s port eligibility, go to the Dialpad ES Portal.
Select Port Eligibility

In the Port Eligibility field, enter the phone number
Note
In this field, you can only enter one phone number.

(Optional) If you have multiple phone numbers to check for porting eligibility, upload a CSV file in the Bulk Port eligibility check section
Dialpad returns a result indicating whether the number is eligible for porting.

Proxy into a user's account
Need to take a closer look at a user’s account or help troubleshoot an issue? Proxying might be just what you need.
Notes
Reach out to your dedicated Customer Success Manager to enable this feature.
Proxying only allows access to users' accounts and web settings -- not to the web app or to any calls, messages, voicemails or recordings.
To proxy into a user's account:
Search for a user's profile in the ES Portal
Navigate to Proxy User
Select Login Access
When proxying into a user’s account, admins can make changes like:
A user’s name
A user’s email address
A user’s voicemail greeting
Any changes that are made in this state will be logged in the Notes section on a user page. You'll also see notes in a user's history when a Dialpad employee uses this proxy feature to debug an issue or verify settings in a specific user's account.

Bulk add users
Need to add more than one user at a time? Admins can bulk import their users through the Enterprise Support Portal.
To add multiple users
Navigate to the desired office
Navigate to Add User via CSV
Select Choose File
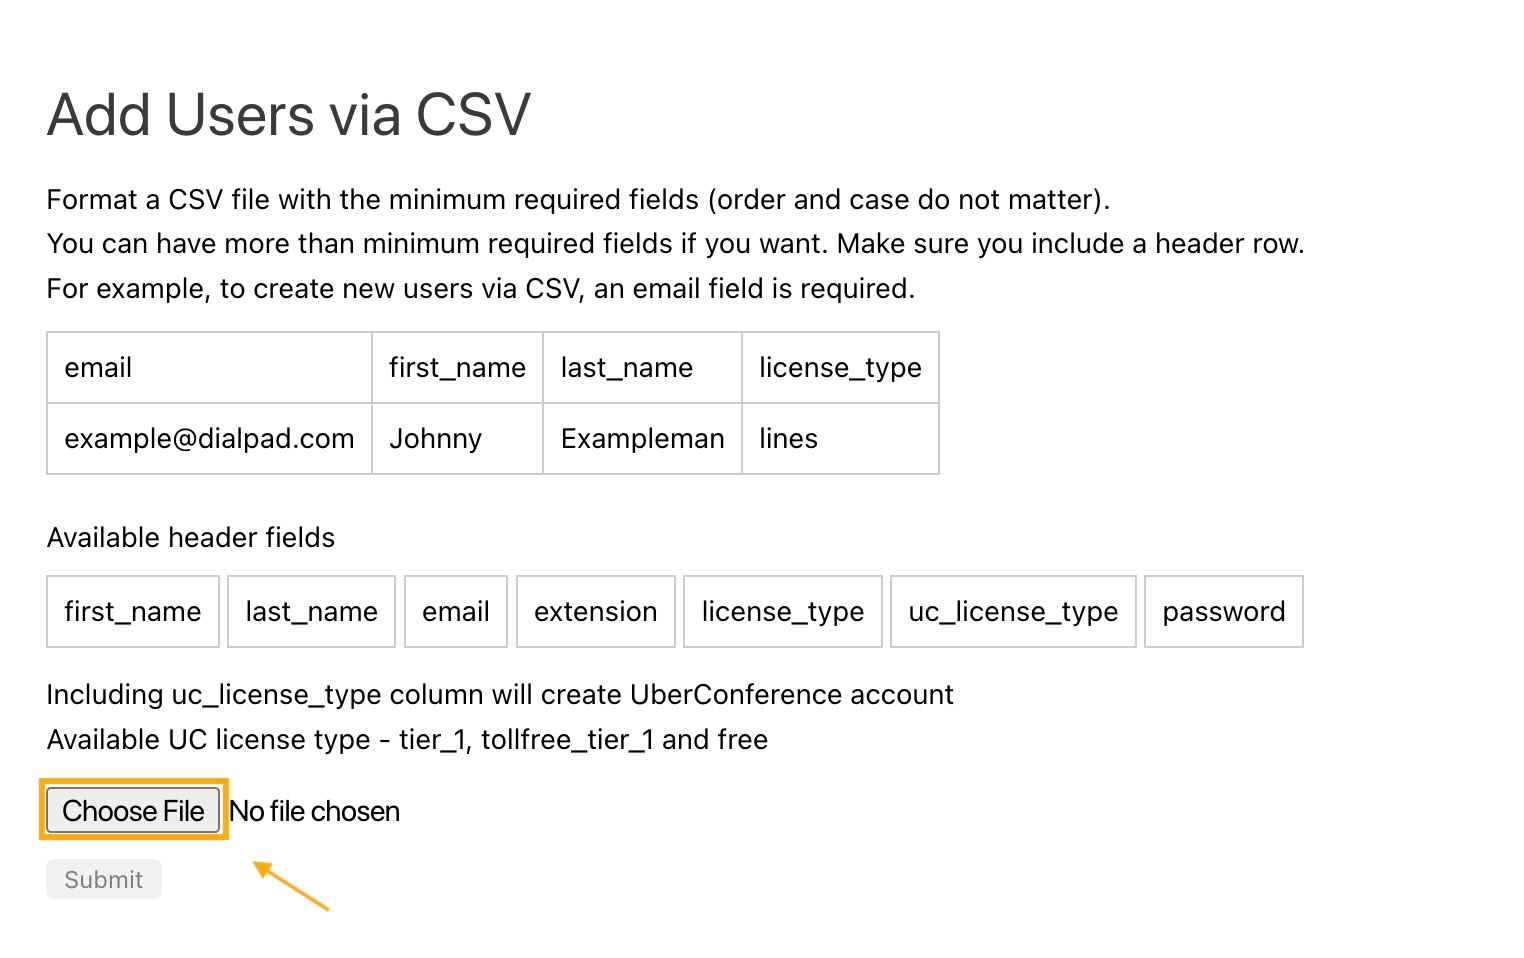
Upload your CSV
Select Submit
Swap or remove a number
Need to change a user or shared line number? You can change or remove a number from the ES Portal. Let's look at both options,
To swap a number:
Select a user or shared line
Navigate to Dialpad #'s
Select Change

Navigate to Number Search on ES
Enter a phone number, or area code
Select Search to find an available number
Select Swap
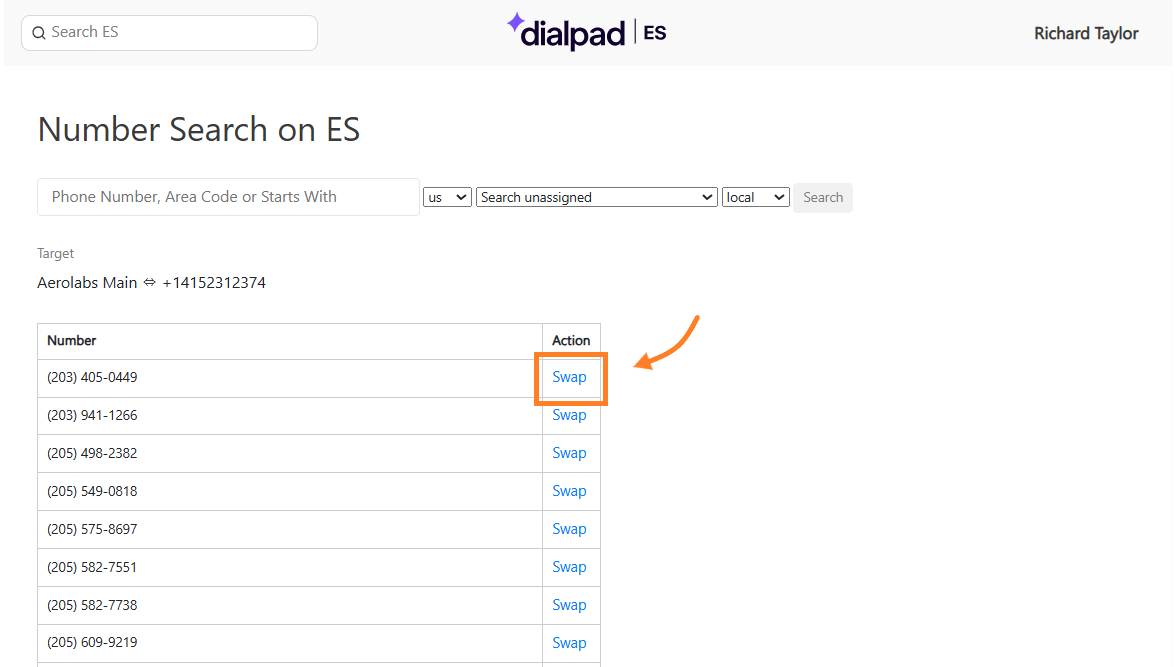
Select Ok to confirm the changes
To remove a number:
Select a user or shared line
Navigate to Dialpad #'s
Select Remove
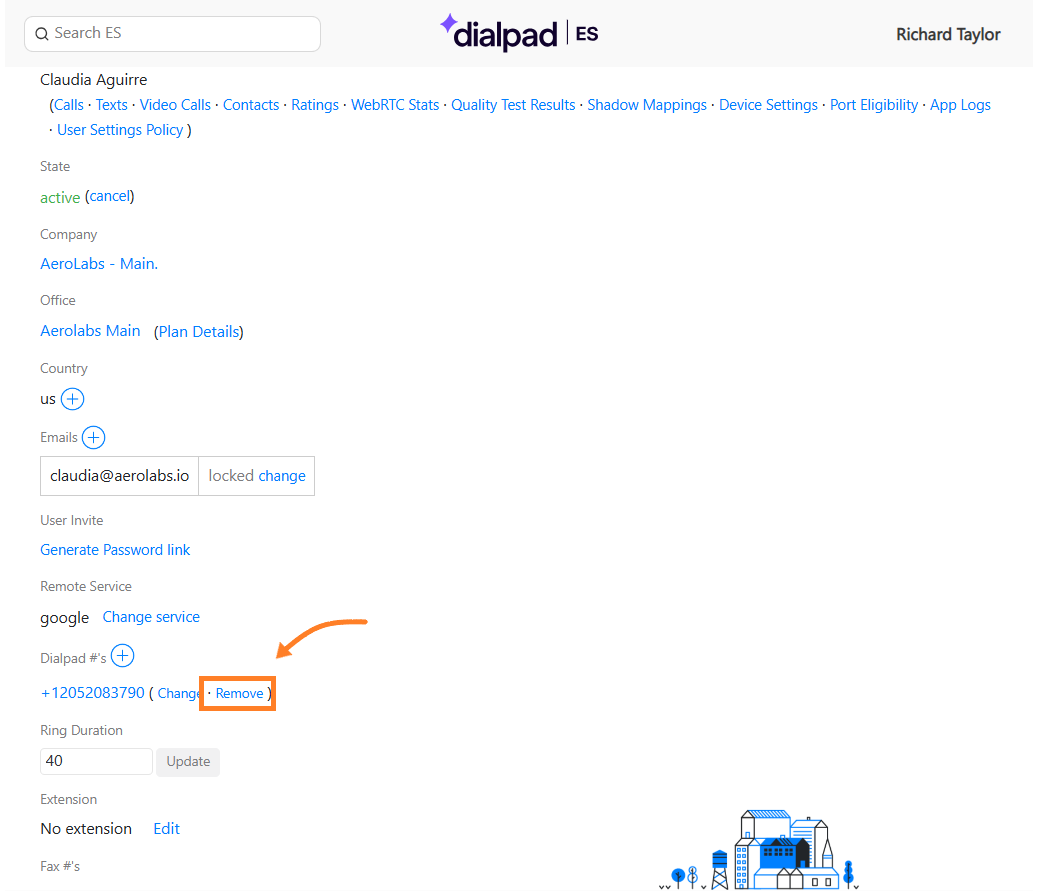
Select Ok to confirm changes
An error message will show if you try to remove a number from a user or shared line that requires an assigned number.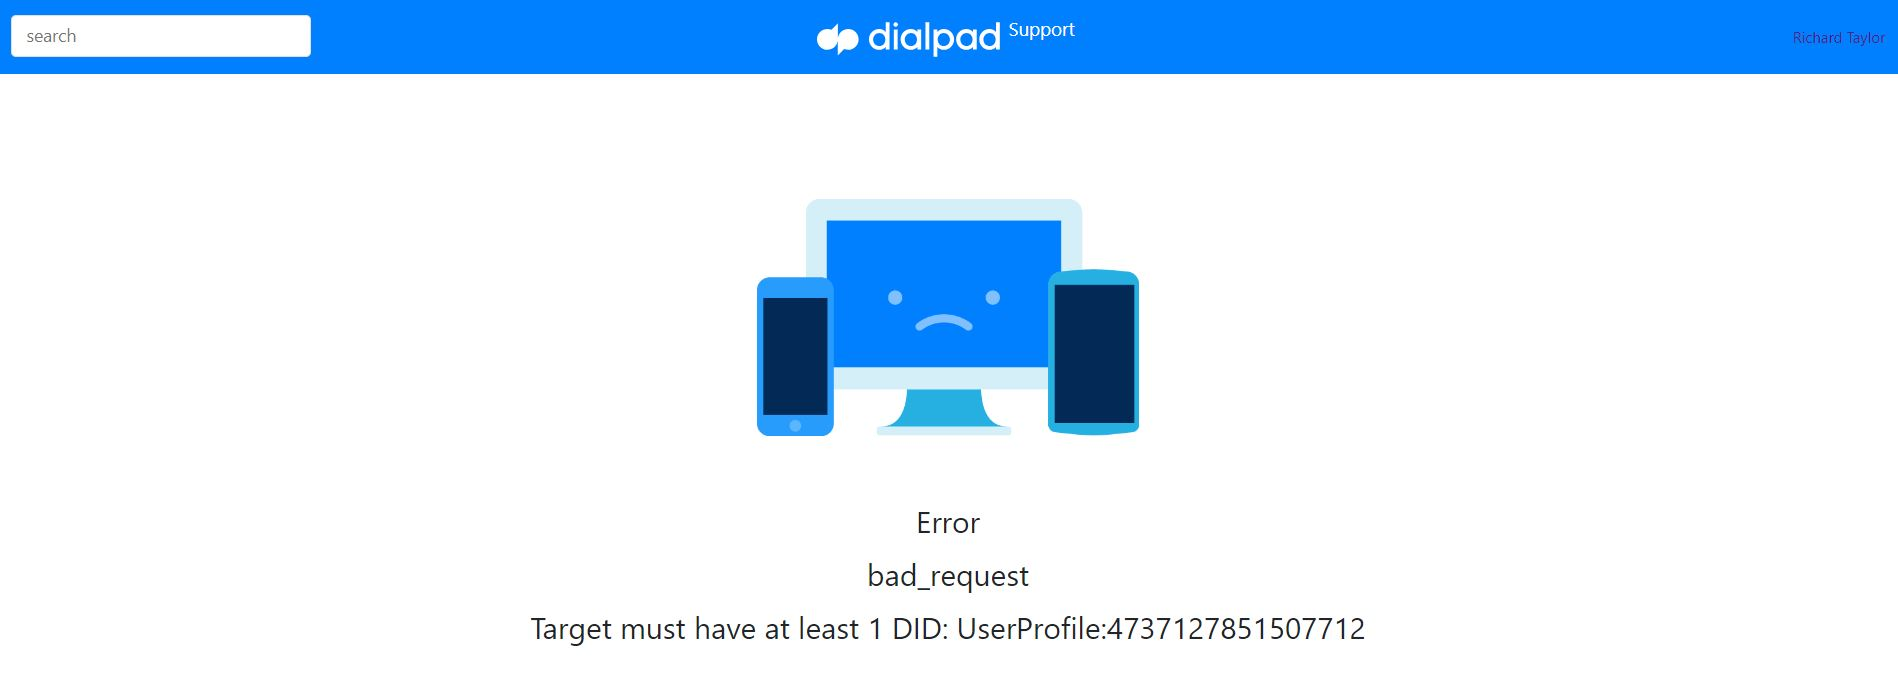
Tip
View a detailed history of number changes in the Changelog & Notes section of the ES Portal.
(1).png)
Edit extension
Using extensions? Use the ES Portal to update your user's and shared lines' extensions.
Navigate to Extension
Select Edit
Navigate to Assign / Replace an extension
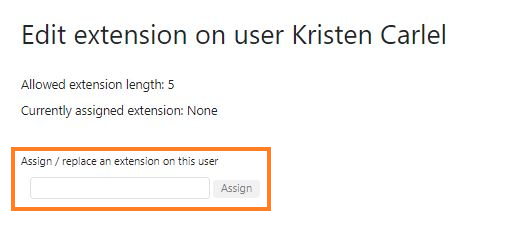
Enter the desired extension
Select Assign
Ringtone preference
Select the ringing sound your callers hear when they call your office.
Navigate to the Company page and select Offices.
Select an office
Navigate to Ringtone Preference
Select a ringtone from the drop-down menu
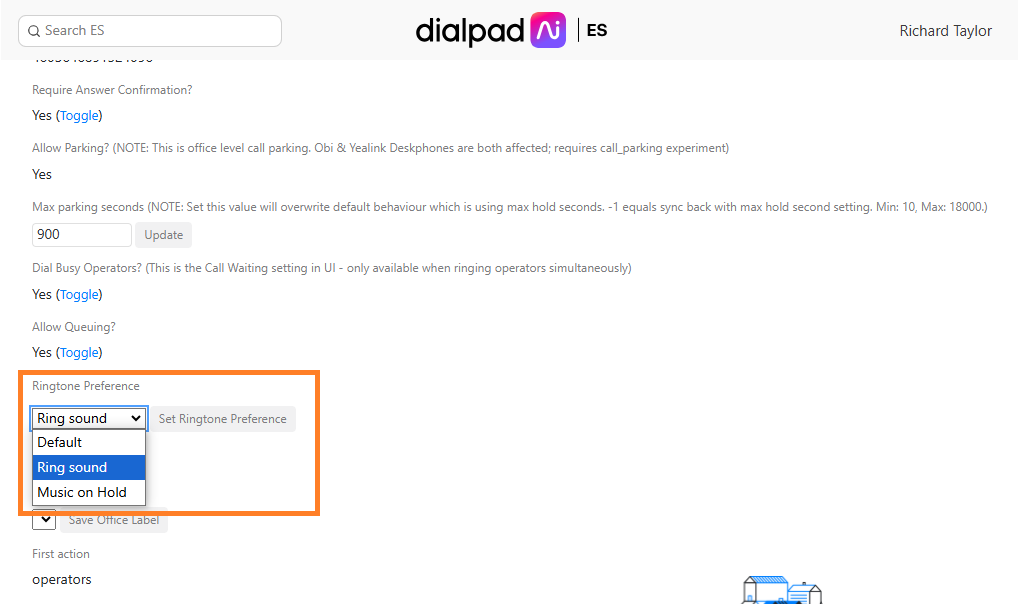
Default
Ring sound
Music on Hold
Select Set Ringtone Preference
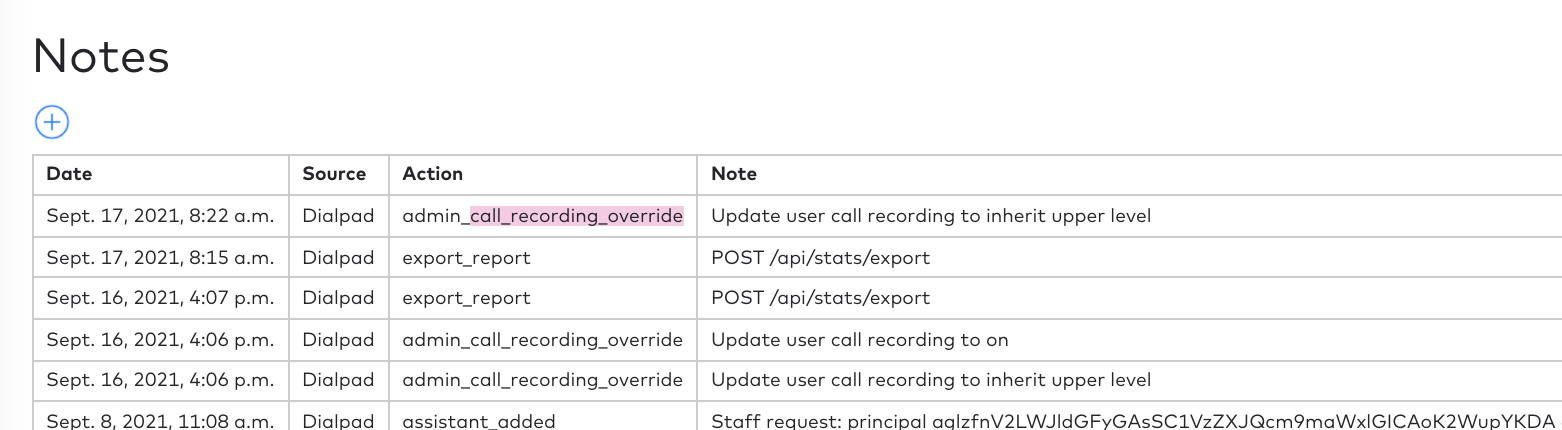
Office call recording
You can also use the ES portal to investigate why a user's calls aren't being recorded.
Note
Reach out to your dedicated Customer Success Manager to enable this feature.
One way to determine why a user's calls aren't being recorded is to first verify when and who enabled call recording.
Why is this helpful? Well, it's possible that call recording was enabled for a particular user after the call in question, or another Admin may have changed the call recording settings for that user before to the call.
To access the call recording change log in the ES portal, navigate to the Notes section. You'll find all admin call recording changes listed there.
Troubleshoot call quality
Your Enterprise Support Portal is a powerful tool to troubleshoot and investigate call quality issues like jitter, delay, or one-way audio.
Let's take a look at all the ways you can troubleshoot call quality, starting with how to look up and investigate a call.
View & investigate calls
Navigate to a user page and select Calls to pull up a rundown of all their placed and received calls in Dialpad.
From here, select the ID to be pulled into the specific call stats, where we'll display info like:
Call Summary (who called who, how long was the call, what time, etc.)
Call ID
Target ( i.e. the user whose calls you’re investigating)
Contact (i.e. the number or user that was contacted by the Target)
Endpoint
Direction (inbound or outbound)
Started/Connected/Ended dates
Description (call direction, time duration)
Sometimes call logs get deleted manually or due to a retention policy. You can view who and when the call log was deleted in the Deletion status column.png)
If the person who deleted the call log is no longer active, their name will appear as anonymized.
Tip
Click on Ratings from your Company page or your individual user page to pull a rundown of all the rated calls.
Call events
Call events provide details about the call's status at various points during the lifecycle of the call. The call event details can be found at the bottom of the call summary.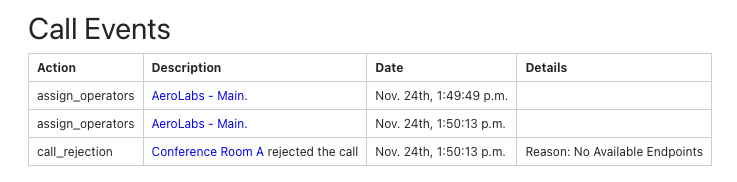
Admins and Supervisors can see reasons for call rejections, providing them with invaluable information on behavioral trends and staffing needs.
Rejection reasons can be:
Reason | Description |
Reserved to another call | When an agent becomes available for a Contact Center, then at the same time receives another Contact Center call fan out. |
No Available Endpoints | The operator did not have any ringable app open (i.e no registered endpoints) and there was no configured forwarding number. The app includes chrome, native, and mobile app. |
Manually Declined | The agent declined the call. |
Call Is Assigned To Another Operator | When two operators come available at the same time, but the other operator takes the call. |
Call is After Hours | A call received outside of the Contact Center's business hours. |
Call is a Spam | The caller was identified as SPAM caller and was blocked. |
On a Call | The call was rejected as the agent was already on a call. |
Do Not Disturb | The call was rejected as the agent was in a DND state (available only for Departments). |
Ringing in Progress | The call was rejected as the agent was already be rung out for another call. |
View WebRTC status
Here's where you can troubleshoot your webRTC calls, including common call quality issues like jitter (choppy audio), delay, or one-way audio.
Note
WebRTC stats are only available for calls made on the desktop or web app. Calls made on a desk phone or mobile device will not generate WebRTC stats.
To view the WebRTC Stats,
Select a user or shared line
Select Calls on the user or shared line page
Select a call on the list
Select on WebRTC Stats next to the call ID
Select View stats
Tip
Keep in mind that the info displayed here is being reported from the app's side.
WebRTC Stats | Jitter
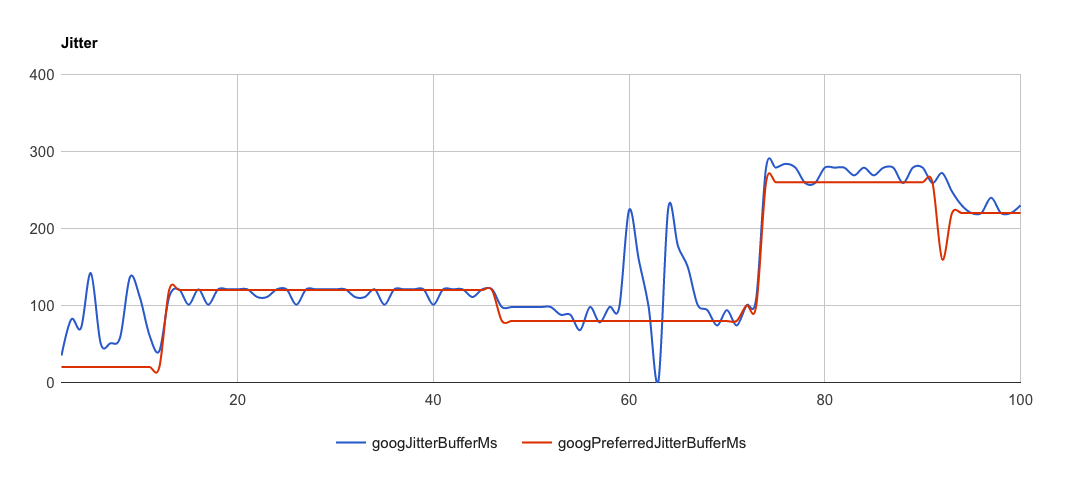
This first graph displays the jitter buffering rates for your call. The blue line is the user experience (incoming packets) on his/her side of the call. The red line is the preferred jitter buffer automatically adjusted by WebRTC in Chrome.
If the red line roughly tracks the blue line, call quality is good. If the blue line is significantly higher than the red line (packets are coming in quicker than they can be buffered) this means dropped packets and a choppy call.
WebRTC Stats | Delay
.png)
The second graph displays the round trip time (RTT) of your packets. RTT is the time a packet takes to travel from the client to our server and back.
The horizontal axis is time during the call, while the vertical axis is the round trip time. From the example above, if we look at the steady state values we can see that at 100 seconds (a min or so in), the RTT is 71 milliseconds.
Here's a quick rundown of RTT values and what they mean in terms of call quality.
Time | Quality |
|---|---|
Less than 100ms | Good (not noticeable) |
100 to 200 ms | Acceptable |
200 to 300 ms | Bad |
More than 300s | Unacceptable |
WebRTC Stats | One-Way Audio
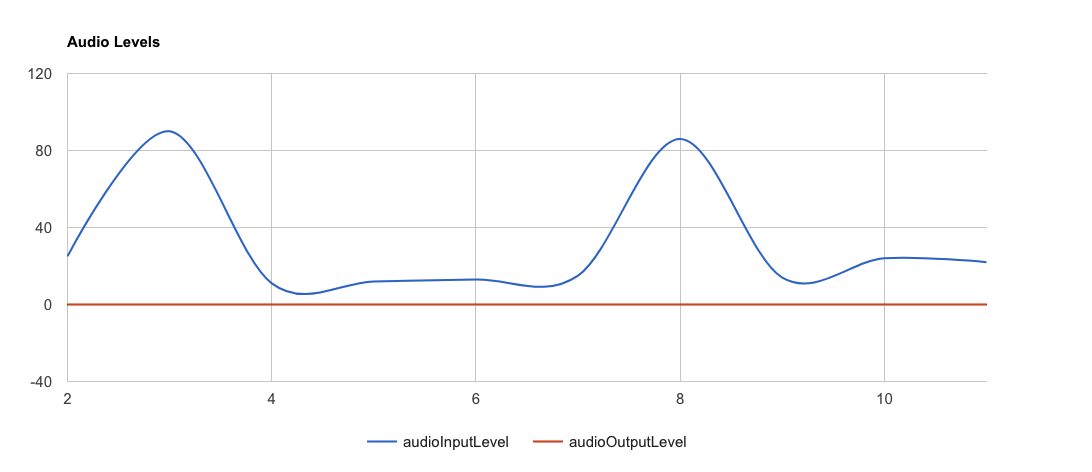
The third graph displays audio levels. The blue line (audio input) is the voice of the Dialpad user. The red line (audio output) is the other person the Dialpad user is talking to. Where you see spikes is where one or both users are speaking.
Take a look at the red line above—callers are experiencing one-way audio, this is how your graph will appear when investigating the call.
Now let's take a look at what a successful call example would look like:
.png)
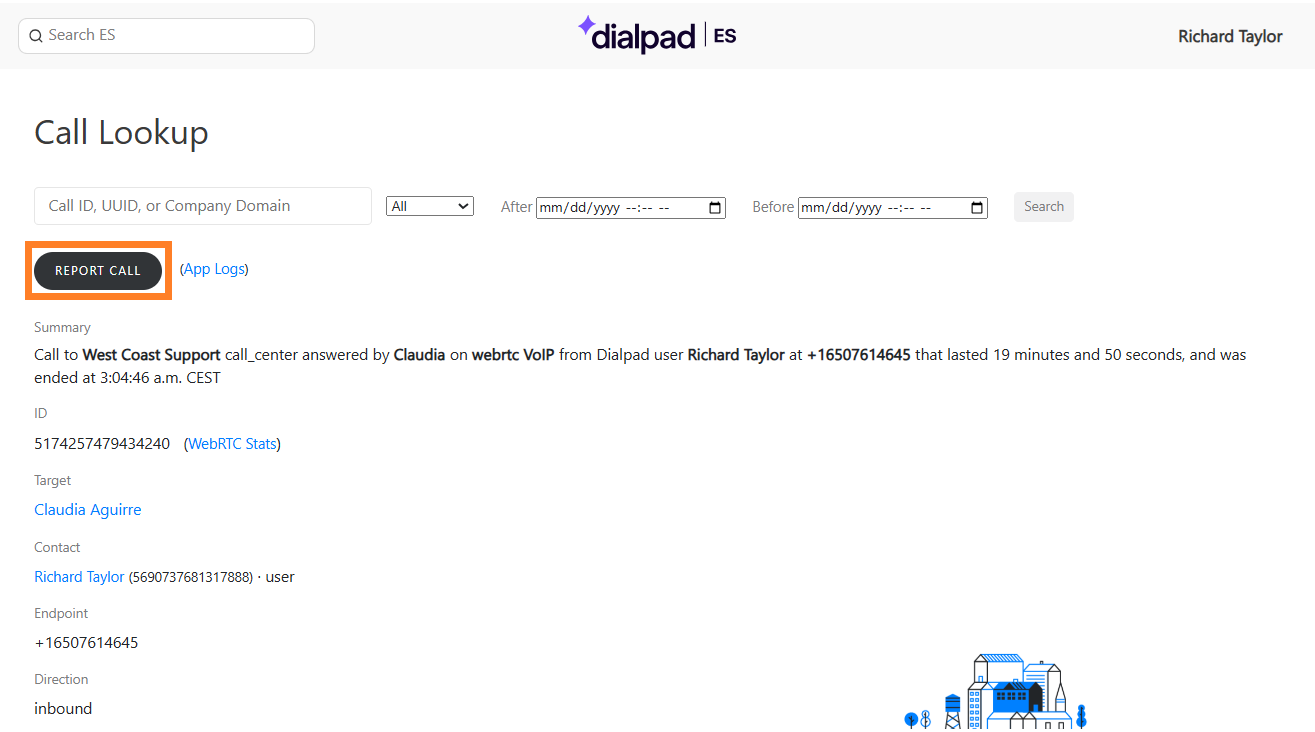
Report call issues
When you need to report a call issue, the Call Lookup page provides the information you need to send to our support team:
User ID - This is the ID of the user experiencing call quality issues. Copy and paste the URL from their User Lookup page.
Call Examples - The more examples of poor call quality, the better (for troubleshooting purposes). Copy and paste the URL from the Call Lookup pages of the affected calls.
To Number - The number that received the inbound call. If this is your user, the To Number is their Dialpad number
From Number - The number that initiated the outbound call. If this is your user, the From Number is their Dialpad number. If not, the number will be listed in the Call Summary
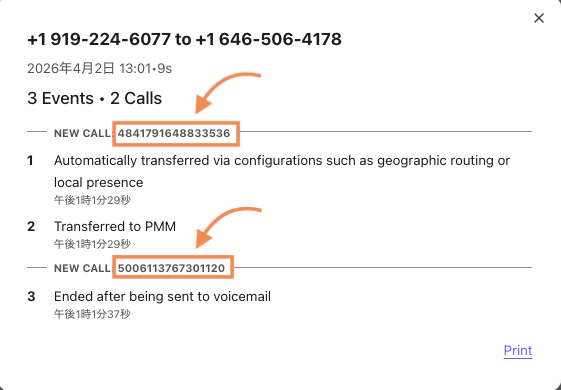
You’ll also need to provide Call IDs for the impacted calls. Call IDs let Customer Care immediately locate and review the exact calls you’re reporting:
Get the Call ID on the user's Calls page in the ES Portal, or
Get the Call ID from the Call Journey
You’ll see the Call ID in the call journey details window:
Note
Call information is generally retained for 24–48 hours in Dialpad. If you rate a call 1 or 2 stars after it ends, it is retained longer and is easier for Customer Care to investigate.
If Call IDs aren’t available, include as much of the following as you can for each example call:
Date of call
Time of call
Approximate time during the call when the issue was experienced
Was the call inbound or outbound?
User/agent who reported the behavior
Customer’s/Caregiver’s/Lead’s phone number
Bulk Manage Extensions with a CSV
Manage extensions at scale across your entire organization by using a single CSV file to add, update, or clear extensions for Users, Rooms, Departments, Contact Centers, and Offices.
Special permissions are required to use this feature
Please contact Dialpad Customer Care to set up the correct permissions for your account.
CSV requirements
The system identifies the target (who gets the extension) and the value (the extension itself) based on a simple two-column CSV. Your CSV must contain the following headers.
Header | Description |
|---|---|
target_key | Identifies the target. You can use a Target Key, User Email, or a User/Room ID. |
extension | The Action. Enter the numeric extension to add/edit. |
Validation rules
Headers must be exactly as shown above (all lowercase). Any additional columns in your file will be ignored.
Before processing, the system validates each row in the file. Only error-free rows are processed, and white spaces are not permitted.
No duplicates: Don’t include duplicate target_key or extension values in the same file.
Target Must Exist: The target (User, Room, etc.) must be active in the system.
Format: Extensions must be numeric and comply with your company’s specific extension-length requirements configured on the company page..
Availability: The extension cannot already be in use by another target.
Example CSV configuration
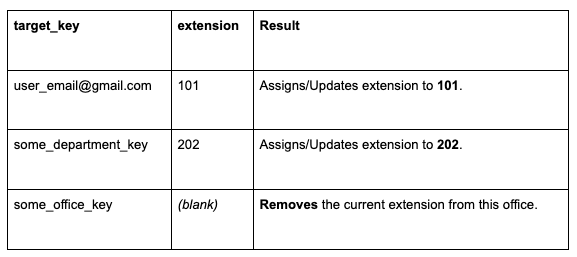
To upload your CSV extension sheet, navigate to the desired Office in the Enterprise Support Portal.
Navigate to Bulk Add, Edit or Remove Extensions via CSV
Select Choose file
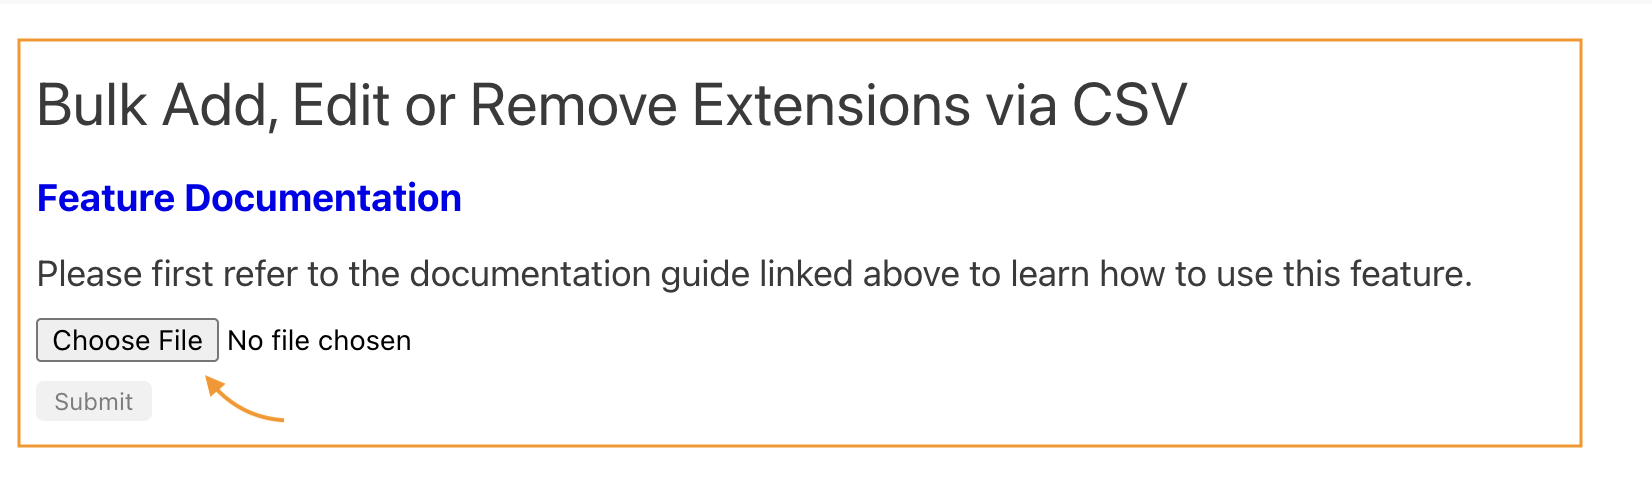
Select the file
Select Submit
Review the validation summary
Select Confirm
This task runs in the background. You can safely leave the page, bookmark the URL, or return later to check the status. Once complete, the results page will provide a final summary of successful updates and any specific rows that failed during the final execution.
Troubleshooting CSV upload errors
The table below shows common CSV upload errors and how to resolve them.
Issue | Resolution |
|---|---|
Validation fails on headers | Ensure the headers are written in all lowercase. |
Target not found | Double-check the email or Target Key for typos or trailing spaces. |
Extension length error | Ensure the number of digits matches your organization's required extension length. |
Row ignored | If a row has an error, it is skipped. Correct the error in your CSV and re-upload only the affected rows. |
Bulk activate devices with a CSV
Activate multiple devices at scale across your entire organization by using a single CSV file to add, update, or clear devices for users, rooms, Departments, Contact Centers, and Offices.
Special permissions are required to use this feature
Please contact Dialpad Customer Care to set up the correct permissions for your account. Access should only be granted to Admins.
CSV requirements
The system identifies the target (who gets the device) and the value (the device itself) based on a CSV file. Your CSV must contain the following headers.
All Devices
Header | Description |
mac_address | The MAC address of the device(s). This must be valid and unique. It is recommended to use lowercase or colon formatted characters. (e.g., aa:bb:cc…) |
device_type | The device brand. They must be one of the following:
|
User vs. Room
You must choose on of the following options for a user phone or a room phone.
Header | Description |
For User Devices. It must match an existing user email in the system. | |
room_name | The room name. For Room Devices only. The system will automatically create the room if it doesn't exist. |
Room-specific and Optional Headers
Header | Description |
room_local_or_tollfree | The local or toll-free number associated with the device. Required for Rooms. It must be local or toll-free. |
phone_number | (Optional) Add this header if you need to assign a specific number to a room device. It must include international prefix (e.g., +1) and it must match the license type selected. |
device_model | The device model. This is required only for Yealink devices. It must be one of:
|
serial_number | The device serial number. Required only for Grandstream devices. |
Success Factors
License Counting
If a Room device row has an error, the system still counts it against your available licenses during the validation step. Fix or remove failed rows to release these licenses before clicking confirm.
Format Sensitivity
Formatting is critical. Be mindful of the following
No Spaces: Leading or trailing spaces in headers or cells will cause validation to fail.
Case Sensitivity: Use lowercase for MAC addresses in CSR to ensure searchability.
Japan Offices
Auto-assigned DIDs may fail for Japan-based offices (effective Aug 1, 2025). Workaround: Manually assign a number from the office’s reserved pool using the phone_number column.
To upload your CSV device sheet, navigate to the desired Office in the Enterprise Support Portal.
Navigate to Bulk Add, Edit or Remove Extensions via CSV
Select Choose file
Choose the file and select Submit
Review the validation summary
Select Confirm
This task runs in the background. You can safely leave the page, bookmark the URL, or return later to check the status. Once complete, the final results page provides a breakdown of successfully created devices and any individual row failures.
Troubleshooting CSV device upload errors
The table below shows common CSV upload errors and how to resolve them.
Issue | Resolution |
MAC address already in use | The MAC address is already assigned to another device. Use a unique value. |
Email not found | The email provided does not match an existing user in the database. |
Not enough room licenses | You have exceeded your license cap. Remove failed room rows or purchase more licenses. |
Invalid device_type | Ensure the value is lowercase and matches the supported list exactly. |
Row contains unexpected spaces | Use "Find and Replace" in the spreadsheet to trim all leading/trailing spaces from your data. |