Legacy feature: check the new Dialpad Dialer
An incredible time-saver, Powerdialer lets reps dial through these lists automatically without bringing up each record individually. Dialpad’s Powerdialer inside Salesforce allows Sales Managers to create and assign dial lists containing Leads, Contacts, Opportunities, or Accounts.
Let's take a look at the details.
Who can use this
Dialpad’s Powerdialer with Salesforce is available to users with a Dialpad Sell license.
Dialpad Admins with Salesforce Administrator access must set up this integration.
To use the integration, agents must be assigned to at least one Contact Center and download the Dialpad app in Salesforce Lightning.
Tip
All users with access to the Salesforce Powerdialer have access to the new Dialpad Dialer. You don’t need to request access separately.
Download Dialpad Powerdialer
Download the latest Dialpad for Salesforce package from the Salesforce AppExchange.
Note
If you are using a URL to install the package inside your Salesforce Sandbox, replace “login.salesforce.com” with “test.salesforce.com” in the URL.
Enable the Powerdialer
The Powerdialer must be enabled by your Company Admin.
To enable the Powerdialer, go to your Dialpad Admin Portal.
Select Company Settings
Select Integrations
Beside Salesforce, select Options
Select Manage Settings
Navigate to Powerdialer
Select Connect
-
Drag and drop the Salesforce fields into your preferred order
-
Autodial will dial the first number where a value is returned.
-
Note
If your company has only one office, you must execute all the configuration steps in your Office Integration Settings (not in the Company Settings).
Create a list
Lists are created and assigned within Dialpad Lightning.
A Powerdialer list can support up to 50,000 records. Exceeding this limit may result in errors.
Note
To create Powerdialer lists, you must have the Dialpad for Salesforce - Administrator permission set.
To create a list, go to the Salesforce Launcher:
Search for Dialpad Lightning
From here, you will be taken to the Powerdialer setup page.
Select Create New List
-
Enter the list details
List Name: Enter alphabetical letters, numbers, spaces, or special characters, including '-' and '_'
Salesforce Object: Choose between Lead, Contact, Opportunity, or Account.
List Type: Static lists do not update to add new records, but records get removed if they no longer meet the list's criteria; dynamic lists add or remove records automatically when the criteria for the list are met.
Note
Salesforce Object and List Type cannot be changed once the list is created.
After your new list is created, it's time to create your filtering criteria.
List Status: Shows whether the list is currently active.
Object Type: Indicates the type of SFDC object the list would contain.
List Sorted By: Organizes the calling priority for the records from the list; the records in the list are vended in the list sort order.
Times Dialed: Number of times a record from the list should be dialed; each time a record is vended for dialing, this number is incremented for that record.
Follow-Up Field: Field that can be used for scheduling callbacks.
To add records to your list, click the filter icon and specify the criteria.
Filtering criteria can be any object attribute. In the example below, the list contains all leads from 'Dialpad' in the state of California.
Select Apply to save the filtering criteria, then Save.
You can always go back and edit the filtering criteria, and records will be added/removed depending on the new criteria.
Tip
Use cross-object filter criteria to save time and avoid managing complex formulas.
This means that when the parent object is modified, the Powerdialer list containing those filters will be refreshed.
Supported list data types
Lists support a wide variety of data types. Please refer to the table below for details.
Salesforce Data Type |
List Filter |
Sort By |
Follow-up Field |
Exclusion Rule |
Notes |
Checkbox |
Yes |
Yes |
No |
No |
|
Currency |
Yes |
Yes |
No |
No |
|
Date |
Yes |
Yes |
No |
No |
|
Date/Time |
Yes |
Yes |
Yes |
No |
|
Yes |
Yes |
No |
No |
|
|
Geolocation |
Yes |
Yes |
No |
No |
Latitude and longitude filters must be added separately. |
Number |
Yes |
Yes |
No |
No |
|
Percentage |
Yes |
Yes |
No |
No |
|
Phone |
Yes |
Yes |
No |
No |
|
Picklist |
Yes |
Yes |
No |
No |
|
Multiselect Picklist |
Yes |
No |
No |
No |
Values must be added within quotes. |
Text |
Yes |
Yes |
No |
Yes |
|
Text Area (Long) |
Partially |
Yes |
No |
No |
Multi-line text is not supported. |
Text Area (Rich) |
No |
No |
No |
No |
|
Text Encrypted |
No |
No |
No |
No |
|
URL |
Yes |
No |
No |
No |
|
Time |
Yes |
Yes |
No |
No |
Only use the Time filter once you are familiar with the format. |
Lookup Field |
Partially |
Yes |
No |
No |
A Lookup field name is required. |
Formula |
Partially |
Partially |
No |
No |
A change in formula value will not trigger an automation — in a dynamic list, this would result in incorrect data. |
Assign a list
Once you have completed your list, it is ready to be assigned to agents or Contact Centers.
Assign the list to agents if you'd like one or more agents to be assigned for all calls from that list |
|
Assign to Contact Centers if you'd like records from a list to be assigned to agents when they go active in a Contact Center. |
Note
Agents or Contact Centers are picked up from the company which is authenticated with the Salesforce instance.
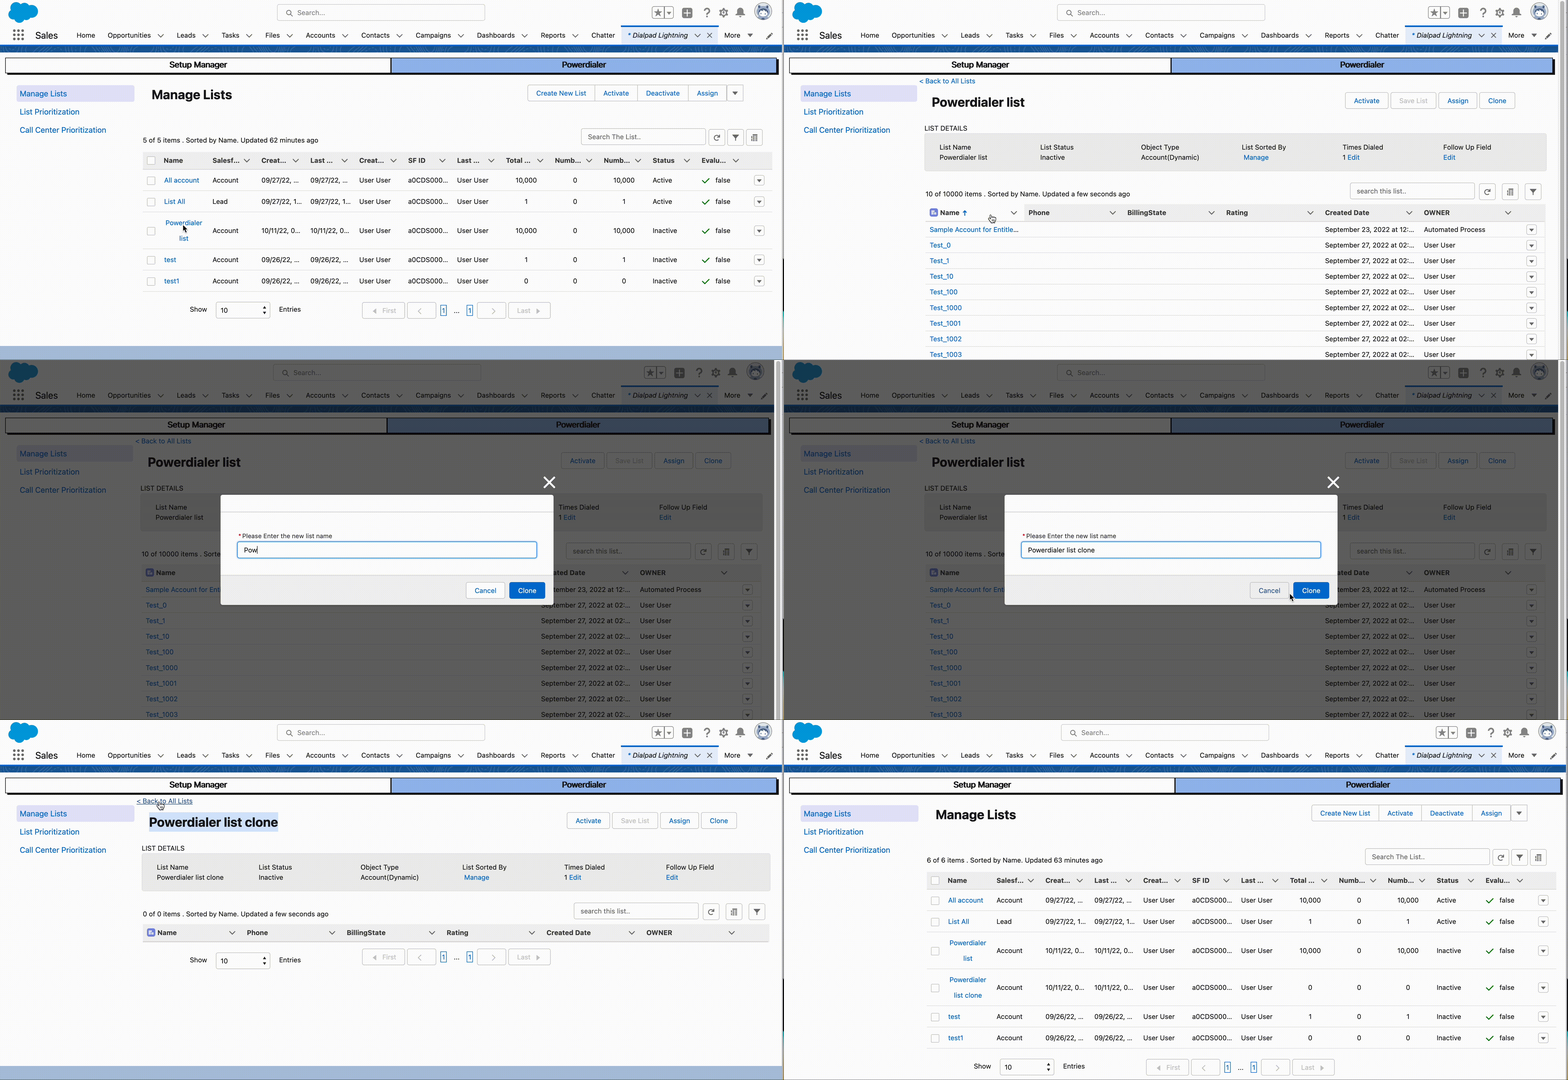
Clone Dialpad list
Need to make a copy of your current list? Use the clone feature to make a copy of your Dialpad List.
Select the Clone button
Enter the New list's name
Select Clone
Note
The new cloned list is always created with the List Status as Inactive
List & contact center prioritization
Ensure your Contact Centers and Lists receive the exact attention they need by prioritizing their rank.
List prioritization
List prioritization lets you rank different lists by dragging and dropping (or by clicking the up/down arrows) to sort your Lists into the desired order.
List priorities are generally used if a representative is assigned to multiple lists simultaneously.
Contact Center prioritization
Contact Center prioritization lets you rank different Contact Centers. Contact Center priorities are considered only after considering a list's priority.
To edit the Contact Center priority, navigate to the Priority section of your Contact Center and select Edit (that's the pencil icon). Update the priority number and press Enter to save.
Note
We prioritize and queue records based on the following criteria:
List Priority
Contact Center Priority
Threshold time
Followup time
Times Dialed
Sorting order
Dial out of the Powerdialer
Once assigned to a list(s), agents will see a Start Dialing button in the Dialpad CTI within Salesforce Lightning.
Once dialing button, the agent will be active in Powerdialer mode, and the record being dialed out will be displayed on the screen while it is being dialed.
After the call, agents will get a wrap-up time before moving on to the next call. This wrap-up time is determined by the value selected by the Dialpad Office Admin in the Office Settings. Closing the wrap-up time before the present time is up will cause the Powerdialer to move on to the next call.
Note
Agents can end Powerdialer mode at any time by toggling the button off.
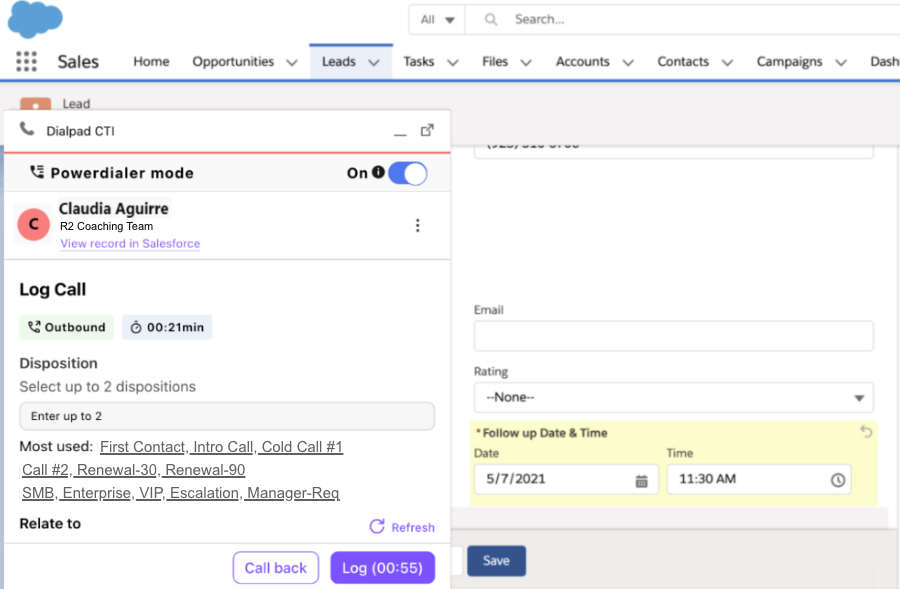
Set follow-up time
Using the follow-up field, you can send records out of a list and bring them back in after the specified timeframe.
Please ensure that there is a field that lets you set a date and time.
In the list creation view, select Edit under the Follow-Up Field menu and choose the field you'd like to use for follow-ups.
After setting the follow-up time, records are taken out of the list and brought back in after the specified timeframe.
 Timezone support
When Timezone support is enabled, Salesforce Powerdialer considers the timezone of a record (i.e. leads, contacts and accounts) to ensure that customers are called during their preferred availability.
You must be using Salesforce package V1.775 or higher if you want to use Timezone support.
Enable Timezone support
To enable Timezone Support, head to your Dialpad Lightning tab in Salesforce.
Select Setup manager
Navigate to Settings
Select Powerdialer general settings
Navigate to Timezone Support
Toggle the slider on to enable the feature
Use Timezone Support
Timezone Support is available for standard records.
To use Timezone support:
Select a record
In the record details, navigate to the Contact (or Lead) Timezone field
Select the timezone
Set the start and end times for active hours
These times will be linked to the timezone field for the record
Select Save
-
Create a new list
Select Manage Table Columns > Done to add the Contact Time Zone filter to your list view
-
Once added, you'll see the Contact Timezone field in the list's view
Note
If a timezone is not configured, it will automatically default to the timezone of the Powerdialer user.
Powerdialer general settings
Customize your Powerdialer in the General Settings.
Here, you're able to customize the following:
Call Threshold time (In Minutes) - Time gap to be left by Dialpad between 2 consecutive attempts to autodial any specific record from a list. This setting will make sure you don't make a call to the same number again within the threshold time.
MyDialpad - Total Records To Display - Count of queued records to be displayed in My Dialpad Tab for powerdialer agents. The maximum count allowed is 2000. No impact on the dynamic list.
Enable Real-Time Deletion and Enable Dialpad List Deletion - No impact on the dynamic list. As the name suggests these are used for enabling list deletions.
-
Job Interval - Determines when a record is added or changed, as evaluated against existing active, dynamic Dialpad Powerdialer lists. This ensures that new records matching the filter criteria are added, and records that no longer fit the criteria are removed.
Example: You have a list called 'Open Opportunity' that filters records with 'Status = Open'. If 'Record A', which is on this list, is updated to 'Status = Closed', then 'Record A' will be removed from the 'Open Opportunity' list.
-
Relative date evaluation job - Determines how often the Dialpad Powerdialer lists are evaluated. The relative date evaluation job will assess all active dynamic Dialpad lists with relative date filters and update the records on the object based on the specified date criteria, regardless of any modification.
Example: If the Dialpad list is filtered by 'Created Date < 1 week,' some records need to be removed, and new records that meet the date criteria will be added.
Viewing Powerdialer list assignments
As an agent, you can view your Powerdialer list assignments using the “My Dialpad'' tab in Salesforce. This page allows the agent to find out the records in his/her Powerdialer queue in the sequence used by the Salesforce application to vend out the records for powerdialing. You can also view lists that are assigned to you in this page.