Responses are unique user journeys where the admin is able to curate a response or user flow. Admins can create any response they like or use the Improve card feature where the AI will suggest cards that the admin can improve.
To create a new response, you will need to navigate to the Responses tab in the Knowledge section and click the "NEW RESPONSE" button in the top right-hand corner of the page.
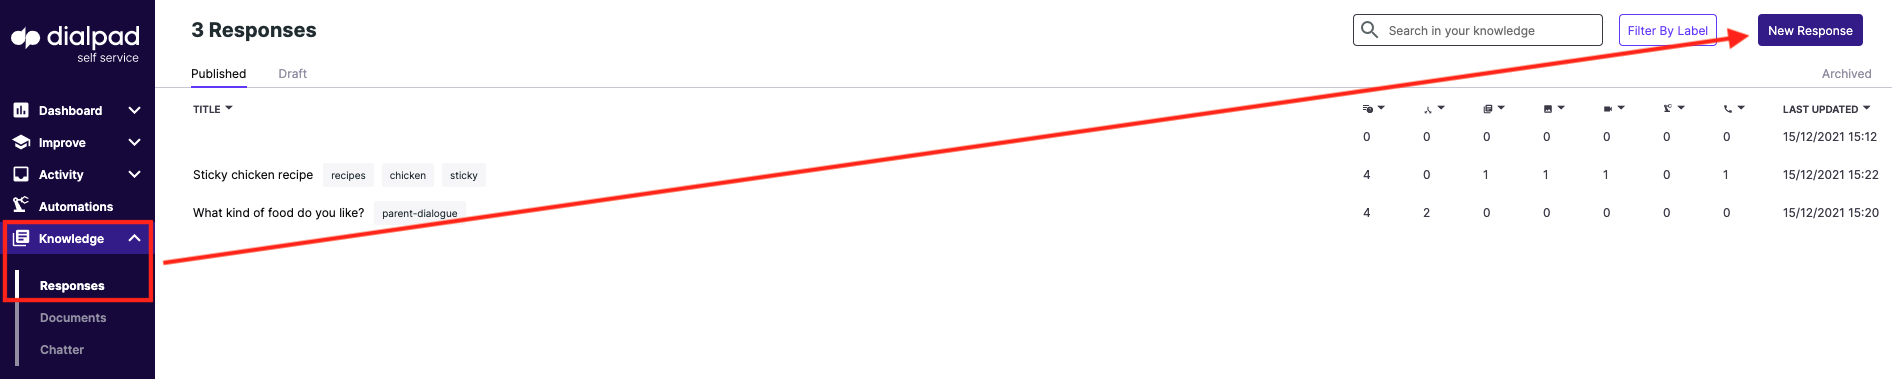
You can review responses you have created in this tab, and order them by name, content type, or last updated.
Creating Responses
Creating the perfect title for your response
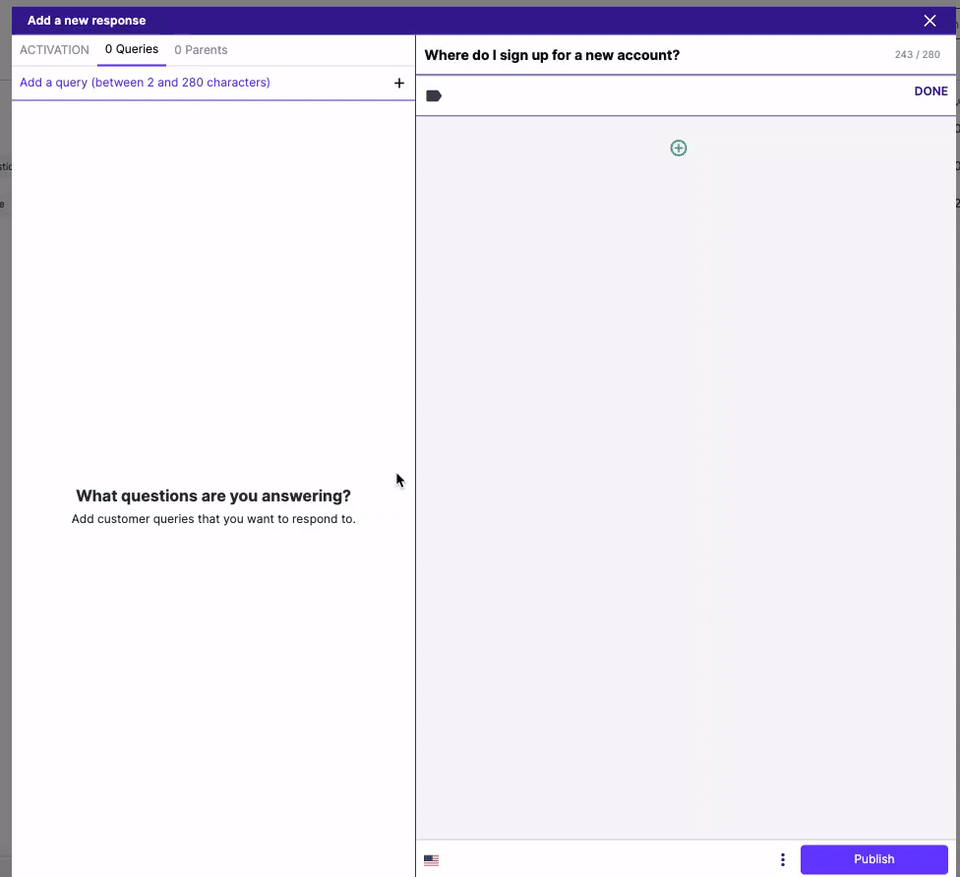
You can add a title to your response in the 'Title' field. This will be visible to the front end user – It is a good idea where possible to keep the title in line with the queries that will be associated with the response (e.g. "Where do I sign up for a new account?")
.png)
Adding appropriate labels
Labels are used for grouping particular responses according to type and content for admin purposes, as well as tracking value stream activity and real-time conversations. If you have an existing glossary or ontology around labeling then it is a good idea to use the same labels here.
.png)
Adding queries in line with best practice
Queries are examples of the question a front-end user might ask in order to elicit the response you are creating (e.g. "do you use sustainable packaging?").
.png)
Each new response you would like to be searchable should have a base number of 5 queries associated with it for best practice to optimize the search capabilities of the bot. When creating a new response, you should add 5 semantically different versions of the question that you would expect to answer with this response.
Adding the content features to responses
There are several different types of content that you can add to a response by clicking on the green '⊕' sign.
You will have to the ability to add:
- Text: Add free text in a WordPress format text box
- Attach Content: Link and quote content selected from crawled documents in the console
- Image: Add an image URL or file
- Video: Add a video URL or file
- Attach Files: Attach a whole document to a response (e.g. a PDF disclaimer for view and/or download)
- Create dialogue: Link responses together to create a decision flow/dialogue (see next section on creating dialogues)
- Call to Action: Create a configurable call to action button as a conversion tool, hyperlinking to a specific landing page
- Handover: Add an escalation to hand specific processes over to an agent where required
- Action: Add automation (RPA's), apps, or web extensions
- CSAT: Add a CSAT survey form
- CES: Add a CES survey form
Creating dialogues
The option to create dialogue flows is a key feature of the Dialpad Self Service platform. This feature allows you to guide the user through a specific process either step by step or troubleshoot by process of elimination in a decision tree. With Dialpad Self Service dialogues you are able to create workflows for customers and/or agents in a variety of use cases.
You can link 2 or more responses together using the "Create Dialogue" button in the response builder and it is also possible to add a short amount of introductory text (150 characters) and assign different copy to a linked response, enabling you to create a dialogue with a binary Q&A format on top of existing responses (e.g. "Q: Have you booked accommodation at your destination? A: yes/no" > no = where can I browse accommodation? response).
When creating a new dialogue, remember to start at the endpoint responses and work backward up the chain to the beginning as you can only link published responses to a response you are creating.
You can also view the structure of your dialogue in the responses tab by hovering over a specific response and selecting the 'view in dialogue map' link that appears.
Publishing responses, saving drafts, archiving material, and cloning copies
Once you have finished creating your response, you can publish simply by hitting the 'PUBLISH' button in the bottom right, or save a draft copy of your response instead by clicking the kebab menu (3 dots) to the left of the publish button and selecting 'Save as draft'.
.png)
Once published, if you reopen a response, the kebab menu will also give you the option to Revert to Draft, Archive, or Clone the response.
.png)
Archiving the response will remove it from the knowledge base (essentially like moving it to 'trash'). Cloning the response will do exactly that – giving you an exact copy should you wish to create a response that has similar characteristics either in terms of content, dialogue links, or labeling. Drafts and archived responses can be found by selecting the correct tab on the responses page.
Chatter messaging
Chatter is a feature that lets you create responses that are separate from your knowledge base but are still focussed on helping the end customer. They do not affect AI learning and are hard-wired responses. You can create as many as you like, they are configured in the same way as standard responses (minus the labels) but should only be used for content that is not pertinent to the core product knowledge base: e.g. greetings ("Hello, how can I help you today?"), introducing the virtual assistant and other colloquial pleasantries.
.png)
Audience – Default 'static' messaging
The system identifies certain user behaviors in the widget and in the Default messaging section, allowing the knowledge manager to assign 'static' messages into predetermined slots in order to respond to these occurrences.
.png)
Create the responses as you would any other response but without any associated queries and then assign them to the relevant slot from the list:
- Multiple choices*: For when the system, as opposed to a one-for-one answer, has offered the end-user a selection of responses to choose from, a message assigned to 'multiple choices' will appear under this list.
- Exit message: A pop-over message that appears when the front end user closes the widget (typically, this might include a CX survey or a thank you message).
- Message Received: Generated if a user needs to escalate in a message format in the widget (typically thanking the user for their message and offering an estimated timeline for response).
- Please rephrase*: If the search fails at the first attempt, the system should have an assigned message that apologies and asks the user to rephrase the question (to account for wildly erroneous spelling or a lack of clarity).
- Nothing Added*: If the search fails at the second attempt, the system should have an assigned message that apologies and offers the user the option to escalate to a human agent.
- Visitors Pop-over message: Pop-over messages appear before the widget has been opened and have a range of uses from marketing new products or initiatives to agent attention notifications.
- Stuck in a loop*: The system identifies when a conversation or dialogue flow is going round in circles and in this scenario should have an assigned message that offers the user the option to escalate to a human agent.
- Negative feedback: Where a user has offered a thumbs down to a response the system should have an assigned message that apologies and offers the user the option to escalate to a human agent.
- Positive feedback: Where a user has offered a thumbs up to a response, the message should be a thank you (and contain a feedback form should you wish).
- Visitor's welcome message*: The welcome message is very important. As the first thing that people see when they open the widget it could largely define the customer experience from the beginning. Large amounts of text should be avoided (no more than 1 or 2 sentences), however, you should set the tone of the account here in terms of copy style. You can include some helpful links and updates that were required but not too many. Retail clients are encouraged to consider building a conversion dialogue into the welcome message (e.g. "Find the perfect product for me")
You do not have to configure all of the static messaging however those marked with an asterisk* should be considered compulsory for best practice.
Audience – Campaigns
The campaigns tool allows the client to tailor the static messaging to a specific audience for a variety of purposes from marketing drives and promotions to warnings and error message banners.
.png)
Once user tracking has been enabled, campaigns can be configured to target users via an existing tag management system, also those using specific devices, operating systems, or browsers and on selected web pages.
.png)
You can change the static messaging for these users (so everything from the welcome message itself and associated dialogue flows to pop-overs and exit messages can be segregated by user type or value stream and tailored to that specific user).
How do I test the user experience?
The 'TRY NOW' button in the bottom left of the console enables the knowledge manager to test any additions or alterations they have made without affecting the analytics*. This allows you to see what those changes look like in the front end and make any necessary adjustments.
.png)
User tracking in the try now page is contingent on the status of the tracking toggle switches on the widget tab in the account section.