Stop wasting valuable time switching between apps! The Front integration with Dialpad streamlines customer communication and lead management, boosting your team's efficiency. Respond seamlessly across all channels—email, SMS, live chat, and phone—directly within Front. Unlock effortless omnichannel support and deliver exceptional customer service without the frustration of constant context switching.
Let’s dive into the details.
Who can use this
Dialpad’s CTI integration within Front is available to customers on all Dialpad plans.
Call logging with Front is available to Dialpad Support and Dialpad Sell customers, as well as Dialpad Connect users on a Pro or Enterprise plan.
This integration is available to Front users on a Growth, Scale, or Premier account.
How the Front integration works
The Dialpad + Front integration is available as a CTI in the Front environment. As an Admin, you can connect to Voice by Dialpad and/or the SMS by Dialpad channels in Front.
With it, you can:
Manage calls and SMS from your inbox.
Initiate and receive calls directly from your Front inbox and save time from switching between apps.
Access call controls like recording, mute, hold and transfer from the native CTI.
Automatically show customer details when calls come in.
Keep agents focused with automatic “busy” agent status updates, pausing all other conversations.
Send and receive SMS messages from any phone number you choose.
You can also access your Dialpad call records in one place, allowing you to:
Listen, search, comment, and tag teammates on call transcripts and recordings.
See all relevant conversations for any customer and get up to speed with AI summaries.
Automatically log calls placed or received within Front back to Dialpad.
Log calls to your CRM to keep your customer data up to date.
Enable the Front integration for Dialpad
Note
This integration is set up through Front, not Dialpad.
You should have already set up a Contact Center in Dialpad and are eligible for both Dialpad voice calls and SMS channels.
To enable the Dialpad integration, go to your Front app.
Select the gear icon, and then select company settings or workspace settings
Select Inboxes, and create a new shared inbox
Select Channels > Connect a channel
Navigate to Voice by Dialpad or SMS by Dialpad and select Connect
Select Connect to Dialpad to confirm
Sign in with your Dialpad account
Note
The email address must match the email address used to log into Front.
Select Allow
Using the drop-down, select the phone number you want to connect to your Front inbox, then select Continue
Note
Like other integrations, you must be a Front Admin to set up the integration.
Also, if you have a Pro or Enterprise plan and would like to enable the integration with call logging in Front, you must be a Company Admin in Dialpad to get an API key.
Enable the Dialpad CTI in Front
Once your Front Admin has enabled the integration, each user will need to enable the Dialpad plugin from the app store.
Navigate to Front Settings
Select App store
Search for Dialpad
Select Enable app
.png)
Navigate to Settings and toggle on/off the company-wide settings
Set status as “busy” during calls
Sync Front status to Dialpad

Select Start using this app
The Dialpad widget displays in your Integrations panel on the right, and you'll be prompted to log in to your Dialpad account from the Front app.
The Dialpad widget features the same general app settings you're used to on the desktop app.
Profile settings.
Caller ID toggle.
DND toggle.
If applied, Custom Off Duty Status for Contact Center.
Call screen/search.
You can also view call and SMS logs with a specific Dialpad contact.
Make a call
To make a Dialpad call from Front, navigate to the Inbox.
Select the + icon > Call

Enter a name or number

You can also place a call from your Front contact list.
Open the contact
Select the Phone icon from the contact information panel

Note
When you receive a call, you must answer it using the Dialpad CTI.
Tip
You can also make a call using a shared line number.
Select the New Call From drop-down
Select a Department or a Contact Center
Select the desired number

Receiving calls
When there’s an incoming call, you’ll see a call widget pop up at the bottom left. The call will automatically be assigned to you when you answer it.
To answer the call:
Select Answer via Dialpad in the call widget, or
Select Answer in the conversation
Select the Dialpad icon to expand the widget to take additional actions (mute, transfer, etc.) using the toolbar icons.
.png)
Wrapping up calls
After the call ends, a Call ended label appears in the conversation and the conversation list.
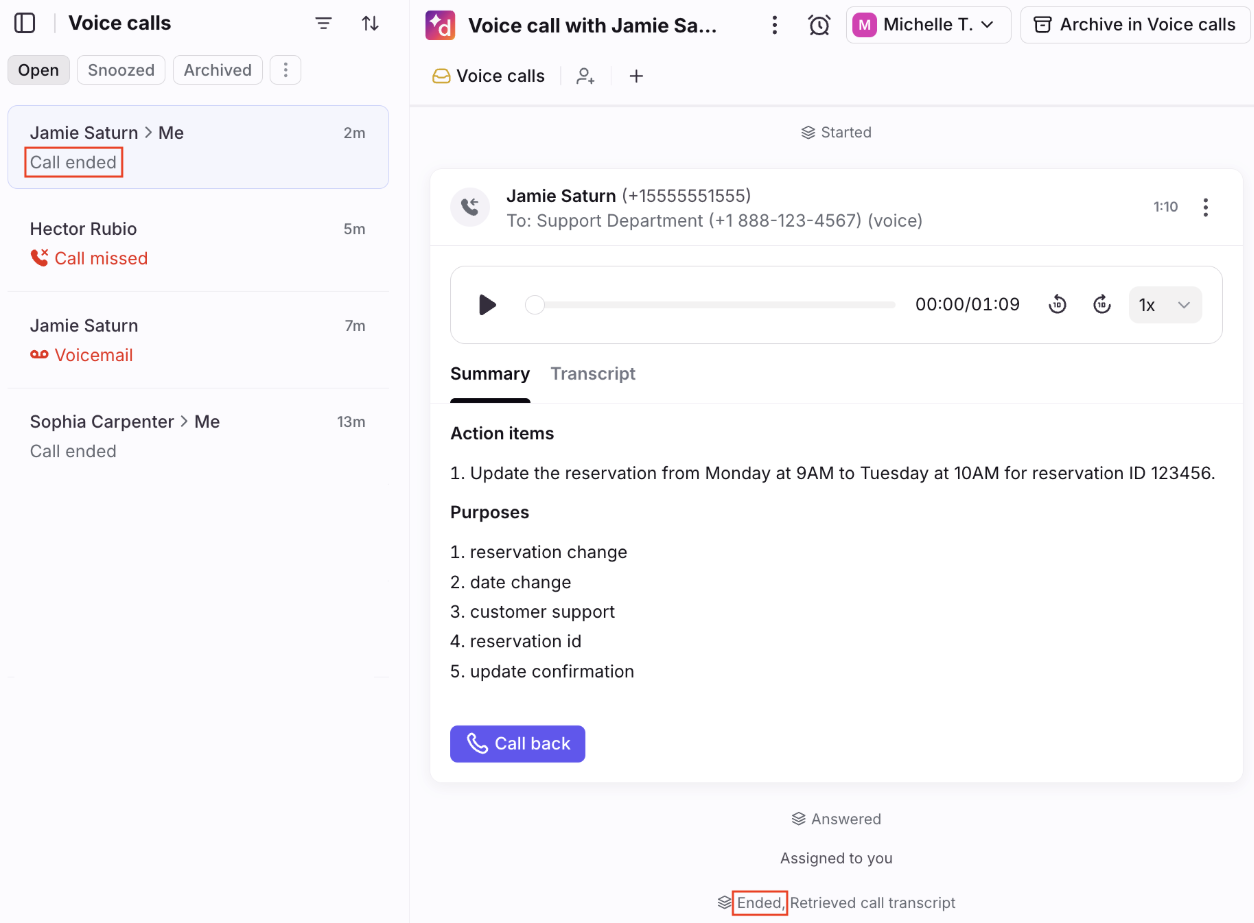
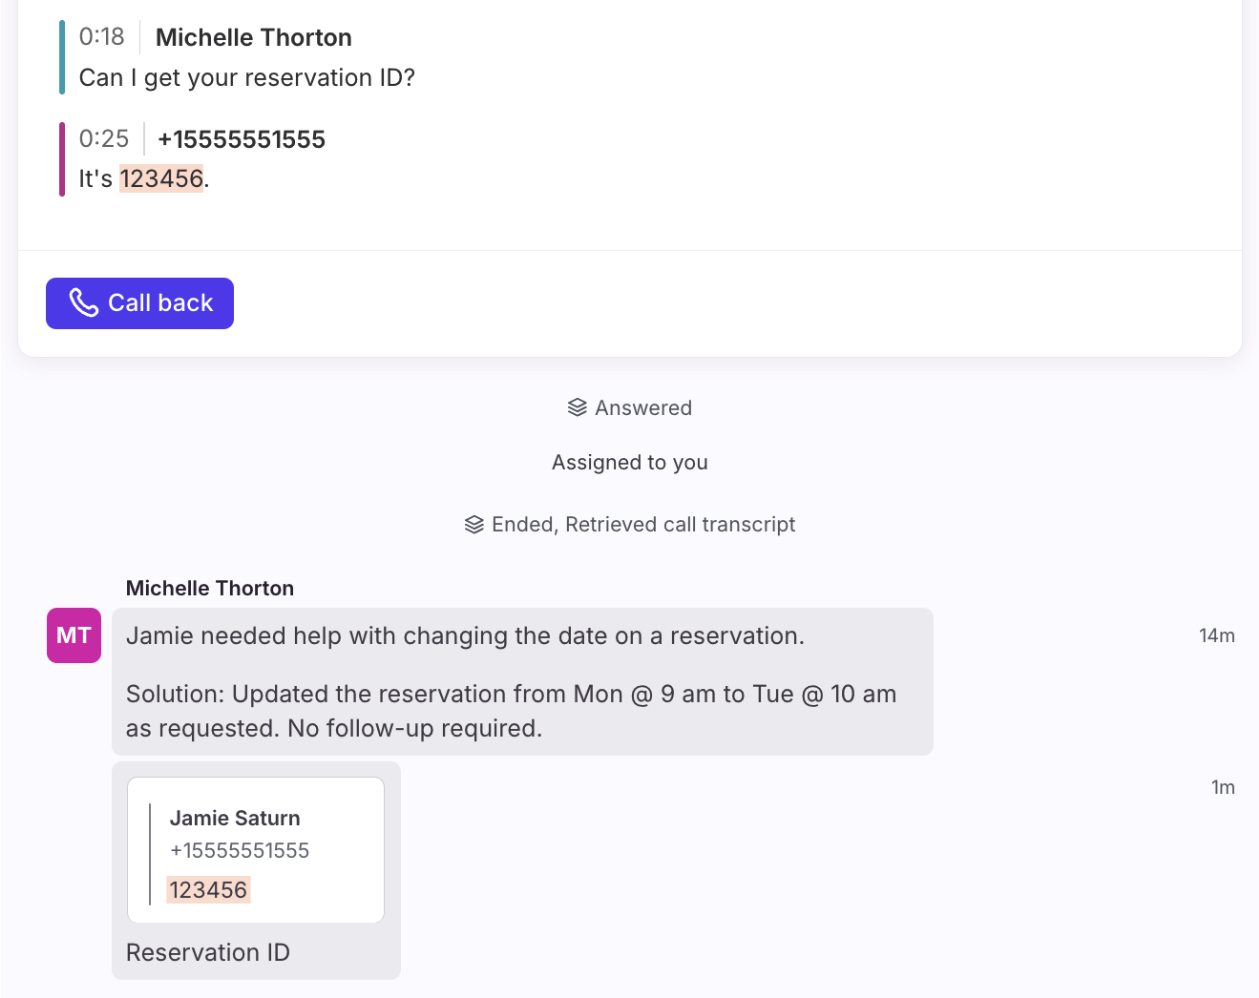
Call summaries, transcripts, and call recordings are available for applicable conversations.
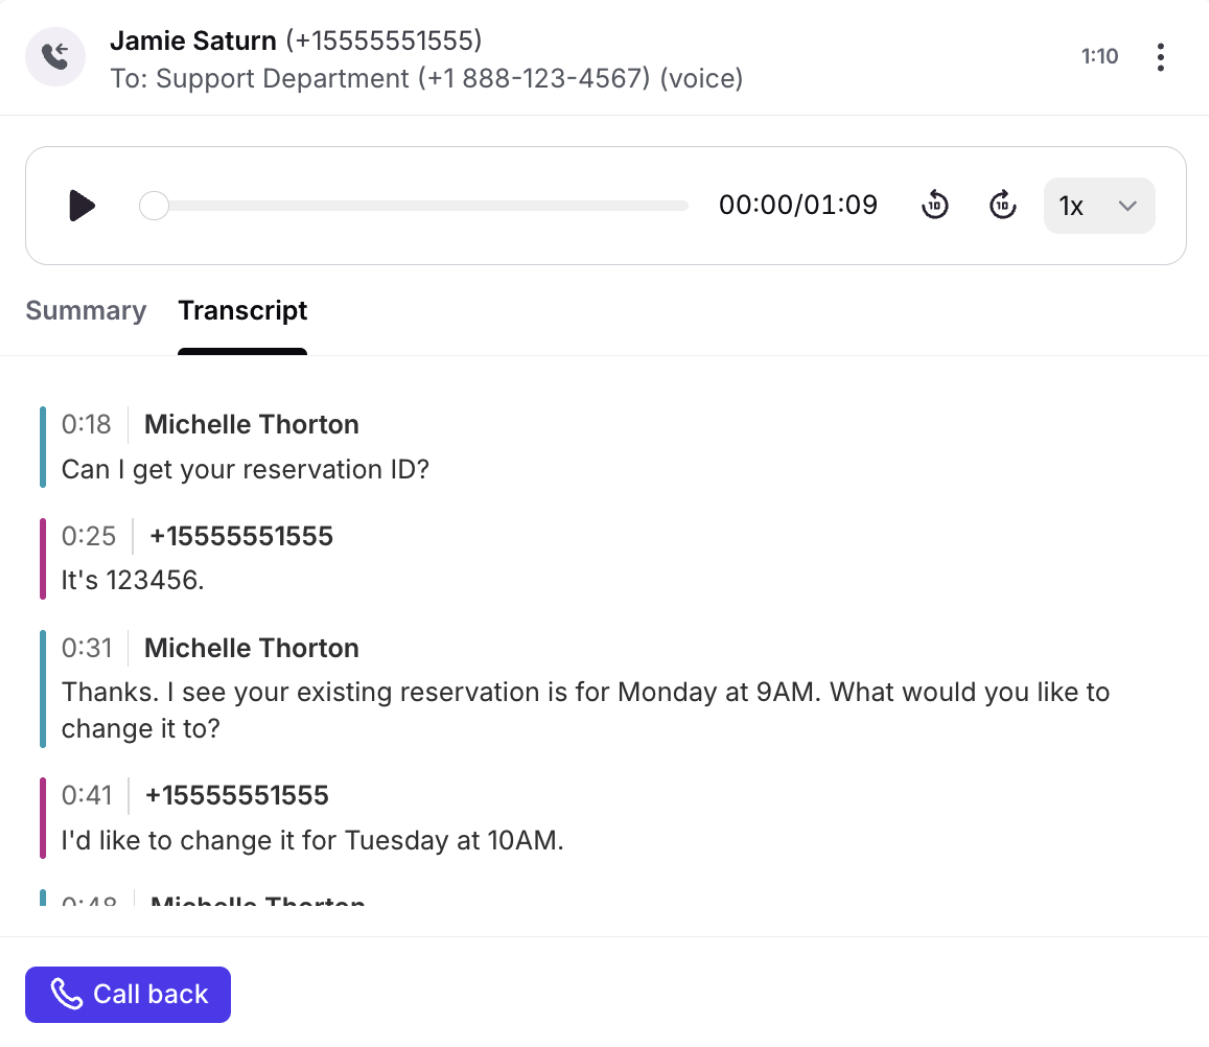
You can take notes during or after the call to add call summaries, action items, and contextual comments to the call transcript.
When you’re done, follow your team’s specific workflows, which may include archiving or tagging.
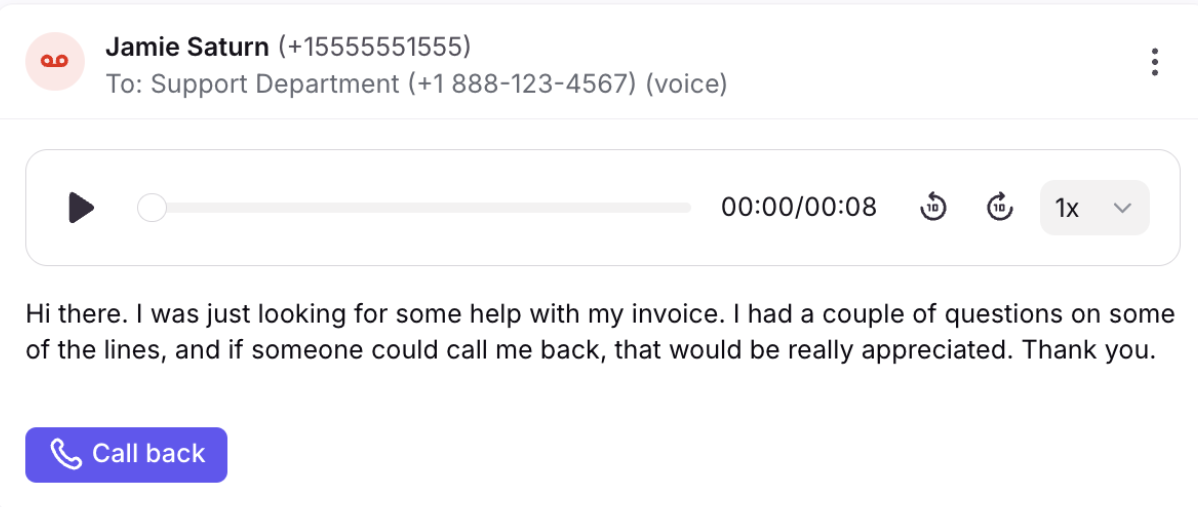
Missed calls & voicemails
If no one is available to answer a call, the conversation is marked as Call missed or Voicemail in the conversation list.
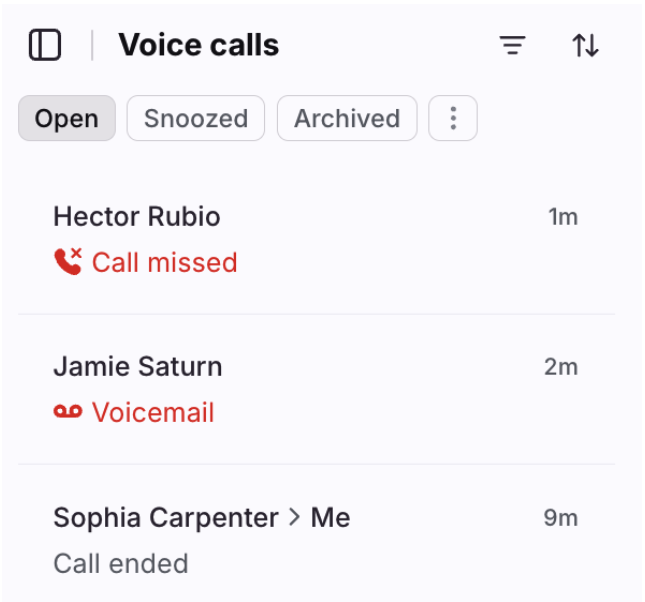
For voicemails, Front will display call recordings and transcripts generated by Dialpad.
Queued calls
If you have call queues set up, a Queued indicator displays in the conversation and conversation list, along with the customer's wait time. The next queued call will be assigned to an agent once one becomes available.
Send a message
To send a Dialpad message from the Front, navigate to the Inbox.
Select Compose
Enter a name in the To field
Enter a name or number in the From field

Type your message
Select Send
Tip
You can also send a message using a shared line number.
Select the New Message From drop-down
Select a Department or a Contact Center

Set yourself to Do Not Disturb (DND)
To set yourself to Do Not Disturb from Front, go to the Account Menu.
Select Dialpad
Select the Options (3 dots) icon
Select Unavailable

Note
Select ‘Unavailable’ means both the “Do not disturb” setting is toggled on AND you are “Off duty” for all contact centers they belong to.
Connect to a channel
Connect your Dialpad Department and Contact Center lines with Front channels to make, receive calls, and send/receive SMS.
Note
There are two separate Dialpad plugins, one for call logging and one for SMS messaging.
To connect to a channel, navigate to Front Settings.
Select the desired workspace
Select Inboxes and create a new shared inbox or select an existing inbox to connect
Select Channels
Select Connect channel
.png)
Navigate to the SMS and telephony page
For Voice by Dialpad, select Connect to Dialpad to log calls in Front
For SMS by Dialpad, select Connect to Dialpad to manage a Dialpad SMS number
Select Connect
.png)
Configure calls in Channels
After connecting the Dialpad plugin for calls, select where to route your Dialpad calls in Front.
From the Front settings:
Navigate to Log-in and configure
Select Connect to Dialpad

Select Allow

Select the Dialpad lines you want to connect

Select Continue
Next, return to the Connect channel page to choose the shared inbox where calls will be routed.
Navigate to Route to inbox
Select your preferred inbox

Create a new inbox
Select a single existing inbox

Select multiple existing inboxes

Select Continue
That's it! Any incoming calls from the chosen Dialpad lines will now route to your preferred inbox.
Configure SMS in Channel
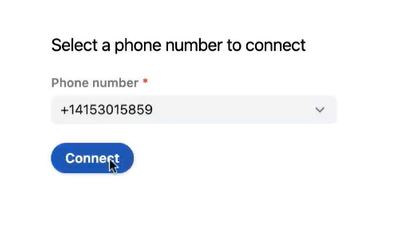
After connecting the Dialpad SMS plugin, set up the number the channel will use to send messages. You'll also need to specify where to route incoming shared line messages in Front.
Navigate to Log-in and configure
Select Connect to Dialpad

Select a phone number from the drop-down

Select Connect
Then, return to the Connect a channel page to select the shared inbox where the SMS messages will be routed.
Navigate to Route to inbox
Select your preferred inbox
Create a new inbox
Select a single existing inbox
Select multiple existing inboxes
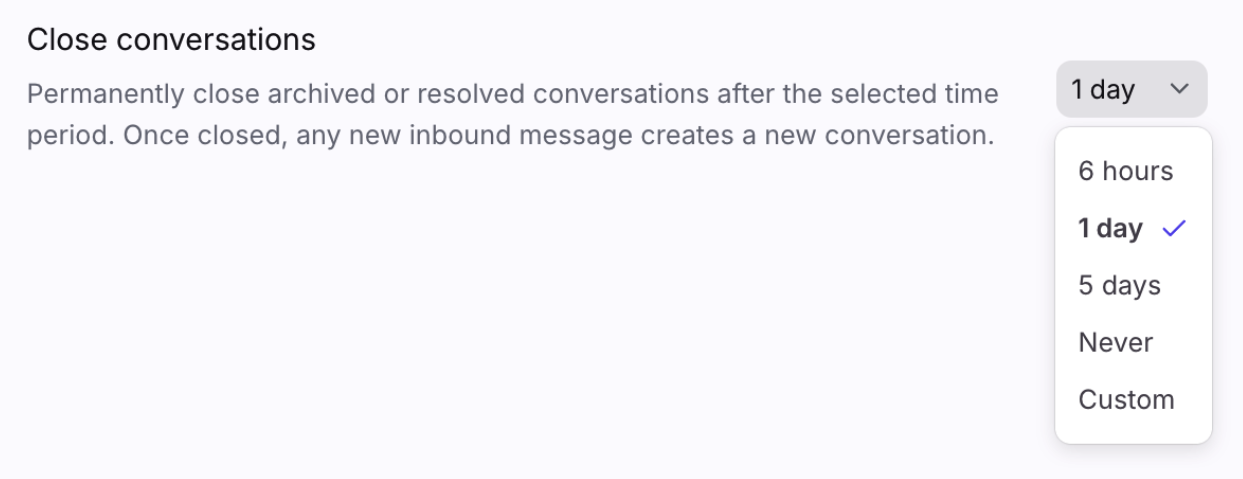
Select when you want conversations to automatically close
Select Continue
That's it! Incoming messages from the chosen Dialpad lines will be routed to the selected shared inbox..png)
Note
Members who were part of a workspace can view all call logs and SMS messages made within a channel under Shared inboxes.
Frequently asked questions
As a Dialpad Admin, can I add Dialpad users through the Front App integration?
No, you need to log in to Dialpad.com and add users to the admin portal.
What if I’m using Front’s legacy Dialpad integrations?
See this Front article for more instructions on how to update your Dialpad channels and unpin your Dialpad plugin.
How do calls get assigned to agents?
Assignment logic differs between calls and conversations:
Calls: Front uses the routing logic set up in Dialpad. When a customer calls a phone number, the call is routed to an agent in Dialpad, then Front will notify (or “ring”) that agent in Front if they are logged into Front with the same email address.
Conversations: Front assigns the conversation to the agent who answers the call. If an agent does not answer a call, or the agent that answers the call isn’t a Front user, then Front will not assign the conversation.
Why don’t I see a call summary, transcript, or recording?
Call summaries, transcripts, and recordings won’t be available in Front if Dialpad doesn’t generate them. Dialpad may not generate these resources if the agent doesn’t have access to the feature, doesn’t turn on the feature, or the call does not meet length requirements. See this article for more information.
Other reasons you may not see a summary, transcript, or recording:
Call summaries and transcripts are not currently supported on the mobile app.
Voicemails, recordings, and transcripts are not currently supported for the Executive Assistant feature.
The call was transferred (such as from an IVR flow) to a call group or number that is not connected to Front. If the call group does not have a number, you should add a number to it in Dialpad and then connect the new number to Front.
Are user extensions supported?
No. The integration does not support user extensions.
Are images and videos supported for SMS messages?
Yes. Images and videos will be visible inline when viewing the message.
Can I send MMS messages?
Yes. You can use MMS messages to send outbound replies with media files up to 500 KB.
Front follows Dialpad's file size, carrier, or geolocation limitations. See Dialpad's documentation for more information.
Are there call and SMS-specific analytics?
Customer satisfaction (CSAT) scores collected in Dialpad will be imported into Front and visible as a comment in the conversation. These scores are accessible in Front Analytics.
You can access voice metrics in the Key metrics chart of the Workload report or a custom report. SMS analytics are included in any text-based metrics, like reply time.
Will I still see calls and SMS messages in Dialpad?
Yes. All calls and SMS messages will be visible in both Front and Dialpad for each phone number connected to Front.
Can I silence Dialpad calls?
Yes. Toggle on the Mute and hide incoming call banner setting in your notification preferences.