Use JumpCloud SAML Single Sign On (SSO) to give Dialpad users convenient and secure access with a single set of credentials.
Let's dive into the details.
Enable SAML in Dialpad
First things first, you'll need to enable SAML in Dialpad.
Head to your Admin Settings from Dialpad.com
- Select My Company
- Select Authentication
- Select SAML
- Navigate to Choose your provider
- Select Custom
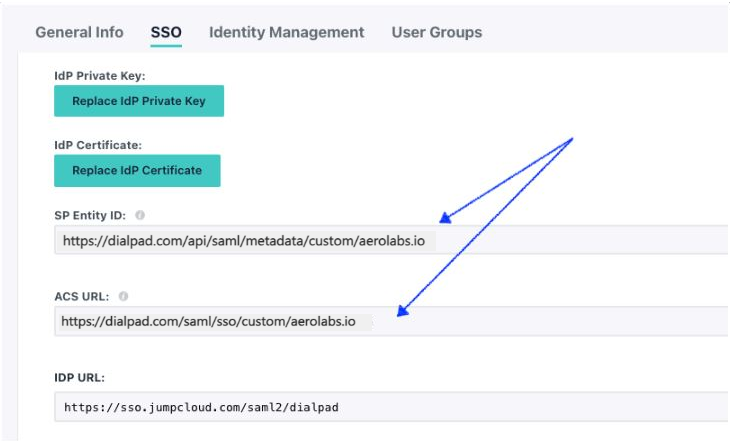
- Take note of the values for SP SSO Url (ACS) and SP Entity ID
- The values will differ based on the domain identifier of your company.
- Keep this tab open — we'll revisit this page after configuring SAML on JumpCloud.
Configure SAML SSO in JumpCloud
Next, its time to configure SAML SSO in Jumpcloud.
- Login to JumpCloud as an admin
- Select SSO
- Select the + icon to add a new application
- Type Dialpad in the search bar
- Select Configure
.png)
- Enter a Display Label
- Select Activate
- Select Continue
.png)
- Select on the created application
.png)
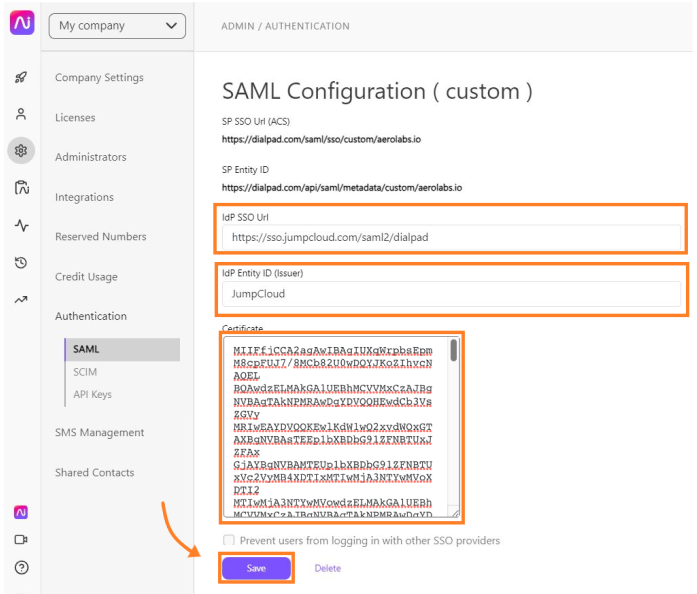
- Navigate to the SSO tab
- Update the SP Entity ID and ACS URL attributes with the values obtained from the Dialpad SAML configuration
JumpCloud attribute to populate
Attribute name in Dialpad
Example Value
SP Entity ID
SP Entity ID
https://dialpad.com/api/saml/metadata/custom/aerolabs.io
ACS URL
SP SSO Url (ACS)
https://dialpad.com/saml/sso/custom/aerolabs.io
- Select Save
- Select the created application again to continue
- Navigate to the Attributes section within the SSO tab
- Verify the email under Service Provider Attribute Name
- Select the created application again to continue
- Under the SSO tab, you’ll need the following attributes (found in the table) from JumpCloud.
- The values against these attributes shall be configured back in the Dialpad SAML configuration tab.
Dialpad Attribute to populate | JumpCloud attribute to use | Example value |
|---|---|---|
IdP Entity ID (Issuer) | IdP Entity ID | JumpCloud |
IdP SSO URL | IDP URL | https://sso.jumpcloud.com/saml2/dialpad |
Certificate | IDP Certificate* | Downloaded pem file (without the BEGIN and END tags) |
* The IDP certificate can be downloaded in JumpCloud.
.png)
Configure SAML in Dialpad
Now, it's time to populate the IdP attributes in Dialpad.
Head to your Admin Settings from Dialpad.com
- Select My Company
- Select Authentication
- Select SAML
- Populate the IdP related attributes retrieved from the previous section (IdP Entity ID, IdP SSO URL and Certificate)
- Select Save
Setting up SAML users
Now that SSO has been configured, its time to set up the users.
- Login as an administrator in JumpCloud
- Select User Groups
- Select a group
- Navigate to the Applications tab
- Select the Dialpad SSO application
.png)
- Log in to JumpCloud using a non-admin test account (picked from the above group) using another browser profile/session
- The Dialpad application should be listed under Applications
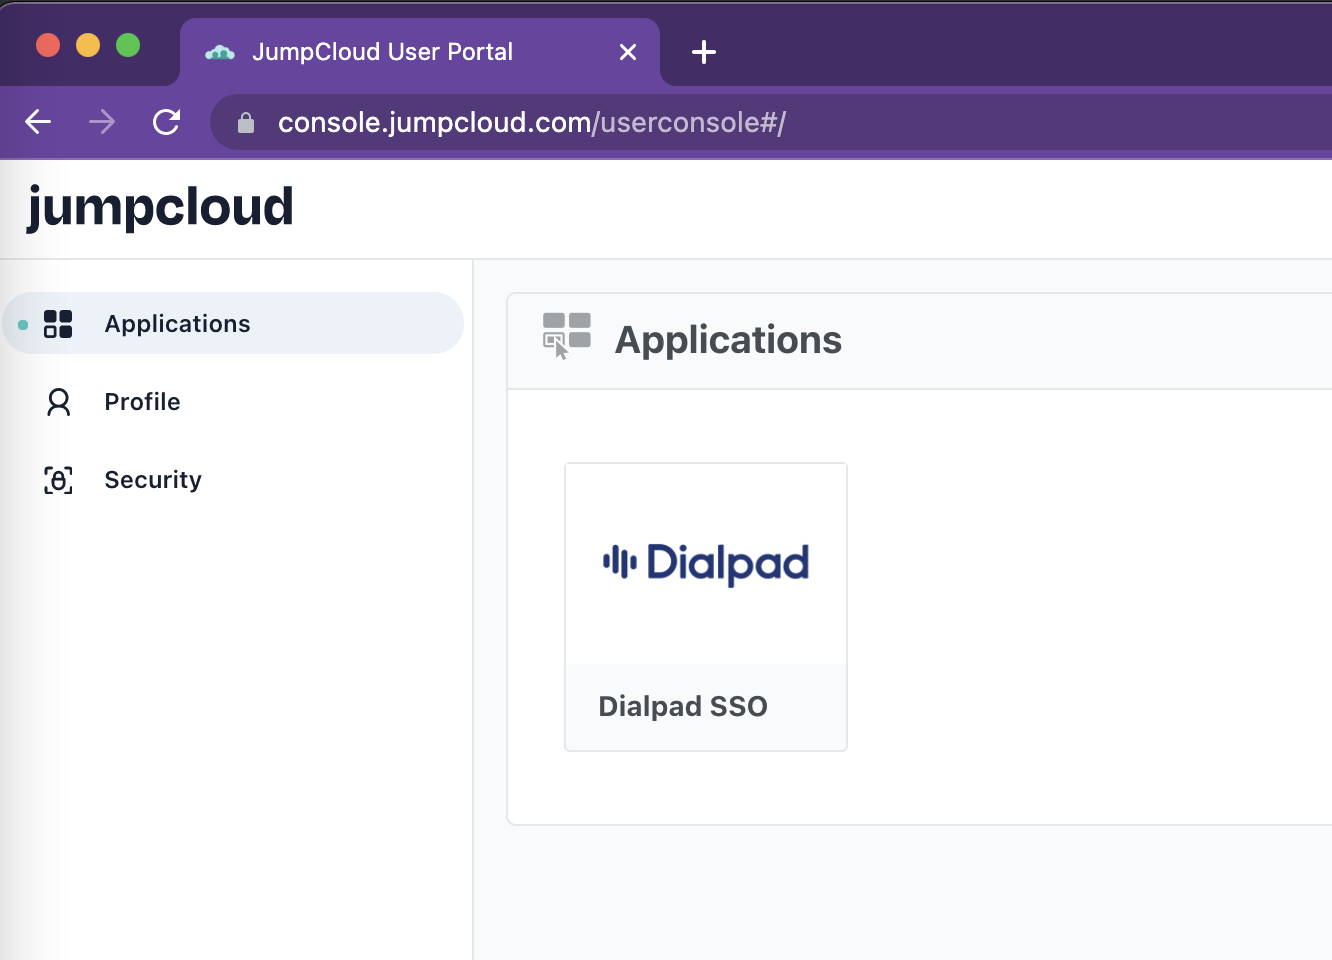
- The Dialpad application should be listed under Applications
- Using the same test user’s browser session, navigate to Dialpad Login in a different tab
- Select Login with Another Provider
.png)
- Enter the domain of the user
- Select Next
After a few redirections, the user should now be logged in to Dialpad.
Enforcing SAML-based SSO
Add an extra level of security by blocking your users from using other SSO providers when logging into Dialpad.
To restrict the use of other authentication providers, navigate to your Admin Settings at Dialpad.com
- Select My Company
- Select Authentication
- Select SAML
- Select Prevent users from logging in with other SSO providers
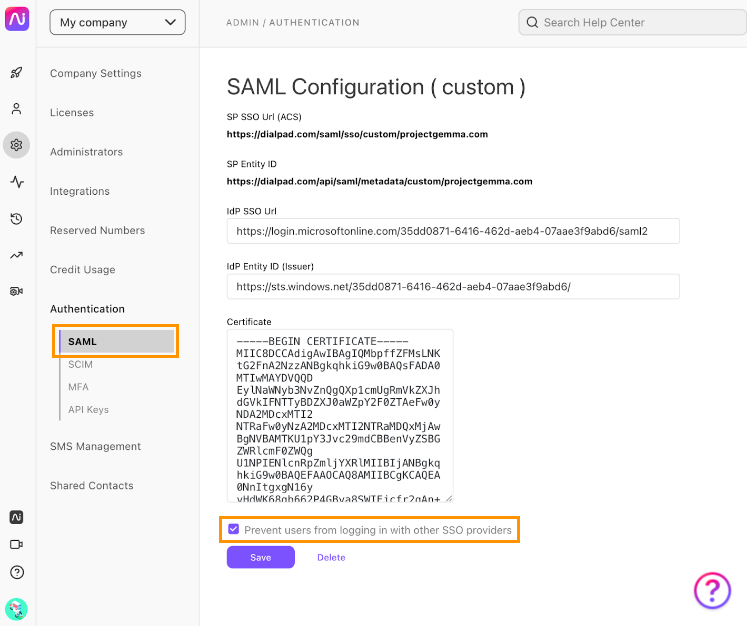
- Select Save
Once saved, your users won't be able to use Microsoft and Google SSO (or even their username and password) to log in to Dialpad.