This integration connects your Dialpad contact center platform with the SpinSci Patient Assist system. It allows your agents to view patient information during every call — such as appointments, referrals, billing, prescriptions, and care team details — directly on their desktop. When a call is received, Patient Assist automatically identifies the caller and retrieves relevant patient data from the EHR system (such as Epic, Cerner, or Athena) in seconds.
The Dialpad Mini Dialer is embedded directly within the Patient Assist interface, eliminating the need to switch between applications. This enables faster, more informed patient interactions and improved operational efficiency.
Who can use this
This is available to all users on a Dialpad Connect license with a Pro or Enterprise account. Feature functionality is available as follows:
Agents: Primary users who handle calls and view patient data
Supervisors: Monitoring, reporting, and oversight
Admins: Setup and configuration (Company Admin required for initial setup)
Let’s dive in!
Setup requirements
Before starting the integration, please ensure the following are in place.
Dialpad Account Requirements
You need these account settings:
An active Dialpad Pro or Enterprise account.
Administrator access to your Dialpad account.
API access enabled (contact your Dialpad account manager if not already active).
At least one Dialpad Connect license is assigned to your organization.
Access Permissions Needed
These permission settings are needed:
Ability to create and manage Apps in the Dialpad Developer Console.
Permission to generate API tokens (Bearer tokens).
Permission to configure event subscriptions (WebSocket and/or webhook).
Permission to manage agent/user settings in Dialpad Admin.
Network and Browser
You’ll need these network and browser settings:
Modern browser (latest version):
Chrome
Edge
Firefox
Microphone access is allowed in the browser for voice calls.
Pop-up blockers are configured to allow dialpad.com and sandbox.dialpad.com.
Dialpad firewall/network permits HTTPS traffic from SpinSci Servers.
SpinSci needs to permit *.dialpad.com and *.dialpadbeta.com for both HTTPS and WSS protocols.
Enable SpinSci Patient Assist in Dialpad
To enable SpinSci Patient Assist in Dialpad, you need to set up a few things first. Let’s take a look.
Request the Dialpad Mini Dialer (CTI)
Dialpad provisions the Mini Dialer (also called CTI) — it is not self-service. You need to submit a request form so Dialpad can set up the CTI instance for your organization.
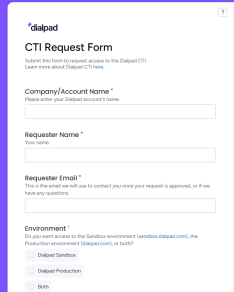
Open the Dialpad CTI Request Form
Fill in the required details:
Allowed Origins — The Patient Assist URL/Domain where the Mini Dialer will be embedded. SpinSci will provide this once the backend setup is complete (e.g., https://{customername}.patient-assist.agenta-cloud.com)
Additional Headers — Any custom headers for the iframe (SpinSci will advise if needed)
Submit the form
The Dialpad team will process your request and provide a Client ID.
Share the Client ID with the SpinSci Team
This is used to load the Mini Dialer at https://dialpad.com/apps/<ClientID>
Note
Coordinate with SpinSci before submitting the form. SpinSci will provide you with the exact Allowed Origins URL (your dedicated Patient Assist DNS) to include in the request. This ensures that the Mini Dialer is authorized to load within Patient Assist from day one.
Creating an API Key from the Dashboard
Next, you’ll need to create an API key. The API key allows Patient Assist to securely receive call events and look up agent information from Dialpad.
To create and access your API Key/Token, go to your Dialpad Admin Settings.
Note
Only Company Admins can create API keys on Dialpad.
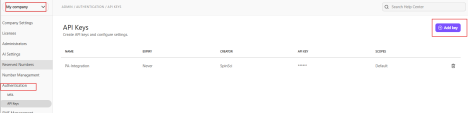
Select My Company
Select Authentication > API Keys
Select Add Key
Name your key and set the expiration terms
Select desired Additional Scopes
Select Save
Share the key with SpinSci using a secure channel (do not send via email)
Note
API keys may expire. Make a note of the date you generated. If the integration stops working unexpectedly, a key refresh is the most common fix. SpinSci will coordinate with you when you need a renewal.
Verify browser permissions
Now, you’ll need to verify browser permissions. To ensure the Mini Dialer functions correctly within Patient Assist, each agent's workstation must have specific browser permissions enabled. The following table outlines the necessary permissions and their purposes:
Permission | Why is it needed |
|---|---|
Microphone | This permission is required for agents to make and receive calls through the Mini Dialer. |
Speaker selection | Enabling speaker selection allows agents to choose their preferred audio output device during calls. |
Autoplay | Allowing autoplay is necessary for ringtones and other audio playback features to function properly. |
Pop-ups from dialpad.com | Granting permission for pop-ups from dialpad.com ensures that the Mini Dialer can open in an overlay within the application. |
Network access
SpinSci handles this. You don't need to do anything.
SpinSci configures the required Dialpad domain allowlisting on the Patient Assist backend, including:
Allowing HTTPS traffic to *.dialpad.com and sandbox.dialpad.com
Enabling secure WebSocket (wss://) connections to Dialpad servers
SpinSci settings
Once you have provided the Client ID and API key, SpinSci takes several steps to ensure seamless integration between Dialpad and Patient Assist. SpinSci completes the following steps:
Action | Description |
|---|---|
Backend configuration | SpinSci adds your App Client ID and API key to the Patient Assist backend, enabling secure connectivity between systems. |
DNS provisioning | A dedicated Patient Assist URL is generated for your organization (for example, https://customername.patient-assist.agenta-cloud.com), which serves as the access point for users. |
Mini Dialer embedding | The Dialpad phone widget is embedded in the Patient Assist application and uses your Client ID to ensure proper functionality. |
EHR integration | SpinSci establishes a connection between Patient Assist and your electronic health record system (Epic, Cerner, Athena, Meditech, or NextGen) to ensure access to health information during calls. |
Screen-pop setup | The integration automatically opens patient charts whenever an inbound call is received, streamlining agent workflow. |
Environment deployment | The completed integration is deployed progressively across your environment, moving from development to staging and finally to production. |
Allow the Patient Assist URL in Dialpad
After SpinSci completes the backend setup, SpinSci will provide you with a dedicated Patient Assist URL for your organization (e.g., https://customername.patientassist.agenta-cloud.com).
This URL must be added as an Allowed Origin in the same Dialpad CTI configuration where your App Client ID was created. This allows the Mini Dialer to load within the Patient Assist.
To add the Allowed Origin:
Contact Dialpad Customer Care (the same team that provisioned your CTI / App Client ID)
Request them to add the Patient Assist URL provided by SpinSci to the Allowed Origins for your CTI app
The Dialpad team will update the configuration on their side
Note
If the Patient Assist URL was already included as an Allowed Origin when you submitted the CTI Request Form, no additional action is needed here.
Additionally, ask your IT team to ensure the Patient Assist URL is not blocked by your organization's firewall, proxy, or content filter.
SpinSci will notify you when the integration is ready.
Using SpinSci with Dialpad
Once the integration is enabled, agents use Dialpad and Patient Assist together from a single screen.
Dialpad agent login
Logging in to Dialpad is required to start receiving and handling calls within Patient Assist.
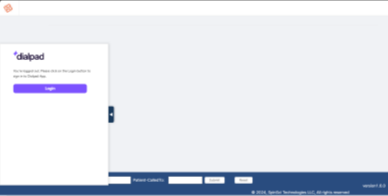
Open the Dialpad Mini Dialer using the Patient Assist URL
(e.g., https://**.patient-assist.agenta-cloud.com)
Sign in using your Dialpad credentials
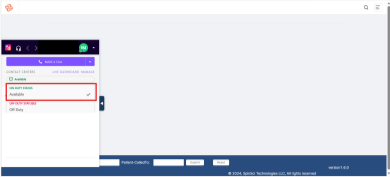
Once logged in, your status will be set to Off-Duty by default
Change your status to Available to start receiving inbound calls
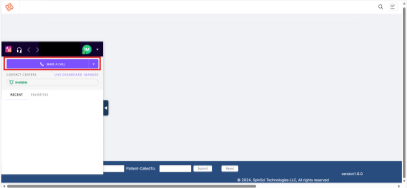
Receiving an inbound call
When an incoming call arrives, a notification appears in Patient Assist.
Answer the call using the Dialpad Mini Dialer
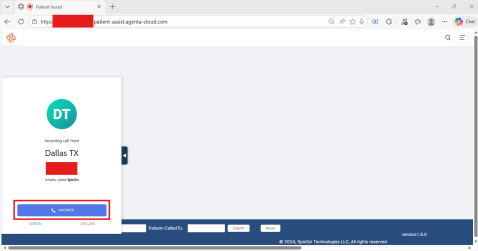
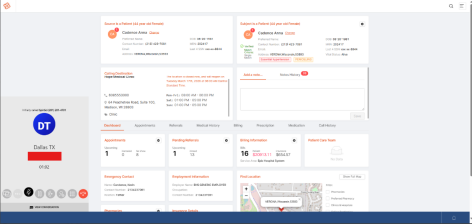
Patient Assist automatically identifies the caller by phone number
The patient's record loads on the dashboard — including appointments, billing, care team, referrals, and prescriptions
If screen-pop is enabled, the patient's chart opens automatically in your EHR system
Making an outbound call
To make a call from Patient Assist:
Open the Dialpad Mini Dialer widget
Enter a phone number or search for a contact
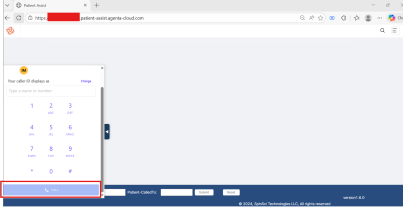
Select Call
Note
You can also click a phone number directly from a patient's record to dial out.
Searching for a patient
Agents can search for patients manually at any time:
Select the Search icon in Patient Assist
Enter a patient name, phone number, or Patient ID

Select the matching record to load the full dashboard

Adding notes during a call
Agents can document call details in real time:
During or after a call, navigate to the Notes section
Type your notes

Select Save
Notes are stored against the patient record and the call session.

Screen pop to EHR
If screen pop is enabled, the patient's chart opens automatically in your health records system (e.g., Epic Hyperspace) when a call is answered. No manual action is needed.

Call transfer
When a call is transferred to another agent, the patient context (dashboard, notes, and call data) follows the receiving agent so they can continue without asking the caller to repeat information.
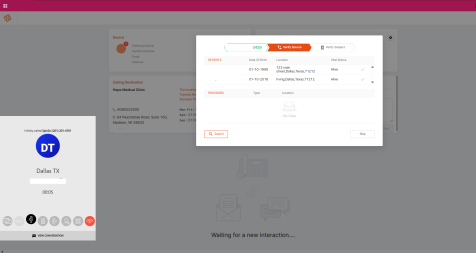
To transfer a call:
Select Transfer in the CTI window

Search for and select the contact to transfer the call to

Select Transfer

Frequently asked questions
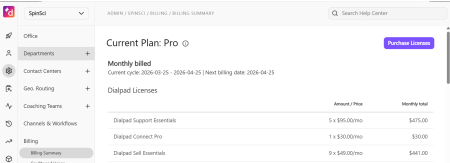
What Dialpad plan do I need?
You need a Dialpad Pro or Enterprise plan with at least one Contact Center license.
Do I need to be an admin to set up the integration?
Yes. A Company Admin in Dialpad must create the app and generate the API key. After setup, agents and supervisors can use the integration without admin access.
How long does the setup take?
The full setup typically takes 1–2 weeks:
Customer provides credentials: 1–2 days
SpinSci configures the integration: 2–3 days
Joint testing: 1–2 days
Go-live: 1 day
What if my API key is invalid or expired?
Generate a new API key using Manual API Key Generation, then share it with SpinSci at support@spinsci.com. The integration will resume once the key is updated.
Which EHR systems are supported?
Patient Assist supports Epic, Cerner, Athena, Meditech, eCW and NextGen.
Can agents search for patients manually?
Yes. Agents can search by patient name, phone number, Date of birth, or Patient ID at any time using the search feature in Patient Assist.
What happens when a call is transferred?
Patient context — including the dashboard, notes, and call data — is automatically forwarded to the receiving agent after the call.
Does the integration work with outbound calls?
Yes. Agents can make outbound calls through the Mini Dialer.
Will I still see calls in Dialpad?
Yes. All calls remain visible in Dialpad. Patient Assist adds an additional patient context layer on top of the standard Dialpad experience.
Who do I contact for support?
Email support@spinsci.com for all integration-related issues.
For Dialpad account or billing questions, contact your Dialpad representative.
Troubleshooting
Here are some common troubleshooting scenarios with Dialpad and Patient Assist.
Mini Dialer Not Loading
If the Mini Dialer is not loading within your Patient Assist workflow, there are several potential causes to investigate and steps to resolve the issue:
Possible Cause | Solution |
|---|---|
Incorrect Client ID | Verify that the App Client ID entered in your configuration matches the Client ID provided in your Dialpad application. Any mismatch will prevent the Mini Dialer from loading correctly. |
Browser blocking scripts | Check your browser settings to ensure that pop-ups and scripts from dialpad.com are not being blocked. Blocking these scripts can interfere with the Mini Dialer’s functionality. |
Wrong environment setting | Confirm that your environment is set to either prod (production) or sandbox (testing), matching your intended use case. Using the wrong environment setting could prevent the Mini Dialer from connecting to the appropriate Dialpad instance. |
No Call Events Detected
If call events are not being detected by the system, review the following possible causes and solutions to restore functionality:
Possible Cause | Solution |
|---|---|
API token expired or is invalid | Generate a new API Bearer token from the Dialpad Developer Portal to ensure valid authentication for event retrieval. |
WebSocket not connected | Open your browser’s developer console and check for any WebSocket connection errors. A successful WebSocket connection is required for real-time call event updates. |
Incorrect API base URL | Verify that the API base URL matches your selected environment. Use dialpad.com for production and sandbox.dialpad.com for sandbox environments to ensure proper connectivity. |
Event subscription not created | Confirm that call event subscriptions are active in Dialpad. Without an active event subscription, call events will not be received or processed. |
Patient Not Found After Call Arrives
When a call comes in, and the patient is not found in the EHR system, several factors may be contributing to this issue. Below are the possible causes and their corresponding solutions:
Possible Cause | Solution |
|---|---|
Caller ID (ANI) not available | Some calls may not include a caller ID. To resolve this, verify with your Dialpad administrator whether the necessary caller ID information is being transmitted for all incoming calls. |
Phone number format mismatch | Patient lookups may fail if the phone number format in the EHR does not match the format Dialpad sends. Review the phone number formatting in your EHR system and ensure consistency with what is received from Dialpad. |
EHR connectivity issue | If the connection between your backend and the EHR system is inactive, patient information will not be retrieved. Check that the backend integration with the EHR is functioning and active. |
Authentication Errors
Authentication issues can prevent successful communication with Dialpad services. The following table outlines common authentication errors and how to address them:
Possible Cause | Solution |
|---|---|
Expired Bearer token | Bearer tokens may expire after a set period. If your token has expired, generate a new token in the Dialpad Developer Portal to restore access. |
Missing Bearer prefix | When making API calls, ensure that the token is prefixed with "Bearer ". Omitting this prefix will cause authentication to fail. |
Insufficient API permissions | If your Dialpad app does not have the required API scopes enabled, authentication will fail. Check your app configuration in the Dialpad Developer Portal and verify that all necessary scopes are active. |
WebSocket Disconnects
WebSocket disconnects may occur for several reasons, impacting real-time communication between your system and Dialpad. Understanding these causes and their solutions can help restore and maintain connectivity.
Possible Cause | Solution |
|---|---|
Token expiry (approximately 1 hour) | The system automatically refreshes the WebSocket connection when the token expires. If the auto-refresh fails for any reason, reload the page to restore the connection. |
Network interruption | If the WebSocket disconnects due to a network interruption, check your internet connectivity. The system will try to reconnect automatically once the network is restored. |
Firewall blocking WebSocket | Verify that secure WebSocket connections (wss://) to Dialpad servers are permitted by your firewall settings. Restrictions may prevent the WebSocket from establishing or maintaining a connection. |
Agent Status Not Updating
Agent status updates may fail to appear in your system due to specific configuration or connectivity issues. Identifying and resolving these problems will ensure that agent status changes are accurately reflected and processed.
Possible Cause | Solution |
|---|---|
Agent status subscription is disabled | Make sure the agentStatusSubscription setting is enabled in your system configuration. This ensures that updates to agent status are received and processed properly. |
Webhook URL is unreachable | If you are using webhooks for agent status updates, confirm that the webhook endpoint is accessible from the internet. An unreachable endpoint will prevent status updates from reaching your system. |