Have you ever answered a call and wished that you knew more about the customer?
With Dialpad’s Custom Customer Context, agents and supervisors have crucial client data at their fingertips, right from the beginning. Client details will appear as the call rings and are accessible throughout the call. This ensures customers avoid repeating information and allows agents to handle their specific needs better, resulting in improved overall customer satisfaction and more efficient interactions.
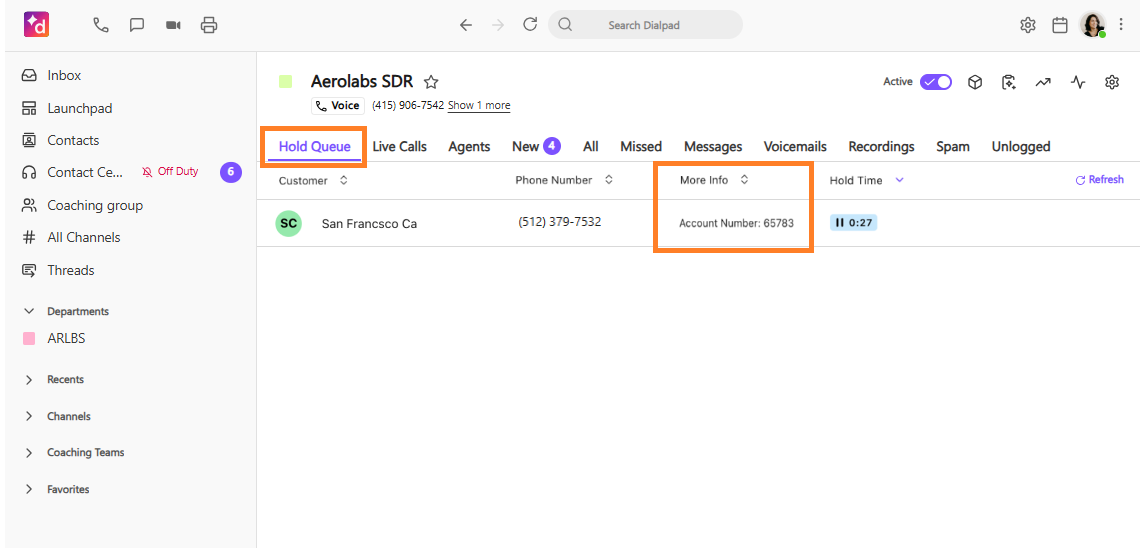
Digital Contact Center Supervisors can also keep tabs on priority customers by easily referencing customized customer context (think More info) from the live Supervisor Hold Queue tab.
Let’s dive into the details.
Who can use this
Custom Customer Context is available to Dialpad users using an Expert IVR Workflow or a Digital Engagement license.
This feature must be configured by our Professional Services team.
Configuration
Dialpad’s Professional Services Team will work with you to create a bespoke Custom Customer Context. We’ll discuss your exact business needs and desired data points to ensure the right information is displayed to your team. Creation and configuration is a 5-staged process.
Data Collection

Custom Customer Context is customizable for your team and because each team is unique, this means that there are multiple ways to collect client data.
No matter the data source, each data item needs to be stored within a DX Context variable.
This allows us to reference that data item in future stages of the pipeline above.
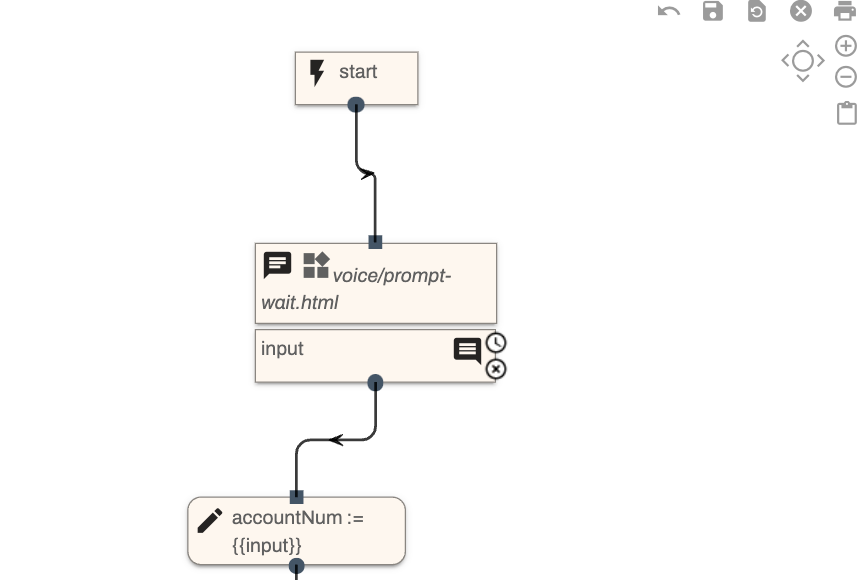
In the example below, we’re collecting the user’s account number, using the ‘Prompt and Wait’ IVR node that prompts the user to enter their 5-digit account number. The result will be stored within a context variable which we’ll call “accountNum”.
Context Object formation
Once the context data has been collected and saved within the context variables, a Context Object is created to display the data within Dialpad.
This Context Object is an aggregate of all of the context variables created in the previous stage, organized in a specific array JSON structure.
Each context item object must be noted using the following structure and parameters.
name: The name key references the visible key name of the context item.
Each context item will have a different key name.
value: The value is the value of that context item.
In most cases, this value will reference an existing context variable containing information collected in previous steps.
displayOrder:The displayOrder integer property tells us the order to display this particular item.
If we have > 2 or more context items, specifying the displayOrder tells us which ones should be displayed before the others.
{
"name" : "Call Type"
"value" : "{{value}}"
"displayOrder" : 2
}
For example, in the below structure, we’re specifying that we want “Call Type” to be displayed first (displayOrder = 1), and following that we want to display “Account Info” (displayOrder = 2)
[
{
"name": "Call Type"
"value": "{{callType}}"
"displayOrder": 1
},
{
"name": "Account Info"
"value": "{{accountInfo}}"
"displayOrder": 2
},
]
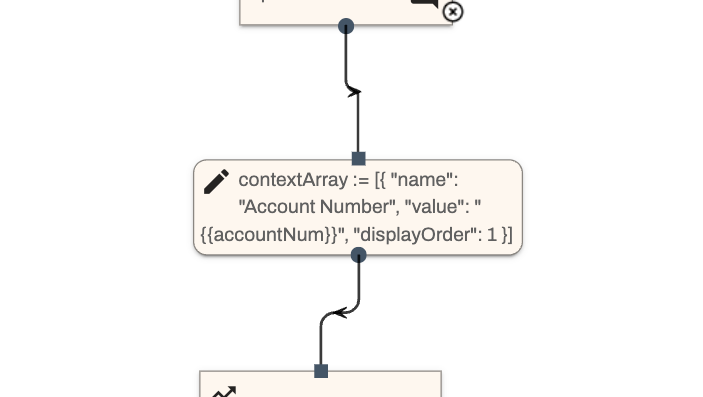
In our example, we have only one context item, "accountNum".
We can create Context Array as follows:
[
{
"name": "Account Number"
"value": "{{accountNum}}"
"displayOrder": 1
},
]
The {{ }} mustache notation allows us to reference pre-existing context variables created elsewhere. In this case, we’re setting the “value” key to equal the accountNum variable we defined above.
Finally, we’ll create the context array by setting it as a new context variable (as below).
Saving the Context data
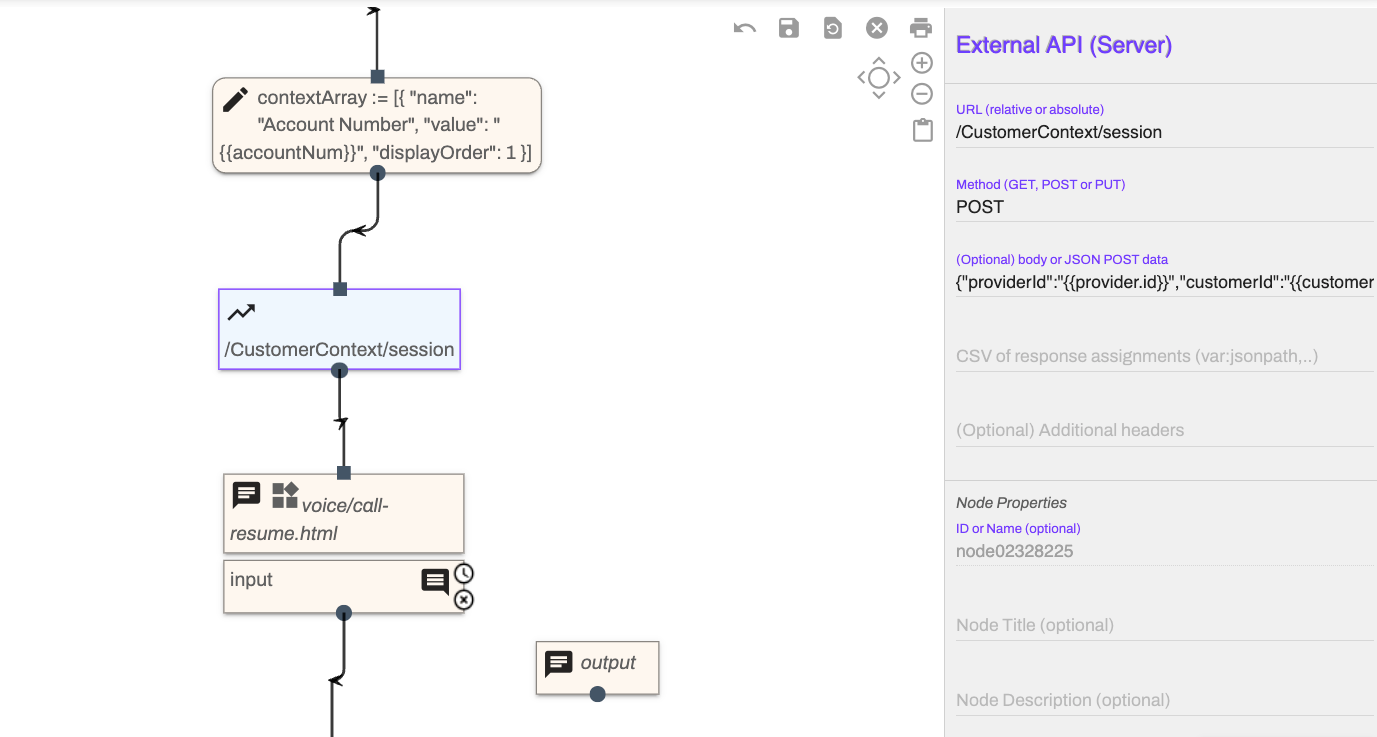
Next, the Context Object is passed within the body of a specific API call node - this node will call the `/CustomerContext/session` DX API in order to save the context data to the DX database. This step ensures that the data can still be accessed once when the call ends.
For this, we’ll need to use the “External API” node, setting the URL value to be /CustomerContext/session , and the JSON body to be the following:
{
"providerId": "{{provider.id}}"
"customerId": "{{customer.id}}"
"type": "{{customer.session.id}}"
"context": "{{contextArray|type=json}}"
}
IVR Workflow Transfer
If built-in functionality of non-expert transfers can be used, publish your completed Expert IVR workflow and navigate back to your IVR Workflow.
After your Expert Workflow has set the context, every transfer node should include the Enable Call Context checkbox.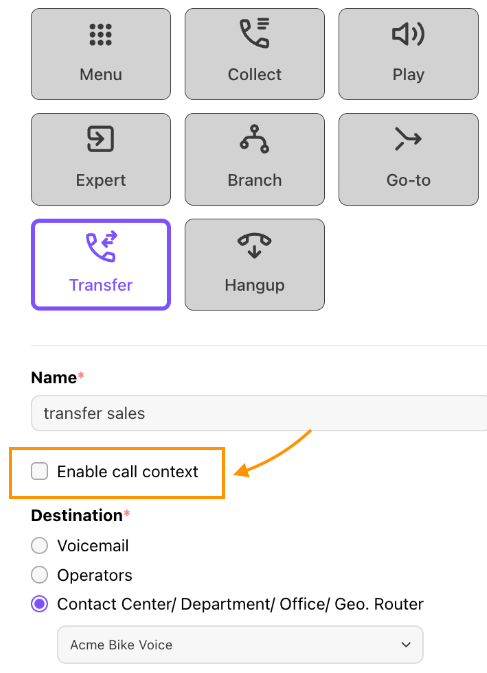
Transfers within Expert Mode
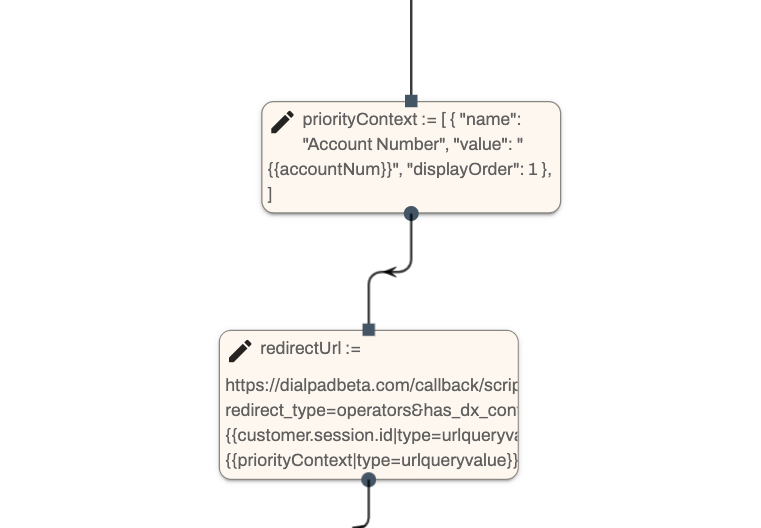
Transfers within Expert Mode are done using the Priority Context object and Redirect URLs.
Creating the Priority Context object
Using the original Context Object, we create a subset of the object and extract the top 3 items. We’ll use those 3 items to create a new array that we’ll call the Priority Context object.
This object specifies which 3 items we want to display in the Incoming Call notification view. Later, we’ll use this object in a redirect URL that allows us quick and easy access to the information.
Since we only have one context item in our example, we’ll add only that one item to the Priority context object. If we have 5 or more context items in total, then the Priority object would be composed of only the top 3 highest priority items.
Here’s what the priority object would look like:
[
{
"name": "Account Number"
"value": "{{accountNum}}"
"displayOrder": 1
},]
Finally, we redirect the call to Dialpad servers. This is done through either a Transfer node, or a Digital Node. The Digital route node handles this step automatically, with no extra configuration required. If using an IVR Transfer step, Customer Context is added by checking the Enable call context box (when Expert Workflows are enabled).
Redirecting to Dialpad
In the redirect URL, we will append two new query parameters: has_dx_context, which is set to ‘true’, and session_id, which maps to the current DX session ID. In addition, we’ll append a new priority_context param that references the priority context object.
All query parameters are required in order to tell the Dialpad servers that there is indeed context data that is tied to the current call.
Here’s what a typical redirect URL looks like:
https://dialpad.com/callback/scripted_ivr_option?redirect_type=operators&has_dx_context=1&session_id={{customer.session.id|type=urlqueryvalue}}&priority_context={{priorityContext|type=urlqueryvalue}}
We have two new query params, has_dx_context equals “1” and session_id equals the current session, referenced through the existing customer variable (as you can see above, we also make sure to serialize it as a query param). Both values are static regardless of the context data, so this URL will never change based on any dynamic data.
We also serialize the priorityContext object as a urlqueryvalue to ensure it’s sent to the DP in the correct format.
Here, the transfer node references the redirect URL within its “Dialpad Redirect URL” input:
Agent view
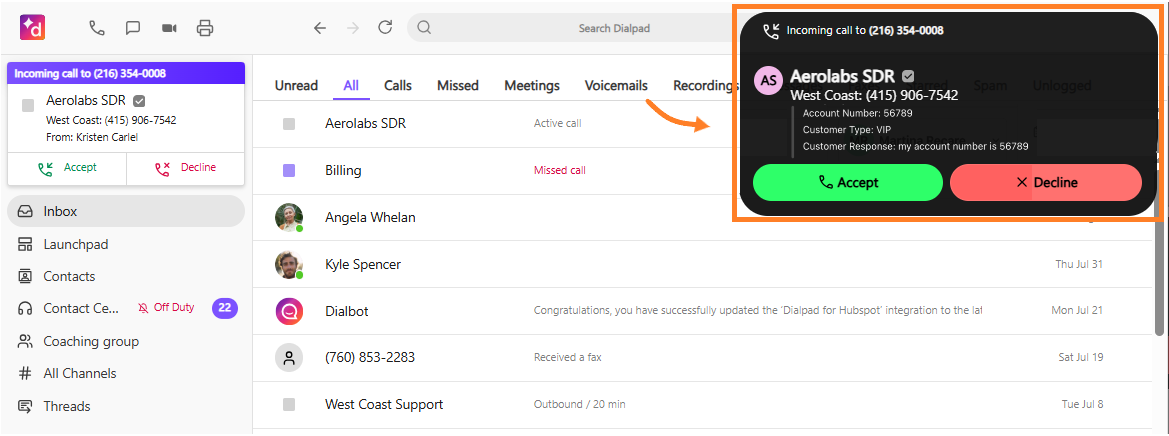
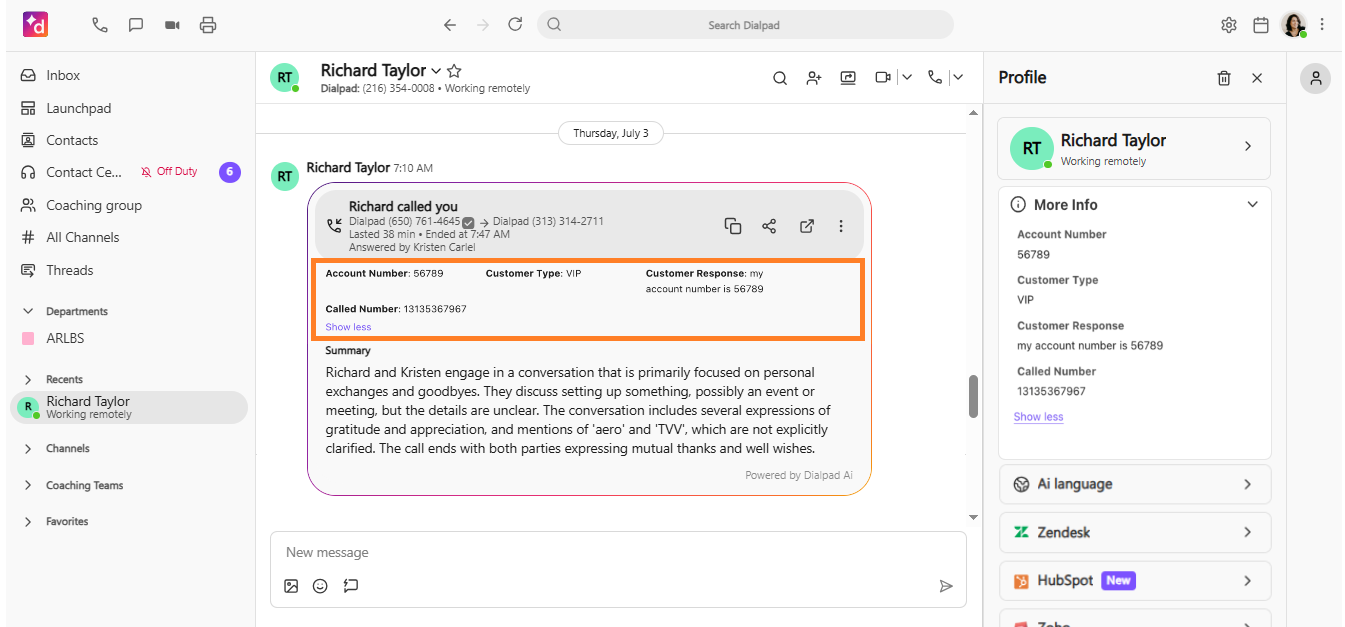
Contact Center agents can view the caller’s custom context details in 4 locations.
Within the incoming call notification
.png)
In the right-hand sidebar

From the post-call and/or chat summary
Supervisor View
Supervisors can easily monitor top-priority customers by keeping tabs on the More info column in the Supervisor Hold Queue tab
Frequently asked questions
Can I create a Custom Customer Context widget myself?
You can customize the client details that you want to see, however, due to the complexity of the configuration, Dialpad’s Professional Services team is required to create this feature.
Is there a cost for Custom Customer Context?
Yes. Please contact your Customer Success Manager, or our Professional Services team for more pricing information.
Will this work for any Contact Center?
Yes, Custom Customer Context is available for any Dialpad Connect, Dialpad Support, and digital configuration.
Does Custom Customer Context appear in analytics?
No, not at this time.