Dialpad WFM's Salesforce integration seamlessly pulls historical data from Salesforce to provide valuable insights within your Dialpad WFM dashboard.
Once connected, you can:
View Actual Ticket Count: Accurately track the number of contacts handled through Salesforce within Dialpad WFM.
Generate Accurate Forecasts: Leverage Salesforce data to create more precise forecasts for staffing and resource allocation.
Track agent performance: Monitor agent adherence and productivity, directly within Dialpad WFM.
Who can use this
Dialpad WFM is available to all Dialpad users, and as a standalone product.
Please contact your Customer Success Manager if you’re interested in using Dialpad WFM.
Integrate Salesforce
Before connecting your Salesforce to Dialpad WFM, you’ll need to provide our Customer Care with your Salesforce subdomain.
The subdomain is your organization’s unique Salesforce identifier, — it’s usually included in your login and application URL: https://mycompany.my.salesforce.com
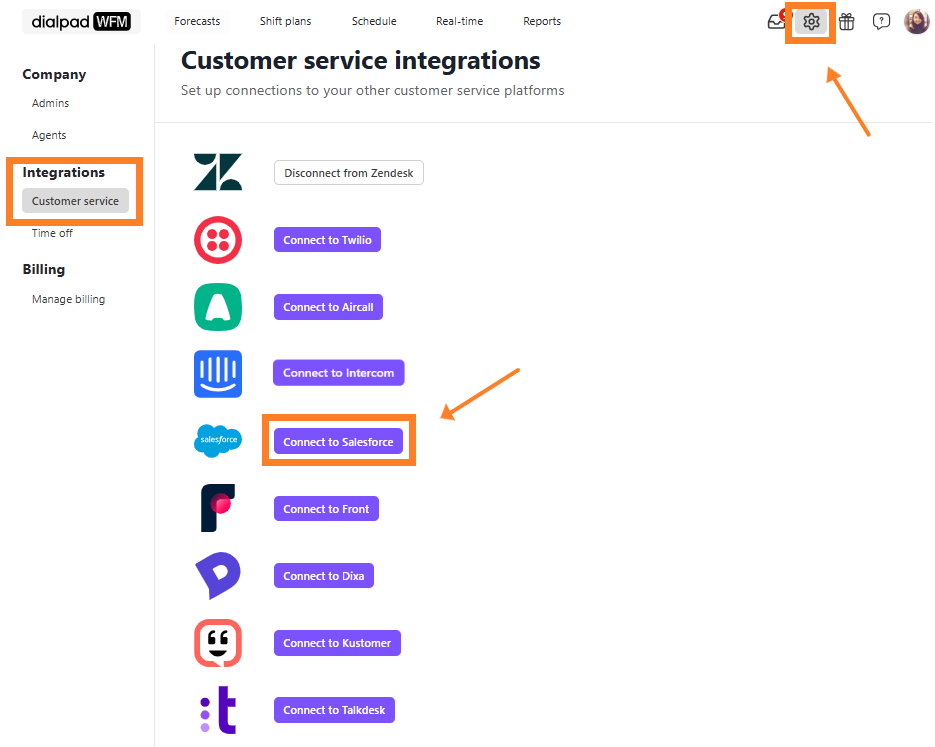
To connect Salesforce to Dialpad WFM, go to the Dialpad WFM Settings.
Navigate to Integrations
Select Customer Service
Select Connect to Salesforce
You’ll be redirected to a new screen to authorize your connection. Once authorized, your platform will be connected and ready for forecasting.
Note
Contact volume affects how quickly Dialpad WFM gathers data, but it typically takes around 72 hours to generate forecasts.
Set up Salesforce queues
Now that your Salesforce account is connected, you need to create queues that represents an inbox, queue or channel that your team staffs and serves in Salesforce.
By organizing your contacts into queues, you can accurately forecast the expected contact volume and required staffing for each queue. This allows you to optimize staffing levels and ensures your team is equipped to handle the expected workload.
To create a queue:
Select Forecasts
Select Queues
Select New queue
Name the queue
We recommend using the same name you use in Salesforce
Select the conversation type
Select real-time if conversations are handled while the customer is present and waiting, i.e. 'true' live chat.
Select non real-time if the conversations can happen asynchronously, e.g. the messages can be sent at any time, and the customer isn't always present.
From the connections dropdown, select Salesforce
Now, use the Filter Queues section to choose which contacts you want to include in this queue.
You can filter by:
Id
MasterRecordId
CaseNumber
ContactId
AccountId
ParentId
Type
Status
Reason
Origin
IsClosed
ClosedDate
OwnerId
CreatedDate
CreatedById
LastModifiedDate
LastModifiedById
SystemModstamp
LastViewedDate
LastReferencedDate
RecordTypeId
We can also collect custom fields if requested
On the right, you’ll see a preview of the number of contacts you received in the last 7 days that match your filters. We recommend checking this against the data in your Salesforce account to ensure you've set up the filters correctly.
Next, you need to enter the staffing parameters for this queue.
These inputs turn contact volumes into a staffing requirement.
Average conversation/interaction time: The average handle time for the entire conversation.
Concurrency: How many interactions an agent can handle at once.
Tor phones, this should always be 1, as agents can only handle 1 call at a time.
Shrinkage: The percentage of scheduled time that's lost while agents work in this queue.
If you're not sure what you're shrinkage is, 30% is industry average.
Finally, you need to enter the service level (SLA) that you're trying to achieve.
This is target percentage of all tickets that should meet your first response time target.
That’s it! Your ticket group is now set up and ready to forecast, track coverage and agent performance.
Set up Salesforce performance tracking
Your Salesforce integration will be used for both forecasting and performance tracking.
However, as Salesforce users commonly use custom status, you will be required to map your custom status to Dialpad WFM’s standard status’ at set up.
Dialpad WFM needs to know when work starts, is paused and ends to correctly track your team's adherence. To do this, we need to match the relevant statuses to either 'open', 'on hold' or 'closed’.
Our team will download a list of the status from the last 2000 contacts in your Salesforce account for you to map. Contact the Customer Care team to get started.