- 25 Jul 2024
- 2 Minutes to read
- Print
- DarkLight
- PDF
Provision a Poly ATA Device to Dialpad
- Updated on 25 Jul 2024
- 2 Minutes to read
- Print
- DarkLight
- PDF
We know how much you love options, and Dialpad is happy to provide support for Analog Telephone Adaptor (ATA) devices. ATAs devices let you connect multiple handsets or ports, and can even be used for faxing.
Let's dive into the details.
Set up process
Setting up your new ATA device with Dialpad is a 3 step process.
- Provision the ATA device to Dialpad
- Add the ATA device to the Dialpad Admin Portal
- Activate (assign) the port for a Dialpad user or room
Provision Poly 402 ATA device to Dialpad
To provision a Poly 402 ATA device to Dialpad:
- Confirm the ATA device is connected to the internet through ethernet or WiFi
- From the phone, dial ***1 to find your IP address
- Enter the IP address in a new browser tab
- Be sure to use HTTPS format
- Navigate to System Management
- Select Auto Provisioning
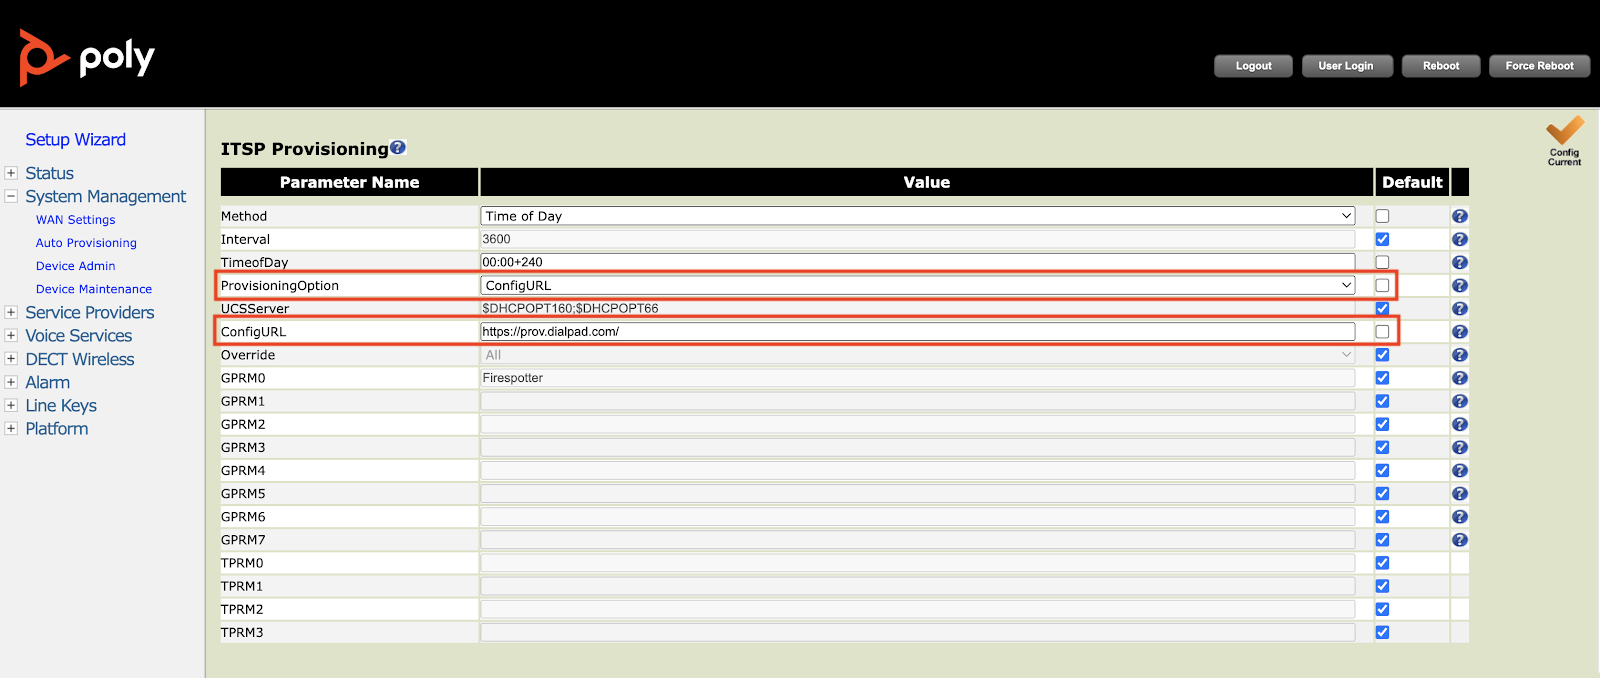
- Navigate to ITSP Provisioning
- Set the ProvisioningOption to ConfigURL
- Uncheck the box beside ConfigURL
- Set ConfigURL to: https://prov.dialpad.com/
- The trailing terminating backslash is required

- The trailing terminating backslash is required
- Select Submit
- Reboot the device
Add the ATA to the Dialpad Admin Portal
Now that your ATA device has been provisioned to Dialpad, it's time to add it to the Dialpad Admin Portal.
To add the device, head to your Admin Settings from Dialpad.com
- Navigate to Office
- Select Office Settings
- Select Desk Phones
- Select the DECT/ATA Devices tab
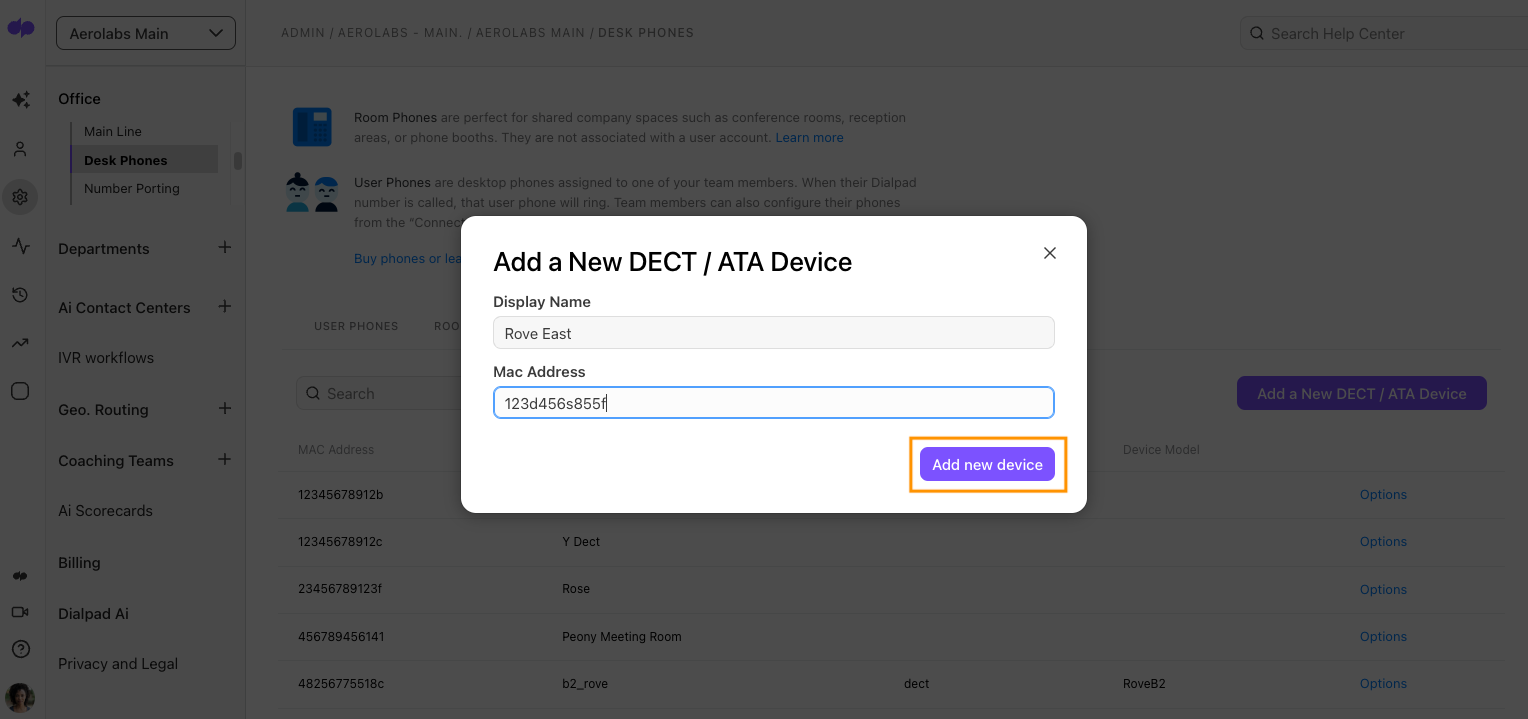
- Select Add a new DECT/ATA
.png)
- Enter the display name and the device's MAC address
- Select Add new device

That's it! The device will reboot and you'll see it listed in the DECT/ADA Devices tab.
Assign the port
Now that the device is provisioned and set up for Dialpad, it's time to assign the port to a user or room.
Assign a port to a user
To assign a port to a user, head to the DECT/ATA tab from your Admin Portal.
- Select Options
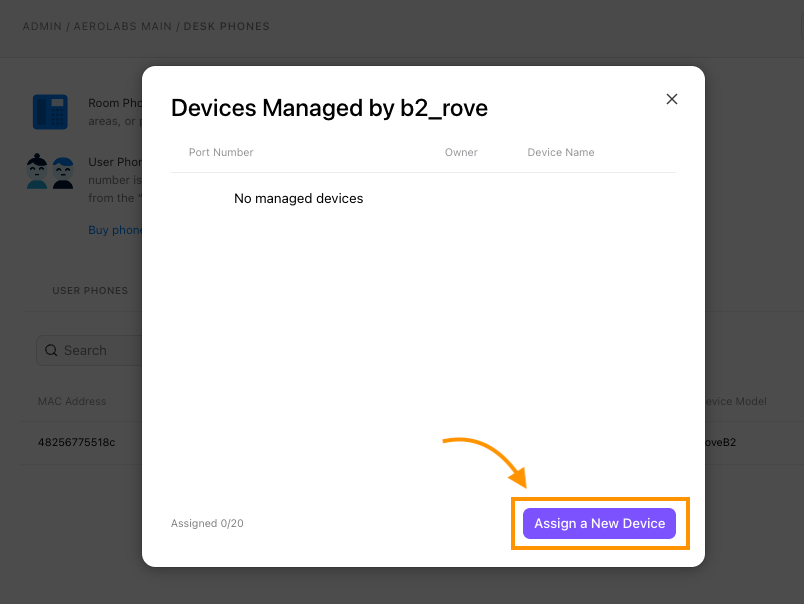
- Select Show managed devices
- Select Assign a new device
- Select User
- Choose the owner, add the display name and port
- The port number must match the index number on the handset
- Select Assign port
Once the port has been assigned, the base station will reboot.
Assign a port to a room
To assign a port to a room, head to the DECT/ATA tab from your Admin Portal.
- Select Options
- Select Show managed devices
- Select Assign a new device

- Select Room phone
- Enter the room name and port number
- The port number must match the index number on the handset.
- Choose the number type
- Local
- Toll-free
- Select Assign port
After assigning the port, the base station will reboot.
ATA devices set as room devices can be configured for faxing!
Head to this Help Center article to learn how.
Unassign a port
To unassign a port, head to your Admin Settings from Dialpad.com
- Navigate to Office
- Select Desk Phones
- Select DECT/ATA Devices tab
- Select Options beside the device
- Select Show Managed Devices
- Select Options
- Select Unassign
The device will reboot to apply the update.
Rename an ATA device
To rename an ATA device, head to your Admin Settings from Dialpad.com
- Navigate to Office
- Select Desk Phones
- Select DECT/ATA Devices tab
- Select Options beside the device you want to rename
- Select Rename
- Enter the new display name
- Select Rename
Rename a managed ATA device
To rename a managed ATA device, head to your Admin Settings from Dialpad.com
- Navigate to Office
- Select Desk Phones
- Select DECT/ATA Devices tab
- Select Options beside the device
- Select Show Managed Devices
- Select Options beside the device
- Select Rename
.png)
- Enter the new display name
- Select Rename


.png)

.png)


.png)
.png)
.png)
.png)
.png)
